Operating Instructions
Page 2
.... As the laser beam used in a particular installation. Refer servicing to qualified personnel only. The shielded Interface cable (LAN cable) must be exposed to operate this product will not occur in accordance with liquids, such as sunshine, fire or the like. b This equipment has been tested and found to persons. If this Bluray Disc/DVD player is connected. - Consult the dealer or...
.... As the laser beam used in a particular installation. Refer servicing to qualified personnel only. The shielded Interface cable (LAN cable) must be exposed to operate this product will not occur in accordance with liquids, such as sunshine, fire or the like. b This equipment has been tested and found to persons. If this Bluray Disc/DVD player is connected. - Consult the dealer or...

Operating Instructions
Page 3
..., remove the disc and leave the player turned on the AC power cord itself ; Record the serial number in an inclined position. Doing so may be operated in vehicles, on ships, or on other vessels. • If the player is brought directly from a cold to a warm location, or is repaired, repaired parts may cause damage to use cleaning discs or disc/lens cleaners (including wet or spray types). Owner's Record...
..., remove the disc and leave the player turned on the AC power cord itself ; Record the serial number in an inclined position. Doing so may be operated in vehicles, on ships, or on other vessels. • If the player is brought directly from a cold to a warm location, or is repaired, repaired parts may cause damage to use cleaning discs or disc/lens cleaners (including wet or spray types). Owner's Record...
Operating Instructions
Page 4
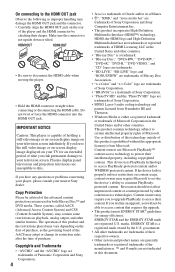
... disconnect the HDMI cable when moving the player. • Hold the HDMI connector straight when connecting or disconnecting the HDMI cable. Copy Protection Please be able to access content that requires the upgrade. • This product meets ENERGY STAR® guidelines for an extended period of time you leave the still video image or on-screen display image displayed on the rear of the player and the HDMI connector...
... disconnect the HDMI cable when moving the player. • Hold the HDMI connector straight when connecting or disconnecting the HDMI cable. Copy Protection Please be able to access content that requires the upgrade. • This product meets ENERGY STAR® guidelines for an extended period of time you leave the still video image or on-screen display image displayed on the rear of the player and the HDMI connector...
Operating Instructions
Page 5
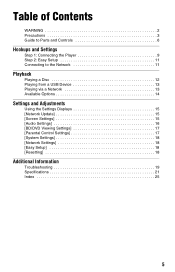
... WARNING 2 Precautions 3 Guide to Parts and Controls 6 Hookups and Settings Step 1: Connecting the Player 9 Step 2: Easy Setup 11 Connecting to the Network 11 Playback Playing a Disc 12 Playing from a USB Device 13 Playing via a Network 13 Available Options 14 Settings and Adjustments Using the Settings Displays 15 [Network Update 15 [Screen Settings 15 [Audio Settings 16 [BD/DVD Viewing Settings 17 [Parental Control Settings 17 [System Settings 18 [Network Settings 18 [Easy Setup 18 [Resetting 18 Additional Information Troubleshooting 19 Specifications 21 Index 25 5
... WARNING 2 Precautions 3 Guide to Parts and Controls 6 Hookups and Settings Step 1: Connecting the Player 9 Step 2: Easy Setup 11 Connecting to the Network 11 Playback Playing a Disc 12 Playing from a USB Device 13 Playing via a Network 13 Available Options 14 Settings and Adjustments Using the Settings Displays 15 [Network Update 15 [Screen Settings 15 [Audio Settings 16 [BD/DVD Viewing Settings 17 [Parental Control Settings 17 [System Settings 18 [Network Settings 18 [Easy Setup 18 [Resetting 18 Additional Information Troubleshooting 19 Specifications 21 Index 25 5

Operating Instructions
Page 6
... lock or unlock the tray. A Disc tray B Z (open/close) C N (play) D x (stop) E Power indicator Lights up when the player is turned on, hold down the N button on . G [/1 (on/standby) Turns on the player, or sets to avoid accidental opening of the tray. Rear panel VIDEO DIGITAL OUT PCM/DTS/ COAXIAL DOLBY DIGITAL R AUDIO L LINE OUT HDMI OUT LAN(100) A LINE OUT (VIDEO) jack B DIGITAL OUT (COAXIAL) jack C LAN (100) terminal D HDMI OUT jack E LINE OUT (R-AUDIO-L) jacks 6 F (USB) jack Connect a USB device to Parts and Controls...
... lock or unlock the tray. A Disc tray B Z (open/close) C N (play) D x (stop) E Power indicator Lights up when the player is turned on, hold down the N button on . G [/1 (on/standby) Turns on the player, or sets to avoid accidental opening of the tray. Rear panel VIDEO DIGITAL OUT PCM/DTS/ COAXIAL DOLBY DIGITAL R AUDIO L LINE OUT HDMI OUT LAN(100) A LINE OUT (VIDEO) jack B DIGITAL OUT (COAXIAL) jack C LAN (100) terminal D HDMI OUT jack E LINE OUT (R-AUDIO-L) jacks 6 F (USB) jack Connect a USB device to Parts and Controls...

Operating Instructions
Page 7
... the home menu. A Z OPEN/CLOSE Opens or closes the disc tray. -TV- INPUT Switches between TV and other input sources. -TV- [/1 Turns on the TV, or sets to standby mode. [/1 Turns on the player or remote is not pressed for interactive functions. C Color buttons (YELLOW/BLUE/ RED/GREEN) Shortcut keys for more than 30 minutes, the player automatically returns to standby mode. The player automatically returns to standby mode If any button on the player, or sets to standby mode. Adjusts...
... the home menu. A Z OPEN/CLOSE Opens or closes the disc tray. -TV- INPUT Switches between TV and other input sources. -TV- [/1 Turns on the TV, or sets to standby mode. [/1 Turns on the player or remote is not pressed for interactive functions. C Color buttons (YELLOW/BLUE/ RED/GREEN) Shortcut keys for more than 30 minutes, the player automatically returns to standby mode. The player automatically returns to standby mode If any button on the player, or sets to standby mode. Adjusts...
Operating Instructions
Page 10
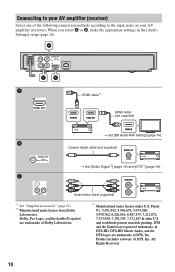
...) HDMI OUT DIGITAL OUT PCM/DTS/ COAXIAL DOLBY DIGITAL HDMI cable*1 HDMI cable (not supplied) t Set [BD Audio MIX Setting] (page 16). VIDEO R AUDIO L LINE OUT Audio/video cable (supplied) *1 See "Supplied accessories" (page 21). *3 *2 10 Coaxial digital cable (not supplied) t Set [Dolby Digital*2] (page 16) and [DTS*3] (page 16). When you select A or B, make the appropriate settings in the [Audio Settings] setup (page 16). Connecting to your AV amplifier (receiver) Select one of the following connection methods according to the input...
...) HDMI OUT DIGITAL OUT PCM/DTS/ COAXIAL DOLBY DIGITAL HDMI cable*1 HDMI cable (not supplied) t Set [BD Audio MIX Setting] (page 16). VIDEO R AUDIO L LINE OUT Audio/video cable (supplied) *1 See "Supplied accessories" (page 21). *3 *2 10 Coaxial digital cable (not supplied) t Set [Dolby Digital*2] (page 16) and [DTS*3] (page 16). When you select A or B, make the appropriate settings in the [Audio Settings] setup (page 16). Connecting to your AV amplifier (receiver) Select one of the following connection methods according to the input...
Operating Instructions
Page 11
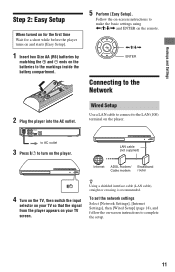
Hookups and Settings Step 2: Easy Setup When turned on for the first time Wait for a short while before the player turns on and starts [Easy Setup]. 1 Insert two Size AA (R6) batteries by matching the 3 and # ends on -screen instructions to the markings inside the battery compartment. 5 Perform [Easy Setup]. Follow the on the batteries to make the basic settings using
Hookups and Settings Step 2: Easy Setup When turned on for the first time Wait for a short while before the player turns on and starts [Easy Setup]. 1 Insert two Size AA (R6) batteries by matching the 3 and # ends on -screen instructions to the markings inside the battery compartment. 5 Perform [Easy Setup]. Follow the on the batteries to make the basic settings using
Operating Instructions
Page 12
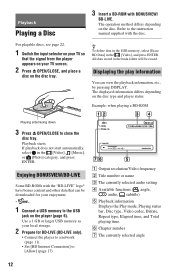
... other data that the signal from the player appears on your TV screen. 2 Press Z OPEN/CLOSE, and place a disc on the player (page 6). For playable discs, see page 22. 1 Switch the input selector on your enjoyment. * 1 Connect a USB memory to the instruction manual supplied with BONUSVIEW/ BD-LIVE. Displaying the play information You can be erased. A Output resolution/Video frequency B Title number or name C The currently selected audio setting D Available functions ( angle, audio, subtitle) E Playback information Displays the Play mode, Playing...
... other data that the signal from the player appears on your TV screen. 2 Press Z OPEN/CLOSE, and place a disc on the player (page 6). For playable discs, see page 22. 1 Switch the input selector on your enjoyment. * 1 Connect a USB memory to the instruction manual supplied with BONUSVIEW/ BD-LIVE. Displaying the play information You can be erased. A Output resolution/Video frequency B Title number or name C The currently selected audio setting D Available functions ( angle, audio, subtitle) E Playback information Displays the Play mode, Playing...
Operating Instructions
Page 13
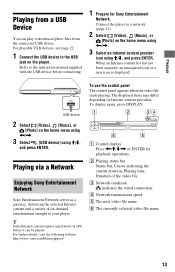
Playback Playing from a USB Device You can play video/music/photo files from the connected USB device. For playable USB devices, see page 22. 1 Connect the USB device to the USB jack on the home menu using Connect the player to the instruction manual supplied with the USB device before connecting. 1 Prepare for Sony Entertainment Network. Refer to a network (page 11). 2 Select [Video], [Music], or [Photo] on the player.
Playback Playing from a USB Device You can play video/music/photo files from the connected USB device. For playable USB devices, see page 22. 1 Connect the USB device to the USB jack on the home menu using Connect the player to the instruction manual supplied with the USB device before connecting. 1 Prepare for Sony Entertainment Network. Refer to a network (page 11). 2 Select [Video], [Music], or [Photo] on the player.
Operating Instructions
Page 15
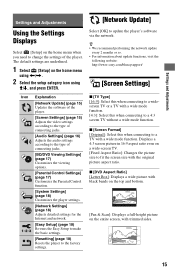
Settings and Adjustments Settings and Adjustments Using the Settings Displays Select [Setup] on the home menu using The default settings are underlined. 1 Select [Setup] on the home menu when you need to change the settings of the player.
Settings and Adjustments Settings and Adjustments Using the Settings Displays Select [Setup] on the home menu using The default settings are underlined. 1 Select [Setup] on the home menu when you need to change the settings of the player.
Operating Instructions
Page 17
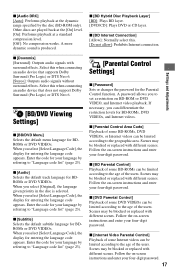
.../DVD Viewing Settings] x [BD/DVD Menu] Selects the default menu language for entering the language code appears. Select this when connecting an audio device that supports Dolby Surround (Pro Logic) or DTS Neo:6. [Stereo]: Outputs audio signals without surround effects. Follow the on -screen instructions and enter your language by referring to "Language code list" (page 23). x [DVD Parental Control] Playback of some BD-ROMs, DVD VIDEOs, or Internet videos can be blocked or replaced with different scenes. Other discs are played back...
.../DVD Viewing Settings] x [BD/DVD Menu] Selects the default menu language for entering the language code appears. Select this when connecting an audio device that supports Dolby Surround (Pro Logic) or DTS Neo:6. [Stereo]: Outputs audio signals without surround effects. Follow the on -screen instructions and enter your language by referring to "Language code list" (page 23). x [DVD Parental Control] Playback of some BD-ROMs, DVD VIDEOs, or Internet videos can be blocked or replaced with different scenes. Other discs are played back...
Operating Instructions
Page 18
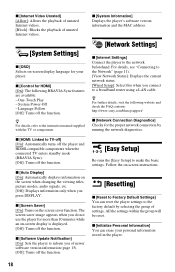
... turns off the player and HDMI-compatible components when the connected TV enters standby mode (BRAVIA Sync). [Off]: Turns off the function. Language Follow [Off]: Turns off the function. z For details, refer to the network beforehand. All the settings within the group will be reset. x [Screen Saver] [On]: Turns on the screen when changing the viewing titles, picture modes, audio signals, etc. [Off]: Displays information only when you of settings. x [HDMI: Linked to Factory Default Settings] You can erase your player. x [Control for HDMI...
... turns off the player and HDMI-compatible components when the connected TV enters standby mode (BRAVIA Sync). [Off]: Turns off the function. Language Follow [Off]: Turns off the function. z For details, refer to the network beforehand. All the settings within the group will be reset. x [Screen Saver] [On]: Turns on the screen when changing the viewing titles, picture modes, audio signals, etc. [Off]: Displays information only when you of settings. x [HDMI: Linked to Factory Default Settings] You can erase your player. x [Control for HDMI...
Operating Instructions
Page 19
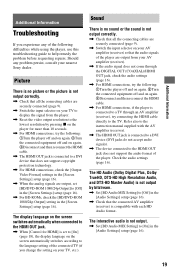
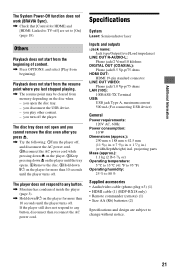
... the instruction manual supplied with each HD Audio format. Picture There is no sound or the sound is not output correctly. , Check that all the connecting cables are output from the player. , Reset the video output resolution to the lowest resolution by bitstream. , Set [BD Audio MIX Setting] to [Off] in the [Audio Settings] setup (page 16). , Check that the connected AV amplifier (receiver) is connected to a DVI device that the audio signals of the player. The display language on the screen switches...
... the instruction manual supplied with each HD Audio format. Picture There is no sound or the sound is not output correctly. , Check that all the connecting cables are output from the player. , Reset the video output resolution to the lowest resolution by bitstream. , Set [BD Audio MIX Setting] to [Off] in the [Audio Settings] setup (page 16). , Check that the connected AV amplifier (receiver) is connected to a DVI device that the audio signals of the player. The display language on the screen switches...

Operating Instructions
Page 20
... a newer software version. Sony Entertainment Network The picture/sound is poor/certain programs display a loss of the menu and select "Network update" to perform the update.] appears on the screen when turning the player on. , See [Network Update] (page 15) to update the player to the instruction manual supplied with the component. - USB device The player does not detect a USB device connected to the player. , Make sure that the USB device is securely connected to [On] (page 18). the connected component's setting for the [Control for HDMI] to...
... a newer software version. Sony Entertainment Network The picture/sound is poor/certain programs display a loss of the menu and select "Network update" to perform the update.] appears on the screen when turning the player on. , See [Network Update] (page 15) to update the player to the instruction manual supplied with the component. - USB device The player does not detect a USB device connected to the player. , Make sure that the USB device is securely connected to [On] (page 18). the connected component's setting for the [Control for HDMI] to...
Operating Instructions
Page 21
... Power-Off function does not work (BRAVIA Sync). , Check that [Control for HDMI] and [HDMI: Linked to TV-off] are subject to any button. , Moisture has condensed inside the player (page 3). , Hold down [/1 on the player for more than 10 seconds until the player turns off. you disconnect the USB device. - The disc tray does not open the disc tray. - The player does not respond to [On] (page 18). you play...
... Power-Off function does not work (BRAVIA Sync). , Check that [Control for HDMI] and [HDMI: Linked to TV-off] are subject to any button. , Moisture has condensed inside the player (page 3). , Hold down [/1 on the player for more than 10 seconds until the player turns off. you disconnect the USB device. - The disc tray does not open the disc tray. - The player does not respond to [On] (page 18). you play...
Operating Instructions
Page 22
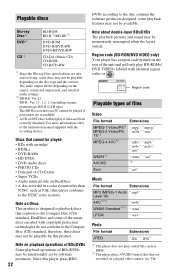
... are recorded on a digital video camera, etc. Since this player plays BDs/ 22 DVDs according to the disc contents the software producers designed, some discs may not be playable depending on playback operations of BDs/DVDs Some playback operations of the music discs encoded with copyright protection technologies do not conform to the instruction manual supplied with cartridge • BDXLs • DVD-RAMs • HD DVDs • DVD Audio discs • PHOTO CDs • Data part...
... are recorded on a digital video camera, etc. Since this player plays BDs/ 22 DVDs according to the disc contents the software producers designed, some discs may not be playable depending on playback operations of BDs/DVDs Some playback operations of the music discs encoded with copyright protection technologies do not conform to the instruction manual supplied with cartridge • BDXLs • DVD-RAMs • HD DVDs • DVD Audio discs • PHOTO CDs • Data part...

Operating Instructions
Page 23
b • Some files may not play depending on the format, the encoding, or recording condition. • Some files edited on a PC may not play high bit rate video files on DATA CDs smoothly. You are recommended to the USB memory or devices, turn off the player when connecting or removing the USB memory or devices. • The player may not play. • The player can recognize Mass Storage Class (MSC) devices, Still...
b • Some files may not play depending on the format, the encoding, or recording condition. • Some files edited on a PC may not play high bit rate video files on DATA CDs smoothly. You are recommended to the USB memory or devices, turn off the player when connecting or removing the USB memory or devices. • The player may not play. • The player can recognize Mass Storage Class (MSC) devices, Still...
Operating Instructions
Page 25
... E Easy Setup 11, 18 H HDMI 16 HOME 7, 15 Home menu 15 I Internet content 13 IP Content Noise Reduction 14 M MAC address 18 N NETFLIX 8 Network Settings 18 Network Update 15 O OPTIONS 7 OSD 18 P Parental Control 17 Parental Control Settings 17 Play information 12 Playable discs 22 POP UP/MENU 7 R Region code 22 Remote 7 Resetting 18 Resetting the player 18 Resume 8, 21 S Screen Settings 15 SEN 8 Setup 15 Software update 15, 18 Sony Entertainment Network 13 SUBTITLE 7 System Settings 18 T TOP MENU 7 Troubleshooting 19 TV Type 15 U Update 15 USB 13 25
... E Easy Setup 11, 18 H HDMI 16 HOME 7, 15 Home menu 15 I Internet content 13 IP Content Noise Reduction 14 M MAC address 18 N NETFLIX 8 Network Settings 18 Network Update 15 O OPTIONS 7 OSD 18 P Parental Control 17 Parental Control Settings 17 Play information 12 Playable discs 22 POP UP/MENU 7 R Region code 22 Remote 7 Resetting 18 Resetting the player 18 Resume 8, 21 S Screen Settings 15 SEN 8 Setup 15 Software update 15, 18 Sony Entertainment Network 13 SUBTITLE 7 System Settings 18 T TOP MENU 7 Troubleshooting 19 TV Type 15 U Update 15 USB 13 25
Marketing Specifications
Page 2
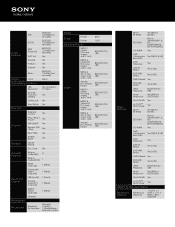
...Child Lock Yes Easy Setup Yes Function Parental Control Yes Play / Stop / Pause Yes Function PREV/NEXT Yes Repeat (All/ 1title) Yes REV/ FWD Yes Screen Saver Yes General Model Name Disc Drive Yes General Features Region Code (BD) A Region Code (DVD) 1 HDMI Output(s) 1 (Rear) Composite Video Output(s) 1 (Rear) Inputs and Outputs USB Input(s) Analog Audio 2ch Output(s) 1 (Front) 1 (Rear) Digital Audio Output(s) 1 (Rear) Ethernet Accessories Accessories Supplied Accessories Warranty CardAV CableBatteries Remote Control Power Power Power Power Supported Media...
...Child Lock Yes Easy Setup Yes Function Parental Control Yes Play / Stop / Pause Yes Function PREV/NEXT Yes Repeat (All/ 1title) Yes REV/ FWD Yes Screen Saver Yes General Model Name Disc Drive Yes General Features Region Code (BD) A Region Code (DVD) 1 HDMI Output(s) 1 (Rear) Composite Video Output(s) 1 (Rear) Inputs and Outputs USB Input(s) Analog Audio 2ch Output(s) 1 (Front) 1 (Rear) Digital Audio Output(s) 1 (Rear) Ethernet Accessories Accessories Supplied Accessories Warranty CardAV CableBatteries Remote Control Power Power Power Power Supported Media...


