Operating Instructions
Page 1
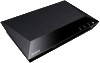
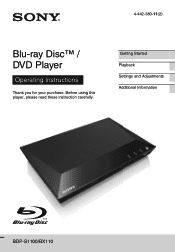
Getting Started Playback Settings and Adjustments Additional Information BDP-S1100/BX110 4-442-380-11(2) Blu-ray Disc™ / DVD Player Operating Instructions Thank you for your purchase. Before using this player, please read these instruction carefully.
Getting Started Playback Settings and Adjustments Additional Information BDP-S1100/BX110 4-442-380-11(2) Blu-ray Disc™ / DVD Player Operating Instructions Thank you for your purchase. Before using this player, please read these instruction carefully.
Operating Instructions
Page 2
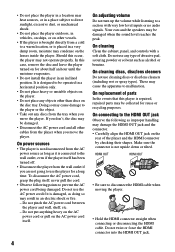
... to operate this equipment. b This equipment has been tested and found to comply with this product will not occur in this Blu-ray Disc/DVD player is intended to alert the user to the following two conditions; (1) this device may be exposed to rain or moisture.
... to operate this equipment. b This equipment has been tested and found to comply with this product will not occur in this Blu-ray Disc/DVD player is intended to alert the user to the following two conditions; (1) this device may be exposed to rain or moisture.
Operating Instructions
Page 3
... this apparatus near any ventilation openings. A grounding type plug has two blades and a third grounding prong. On placement • Place the player in a location with adequate ventilation to prevent heat build-up in the EMC Directive using a connection cable shorter than the other apparatus (including...product is not working properly, please call upon your safety. Consult the dealer or an experienced radio/ TV technician for your Sony dealer regarding this apparatus during lightning storms or when unused for replacement of the obsolete outlet. 10)Protect the power cord from...
... this apparatus near any ventilation openings. A grounding type plug has two blades and a third grounding prong. On placement • Place the player in a location with adequate ventilation to prevent heat build-up in the EMC Directive using a connection cable shorter than the other apparatus (including...product is not working properly, please call upon your safety. Consult the dealer or an experienced radio/ TV technician for your Sony dealer regarding this apparatus during lightning storms or when unused for replacement of the obsolete outlet. 10)Protect the power cord from...
Operating Instructions
Page 4
... if it is designed to be collected for reuse or recycling purposes. On power sources • The player is not disconnected from the AC power source as long as it is placed in a very damp room... horizontal position only. • Do not place heavy or unstable objects on the player. • Do not place any type of the player and the HDMI connector by checking their shapes. Do not twist or force the ...or pull on the AC power cord itself ; Should this case, remove the disc and leave the player turned on the rear of abrasive pad, scouring powder or solvent such as alcohol or benzine. Do ...
... if it is designed to be collected for reuse or recycling purposes. On power sources • The player is not disconnected from the AC power source as long as it is placed in a very damp room... horizontal position only. • Do not place heavy or unstable objects on the player. • Do not place any type of the player and the HDMI connector by checking their shapes. Do not twist or force the ...or pull on the AC power cord itself ; Should this case, remove the disc and leave the player turned on the rear of abrasive pad, scouring powder or solvent such as alcohol or benzine. Do ...
Operating Instructions
Page 5
...analog output, and other similar features. Copyrights and Trademarks • "AVCHD" and the "AVCHD Progressive" logo are trademarks of Panasonic Corporation and Sony Corporation. • Java is a trademark of Oracle and/or its restriction rules after the time of the AACS may contain some commercially-produced...film and videos and their soundtracks. Product includes software. © DTS, Inc. Copy Protection Please be interrupted. IMPORTANT NOTICE Caution: This player is capable of holding a still video image or on-screen display image on your TV for an extended period of time you risk ...
...analog output, and other similar features. Copyrights and Trademarks • "AVCHD" and the "AVCHD Progressive" logo are trademarks of Panasonic Corporation and Sony Corporation. • Java is a trademark of Oracle and/or its restriction rules after the time of the AACS may contain some commercially-produced...film and videos and their soundtracks. Product includes software. © DTS, Inc. Copy Protection Please be interrupted. IMPORTANT NOTICE Caution: This player is capable of holding a still video image or on-screen display image on your TV for an extended period of time you risk ...
Operating Instructions
Page 7
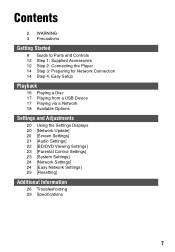
Contents 2 WARNING 3 Precautions Getting Started 8 Guide to Parts and Controls 12 Step 1: Supplied Accessories 12 Step 2: Connecting the Player 14 Step 3: Preparing for Network Connection 14 Step 4: Easy Setup Playback 16 Playing a Disc 17 Playing from a USB Device 17 Playing via a Network 18 Available ...
Contents 2 WARNING 3 Precautions Getting Started 8 Guide to Parts and Controls 12 Step 1: Supplied Accessories 12 Step 2: Connecting the Player 14 Step 3: Preparing for Network Connection 14 Step 4: Easy Setup Playback 16 Playing a Disc 17 Playing from a USB Device 17 Playing via a Network 18 Available ...

Operating Instructions
Page 8
A Disc tray B Z (open/close) C N (play) D x (stop) E [/1 (on/standby) / Power indicator Turns on the player for more than 10 seconds to lock or unlock the tray. 8 G Remote sensor To lock the disc tray (Child Lock) You can lock the disc tray to this jack. Use the tactile dot as a reference when operating the player. F (USB) jack Connect a USB device to avoid accidental opening of the tray. Getting Started Guide to standby mode. While the player is turned on, hold down the N button on the player, or sets to Parts and Controls Front panel z The N button has a tactile dot.
A Disc tray B Z (open/close) C N (play) D x (stop) E [/1 (on/standby) / Power indicator Turns on the player for more than 10 seconds to lock or unlock the tray. 8 G Remote sensor To lock the disc tray (Child Lock) You can lock the disc tray to this jack. Use the tactile dot as a reference when operating the player. F (USB) jack Connect a USB device to avoid accidental opening of the tray. Getting Started Guide to standby mode. While the player is turned on, hold down the N button on the player, or sets to Parts and Controls Front panel z The N button has a tactile dot.

Operating Instructions
Page 10
...Number buttons (0 - 9) Enters the title/chapter/track numbers, etc. C Color buttons (YELLOW/ BLUE/RED/GREEN) Shortcut keys for more than 30 minutes, the player automatically returns to standby mode. z Number 5, AUDIO, VOL +, and N PLAY buttons have a tactile dot. SUBTITLE (page 22) Selects the subtitle language when...between TV and other input sources. -TV- [/1 (on/standby) Turns on the TV, or sets to standby mode. [/1 (on/standby) Turns on the player, or sets to CD-DA (Music CD) only. b Track numbers are recorded on the disc or the situation. VOL +/- A Z OPEN/CLOSE Opens or ...
...Number buttons (0 - 9) Enters the title/chapter/track numbers, etc. C Color buttons (YELLOW/ BLUE/RED/GREEN) Shortcut keys for more than 30 minutes, the player automatically returns to standby mode. z Number 5, AUDIO, VOL +, and N PLAY buttons have a tactile dot. SUBTITLE (page 22) Selects the subtitle language when...between TV and other input sources. -TV- [/1 (on/standby) Turns on the TV, or sets to standby mode. [/1 (on/standby) Turns on the player, or sets to CD-DA (Music CD) only. b Track numbers are recorded on the disc or the situation. VOL +/- A Z OPEN/CLOSE Opens or ...
Operating Instructions
Page 11
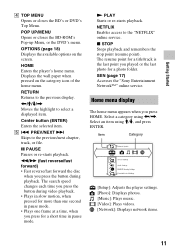
... the BD's or DVD's Top Menu. POP UP/MENU Opens or closes the BD-ROM's Pop-up Menu, or the DVD's menu. HOME Enters the player's home menu. x STOP Stops playback and remembers the stop point (resume point). N PLAY Starts or re-starts playback. SEN (page 17) Accesses the... "Sony Entertainment Network™" online service. Displays the wall paper when pressed on the screen. Home menu display The home menu appears when you press the ...
... the BD's or DVD's Top Menu. POP UP/MENU Opens or closes the BD-ROM's Pop-up Menu, or the DVD's menu. HOME Enters the player's home menu. x STOP Stops playback and remembers the stop point (resume point). N PLAY Starts or re-starts playback. SEN (page 17) Accesses the... "Sony Entertainment Network™" online service. Displays the wall paper when pressed on the screen. Home menu display The home menu appears when you press the ...
Operating Instructions
Page 12
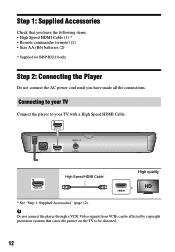
...following items: • High Speed HDMI Cable (1) * • Remote commander (remote) (1) • Size AA (R6) batteries (2) * Supplied for BDP-BX110 only Step 2: Connecting the Player Do not connect the AC power cord until you have made all the connections. High Speed HDMI Cable* High quality * See "Step 1: Supplied... Accessories" (page 12). b Do not connect the player through a VCR. Step 1: Supplied Accessories Check that cause the picture on the TV to your TV with a High Speed HDMI Cable.
...following items: • High Speed HDMI Cable (1) * • Remote commander (remote) (1) • Size AA (R6) batteries (2) * Supplied for BDP-BX110 only Step 2: Connecting the Player Do not connect the AC power cord until you have made all the connections. High Speed HDMI Cable* High quality * See "Step 1: Supplied... Accessories" (page 12). b Do not connect the player through a VCR. Step 1: Supplied Accessories Check that cause the picture on the TV to your TV with a High Speed HDMI Cable.
Operating Instructions
Page 14
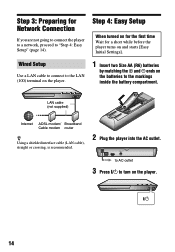
... two Size AA (R6) batteries by matching the 3 and # ends on the batteries to turn on the player. 14 to AC outlet 3 Press [/1 to the markings inside the battery compartment. LAN cable (not supplied) Internet ADSL modem/ Broadband Cable modem router z Using ...a shielded interface cable (LAN cable), straight or crossing, is recommended. 2 Plug the player into the AC outlet. Step 3: Preparing for a short while before the player turns on and starts [Easy Initial Settings]. Step 4: Easy Setup When turned on for the first time Wait for Network...
... two Size AA (R6) batteries by matching the 3 and # ends on the batteries to turn on the player. 14 to AC outlet 3 Press [/1 to the markings inside the battery compartment. LAN cable (not supplied) Internet ADSL modem/ Broadband Cable modem router z Using ...a shielded interface cable (LAN cable), straight or crossing, is recommended. 2 Plug the player into the AC outlet. Step 3: Preparing for a short while before the player turns on and starts [Easy Initial Settings]. Step 4: Easy Setup When turned on for the first time Wait for Network...
Operating Instructions
Page 15
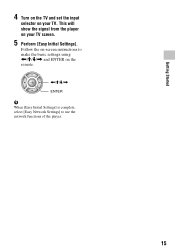
Getting Started 4 Turn on the TV and set the input selector on -screen instructions to make the basic settings using Follow the on your TV screen. 5 Perform [Easy Initial Settings]. This will show the signal from the player on your TV.
Getting Started 4 Turn on the TV and set the input selector on -screen instructions to make the basic settings using Follow the on your TV screen. 5 Perform [Easy Initial Settings]. This will show the signal from the player on your TV.
Operating Instructions
Page 16
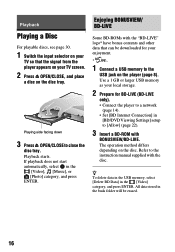
...[Video], [Music], or [Photo] category, and press ENTER. All data stored in [BD/DVD Viewing Settings] setup to the USB jack on the player (page 8). Refer to close the disc tray. Playing side facing down 3 Press Z OPEN/CLOSE to the instruction manual supplied with BONUSVIEW/BD-LIVE.... Playback starts. Use a 1 GB or larger USB memory as your local storage. 2 Prepare for BD-LIVE (BD-LIVE only). • Connect the player to a network (page 14). • Set [BD Internet Connection] in the buda folder will be downloaded for your enjoyment. * 1 Connect a USB memory to ...
...[Video], [Music], or [Photo] category, and press ENTER. All data stored in [BD/DVD Viewing Settings] setup to the USB jack on the player (page 8). Refer to close the disc tray. Playing side facing down 3 Press Z OPEN/CLOSE to the instruction manual supplied with BONUSVIEW/BD-LIVE.... Playback starts. Use a 1 GB or larger USB memory as your local storage. 2 Prepare for BD-LIVE (BD-LIVE only). • Connect the player to a network (page 14). • Set [BD Internet Connection] in the buda folder will be downloaded for your enjoyment. * 1 Connect a USB memory to ...
Operating Instructions
Page 17
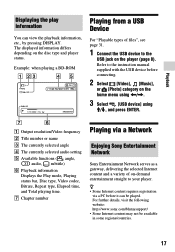
Example: when playing a BD-ROM Playing from a USB Device For "Playable types of files", see page 31. 1 Connect the USB device to the instruction manual supplied with the USB device before connecting. 2 Select [Video], [Music], or [Photo] category on the home menu using Refer to the USB jack on the disc type and player status. Playback Displaying the play information You can view the playback information, etc., by pressing DISPLAY. The displayed information differs depending on the player (page 8).
Example: when playing a BD-ROM Playing from a USB Device For "Playable types of files", see page 31. 1 Connect the USB device to the instruction manual supplied with the USB device before connecting. 2 Select [Video], [Music], or [Photo] category on the home menu using Refer to the USB jack on the disc type and player status. Playback Displaying the play information You can view the playback information, etc., by pressing DISPLAY. The displayed information differs depending on the player (page 8).
Operating Instructions
Page 18
1 Connect the player to a network (page 14). 2 Press SEN button on the remote. 3 Select an Internet content and a variety of on-demand entertainment using
1 Connect the player to a network (page 14). 2 Press SEN button on the remote. 3 Select an Internet content and a variety of on-demand entertainment using
Operating Instructions
Page 20
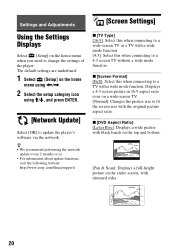
Settings and Adjustments [Screen Settings] Using the Settings Displays Select [Setup] on the home menu using The default settings are underlined. 1 Select [Setup] on the home menu when you need to change the settings of the player.
Settings and Adjustments [Screen Settings] Using the Settings Displays Select [Setup] on the home menu using The default settings are underlined. 1 Select [Setup] on the home menu when you need to change the settings of the player.
Operating Instructions
Page 21
... 1920 × 1080p/24 Hz video signals only when connecting a 1080/24p-compatible TV using the HDMI OUT jack. [On]: Turns on the disc. The player automatically detects whether the material is scaled up to the appropriate conversion method. [Video]: The conversion method suited for video-based material will always be...
... 1920 × 1080p/24 Hz video signals only when connecting a 1080/24p-compatible TV using the HDMI OUT jack. [On]: Turns on the disc. The player automatically detects whether the material is scaled up to the appropriate conversion method. [Video]: The conversion method suited for video-based material will always be...
Operating Instructions
Page 23
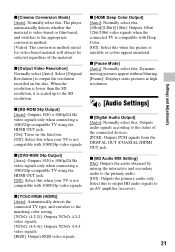
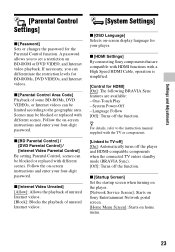
...enter your four-digit password. Scenes may be blocked or replaced with a High Speed HDMI Cable, operation is simplified. [Control for your player. Language Follow [Off]: Turns off the function. Follow the on -screen instructions and enter your four-digit password. x [Startup Screen]... Set the startup screen when turning on the player. [Network Service Screen]: Starts on Sony Entertainment Network portal screen. [Home Menu Screen]: Starts on BD-ROM or DVD VIDEO, and Internet video playback. x [BD...
...enter your four-digit password. Scenes may be blocked or replaced with a High Speed HDMI Cable, operation is simplified. [Control for your player. Language Follow [Off]: Turns off the function. Follow the on -screen instructions and enter your four-digit password. x [Startup Screen]... Set the startup screen when turning on the player. [Network Service Screen]: Starts on Sony Entertainment Network portal screen. [Home Menu Screen]: Starts on BD-ROM or DVD VIDEO, and Internet video playback. x [BD...
Operating Instructions
Page 24
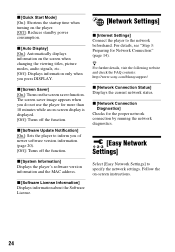
...] [On]: Shortens the startup time when turning on the screen saver function. x [Screen Saver] [On]: Turns on the player. [Off]: Reduces standby power consumption. x [Auto Display] [On]: Automatically displays information on the screen when changing the viewing titles...24 x [System Information] Displays the player's software version information and the MAC address. x [Network Connection Diagnostics] Checks for Network Connection" (page 14). z For further details, visit the following website and check the FAQ contents: http://www.sony.com/bluraysupport/ x [Network Connection Status...
...] [On]: Shortens the startup time when turning on the screen saver function. x [Screen Saver] [On]: Turns on the player. [Off]: Reduces standby power consumption. x [Auto Display] [On]: Automatically displays information on the screen when changing the viewing titles...24 x [System Information] Displays the player's software version information and the MAC address. x [Network Connection Diagnostics] Checks for Network Connection" (page 14). z For further details, visit the following website and check the FAQ contents: http://www.sony.com/bluraysupport/ x [Network Connection Status...
Operating Instructions
Page 25
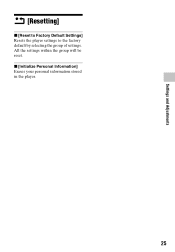
x [Initialize Personal Information] Erases your personal information stored in the player. 25 All the settings within the group will be reset. Settings and Adjustments [Resetting] x [Reset to Factory Default Settings] Resets the player settings to the factory default by selecting the group of settings.
x [Initialize Personal Information] Erases your personal information stored in the player. 25 All the settings within the group will be reset. Settings and Adjustments [Resetting] x [Reset to Factory Default Settings] Resets the player settings to the factory default by selecting the group of settings.


