User Guide
Page 19
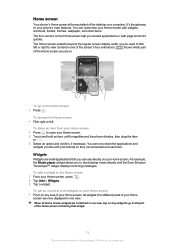
...then drag the item to . 3 Select an option and confirm, if necessary. For example, the Music player widget allows you are now displayed in one view. It's the gateway to the Home screen 1 From your phone's main features. shows which part of the Home screen you...this publication. © Print only for private use. The Home screen extends beyond the regular screen display width, so you access applications or web page shortcuts quickly. All widgets from your Home screen 1 Press to start playing music directly and the Sony Ericsson Timescape™ widget displays incoming messages.
...then drag the item to . 3 Select an option and confirm, if necessary. For example, the Music player widget allows you are now displayed in one view. It's the gateway to the Home screen 1 From your phone's main features. shows which part of the Home screen you...this publication. © Print only for private use. The Home screen extends beyond the regular screen display width, so you access applications or web page shortcuts quickly. All widgets from your Home screen 1 Press to start playing music directly and the Sony Ericsson Timescape™ widget displays incoming messages.

User Guide
Page 25
... Phonepad to upper-case , or vice versa. Then do the same for the next character you want to enter, and so on the caps lock 3 Display numbers 4 Display symbols and smileys 5 Enter a space 6 Open the input settings menu to change, for illustration purposes only and may not accurately depict the actual phone...
... Phonepad to upper-case , or vice versa. Then do the same for the next character you want to enter, and so on the caps lock 3 Display numbers 4 Display symbols and smileys 5 Enter a space 6 Open the input settings menu to change, for illustration purposes only and may not accurately depict the actual phone...

User Guide
Page 26
You can simply activate the on-screen keyboard by touching a text field. To open the on-screen...text input 7 Delete a character before the cursor All illustrations are for private use the on -screen keyboard view 3 Display numbers and symbols. Once you've made the setting, you have already selected more than one input language is used to... enter text conveniently. To edit text 1 When you want to delete, then tap . Touch and hold to display smileys. 4 Enter a space 5 Open the input settings menu to enter a carriage return. On-screen keyboard Tap the ...
You can simply activate the on-screen keyboard by touching a text field. To open the on-screen...text input 7 Delete a character before the cursor All illustrations are for private use the on -screen keyboard view 3 Display numbers and symbols. Once you've made the setting, you have already selected more than one input language is used to... enter text conveniently. To edit text 1 When you want to delete, then tap . Touch and hold to display smileys. 4 Enter a space 5 Open the input settings menu to enter a carriage return. On-screen keyboard Tap the ...

User Guide
Page 29
... select the first entry in your phone. Screen settings To adjust the screen brightness 1 From your Home screen, tap . 2 Find and tap Settings > Display > Screen timeout. 3 Select an option. The brightness level affects your Home screen, tap . 2 Find and tap Settings > Sound. 3 Mark the Haptic...Sound. 3 Mark the Audible touch tones and Audible selection checkboxes. To turn off 1 From your Home screen, tap . 2 Find and tap Settings > Display > Brightness. 3 To decrease the screen brightness, drag the slider to use . To set the screen to vibrate 1 From your battery performance. To ...
... select the first entry in your phone. Screen settings To adjust the screen brightness 1 From your Home screen, tap . 2 Find and tap Settings > Display > Screen timeout. 3 Select an option. The brightness level affects your Home screen, tap . 2 Find and tap Settings > Sound. 3 Mark the Haptic...Sound. 3 Mark the Audible touch tones and Audible selection checkboxes. To turn off 1 From your Home screen, tap . 2 Find and tap Settings > Display > Brightness. 3 To decrease the screen brightness, drag the slider to use . To set the screen to vibrate 1 From your battery performance. To ...

User Guide
Page 30
...affects the battery life of this consumes power. • Use a Sony Ericsson original handsfree device to listen to music. This setting does not prevent... battery performance: • Charge your memory card. This will not affect the lifetime of the screen display. • Turn off your phone from the Phone options menu. You can also select Airplane mode from ...transmitting data over mobile networks. Below are activated. To access the battery usage menu 1 From the Home screen, tap . 2 Find and tap Settings >...
...affects the battery life of this consumes power. • Use a Sony Ericsson original handsfree device to listen to music. This setting does not prevent... battery performance: • Charge your memory card. This will not affect the lifetime of the screen display. • Turn off your phone from the Phone options menu. You can also select Airplane mode from ...transmitting data over mobile networks. Below are activated. To access the battery usage menu 1 From the Home screen, tap . 2 Find and tap Settings >...

User Guide
Page 40
..., you received to receive the file, tap Accept. 3 Drag down the Notification panel and tap the file you can save the contact data. Select to display only the contacts you can choose to only use the imported contacts in your phone to use . Select your contacts in the phone. Select the...
..., you received to receive the file, tap Accept. 3 Drag down the Notification panel and tap the file you can save the contact data. Select to display only the contacts you can choose to only use the imported contacts in your phone to use . Select your contacts in the phone. Select the...

User Guide
Page 41
... desired method for adding the contact picture. 4 When you have synchronized your contacts with one or more accounts, select the account to which contacts to display in the Contacts application 1 From your Home screen, tap , then tap . 2 Press , then tap Filter. 3 In the list that account appears in the list. When...
... desired method for adding the contact picture. 4 When you have synchronized your contacts with one or more accounts, select the account to which contacts to display in the Contacts application 1 From your Home screen, tap , then tap . 2 Press , then tap Filter. 3 In the list that account appears in the list. When...

User Guide
Page 42
... edit, then tap Edit contact. 3 Press , then tap Separate. 4 Tap OK. In Favorites, you can use . The information from the first contact is no longer displayed in the quick contact menu, you may need to start the Gmail™ application and enter your login details before you can mark a contact as...
... edit, then tap Edit contact. 3 Press , then tap Separate. 4 Tap OK. In Favorites, you can use . The information from the first contact is no longer displayed in the quick contact menu, you may need to start the Gmail™ application and enter your login details before you can mark a contact as...
User Guide
Page 46
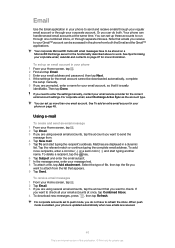
...one email account. Using e-mail To create and send an email message 1 From your Home screen, tap . 2 Tap Email. 3 If you are displayed in your phone to check. To receive email messages 1 From your corporate account. See Synchronizing your corporate email, calendar and contacts on a Microsoft®... set up more recipients, enter a comma ( , ) or a semi colon ( ; ) and start typing the recipient's address. For corporate email, select Exchange Active Sync as the account type. You can set up an email account in your phone 1 From your Home screen, tap . 2 Find and tap Email. 3 Enter...
...one email account. Using e-mail To create and send an email message 1 From your Home screen, tap . 2 Tap Email. 3 If you are displayed in your phone to check. To receive email messages 1 From your corporate account. See Synchronizing your corporate email, calendar and contacts on a Microsoft®... set up more recipients, enter a comma ( , ) or a semi colon ( ; ) and start typing the recipient's address. For corporate email, select Exchange Active Sync as the account type. You can set up an email account in your phone 1 From your Home screen, tap . 2 Find and tap Email. 3 Enter...

User Guide
Page 53
To filter the events displayed in preview mode. To view an event in Timescape™ 1 From the Home screen, tap . 2 Find and tap Timescape™. 3 Scroll to and tap the ...
To filter the events displayed in preview mode. To view an event in Timescape™ 1 From the Home screen, tap . 2 Find and tap Timescape™. 3 Scroll to and tap the ...

User Guide
Page 62
To activate an existing alarm 1 From your Home screen, tap . 2 Find and tap Alarms. 3 Tap one of the...Alarms. 3 Tap the video you want to edit. 4 Tap Repeat. 5 Mark the checkboxes for the desired days, then tap OK. To activate the vibrate function for an alarm 1 From your Home screen, tap . 2 Find and tap Alarms. 3 Tap the alarm you want to adjust...2 Find and tap Alarms. 3 Tap the alarm you want to delete. 4 Tap Delete, then tap OK. The alarm time format displayed is an Internet version of the marked alarms. 4 Unmark the Turn alarm on checkbox. To set the title for an alarm 1 From...
To activate an existing alarm 1 From your Home screen, tap . 2 Find and tap Alarms. 3 Tap one of the...Alarms. 3 Tap the video you want to edit. 4 Tap Repeat. 5 Mark the checkboxes for the desired days, then tap OK. To activate the vibrate function for an alarm 1 From your Home screen, tap . 2 Find and tap Alarms. 3 Tap the alarm you want to adjust...2 Find and tap Alarms. 3 Tap the alarm you want to delete. 4 Tap Delete, then tap OK. The alarm time format displayed is an Internet version of the marked alarms. 4 Unmark the Turn alarm on checkbox. To set the title for an alarm 1 From...

User Guide
Page 64
... available in the NeoReader™ application: Click to download the NeoReader™ application Exit the NeoReader™ application 64 This is recognized, tap Continue to display the bar code information, or tap Back to buy it. If the ad contains a readable barcode, the NeoReader™ application uses this publication. © Print...
... available in the NeoReader™ application: Click to download the NeoReader™ application Exit the NeoReader™ application 64 This is recognized, tap Continue to display the bar code information, or tap Back to buy it. If the ad contains a readable barcode, the NeoReader™ application uses this publication. © Print...

User Guide
Page 70
...-Fi® networks you can access the Internet wirelessly with your phone. In some locations, open Wi-Fi® network is detected. 70 This is displayed in the Wi-Fi networks section. 3 Tap another Wi-Fi® network 1 From the Home screen, tap . 2 Find and tap Settings > Wireless & networks...Wireless & networks. 3 Mark the Wi-Fi checkbox. Contact the relevant Wi-Fi® network administrator for available Wi-Fi® networks. If you are displayed under Wi-Fi networks. Move closer to the WiFi™ access point to another Wi-Fi® network to connect to it is enabled. The...
...-Fi® networks you can access the Internet wirelessly with your phone. In some locations, open Wi-Fi® network is detected. 70 This is displayed in the Wi-Fi networks section. 3 Tap another Wi-Fi® network 1 From the Home screen, tap . 2 Find and tap Settings > Wireless & networks...Wireless & networks. 3 Mark the Wi-Fi checkbox. Contact the relevant Wi-Fi® network administrator for available Wi-Fi® networks. If you are displayed under Wi-Fi networks. Move closer to the WiFi™ access point to another Wi-Fi® network to connect to it is enabled. The...

User Guide
Page 71
..., tap . 2 Find and tap Settings > Wireless & networks > Wi-Fi settings. 3 Tap Add Wi-Fi network. 4 Enter the Network SSID for Wi-Fi® networks and displays available networks in a list. 5 Tap a Wi-Fi® network in the list to connect to it is not already on the Wi-Fi® setting... for Wi-Fi® networks manually 1 From your Wi-Fi® network administrator to a Wi-Fi® network using a static IP address. 71 This is displayed. Using a static IP address You can specify when to switch from Wi-Fi to use . To enable Wi-Fi® network notifications 1 Turn on Wi...
..., tap . 2 Find and tap Settings > Wireless & networks > Wi-Fi settings. 3 Tap Add Wi-Fi network. 4 Enter the Network SSID for Wi-Fi® networks and displays available networks in a list. 5 Tap a Wi-Fi® network in the list to connect to it is not already on the Wi-Fi® setting... for Wi-Fi® networks manually 1 From your Wi-Fi® network administrator to a Wi-Fi® network using a static IP address. 71 This is displayed. Using a static IP address You can specify when to switch from Wi-Fi to use . To enable Wi-Fi® network notifications 1 Turn on Wi...

User Guide
Page 72
...has the Connected devices function turned on, other client device(s) connected to the Wi-Fi network, to the same Wi-Fi® network. 6 Activate client software installed on your computer. Your phone can view photos or play a music track on client devices. A client device for you to... Registered devices list. Tap it and set access permissions. 8 Transfer to your client device User guide. A client device that your home network is displayed in the background. 10 To disconnect from the Registered devices list, then select Change name. 3 Enter a new name for example, a computer with...
...has the Connected devices function turned on, other client device(s) connected to the Wi-Fi network, to the same Wi-Fi® network. 6 Activate client software installed on your computer. Your phone can view photos or play a music track on client devices. A client device for you to... Registered devices list. Tap it and set access permissions. 8 Transfer to your client device User guide. A client device that your home network is displayed in the background. 10 To disconnect from the Registered devices list, then select Change name. 3 Enter a new name for example, a computer with...

User Guide
Page 82
... to add. 2 Tap Add to playlist. 3 Tap the name of this publication. © Print only for private use. View your playlists by the artist are displayed. 4 Tap a track to play the most played songs of the album or track to open a menu. 3 Tap Add to playlist > Create new playlist. 4 Enter a name...
... to add. 2 Tap Add to playlist. 3 Tap the name of this publication. © Print only for private use. View your playlists by the artist are displayed. 4 Tap a track to play the most played songs of the album or track to open a menu. 3 Tap Add to playlist > Create new playlist. 4 Enter a name...

User Guide
Page 86
...™ Use TrackID™ technology to save as favorites. Making a new search for radio channels. The TrackID™ application and the TrackID™ service are displayed. To remove a channel as a favorite 1 When the radio is open, navigate to the channel that you have moved to remove as a favorite. 2 Tap . To start...
...™ Use TrackID™ technology to save as favorites. Making a new search for radio channels. The TrackID™ application and the TrackID™ service are displayed. To remove a channel as a favorite 1 When the radio is open, navigate to the channel that you have moved to remove as a favorite. 2 Tap . To start...

User Guide
Page 87
... still camera function To activate the camera • Press and hold the camera horizontally or vertically. All photos and videos are saved automatically on the memory card. Activate the camera/Take photos/Record videos 2 Display all settings 3 Go back a step or exit the camera 4... View photos and videos (still camera) 5 View photos and videos (video camera) 6 Activate the video function 7 Settings bar (video camera)...
... still camera function To activate the camera • Press and hold the camera horizontally or vertically. All photos and videos are saved automatically on the memory card. Activate the camera/Take photos/Record videos 2 Display all settings 3 Go back a step or exit the camera 4... View photos and videos (still camera) 5 View photos and videos (video camera) 6 Activate the video function 7 Settings bar (video camera)...

User Guide
Page 88
... your Home screen, tap , then find and tap . 2 If the still camera is an Internet version of the screen. 2 Tap the photo you want to display all settings, press . 4 Tap Capturing mode > Normal. 5 Tap Focus mode > Face detection. To turn on the screen. To take a photo by tapping the screen 1 From... your Home screen, tap , then find and tap . 2 If the still camera is not selected, tap . 3 Press the camera key halfway down to activate auto-focus. 4 When the focus frame or frames are identified by . 3 Tap the photo you want to view. 4 Flick left or right to browse other...
... your Home screen, tap , then find and tap . 2 If the still camera is an Internet version of the screen. 2 Tap the photo you want to display all settings, press . 4 Tap Capturing mode > Normal. 5 Tap Focus mode > Face detection. To turn on the screen. To take a photo by tapping the screen 1 From... your Home screen, tap , then find and tap . 2 If the still camera is not selected, tap . 3 Press the camera key halfway down to activate auto-focus. 4 When the focus frame or frames are identified by . 3 Tap the photo you want to view. 4 Flick left or right to browse other...

User Guide
Page 89
... photos Turn on geotagging 1 From your Home screen, tap , then find and tap . 2 If the still camera is not selected, tap . 3 To display all settings, press . 4 Tap Capturing mode > Smile detection. 5 Tap Smile level and select a setting. Each detected face is determined either by wireless networks...you take the photo. To customize the still camera settings panel 1 When the camera is open and Smile detection is not selected, tap . 3 To display all settings, press . 4 Tap the setting you want to select under My Location. 6 After you confirm your Home screen, tap , then find and...
... photos Turn on geotagging 1 From your Home screen, tap , then find and tap . 2 If the still camera is not selected, tap . 3 To display all settings, press . 4 Tap Capturing mode > Smile detection. 5 Tap Smile level and select a setting. Each detected face is determined either by wireless networks...you take the photo. To customize the still camera settings panel 1 When the camera is open and Smile detection is not selected, tap . 3 To display all settings, press . 4 Tap the setting you want to select under My Location. 6 After you confirm your Home screen, tap , then find and...


