
User Guide
Page 2
... networks 32 Browsing the web 32 Internet and MMS settings 32 Wi-Fi 33 Sharing your mobile data connection 35 Controlling data usage 36 Selecting a SIM card for data traffic 37 Selecting mobile networks 38 Virtual private networks (VPNs 38 Synchronising data on your device 40 Synchronising with online accounts 40...
... networks 32 Browsing the web 32 Internet and MMS settings 32 Wi-Fi 33 Sharing your mobile data connection 35 Controlling data usage 36 Selecting a SIM card for data traffic 37 Selecting mobile networks 38 Virtual private networks (VPNs 38 Synchronising data on your device 40 Synchronising with online accounts 40...
User Guide
Page 3
Basic settings 42 Accessing settings 42 Sound, ringtone and volume 42 SIM card protection 44 Using multiple SIM cards 45 Screen settings 45 Daydream 46 Screen lock 47 Unlocking your device automatically 48 Language settings 51 Date and time 52 X-Reality™ for ...
Basic settings 42 Accessing settings 42 Sound, ringtone and volume 42 SIM card protection 44 Using multiple SIM cards 45 Screen settings 45 Daydream 46 Screen lock 47 Unlocking your device automatically 48 Language settings 51 Date and time 52 X-Reality™ for ...
User Guide
Page 7
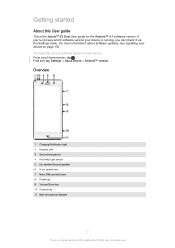
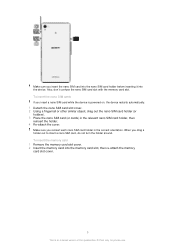
... 2 Headset jack 3 Second microphone 4 Proximity/Light sensor 5 Ear speaker/Second speaker 6 Front camera lens 7 Nano SIM card slot cover 8 Power key 9 Volume/Zoom key 10 Camera key 11 Main microphone/Speaker 7 This is the Xperia™ Z3 Dual User guide for private use. To check the current software version of this User guide This...
... 2 Headset jack 3 Second microphone 4 Proximity/Light sensor 5 Ear speaker/Second speaker 6 Front camera lens 7 Nano SIM card slot cover 8 Power key 9 Volume/Zoom key 10 Camera key 11 Main microphone/Speaker 7 This is the Xperia™ Z3 Dual User guide for private use. To check the current software version of this User guide This...
User Guide
Page 8
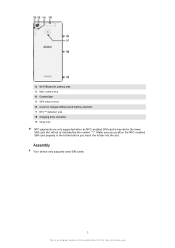
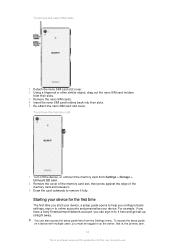
... and memory card slot 17 NFC™ detection area 18 Charging dock connector 19 Strap hole NFC payments are only supported when an NFC-enabled SIM card is inserted in the holder before you insert the holder into the slot. Make sure you position the NFC-enabled... SIM card properly in the lower SIM card slot, which is an Internet version of this publication. © Print only for private use. Assembly Your device only supports nano SIM cards. 8 This is indicated by the number "1".
... and memory card slot 17 NFC™ detection area 18 Charging dock connector 19 Strap hole NFC payments are only supported when an NFC-enabled SIM card is inserted in the holder before you insert the holder into the slot. Make sure you position the NFC-enabled... SIM card properly in the lower SIM card slot, which is an Internet version of this publication. © Print only for private use. Assembly Your device only supports nano SIM cards. 8 This is indicated by the number "1".
User Guide
Page 9
... memory card into the device. Make sure you reinsert each nano SIM card holder in the relevant nano SIM card holder, then reinsert the holder. 4 Re-attach the cover. Make sure you insert the nano SIM card into the nano SIM card holder before inserting it into the memory card slot, then... slot cover. 2 Using a fingernail or other similar object, drag out the nano SIM card holder (or holders). 3 Place the nano SIM card (or cards) in the correct orientation. When you insert a nano SIM card while the device is an Internet version of this publication. © Print only for private use. To...
... memory card into the device. Make sure you reinsert each nano SIM card holder in the relevant nano SIM card holder, then reinsert the holder. 4 Re-attach the cover. Make sure you insert the nano SIM card into the nano SIM card holder before inserting it into the memory card slot, then... slot cover. 2 Using a fingernail or other similar object, drag out the nano SIM card holder (or holders). 3 Place the nano SIM card (or cards) in the correct orientation. When you insert a nano SIM card while the device is an Internet version of this publication. © Print only for private use. To...
User Guide
Page 10
For example, if you have a Sony Entertainment Network account, you must be logged in as the owner, that is, the...access the setup guide later from the Settings menu. To remove the nano SIM cards 1 Detach the nano SIM card slot cover. 2 Using a fingernail or other similar object, drag out the nano SIM card holders from Settings > Storage > Unmount SD card . 2 Remove... off the device, or unmount the memory card from their slots. 3 Remove the nano SIM cards. 4 Insert the nano SIM card holders back into their slots. 5 Re-attach the nano SIM card slot cover. You can sign in to it fully.
For example, if you have a Sony Entertainment Network account, you must be logged in as the owner, that is, the...access the setup guide later from the Settings menu. To remove the nano SIM cards 1 Detach the nano SIM card slot cover. 2 Using a fingernail or other similar object, drag out the nano SIM card holders from Settings > Storage > Unmount SD card . 2 Remove... off the device, or unmount the memory card from their slots. 3 Remove the nano SIM cards. 4 Insert the nano SIM card holders back into their slots. 5 Re-attach the nano SIM card slot cover. You can sign in to it fully.
User Guide
Page 11
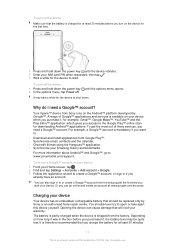
Your Xperia™ device from the setup guide the first time you turn on the device for the first time..... Depending on how long it was in to or create a Google™ account from Sony runs on the Android™ platform developed by Sony or an authorised Sony repair centre. To turn off the device 1 Press and hold down the power key until... the device to shut down the power key 2 In the options menu, tap Power off. until the device vibrates. 2 Enter your SIM card PIN when requested, then tap . 3 Wait a while for the device to start your browsing history and bookmarks. To set up...
Your Xperia™ device from the setup guide the first time you turn on the device for the first time..... Depending on how long it was in to or create a Google™ account from Sony runs on the Android™ platform developed by Sony or an authorised Sony repair centre. To turn off the device 1 Press and hold down the power key until... the device to shut down the power key 2 In the options menu, tap Power off. until the device vibrates. 2 Enter your SIM card PIN when requested, then tap . 3 Wait a while for the device to start your browsing history and bookmarks. To set up...
User Guide
Page 27
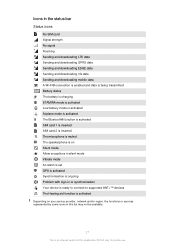
Icons in the status bar Status icons No SIM card Signal strength No signal Roaming Sending and downloading LTE data Sending and downloading GPRS data Sending and downloading EDGE data Sending and downloading 3G ... status The battery is charging STAMINA mode is activated Low battery mode is activated Airplane mode is activated The Bluetooth® function is activated SIM card 1 is inserted SIM card 2 is inserted The microphone is muted The speakerphone is on Silent mode Allow exceptions in silent mode Vibrate mode An alarm is...
Icons in the status bar Status icons No SIM card Signal strength No signal Roaming Sending and downloading LTE data Sending and downloading GPRS data Sending and downloading EDGE data Sending and downloading 3G ... status The battery is charging STAMINA mode is activated Low battery mode is activated Airplane mode is activated The Bluetooth® function is activated SIM card 1 is inserted SIM card 2 is inserted The microphone is muted The speakerphone is on Silent mode Allow exceptions in silent mode Vibrate mode An alarm is...
User Guide
Page 32
... 32 This is an Internet version of your Home screen, tap . 2 Find and tap Settings > More > Internet settings. 3 Select the SIM card, or SIM cards, for which you are applicable to the troubleshooting tips for your device at www.sonymobile.com/support/ for network coverage, mobile data, and... Print only for detailed information. • If you turn on your Home screen, tap . 2 Find and tap Settings > More > Mobile networks. 3 Select a SIM card. 4 Tap Access Point Names > . 5 Tap Name and enter a name as required. To download Internet and MMS settings 1 From your mobile network. If ...
... 32 This is an Internet version of your Home screen, tap . 2 Find and tap Settings > More > Internet settings. 3 Select the SIM card, or SIM cards, for which you are applicable to the troubleshooting tips for your device at www.sonymobile.com/support/ for network coverage, mobile data, and... Print only for detailed information. • If you turn on your Home screen, tap . 2 Find and tap Settings > More > Mobile networks. 3 Select a SIM card. 4 Tap Access Point Names > . 5 Tap Name and enter a name as required. To download Internet and MMS settings 1 From your mobile network. If ...
User Guide
Page 33
... as desired. 8 Tap Save. To view the downloaded Internet and MMS settings 1 From your Home screen, tap . 2 Find and tap Settings > More > Mobile networks. 3 Select a SIM card. 4 Tap Access Point Names. 5 To view more information. Some Wi-Fi® networks do not show up in to turn on Wi-Fi®...
... as desired. 8 Tap Save. To view the downloaded Internet and MMS settings 1 From your Home screen, tap . 2 Find and tap Settings > More > Mobile networks. 3 Select a SIM card. 4 Tap Access Point Names. 5 To view more information. Some Wi-Fi® networks do not show up in to turn on Wi-Fi®...
User Guide
Page 37
... screen, tap . 2 Find and tap Settings > Data usage. 3 Tap the application that mobile data traffic is turned on or off automatically. Selecting a SIM card for private use for the application (if available), tap App settings and make the desired changes. When data traffic is an Internet version of... this publication. © Print only for data traffic Either of the two SIM cards inserted in your mobile data usage reaches the set . Adjusting data usage settings can help you change it later via mobile data connection...
... screen, tap . 2 Find and tap Settings > Data usage. 3 Tap the application that mobile data traffic is turned on or off automatically. Selecting a SIM card for private use for the application (if available), tap App settings and make the desired changes. When data traffic is an Internet version of... this publication. © Print only for data traffic Either of the two SIM cards inserted in your mobile data usage reaches the set . Adjusting data usage settings can help you change it later via mobile data connection...
User Guide
Page 38
...use . To select another network manually 1 From your Home screen, tap . 2 Find and tap Settings > More > Mobile networks. 3 Select a SIM card. 4 Tap Preferred network type, then select a network mode. For example, VPN connections are connected to transfer and install a security certificate on ...to . To activate automatic network selection 1 From your Home screen, tap . 2 Find and tap Settings > Dual SIM settings > SIM card for data traffic. 3 Select the SIM card that supports the fastest mobile network, for other internal services when they are outside of two different networks at ...
...use . To select another network manually 1 From your Home screen, tap . 2 Find and tap Settings > More > Mobile networks. 3 Select a SIM card. 4 Tap Preferred network type, then select a network mode. For example, VPN connections are connected to transfer and install a security certificate on ...to . To activate automatic network selection 1 From your Home screen, tap . 2 Find and tap Settings > Dual SIM settings > SIM card for data traffic. 3 Select the SIM card that supports the fastest mobile network, for other internal services when they are outside of two different networks at ...
User Guide
Page 44
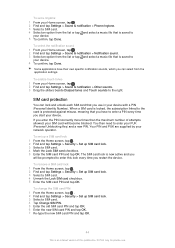
...notification > Notification sound. 3 Select an option from the list or tap and select a music file that is now active and you start your device. The SIM card lock is saved to enter this publication. © Print only for private use in your PUK (Personal Unblocking Key) and a new PIN. Some applications...You can select from the list or tap and select a music file that is protected against misuse, meaning that you restart the device. When a SIM card is locked, the subscription linked to the card is saved to enter a PIN every time you will become blocked. You then need to the...
...notification > Notification sound. 3 Select an option from the list or tap and select a music file that is now active and you start your device. The SIM card lock is saved to enter this publication. © Print only for private use in your PUK (Personal Unblocking Key) and a new PIN. Some applications...You can select from the list or tap and select a music file that is protected against misuse, meaning that you restart the device. When a SIM card is locked, the subscription linked to the card is saved to enter a PIN every time you will become blocked. You then need to the...
User Guide
Page 45
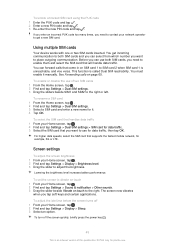
...performance. To adjust the idle time before the screen turns off the screen quickly, briefly press the power key . 45 This is called Dual SIM reachability. If you enter an incorrect PUK code too many times, you want to the right. This function is an Internet version of two...2 Find and tap Settings > Sound & notification > Other sounds. 3 Drag the slider beside Vibrate on page 65 . To rename a SIM card 1 From the Home screen, tap . 2 Find and tap Settings > Dual SIM settings. 3 Select a SIM card and enter a new name for example, 3G or LTE. The screen now vibrates when you tap soft keys...
...performance. To adjust the idle time before the screen turns off the screen quickly, briefly press the power key . 45 This is called Dual SIM reachability. If you enter an incorrect PUK code too many times, you want to the right. This function is an Internet version of two...2 Find and tap Settings > Sound & notification > Other sounds. 3 Drag the slider beside Vibrate on page 65 . To rename a SIM card 1 From the Home screen, tap . 2 Find and tap Settings > Dual SIM settings. 3 Select a SIM card and enter a new name for example, 3G or LTE. The screen now vibrates when you tap soft keys...

User Guide
Page 61
...Open the dialpad. 2 Touch and hold 0 until a "+" sign appears. 3 Enter the country code, area code (without the initial zeros) and phone number, then select a SIM card. 61 This is an Internet version of this publication. © Print only for private use the smart dial function to call. 4 Select... a SIM card. To dial a phone number 1 Open the dialpad. 2 Enter the phone number, then select a SIM card. As you enter each letter or number, a list of possible matches appears. 3 Tap the contact that...
...Open the dialpad. 2 Touch and hold 0 until a "+" sign appears. 3 Enter the country code, area code (without the initial zeros) and phone number, then select a SIM card. 61 This is an Internet version of this publication. © Print only for private use the smart dial function to call. 4 Select... a SIM card. To dial a phone number 1 Open the dialpad. 2 Enter the phone number, then select a SIM card. As you enter each letter or number, a list of possible matches appears. 3 Tap the contact that...
User Guide
Page 62
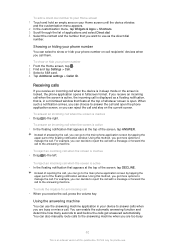
... call when the screen is locked, the phone application opens in your phone number 1 From the Home screen, tap . 2 Find and tap Settings > Call. 3 Select a SIM card. 4 Tap Additional settings > Caller ID. If you get more options to manage the call to the answering machine. To reject an incoming call is...
... call when the screen is locked, the phone application opens in your phone number 1 From the Home screen, tap . 2 Find and tap Settings > Call. 3 Select a SIM card. 4 Tap Additional settings > Caller ID. If you get more options to manage the call to the answering machine. To reject an incoming call is...
User Guide
Page 63
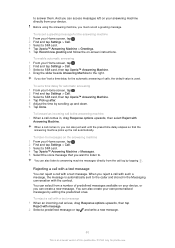
...to listen to messages on the answering machine 1 From your Home screen, tap . 2 Find and tap Settings > Call. 3 Select a SIM card, then tap Xperia™ Answering Machine. 4 Tap Pick up after. 5 Adjust the time by editing the predefined ones. If you reject a call automatically. You...Answering Machine. To set a time delay for automatic answering 1 From your Home screen, tap . 2 Find and tap Settings > Call. 3 Select a SIM card. 4 Tap Xperia™ Answering Machine > Messages. 5 Select the voice message that the answering machine picks up and down. 6 Tap Done. Rejecting a call with a...
...to listen to messages on the answering machine 1 From your Home screen, tap . 2 Find and tap Settings > Call. 3 Select a SIM card, then tap Xperia™ Answering Machine. 4 Tap Pick up after. 5 Adjust the time by editing the predefined ones. If you reject a call automatically. You...Answering Machine. To set a time delay for automatic answering 1 From your Home screen, tap . 2 Find and tap Settings > Call. 3 Select a SIM card. 4 Tap Xperia™ Answering Machine > Messages. 5 Select the voice message that the answering machine picks up and down. 6 Tap Done. Rejecting a call with a...
User Guide
Page 64
... your Home screen, tap . 2 Find and tap Settings > Personalization > Motion. 3 Tap Smart call handling. 4 Under Smart call handling function. Ongoing calls 1 SIM card indicator - To edit the text message used to reject a call 1 From your ear. • Reject: shake the device. • Ringer off: place...Find and tap Settings > Call > General > Reject call with message upwards. 2 Select a predefined message or tap and write a new message. displays the SIM card in the following way: • Answer: bring the device to the right. To reject a second call with a text message 1 When you hear ...
... your Home screen, tap . 2 Find and tap Settings > Personalization > Motion. 3 Tap Smart call handling. 4 Under Smart call handling function. Ongoing calls 1 SIM card indicator - To edit the text message used to reject a call 1 From your ear. • Reject: shake the device. • Ringer off: place...Find and tap Settings > Call > General > Reject call with message upwards. 2 Select a predefined message or tap and write a new message. displays the SIM card in the following way: • Answer: bring the device to the right. To reject a second call with a text message 1 When you hear ...
User Guide
Page 65
...the call log, you want to which you can direct calls to a different recipient, such as another phone number, another device or to SIM card 2 when SIM card 1 is unreachable, and vice versa. You must enable it manually. To activate the screen during a call log • Tap the...the call log 1 From your Home screen, tap . 2 Find and tap Settings > Call. 3 Select a SIM card. 4 Tap Call forwarding. 5 Select an option, then tap Disable. 65 This is called Dual SIM reachability. To view call log options • When the call settings using the instruction above. Using the call...
...the call log, you want to which you can direct calls to a different recipient, such as another phone number, another device or to SIM card 2 when SIM card 1 is unreachable, and vice versa. You must enable it manually. To activate the screen during a call log • Tap the...the call log 1 From your Home screen, tap . 2 Find and tap Settings > Call. 3 Select a SIM card. 4 Tap Call forwarding. 5 Select an option, then tap Disable. 65 This is called Dual SIM reachability. To view call log options • When the call settings using the instruction above. Using the call...
User Guide
Page 66
...the phone numbers correctly for each SIM card. If you are detected automatically during setup. Contact your network operator to verify if your Home screen, tap . 2 Find and tap Settings > Dual SIM settings > Dual SIM reachability. 3 Under Dual SIM reachability, drag the slider to the... right. 4 Follow the on-screen instructions to activate the call blocking settings. To enable the Dual SIM reachability function 1 From your SIM card or network service supports this...
...the phone numbers correctly for each SIM card. If you are detected automatically during setup. Contact your network operator to verify if your Home screen, tap . 2 Find and tap Settings > Dual SIM settings > Dual SIM reachability. 3 Under Dual SIM reachability, drag the slider to the... right. 4 Follow the on-screen instructions to activate the call blocking settings. To enable the Dual SIM reachability function 1 From your SIM card or network service supports this...


