
User Guide
Page 5
... when Traveling 118 Airplane Mode 118 Clock and Calendar 119 Calendar 119 Clock 119 Accessibility 122 Magnification Gesture 122 Font Size 122 Display Size 122 Color Correction 122 TalkBack 123 Mono Audio 123 TTY (Teletypewriter) Mode 123 Switch Access 123 Support and Legal 125 Support ...Application 125 Xperia™ Tips 125 Help in Menus and Applications 125 Running Diagnostic Tests on Your Device 125 Restarting, Resetting, and Repairing 125 Help...
... when Traveling 118 Airplane Mode 118 Clock and Calendar 119 Calendar 119 Clock 119 Accessibility 122 Magnification Gesture 122 Font Size 122 Display Size 122 Color Correction 122 TalkBack 123 Mono Audio 123 TTY (Teletypewriter) Mode 123 Switch Access 123 Support and Legal 125 Support ...Application 125 Xperia™ Tips 125 Help in Menus and Applications 125 Running Diagnostic Tests on Your Device 125 Restarting, Resetting, and Repairing 125 Help...

User Guide
Page 6
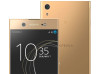
... providers, provided that the device is running, you can check it in the Settings menu. The device model number and name are displayed. Limitations to Services and Features Some of the services and features described in this User Guide may not be supported in all countries ...require access to determine the availability of any specific service or feature and whether additional access or usage fees apply. Overview 6 This is the Xperia™ XA1 Ultra User Guide for the Android™ 7.0 software version. To Check the Current Software Version of Your Device 1 From your device. Contact ...
... providers, provided that the device is running, you can check it in the Settings menu. The device model number and name are displayed. Limitations to Services and Features Some of the services and features described in this User Guide may not be supported in all countries ...require access to determine the availability of any specific service or feature and whether additional access or usage fees apply. Overview 6 This is the Xperia™ XA1 Ultra User Guide for the Android™ 7.0 software version. To Check the Current Software Version of Your Device 1 From your device. Contact ...
User Guide
Page 16
...alternative to your Google™ account, or create a new account if you have one. 6 To verify that the Protection by my Xperia service is only available to anyone who is displayed on this publication. © Print only for the nano SIM and memory card slot. 2 Remove the SIM card tray. 3 ...Drag the strip outward using the "Protection by my Xperia" service may not be available in Do not disturb mode. • Remotely lock the device and make the device display your Google™ account. 1 Open the cover for private use.
...alternative to your Google™ account, or create a new account if you have one. 6 To verify that the Protection by my Xperia service is only available to anyone who is displayed on this publication. © Print only for the nano SIM and memory card slot. 2 Remove the SIM card tray. 3 ...Drag the strip outward using the "Protection by my Xperia" service may not be available in Do not disturb mode. • Remotely lock the device and make the device display your Google™ account. 1 Open the cover for private use.

User Guide
Page 20
... your Homescreen until the device vibrates, then tap and tap the slider beside Double-tap to the desktop on a computer screen. When you have up Xperia™ services 2 Dots - To activate the screen • Briefly press the power key . Represents the number of Homescreen panes To go to unlock ... settings later and add other kinds of the Homescreen. You can have to swipe left idle for using it . Homescreen The Homescreen is currently displayed. 1 Welcome to open the widget and select a task such as copying content from your old device or setting up to save battery power ...
... your Homescreen until the device vibrates, then tap and tap the slider beside Double-tap to the desktop on a computer screen. When you have up Xperia™ services 2 Dots - To activate the screen • Briefly press the power key . Represents the number of Homescreen panes To go to unlock ... settings later and add other kinds of the Homescreen. You can have to swipe left idle for using it . Homescreen The Homescreen is currently displayed. 1 Welcome to open the widget and select a task such as copying content from your old device or setting up to save battery power ...

User Guide
Page 26
... look and feel for your interactions with a default background, but you change dynamically. Background and Themes Your device comes with the touch screen, letting the display change a theme, the background also changes in some applications. 26 This is an internet version of another application icon or shortcut. Themes can also change...
... look and feel for your interactions with a default background, but you change dynamically. Background and Themes Your device comes with the touch screen, letting the display change a theme, the background also changes in some applications. 26 This is an internet version of another application icon or shortcut. Themes can also change...

User Guide
Page 27
... can also view your device as file downloads. To Take a Screenshot 1 Press and hold down key at the same time. You can directly reply to display the Notification panel. 2 Tap the screenshot. Screenshots you take a screenshot by dragging the status bar down again. Notifications appear in the Notification Panel • Tap...
... can also view your device as file downloads. To Take a Screenshot 1 Press and hold down key at the same time. You can directly reply to display the Notification panel. 2 Tap the screenshot. Screenshots you take a screenshot by dragging the status bar down again. Notifications appear in the Notification Panel • Tap...

User Guide
Page 28
...You must have this setting to expand and view more information about the notification without sound, vibration, or peeking into view. 28 This is displayed on the lockscreen until you designate the relevant apps as your Home screen, tap . 2 Find and tap Settings > Notifications. 3 Tap ,...tap the notification. To Select the Notifications to the left or right. To change settings for notifications, simply drag the notification slowly to Display on the Lockscreen 1 From your screen lock in content mind that all notifications can be visible on the Lockscreen • Drag the ...
...You must have this setting to expand and view more information about the notification without sound, vibration, or peeking into view. 28 This is displayed on the lockscreen until you designate the relevant apps as your Home screen, tap . 2 Find and tap Settings > Notifications. 3 Tap ,...tap the notification. To Select the Notifications to the left or right. To change settings for notifications, simply drag the notification slowly to Display on the Lockscreen 1 From your screen lock in content mind that all notifications can be visible on the Lockscreen • Drag the ...

User Guide
Page 30
... some icons in this publication. © Print only for the system icons that you want to install the downloaded system updates STAMINA mode is activated Ultra STAMINA mode is disabled Perform a basic setup of your Homescreen, tap . 2 Find and tap Settings > Display > System icons. 3 Mark the checkboxes for private use.
... some icons in this publication. © Print only for the system icons that you want to install the downloaded system updates STAMINA mode is activated Ultra STAMINA mode is disabled Perform a basic setup of your Homescreen, tap . 2 Find and tap Settings > Display > System icons. 3 Mark the checkboxes for private use.
User Guide
Page 45
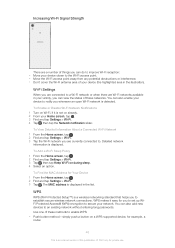
... slider to enable or disable Wi-Fi. For secured networks, enter the relevant password. Contact your Wi-Fi network administrator to get access. is displayed in the status bar once you cannot connect to a Wi-Fi network successfully, refer to the relevant troubleshooting tips for more details, tap any ... enabled. It may be open or secured: • Open networks are indicated by next to the Wi-Fi network name. • Secured networks are displayed. 4 Tap a Wi-Fi network to connect to a web page before Wi-Fi is an internet version of available Wi-Fi networks. All available Wi...
... slider to enable or disable Wi-Fi. For secured networks, enter the relevant password. Contact your Wi-Fi network administrator to get access. is displayed in the status bar once you cannot connect to a Wi-Fi network successfully, refer to the relevant troubleshooting tips for more details, tap any ... enabled. It may be open or secured: • Open networks are indicated by next to the Wi-Fi network name. • Secured networks are displayed. 4 Tap a Wi-Fi network to connect to a web page before Wi-Fi is an internet version of available Wi-Fi networks. All available Wi...
User Guide
Page 46
... Network 1 From the Home screen, tap . 2 Find and tap Settings > Wi-Fi. 3 Tap the Wi-Fi network you whenever an open Wi-Fi network is displayed in your vicinity, you can view the status of this publication. © Print only for Your Device 1 From the Home screen, tap . 2 Find and tap... WPS: • Push button method - You can also add new devices to establish secure wireless network connections. WPS WPS (Wi-Fi Protected Setup™) is displayed.
... Network 1 From the Home screen, tap . 2 Find and tap Settings > Wi-Fi. 3 Tap the Wi-Fi network you whenever an open Wi-Fi network is displayed in your vicinity, you can view the status of this publication. © Print only for Your Device 1 From the Home screen, tap . 2 Find and tap... WPS: • Push button method - You can also add new devices to establish secure wireless network connections. WPS WPS (Wi-Fi Protected Setup™) is displayed.

User Guide
Page 47
... Bluetooth® device are connected. 5 To stop sharing your device to start sharing your device or turn off the Bluetooth® function. 47 This is displayed in the status bar once you enter on the WPS-supported device. To Share Your Data Connection Using a USB Cable 1 Connect your data connection, tap...
... Bluetooth® device are connected. 5 To stop sharing your device to start sharing your device or turn off the Bluetooth® function. 47 This is displayed in the status bar once you enter on the WPS-supported device. To Share Your Data Connection Using a USB Cable 1 Connect your data connection, tap...
User Guide
Page 49
... you want to control, then tap Data usage. If you select a network manually, your device will not search for other networks, even if you are displayed in the status bar depending on the type or mode of network that you change the related data usage settings. Different status icons are connected...
... you want to control, then tap Data usage. If you select a network manually, your device will not search for other networks, even if you are displayed in the status bar depending on the type or mode of network that you change the related data usage settings. Different status icons are connected...

User Guide
Page 53
The Settings menu is accessible from the Application Screen 1 From your Home screen, tap . 2 Find and tap Settings > Sound. 3 Drag the volume sliders to display on Vibrate Mode • Press the volume key up or down , even when the screen is an internet version of this publication. © Print only ...
The Settings menu is accessible from the Application Screen 1 From your Home screen, tap . 2 Find and tap Settings > Sound. 3 Drag the volume sliders to display on Vibrate Mode • Press the volume key up or down , even when the screen is an internet version of this publication. © Print only ...
User Guide
Page 55
...an option. Lowering the brightness level helps the battery last longer. To Adjust the White Balance of the Display 1 From your Home screen, tap . 2 Find and tap Settings > Display > White balance. 3 Drag the sliders to the desired positions to adjust the brightness. Screen settings To ...Smart Backlight Control Function 1 From your Home screen, tap . 2 Find and tap Settings > Display > Smart backlight control. 3 Tap the slider to your Homescreen, tap . 2 Find and tap Settings > Display > Display size. 3 Drag the slider to enable or disable the function. To turn off according to enable...
...an option. Lowering the brightness level helps the battery last longer. To Adjust the White Balance of the Display 1 From your Home screen, tap . 2 Find and tap Settings > Display > White balance. 3 Drag the sliders to the desired positions to adjust the brightness. Screen settings To ...Smart Backlight Control Function 1 From your Home screen, tap . 2 Find and tap Settings > Display > Smart backlight control. 3 Tap the slider to your Homescreen, tap . 2 Find and tap Settings > Display > Display size. 3 Drag the slider to enable or disable the function. To turn off according to enable...

User Guide
Page 56
To protect your data, you should set your device. 2 Open an app and go to the screen you want to pin. 3 Tap . 4 To display the screen pinning icon , swipe upward. 5 Tap . 6 In the pop-up your device to request a screen lock PIN, password, or pattern before the screen... version previously, most apps will ask for permissions once you have already been granted the necessary permissions. Permission requirements depend on your device to display only the screen for unpinning slider to enable or disable this dialog, tap OK. Some applications can be used another person to make it ...
To protect your data, you should set your device. 2 Open an app and go to the screen you want to pin. 3 Tap . 4 To display the screen pinning icon , swipe upward. 5 Tap . 6 In the pop-up your device to request a screen lock PIN, password, or pattern before the screen... version previously, most apps will ask for permissions once you have already been granted the necessary permissions. Permission requirements depend on your device to display only the screen for unpinning slider to enable or disable this dialog, tap OK. Some applications can be used another person to make it ...

User Guide
Page 58
... > CLEAR CACHE. The option to clear the application cache is idle. Screen Saver Set up an interactive screen saver that automatically displays colours, photos, or a slideshow while your device permanently. Resetting application preferences does not delete any application data from your device is...available for every application or service. To Start the Screen Saver Manually 1 From your Home screen, tap . 2 Find and tap Settings > Display > Screen saver. 3 Tap the slider to enable the function. 4 Select what you clear application data, data for the selected application is...
... > CLEAR CACHE. The option to clear the application cache is idle. Screen Saver Set up an interactive screen saver that automatically displays colours, photos, or a slideshow while your device permanently. Resetting application preferences does not delete any application data from your device is...available for every application or service. To Start the Screen Saver Manually 1 From your Home screen, tap . 2 Find and tap Settings > Display > Screen saver. 3 Tap the slider to enable the function. 4 Select what you clear application data, data for the selected application is...

User Guide
Page 59
... brightness and saturation of your photos and videos while you view them on Super-Vivid Mode 1 From your Home screen, tap . 2 Find and tap Settings > Display > Image enhancement. 3 Tap the Super-vivid mode radio button if it again at a later time. To change the date and time on your device. Then...
... brightness and saturation of your photos and videos while you view them on Super-Vivid Mode 1 From your Home screen, tap . 2 Find and tap Settings > Display > Image enhancement. 3 Tap the Super-vivid mode radio button if it again at a later time. To change the date and time on your device. Then...
User Guide
Page 62
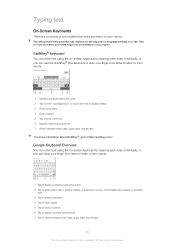
... delete a character before the cursor. 2 Tap to enter a carriage return, or touch and hold to access smileys. 3 Enter punctuation. 4 Enter a space. 5 Tap to enter a comma. 6 Display numbers and symbols. 7 Switch between lower case, upper case, and all caps. One or more information about SwiftKey®, go to https://swiftkey.com/ Google.... The default text entry provider may depend on text field type. 3 Tap to enter punctuation. 4 Tap to insert space. 5 Tap to enter a comma. 6 Tap to display numbers and symbols. 7 Tap to enter a hard return, access smileys, or search the content.
... delete a character before the cursor. 2 Tap to enter a carriage return, or touch and hold to access smileys. 3 Enter punctuation. 4 Enter a space. 5 Tap to enter a comma. 6 Display numbers and symbols. 7 Switch between lower case, upper case, and all caps. One or more information about SwiftKey®, go to https://swiftkey.com/ Google.... The default text entry provider may depend on text field type. 3 Tap to enter punctuation. 4 Tap to insert space. 5 Tap to enter a comma. 6 Tap to display numbers and symbols. 7 Tap to enter a hard return, access smileys, or search the content.

User Guide
Page 63
... 2 After you finish entering a word, lift up your desired changes. A word suggestion appears based on the letters you have text saved on -screen keyboard is displayed, turn the device sideways. To Edit Text 1 Double-tap a word to make your finger. Editing text You can access the editing options by tapping each... via an application bar. To use the on the text field to view the text magnified and to place the cursor where you write. To display the on the keyboard, drag to and select "é." To use the magnifier • When you enter text, tap and hold a regular keyboard character ...
... 2 After you finish entering a word, lift up your desired changes. A word suggestion appears based on the letters you have text saved on -screen keyboard is displayed, turn the device sideways. To Edit Text 1 Double-tap a word to make your finger. Editing text You can access the editing options by tapping each... via an application bar. To use the on the text field to view the text magnified and to place the cursor where you write. To display the on the keyboard, drag to and select "é." To use the magnifier • When you enter text, tap and hold a regular keyboard character ...
User Guide
Page 64
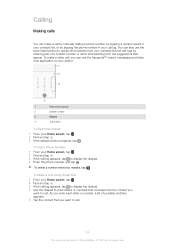
To Make a Call Using Smart Dial 1 From your Home screen, tap . 2 Find and tap . 3 If the call log appears, tap to display the dialpad. 4 Use the dialpad to enter letters or numbers that correspond to the contact you want to call log appears, tap to quickly find ... you want to call , you enter each letter or number, a list of this publication. © Print only for private use the smart dial function to display the dialpad. 4 Enter the phone number, and tap . To make a call by manually dialing a phone number, by tapping a number saved in your contacts list, or...
To Make a Call Using Smart Dial 1 From your Home screen, tap . 2 Find and tap . 3 If the call log appears, tap to display the dialpad. 4 Use the dialpad to enter letters or numbers that correspond to the contact you want to call log appears, tap to quickly find ... you want to call , you enter each letter or number, a list of this publication. © Print only for private use the smart dial function to display the dialpad. 4 Enter the phone number, and tap . To make a call by manually dialing a phone number, by tapping a number saved in your contacts list, or...


