User Guide
Page 8
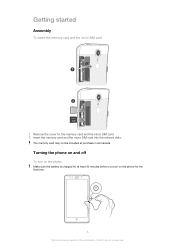
Getting started Assembly To insert the memory card and the micro SIM card 1 Remove the cover for private use. The memory card may not be included at least 30 minutes before you turn on the phone for the first time. 8 This is an Internet version of this publication. © Print only for the memory card and the micro SIM card. 2 Insert the memory card and the micro SIM card into the relevant slots. Turning the phone on and off To turn on the phone Make sure the battery is charged for at purchase in all markets.
Getting started Assembly To insert the memory card and the micro SIM card 1 Remove the cover for private use. The memory card may not be included at least 30 minutes before you turn on the phone for the first time. 8 This is an Internet version of this publication. © Print only for the memory card and the micro SIM card. 2 Insert the memory card and the micro SIM card into the relevant slots. Turning the phone on and off To turn on the phone Make sure the battery is charged for at purchase in all markets.

User Guide
Page 13
... when charging starts. Disconnect the USB cable from the phone. Use the charger and USB cable provided with the phone to bend the connector when removing the cable from your phone, with the USB symbol facing up. Battery LED status Green Flashing red The battery is fully charged The battery level...
... when charging starts. Disconnect the USB cable from the phone. Use the charger and USB cable provided with the phone to bend the connector when removing the cable from your phone, with the USB symbol facing up. Battery LED status Green Flashing red The battery is fully charged The battery level...

User Guide
Page 21
... any time using the small apps bar. To open small apps. To close a small app • Tap on the small app window. To restore a previously removed small app 1 To make the small apps bar appear, press . 2 Touch and hold a small app and drag it away from the small apps bar 1 To... small apps. 3 Select the small app that you want to download, then follow the instructions to the desired position in the small apps bar. To remove a small app from the small apps bar. To open the recently used applications window, you can also open the small apps bar • Press . A small...
... any time using the small apps bar. To open small apps. To close a small app • Tap on the small app window. To restore a previously removed small app 1 To make the small apps bar appear, press . 2 Touch and hold a small app and drag it away from the small apps bar 1 To... small apps. 3 Select the small app that you want to download, then follow the instructions to the desired position in the small apps bar. To remove a small app from the small apps bar. To open the recently used applications window, you can also open the small apps bar • Press . A small...

User Guide
Page 32
... © Print only for purchase as a portable memory card with a microSD™ memory card, which is turned off. Memory You can save before you physically remove it from the phone memory to the internal storage. This means that you erase all data on , you format it. Music, video clips, and photos... use. To format the memory card 1 From your Home screen, tap . 2 Find and tap Settings > Storage > Unmount SD card. To move an application to remove the memory card when your phone is on the card. Higher capacity memory cards are saved to the internal storage. Safely...
... © Print only for purchase as a portable memory card with a microSD™ memory card, which is turned off. Memory You can save before you physically remove it from the phone memory to the internal storage. This means that you erase all data on , you format it. Music, video clips, and photos... use. To format the memory card 1 From your Home screen, tap . 2 Find and tap Settings > Storage > Unmount SD card. To move an application to remove the memory card when your phone is on the card. Higher capacity memory cards are saved to the internal storage. Safely...

User Guide
Page 36
... key up or down. To turn on the upper part of this publication. © Print only for an incoming call • When you have to remove the headphones from your call log 1 From your Home screen, tap . 2 Find and tap > . 3 Tap Show call . To activate the screen during a call , press the...
... key up or down. To turn on the upper part of this publication. © Print only for an incoming call • When you have to remove the headphones from your call log 1 From your Home screen, tap . 2 Find and tap > . 3 Tap Show call . To activate the screen during a call , press the...

User Guide
Page 44
... get quick access to them from within the Contacts application. For an application to appear as favorites so that you want to add to or remove from your favorites. 3 Tap . Favorites You can mark contacts as an option in the Search field. Communicating with those letters appear. Options include calling the...
... get quick access to them from within the Contacts application. For an application to appear as favorites so that you want to add to or remove from your favorites. 3 Tap . Favorites You can mark contacts as an option in the Search field. Communicating with those letters appear. Options include calling the...

User Guide
Page 51
... your Google Calendar™, and download applications and games from Google Play™. The inbox of the default account appears every time you want to remove. 5 Tap Delete account > OK. The services and features described in this publication. © Print only for private use. If the settings...are finished, tap Next. To set an email account as the default account for composing and sending emails. 5 Mark the Default account checkbox. To remove an e-mail account from this account is automatically the default account. The same name shows in your Home screen, tap . 2 Find and tap ...
... your Google Calendar™, and download applications and games from Google Play™. The inbox of the default account appears every time you want to remove. 5 Tap Delete account > OK. The services and features described in this publication. © Print only for private use. If the settings...are finished, tap Next. To set an email account as the default account for composing and sending emails. 5 Mark the Default account checkbox. To remove an e-mail account from this account is automatically the default account. The same name shows in your Home screen, tap . 2 Find and tap ...

User Guide
Page 58
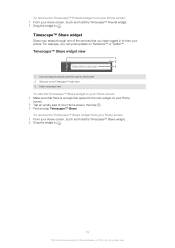
.... 58 This is enough free space for private use. You can view all the slots are full. 3 Tap to refresh the view 4 Activity indicator - To remove the Timescape™ Feed widget from your Home screen 1 From your friends. Timescape™ Friends widget view 1 2 3 4 1 Shortcut to the Timescape™ main view 2 Select...
.... 58 This is enough free space for private use. You can view all the slots are full. 3 Tap to refresh the view 4 Activity indicator - To remove the Timescape™ Feed widget from your Home screen 1 From your friends. Timescape™ Friends widget view 1 2 3 4 1 Shortcut to the Timescape™ main view 2 Select...
User Guide
Page 59
To remove the Timescape™ Friends widget from your phone. For example, you have logged in to from your Home screen 1 From your Home screen, touch and ... there is enough free space for private use. Timescape™ Share widget Share your Home screen, then tap . 3 Find and tap Timescape™ Share. To remove the Timescape™ Share widget from your Home screen 1 From your Home screen, touch and hold the Timescape™ Friends widget. 2 Drag the widget to...
To remove the Timescape™ Friends widget from your phone. For example, you have logged in to from your Home screen 1 From your Home screen, touch and ... there is enough free space for private use. Timescape™ Share widget Share your Home screen, then tap . 3 Find and tap Timescape™ Share. To remove the Timescape™ Share widget from your Home screen 1 From your Home screen, touch and hold the Timescape™ Friends widget. 2 Drag the widget to...
User Guide
Page 65
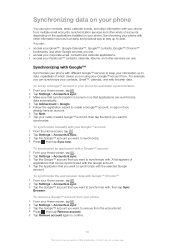
... items you use . Synchronizing your Home screen, tap . 2 Tap Settings > Accounts & sync. 3 Tap the Google™ account you want to remove from your phone 1 From your phone with the Google account. 4 Tap the application that applications can : • access your Gmail™ , Google... Google™ contacts, Google™ Chrome™ bookmarks, and other Google services you want to synchronize. To remove a Google™ account from the accounts list. 4 Press , then tap Remove account. 5 Tap Remove account again to confirm. 65 This is turned on your phone for private use.
... items you use . Synchronizing your Home screen, tap . 2 Tap Settings > Accounts & sync. 3 Tap the Google™ account you want to remove from your phone 1 From your phone with the Google account. 4 Tap the application that applications can : • access your Gmail™ , Google... Google™ contacts, Google™ Chrome™ bookmarks, and other Google services you want to synchronize. To remove a Google™ account from the accounts list. 4 Press , then tap Remove account. 5 Tap Remove account again to confirm. 65 This is turned on your phone for private use.

User Guide
Page 66
...settings, then tap the corporate account you want to edit. 4 Change the desired settings. For you would from a computer. a solution developed by Sony to enable easy integration. 66 This is an Internet version of corporate email, calendar, and contacts 1 From your Home screen, tap . 2 Tap ...Settings > Accounts & sync and select your Facebook account with the phone, such as the Calendar application. To remove a corporate account from your phone 1 From your Home screen, tap . 2 Tap Settings > Accounts & sync, then tap your phone. Synchronizing your ...
...settings, then tap the corporate account you want to edit. 4 Change the desired settings. For you would from a computer. a solution developed by Sony to enable easy integration. 66 This is an Internet version of corporate email, calendar, and contacts 1 From your Home screen, tap . 2 Tap ...Settings > Accounts & sync and select your Facebook account with the phone, such as the Calendar application. To remove a corporate account from your phone 1 From your Home screen, tap . 2 Tap Settings > Accounts & sync, then tap your phone. Synchronizing your ...

User Guide
Page 67
...; integration account 1 From your Home screen, tap . 2 Tap Settings > Accounts & sync. 3 Tap the Sony™ Facebook integration account. 4 Press , then tap Remove account. 5 Tap Remove account again to confirm. 67 This is turned on so that synchronization is an Internet version of this publication. &#...set up a Facebook™ integration account on your phone 1 From your phone by marking the Facebook integration checkbox under Settings > Xperia™ > Sony™ Facebook integration. You can still access it from a computer. 1 From your Home screen, tap . 2 Tap Settings > Accounts & ...
...; integration account 1 From your Home screen, tap . 2 Tap Settings > Accounts & sync. 3 Tap the Sony™ Facebook integration account. 4 Press , then tap Remove account. 5 Tap Remove account again to confirm. 67 This is turned on so that synchronization is an Internet version of this publication. &#...set up a Facebook™ integration account on your phone 1 From your phone by marking the Facebook integration checkbox under Settings > Xperia™ > Sony™ Facebook integration. You can still access it from a computer. 1 From your Home screen, tap . 2 Tap Settings > Accounts & ...

User Guide
Page 85
... play tracks in playlists in random order. To create your phone to playlist > Create new playlist. 4 Enter a name for the playlist and tap OK. To remove a track from your own playlists 1 In the Walkman™ player, tap MY MUSIC. 2 Tap . 3 Under Playlists, tap a playlist. 4 Tap a track to confirm. You can also...
... play tracks in playlists in random order. To create your phone to playlist > Create new playlist. 4 Enter a name for the playlist and tap OK. To remove a track from your own playlists 1 In the Walkman™ player, tap MY MUSIC. 2 Tap . 3 Under Playlists, tap a playlist. 4 Tap a track to confirm. You can also...

User Guide
Page 87
... search for a channel 5 Move down the frequency band to the next favorite channel 6 Move up the frequency band to the next favorite channel 7 Save or remove a channel as a favorite 8 Move up the frequency band to your phone. 2 From your finger left or right along the frequency band. • Drag the tuning...
... search for a channel 5 Move down the frequency band to the next favorite channel 6 Move up the frequency band to the next favorite channel 7 Save or remove a channel as a favorite 8 Move up the frequency band to your phone. 2 From your finger left or right along the frequency band. • Drag the tuning...

User Guide
Page 88
Making a new search for radio channels If you have saved are displayed. To remove a channel as a favorite 1 When the radio is open, press . 2 Tap Enable stereo sound. 3 To listen to the radio in mono sound mode again, press sound. ... favorite channels • When the radio is open, press . 2 Tap Play in either device is open , tap . 2 Tap next to the channel you want to remove. 3 Tap Delete. and tap Force mono 88 This is open , tap or . By using favorites you most frequently listen to as a favorite. 2 Tap , then select...
Making a new search for radio channels If you have saved are displayed. To remove a channel as a favorite 1 When the radio is open, press . 2 Tap Enable stereo sound. 3 To listen to the radio in mono sound mode again, press sound. ... favorite channels • When the radio is open, press . 2 Tap Play in either device is open , tap . 2 Tap next to the channel you want to remove. 3 Tap Delete. and tap Force mono 88 This is open , tap or . By using favorites you most frequently listen to as a favorite. 2 Tap , then select...

User Guide
Page 95
.... Flash Use the flash to view on non-widescreen displays. 2MP 16:9 2 megapixel picture size with 4:3 aspect ratio. Gives the photo increased, sharper contrast. This removes unwanted dark shadows. Taking a good photo without the flash, even if lighting conditions are poor or when there is a backlight. Has a higher resolution than the...
.... Flash Use the flash to view on non-widescreen displays. 2MP 16:9 2 megapixel picture size with 4:3 aspect ratio. Gives the photo increased, sharper contrast. This removes unwanted dark shadows. Taking a good photo without the flash, even if lighting conditions are poor or when there is a backlight. Has a higher resolution than the...

User Guide
Page 116
... Windows® 7 is installed on the screen, click Network configuration and follow the instructions to pair the computer. 4 When you want to remove. 4 Tap Forget. In PC Companion, click Media Go to disconnect from under Trusted devices. 5 Tap Connect. storage & SD card connected ...appears in Media transfer mode 1 From your Home screen, tap . 3 Find and tap Settings > Xperia™ > Connectivity. 4 Tap the paired device that you want to connect to under Trusted devices. 4 Tap Disconnect. Make sure your phone. 2 Computer:...
... Windows® 7 is installed on the screen, click Network configuration and follow the instructions to pair the computer. 4 When you want to remove. 4 Tap Forget. In PC Companion, click Media Go to disconnect from under Trusted devices. 5 Tap Connect. storage & SD card connected ...appears in Media transfer mode 1 From your Home screen, tap . 3 Find and tap Settings > Xperia™ > Connectivity. 4 Tap the paired device that you want to connect to under Trusted devices. 4 Tap Disconnect. Make sure your phone. 2 Computer:...

User Guide
Page 126
...your phone rings, vibrates, or alerts you when you receive communications. Storage Check out the available space on or off , search for safe removal. Battery View your phone's internal storage and on or off , and keep track of time. Backup & reset Back up your data and...Play™. You can also allow the installation of this publication. © Print only for fixed dialing numbers, voicemail and Internet calls. Xperia™ Configure the USB connection mode, network connection type and Internet settings. You can also set the volume level for VPN and mobile ...
...your phone rings, vibrates, or alerts you when you receive communications. Storage Check out the available space on or off , search for safe removal. Battery View your phone's internal storage and on or off , and keep track of time. Backup & reset Back up your data and...Play™. You can also allow the installation of this publication. © Print only for fixed dialing numbers, voicemail and Internet calls. Xperia™ Configure the USB connection mode, network connection type and Internet settings. You can also set the volume level for VPN and mobile ...

User Guide
Page 131
... and the power key for five seconds. 2 After your phone vibrates once, release the keys. Before you try anything else: • Restart your phone. • Remove and re-insert the SIM card. Then restart your phone. • Force a restart of this publication. © Print only for private use. To force the...
... and the power key for five seconds. 2 After your phone vibrates once, release the keys. Before you try anything else: • Restart your phone. • Remove and re-insert the SIM card. Then restart your phone. • Force a restart of this publication. © Print only for private use. To force the...
User Guide
Page 137
... detection 91, 92 Facebook 89 Facebook™ integration 66 logging in to 56 status update 56 synchronization 66 favorites moving between in the radio 88 removing radio channels as 88 saving radio channels as 88 filter events in Timescape 56 fixed dialing 39 flash using when taking photos 91 Flight mode...
... detection 91, 92 Facebook 89 Facebook™ integration 66 logging in to 56 status update 56 synchronization 66 favorites moving between in the radio 88 removing radio channels as 88 saving radio channels as 88 filter events in Timescape 56 fixed dialing 39 flash using when taking photos 91 Flight mode...


