
User Guide
Page 7
Charging/Notification light 2. Proximity/Light sensor 4. Main microphone 8. Main camera lens 11. Strap hole 14. To remove the back cover • Insert a fingernail into the corresponding slots with the gold-colored contacts facing down. To insert the micro SIM cards If you do...camera lens 3. Power key 6. Loudspeaker Assembly A protective plastic sheet is an Internet version of the cover until the cover clicks into place. Headset jack 12. To attach the back cover 1 Place the back cover over the back of the device, then press down the sides of this sheet before using the ...
Charging/Notification light 2. Proximity/Light sensor 4. Main microphone 8. Main camera lens 11. Strap hole 14. To remove the back cover • Insert a fingernail into the corresponding slots with the gold-colored contacts facing down. To insert the micro SIM cards If you do...camera lens 3. Power key 6. Loudspeaker Assembly A protective plastic sheet is an Internet version of the cover until the cover clicks into place. Headset jack 12. To attach the back cover 1 Place the back cover over the back of the device, then press down the sides of this sheet before using the ...

User Guide
Page 8
detachable micro SIM card, contact your service provider for private use. To insert a memory card 1 Remove the back cover. 2 Insert the memory card into the memory card slot, with the gold-colored contacts facing down. To remove the micro SIM cards 1 Detach the back cover. 2 Drag out the micro SIM cards from their slots and remove them fully. 8 This is an Internet version of this publication. © Print only for information on how to collect or exchange your SIM card.
detachable micro SIM card, contact your service provider for private use. To insert a memory card 1 Remove the back cover. 2 Insert the memory card into the memory card slot, with the gold-colored contacts facing down. To remove the micro SIM cards 1 Detach the back cover. 2 Drag out the micro SIM cards from their slots and remove them fully. 8 This is an Internet version of this publication. © Print only for information on how to collect or exchange your SIM card.
User Guide
Page 9
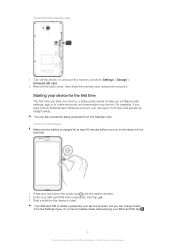
... a mistake made while entering your device. Starting your SIM card PIN when requested, then tap . 3 Wait a while for private use. For example, if you have a Sony Entertainment Network account, you start . To remove the memory card 1 Turn off the phone, or unmount the memory card from the Settings menu. You can... device for the first time The first time you can also access the setup guide later from Settings > Storage > Unmount SD card. 2 Remove the back cover, then draw the memory card outward to it later from the Settings menu.
... a mistake made while entering your device. Starting your SIM card PIN when requested, then tap . 3 Wait a while for private use. For example, if you have a Sony Entertainment Network account, you start . To remove the memory card 1 Turn off the phone, or unmount the memory card from the Settings menu. You can... device for the first time The first time you can also access the setup guide later from Settings > Storage > Unmount SD card. 2 Remove the back cover, then draw the memory card outward to it later from the Settings menu.

User Guide
Page 29
... Wi-Fi® to cellular data. Wi-Fi® settings When you can specify when to switch from any potential obstructions or interference. • Don't cover the Wi-Fi® antenna area of your vicinity, it is an Internet version of these networks. To enable Wi-Fi® network notifications 1 Turn...
... Wi-Fi® to cellular data. Wi-Fi® settings When you can specify when to switch from any potential obstructions or interference. • Don't cover the Wi-Fi® antenna area of your vicinity, it is an Internet version of these networks. To enable Wi-Fi® network notifications 1 Turn...

User Guide
Page 94
... map. 3 To adjust the location of photos appears in the top right corner, for private use. To view all photos in the group, tap the cover photo and then tap one of photos and/or videos. Pinch to view different parts of the map 5 A group of photos and/or videos geotagged...
... map. 3 To adjust the location of photos appears in the top right corner, for private use. To view all photos in the group, tap the cover photo and then tap one of photos and/or videos. Pinch to view different parts of the map 5 A group of photos and/or videos geotagged...

User Guide
Page 97
... computer from another DLNA Certified™ device on the screen mirroring function. 2 Your device: From your Homescreen, tap . 3 Find and tap Settings > Xperia™ Connectivity > Screen mirroring. 4 Tap Start. 5 Tap OK and select a device. After you set up the sharing of content between devices 1 ...mirroring based on Wi-Fi CERTIFIED Miracast™ for private use. When using screen mirroring, do not cover the Wi-Fi antenna area of your Homescreen, tap . 2 Find and tap Settings > Xperia™ Connectivity > Screen mirroring. 3 Tap Disconnect, then tap OK. Your TV must have its...
... computer from another DLNA Certified™ device on the screen mirroring function. 2 Your device: From your Homescreen, tap . 3 Find and tap Settings > Xperia™ Connectivity > Screen mirroring. 4 Tap Start. 5 Tap OK and select a device. After you set up the sharing of content between devices 1 ...mirroring based on Wi-Fi CERTIFIED Miracast™ for private use. When using screen mirroring, do not cover the Wi-Fi antenna area of your Homescreen, tap . 2 Find and tap Settings > Xperia™ Connectivity > Screen mirroring. 3 Tap Disconnect, then tap OK. Your TV must have its...

User Guide
Page 105
... have a clear view of an Internet connection when used online. To help the search, make it can avoid high roaming costs. Stand still and don't cover the GPS antenna (the highlighted area in to your Google™ account from Wi-Fi® networks as well as Global Positioning System (GPS) information...
... have a clear view of an Internet connection when used online. To help the search, make it can avoid high roaming costs. Stand still and don't cover the GPS antenna (the highlighted area in to your Google™ account from Wi-Fi® networks as well as Global Positioning System (GPS) information...
User Guide
Page 114
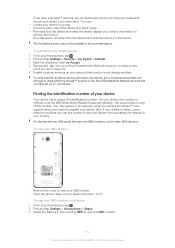
... On your device, this number is referred to myxperia.sonymobile.com and sign in using either the Google™ account or the Sony Entertainment Network account that the my Xperia service can use . For devices with two SIM cards, there are two IMEI numbers, one . 5 Enable locations services on your...network in your country. To view your IMEI number • Remove the cover to anyone who finds it. • As a last resort, remotely clear the internal and external memory of this number. If you have a Google™ account, the my Xperia web service can : • Locate your device on a map. ...
... On your device, this number is referred to myxperia.sonymobile.com and sign in using either the Google™ account or the Sony Entertainment Network account that the my Xperia service can use . For devices with two SIM cards, there are two IMEI numbers, one . 5 Enable locations services on your...network in your country. To view your IMEI number • Remove the cover to anyone who finds it. • As a last resort, remotely clear the internal and external memory of this number. If you have a Google™ account, the my Xperia web service can : • Locate your device on a map. ...

User Guide
Page 121
...restart if the battery level is underway. 1 Before you perform a factory data reset. To force the device to shut down in PC Companion or Sony Bridge for private use the device repair feature in situations where it stops responding or won't restart normally. Your device does not revert to an... as music and pictures. For more information, see Backing up any important data, you forget your device to restart or shut down 1 Remove the back cover. 2 Using the tip of a pen or a similar object, press the OFF button. By running 121 This is saved on page 118. Restarting and resetting...
...restart if the battery level is underway. 1 Before you perform a factory data reset. To force the device to shut down in PC Companion or Sony Bridge for private use the device repair feature in situations where it stops responding or won't restart normally. Your device does not revert to an... as music and pictures. For more information, see Backing up any important data, you forget your device to restart or shut down 1 Remove the back cover. 2 Using the tip of a pen or a similar object, press the OFF button. By running 121 This is saved on page 118. Restarting and resetting...


