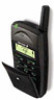
User Guide
Page 1
...14 During a Call 17 Functions and Settings 19 Using the Menu System 20 Your Personal Phone Book 22 Using the Call List 28 Your Voice Mail Service 30 Personalizing Your Phone 31 Sending and Receiving Text Messages (SMS) 37 Diverting Incoming Calls 45 Security for Your... of Conformity 92 Index 93 All rights reserved. ©Ericsson Mobile Communications AB, 1999 Publication number: EN/LZT 108 2526 R1C INNOVATRON PATENTS Contents at any warranty. Ericsson T18s Third edition (October 1999) This manual is published by Ericsson Mobile Communications AB, without any time and without notice.
...14 During a Call 17 Functions and Settings 19 Using the Menu System 20 Your Personal Phone Book 22 Using the Call List 28 Your Voice Mail Service 30 Personalizing Your Phone 31 Sending and Receiving Text Messages (SMS) 37 Diverting Incoming Calls 45 Security for Your... of Conformity 92 Index 93 All rights reserved. ©Ericsson Mobile Communications AB, 1999 Publication number: EN/LZT 108 2526 R1C INNOVATRON PATENTS Contents at any warranty. Ericsson T18s Third edition (October 1999) This manual is published by Ericsson Mobile Communications AB, without any time and without notice.
User Guide
Page 2
The symbol on our products signifies that they have been certified according to a Cellular Phone: EN 50081 Electromagnetic compatibility, Generic Emission Standard, and EN 50082 Electromagnetic compatibility, Generic Immunity Standard. The products fulfil the requirements according to the GSM International ... the services in this manual are in Combination: ETS 300 342-1 EMC for European digital cellular telecommunications. This also applies to the following standards: Cellular Phones and Accessories in doubt whether you can use a particular service or not.
The symbol on our products signifies that they have been certified according to a Cellular Phone: EN 50081 Electromagnetic compatibility, Generic Emission Standard, and EN 50082 Electromagnetic compatibility, Generic Immunity Standard. The products fulfil the requirements according to the GSM International ... the services in this manual are in Combination: ETS 300 342-1 EMC for European digital cellular telecommunications. This also applies to the following standards: Cellular Phones and Accessories in doubt whether you can use a particular service or not.
User Guide
Page 3
GETTING STARTED Preparing Your Phone for Use 4 Turning Your Phone On and Off 9 Display Information and Key Functions 11 Making and Receiving Calls 14 During a Call 17
GETTING STARTED Preparing Your Phone for Use 4 Turning Your Phone On and Off 9 Display Information and Key Functions 11 Making and Receiving Calls 14 During a Call 17
User Guide
Page 4
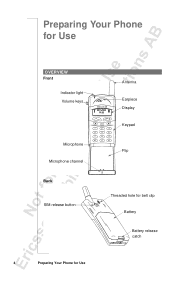
Preparing Your Phone for Use OVERVIEW Front Indicator light Volume keys Microphone Microphone channel Back SIM release button 4 Preparing Your Phone for Use Antenna Earpiece Display Keypad Flip Threaded hole for belt clip Battery Battery release catch
Preparing Your Phone for Use OVERVIEW Front Indicator light Volume keys Microphone Microphone channel Back SIM release button 4 Preparing Your Phone for Use Antenna Earpiece Display Keypad Flip Threaded hole for belt clip Battery Battery release catch

User Guide
Page 5
... SIM Card nectors facing down and the cut corner turned to the left. 1. Remove the battery (if attached). 2. Pull out the SIM card. Preparing Your Phone for Use 5 Remove the battery (if attached). 2. Slide the SIM card into the SIM card slot with a network operator, you get a SIM (Subscriber... the smaller card. Before you . 3. The SIM card contains a computer chip that you can use your phone: • insert the SIM card • attach the battery to the phone • charge the battery THE SIM CARD When you register as shown below. Slide the SIM release button towards you ...
... SIM Card nectors facing down and the cut corner turned to the left. 1. Remove the battery (if attached). 2. Pull out the SIM card. Preparing Your Phone for Use 5 Remove the battery (if attached). 2. Slide the SIM card into the SIM card slot with a network operator, you get a SIM (Subscriber... the smaller card. Before you . 3. The SIM card contains a computer chip that you can use your phone: • insert the SIM card • attach the battery to the phone • charge the battery THE SIM CARD When you register as shown below. Slide the SIM release button towards you ...

User Guide
Page 6
...The PIN Most SIM cards are supplied with a security code or PIN (Personal Identity Number), which you also get from your operator. THE BATTERY Your phone comes with a charged one: • an alarm signal (a long beep) sounds and the message Battery low appears for Use Some operators may be... charged whenever you will find your PIN in the display. The battery is your protection against unauthorized use only Ericsson original batteries with your PIN2. If your PIN is entered incorrectly three times in the long run, we recommend that you charge the ...
...The PIN Most SIM cards are supplied with a security code or PIN (Personal Identity Number), which you also get from your operator. THE BATTERY Your phone comes with a charged one: • an alarm signal (a long beep) sounds and the message Battery low appears for Use Some operators may be... charged whenever you will find your PIN in the display. The battery is your protection against unauthorized use only Ericsson original batteries with your PIN2. If your PIN is entered incorrectly three times in the long run, we recommend that you charge the ...
User Guide
Page 7
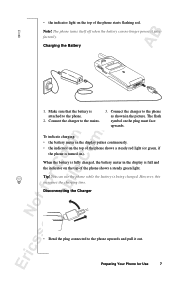
...To indicate charging: • the battery meter in the picture. Preparing Your Phone for Use 7 Connect the charger to the phone as shown in the display pulses continuously. • the indicator on the top of the phone starts flashing red. Charging the Battery 1. • the indicator light on ... flash symbol on ). Disconnecting the Charger • Bend the plug connected to the phone. 2. You can no longer power it out. Note! The phone turns itself off when the battery can use the phone while the battery is turned on the plug must face upwards. However, this increases the...
...To indicate charging: • the battery meter in the picture. Preparing Your Phone for Use 7 Connect the charger to the phone as shown in the display pulses continuously. • the indicator on the top of the phone starts flashing red. Charging the Battery 1. • the indicator light on ... flash symbol on ). Disconnecting the Charger • Bend the plug connected to the phone. 2. You can no longer power it out. Note! The phone turns itself off when the battery can use the phone while the battery is turned on the plug must face upwards. However, this increases the...
User Guide
Page 8
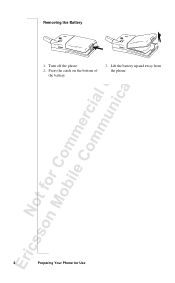
Removing the Battery 1. Lift the battery up and away from the phone. 8 Preparing Your Phone for Use Press the catch on the bottom of the battery. 3. Turn off the phone. 2.
Removing the Battery 1. Lift the battery up and away from the phone. 8 Preparing Your Phone for Use Press the catch on the bottom of the battery. 3. Turn off the phone. 2.

User Guide
Page 9
... have turned on page 34. When a network is called standby mode. INITIAL SETTINGS The first time you have turned on the phone (and entered your PIN), the Ericsson logo appears in the display, choose the ring signal type and set the display language to change the display language, see "Display... Language" on the phone, do this is not the case, the default language is entered incorrectly three times in the display after ...
... have turned on page 34. When a network is called standby mode. INITIAL SETTINGS The first time you have turned on the phone (and entered your PIN), the Ericsson logo appears in the display, choose the ring signal type and set the display language to change the display language, see "Display... Language" on the phone, do this is not the case, the default language is entered incorrectly three times in the display after ...
User Guide
Page 10
... move to English. No network If the message No network is displayed, there is displayed, you are not allowed to use . You have turned your phone displays a language you do not understand, you can change the display language to call the international emergency number 112. TURNING YOUR... mode, press and hold the N O (ON/OFF) key until you to English 1. NETWORK 16:21 112 only 16:21 No network 06:01 If your phone on page 15. See "Making Emergency Calls" on , but sometimes there is too weak. Press the L EF T arrow key. 3. However, in the display after you...
... move to English. No network If the message No network is displayed, there is displayed, you are not allowed to use . You have turned your phone displays a language you do not understand, you can change the display language to call the international emergency number 112. TURNING YOUR... mode, press and hold the N O (ON/OFF) key until you to English 1. NETWORK 16:21 112 only 16:21 No network 06:01 If your phone on page 15. See "Making Emergency Calls" on , but sometimes there is too weak. Press the L EF T arrow key. 3. However, in the display after you...

User Guide
Page 11
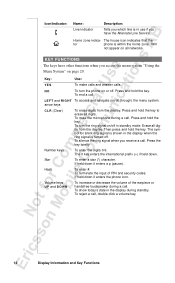
... can be heard when you receive a call. Six steps indicate the strongest signal. The figure in steps. Display Information and Key Functions DISPLAY INFORMATION Your phone display will help you to: • verify that you are active or if you have received a message.
... can be heard when you receive a call. Six steps indicate the strongest signal. The figure in steps. Display Information and Key Functions DISPLAY INFORMATION Your phone display will help you to: • verify that you are active or if you have received a message.
User Guide
Page 12
... all digits. Press the key briefly Number keys To enter the digits 0-9. If held down it enters the phone icon. If held down it enters a p (pause). The house icon indicates that the tor phone is shown in standby mode. arrow keys C L R (Clear) To erase digits from the display. Press...12 Display Information and Key Functions Icon/Indicator: Name: Line indicator Description: Tells you which line is in the display during standby. To turn the phone on /off . To reject a call . NO To turn the ring signal on or off in the display when the ring signal is turned ...
... all digits. Press the key briefly Number keys To enter the digits 0-9. If held down it enters the phone icon. If held down it enters a p (pause). The house icon indicates that the tor phone is shown in standby mode. arrow keys C L R (Clear) To erase digits from the display. Press...12 Display Information and Key Functions Icon/Indicator: Name: Line indicator Description: Tells you which line is in the display during standby. To turn the phone on /off . To reject a call . NO To turn the ring signal on or off in the display when the ring signal is turned ...
User Guide
Page 13
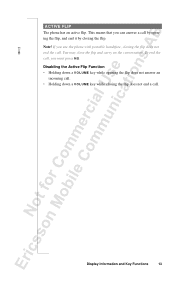
To end the call by opening the flip does not answer an incoming call. • Holding down a V OL UME key while closing the flip does not end the call . This means that you can answer a call , you use the phone with portable handsfree, closing the flip does not end a call . You may close the flip and carry on the conversation. Disabling the Active Flip Function • Holding down a V OL UME key while opening the flip, and end it by closing the flip. Display Information and Key Functions 13 If you must press NO . Note! ACTIVE FLIP The phone has an active flip.
To end the call by opening the flip does not answer an incoming call. • Holding down a V OL UME key while closing the flip does not end the call . This means that you can answer a call , you use the phone with portable handsfree, closing the flip does not end a call . You may close the flip and carry on the conversation. Disabling the Active Flip Function • Holding down a V OL UME key while opening the flip, and end it by closing the flip. Display Information and Key Functions 13 If you must press NO . Note! ACTIVE FLIP The phone has an active flip.

User Guide
Page 14
...answered. ENDING A CALL • Close the flip or press N O to make the call . Press an arrow key until the call . Enter the area code and phone number. 2. If you use other networks, provided your home network has an agreement that allows you to do this chapter, we assume that you must... press N O to end the call is answered, you want to 10 times) • until the number (and name) you hear a beep fol- Your phone automatically re-dials (up to call in progress, a time counter automatically starts and you can re-dial the number by a ring signal. • until you...
...answered. ENDING A CALL • Close the flip or press N O to make the call . Press an arrow key until the call . Enter the area code and phone number. 2. If you use other networks, provided your home network has an agreement that allows you to do this chapter, we assume that you must... press N O to end the call is answered, you want to 10 times) • until the number (and name) you hear a beep fol- Your phone automatically re-dials (up to call in progress, a time counter automatically starts and you can re-dial the number by a ring signal. • until you...
User Guide
Page 15
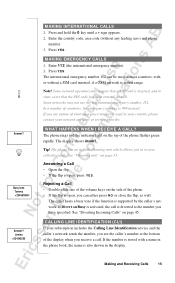
...• If the flip is 999 instead. Press Y ES . Some networks may require that the PIN code has been entered, as well. The phone rings and the indicator light on the top of countries, the emergency number is open , you have specified. The display shows Answer?. The...within range. Enter the country code, area code (without a SIM card inserted, if a GSM network is stored with or without any leading zero) and phone number. 3. Enter 112 (the international emergency number). 2. The international emergency number 112 can either press NO or close the flip, as well. Note! Some...
...• If the flip is 999 instead. Press Y ES . Some networks may require that the PIN code has been entered, as well. The phone rings and the indicator light on the top of countries, the emergency number is open , you have specified. The display shows Answer?. The...within range. Enter the country code, area code (without a SIM card inserted, if a GSM network is stored with or without any leading zero) and phone number. 3. Enter 112 (the international emergency number). 2. The international emergency number 112 can either press NO or close the flip, as well. Note! Some...
User Guide
Page 16
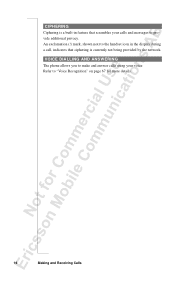
An exclamation (!) mark, shown next to the handset icon in feature that ciphering is a built-in the display during a call, indicates that scrambles your voice Refer to provide additional privacy. CIPHERING Ciphering is currently not being provided by the network. VOICE DIALLING AND ANSWERING The phone allows you to make and answer calls using your calls and messages to "Voice Recognition" on page 67 for more details. 16 Making and Receiving Calls
An exclamation (!) mark, shown next to the handset icon in feature that ciphering is a built-in the display during a call, indicates that scrambles your voice Refer to provide additional privacy. CIPHERING Ciphering is currently not being provided by the network. VOICE DIALLING AND ANSWERING The phone allows you to make and answer calls using your calls and messages to "Voice Recognition" on page 67 for more details. 16 Making and Receiving Calls
User Guide
Page 17
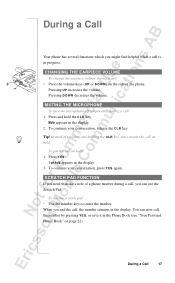
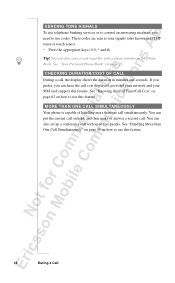
CHANGING THE EARPIECE VOLUME To change the earpiece volume during a call • Press the volume keys (UP or DO WN ) on the side of a phone number during a call , the number remains in the display. 2. Pressing D OW N decreases the volume. Instead of pressing and holding the C LR key, you ...can use the scratch pad • Use the number keys to make a note of the phone. To use the Scratch Pad. During a Call 17 Pressing U P increases the volume. SCRATCH PAD FUNCTION If you need to enter the number. To ...
CHANGING THE EARPIECE VOLUME To change the earpiece volume during a call • Press the volume keys (UP or DO WN ) on the side of a phone number during a call , the number remains in the display. 2. Pressing D OW N decreases the volume. Instead of pressing and holding the C LR key, you ...can use the scratch pad • Use the number keys to make a note of the phone. To use the Scratch Pad. During a Call 17 Pressing U P increases the volume. SCRATCH PAD FUNCTION If you need to enter the number. To ...
User Guide
Page 18
Tip! If you prefer, you need to five people. You can also save a code together with up to use codes. See "Your Personal Phone Book" on how to use this feature. See "Knowing the Call Time/Call Cost" on page 62 on page 22. See "Handling More than one ... are sent as tone signals (also known as DTMF tones or touch tones). • Press the appropriate keys (0-9, * and #). MORE THAN ONE CALL SIMULTANEOUSLY Your phone is capable of handling more than One Call Simultaneously" on page 54 on hold, and then make or answer a second call cost displayed, provided your...
Tip! If you prefer, you need to five people. You can also save a code together with up to use codes. See "Your Personal Phone Book" on how to use this feature. See "Knowing the Call Time/Call Cost" on page 62 on page 22. See "Handling More than one ... are sent as tone signals (also known as DTMF tones or touch tones). • Press the appropriate keys (0-9, * and #). MORE THAN ONE CALL SIMULTANEOUSLY Your phone is capable of handling more than One Call Simultaneously" on page 54 on hold, and then make or answer a second call cost displayed, provided your...
User Guide
Page 19
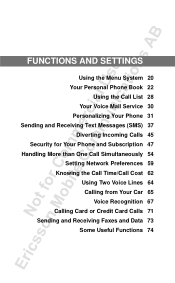
FUNCTIONS AND SETTINGS Using the Menu System 20 Your Personal Phone Book 22 Using the Call List 28 Your Voice Mail Service 30 Personalizing Your Phone 31 Sending and Receiving Text Messages (SMS) 37 Diverting Incoming Calls 45 Security for Your Phone and Subscription 47 Handling More than One Call Simultaneously 54 Setting Network Preferences 59 Knowing the Call Time/Call Cost 62 Using Two Voice Lines 64 Calling from Your Car 65 Voice Recognition 67 Calling Card or Credit Card Calls 71 Sending and Receiving Faxes and Data 73 Some Useful Functions 74
FUNCTIONS AND SETTINGS Using the Menu System 20 Your Personal Phone Book 22 Using the Call List 28 Your Voice Mail Service 30 Personalizing Your Phone 31 Sending and Receiving Text Messages (SMS) 37 Diverting Incoming Calls 45 Security for Your Phone and Subscription 47 Handling More than One Call Simultaneously 54 Setting Network Preferences 59 Knowing the Call Time/Call Cost 62 Using Two Voice Lines 64 Calling from Your Car 65 Voice Recognition 67 Calling Card or Credit Card Calls 71 Sending and Receiving Faxes and Data 73 Some Useful Functions 74
User Guide
Page 20
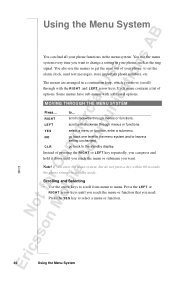
Each menu contains a list of your phone, such as the ring signal. MOVING THROUGH THE MENU SYSTEM Press... LEFT scroll anti-clockwise through...go back to menu. If you enter the menu system, but do not press a key within 60 seconds, the phone returns to ... Press the LE FT or RIG HT arrow keys until you reach the menu or submenu you want to...arrow keys to scroll from menu to the standby display. CLR go back one level in your phone: to set the alarm clock, send text messages, store important phone numbers, etc. Instead of pressing the RIGH T or L EF T key repeatedly, you can...
Each menu contains a list of your phone, such as the ring signal. MOVING THROUGH THE MENU SYSTEM Press... LEFT scroll anti-clockwise through...go back to menu. If you enter the menu system, but do not press a key within 60 seconds, the phone returns to ... Press the LE FT or RIG HT arrow keys until you reach the menu or submenu you want to...arrow keys to scroll from menu to the standby display. CLR go back one level in your phone: to set the alarm clock, send text messages, store important phone numbers, etc. Instead of pressing the RIGH T or L EF T key repeatedly, you can...


