
User Guide
Page 1
Contents Sony Ericsson K630i Getting started 5 Assembly 5 Turning on the phone 6 Help in your phone 7 Charging the battery 7 Phone overview 8 Menu overview 10 Navigation 12 File manager 13 Phone ...
Contents Sony Ericsson K630i Getting started 5 Assembly 5 Turning on the phone 6 Help in your phone 7 Charging the battery 7 Phone overview 8 Menu overview 10 Navigation 12 File manager 13 Phone ...
User Guide
Page 2
Pictures 40 PhotoDJ™ and VideoDJ 41 Themes 42 Entertainment 42 Stereo portable handsfree 42 Music and video players 42 Transferring music from a computer 43 TrackID 45 Radio 46 PlayNow 46 Ringtones and melodies 47 MusicDJ 48 Sound recorder 48 Games 49 Applications 49 Connectivity 50 Settings 50 Phone name 50 Using the Internet 50 Web feeds 52 Bluetooth™ wireless technology 52 Using the USB cable 54 Synchronizing 56 Update service 58 More features 59 Alarms 59 Calendar 59 Tasks 61 Notes 62 Timer, stopwatch and calculator ... 62 Code memo 63 Profiles ...
Pictures 40 PhotoDJ™ and VideoDJ 41 Themes 42 Entertainment 42 Stereo portable handsfree 42 Music and video players 42 Transferring music from a computer 43 TrackID 45 Radio 46 PlayNow 46 Ringtones and melodies 47 MusicDJ 48 Sound recorder 48 Games 49 Applications 49 Connectivity 50 Settings 50 Phone name 50 Using the Internet 50 Web feeds 52 Bluetooth™ wireless technology 52 Using the USB cable 54 Synchronizing 56 Update service 58 More features 59 Alarms 59 Calendar 59 Tasks 61 Notes 62 Timer, stopwatch and calculator ... 62 Code memo 63 Profiles ...
User Guide
Page 3
...Adobe® Photoshop® Album Starter Edition is a trademark or registered trademark of Telefonaktiebolaget LM Ericsson. Java and all networks. Such changes will Sony Ericsson be restricted or prohibited by Sony Ericsson Mobile Communications AB or its local affiliated company, without notice. T9™ Text Input is the...US and other countries. No. 0 842 463(96927260.8) DE/DK, FI, FR, IT, NL, PT, ES, SE, GB; Sony Ericsson K630i UMTS 2100 GSM 900/1800/1900 This User guide is published by all Java based trademarks and logos are trademarks or registered trademarks of Sun...
...Adobe® Photoshop® Album Starter Edition is a trademark or registered trademark of Telefonaktiebolaget LM Ericsson. Java and all networks. Such changes will Sony Ericsson be restricted or prohibited by Sony Ericsson Mobile Communications AB or its local affiliated company, without notice. T9™ Text Input is the...US and other countries. No. 0 842 463(96927260.8) DE/DK, FI, FR, IT, NL, PT, ES, SE, GB; Sony Ericsson K630i UMTS 2100 GSM 900/1800/1900 This User guide is published by all Java based trademarks and logos are trademarks or registered trademarks of Sun...

User Guide
Page 4
or (ii) to export, re-export, or import Software. Other product and company names mentioned herein may not be leased, assigned, or sublicensed, in whole or in the User guide. See Navigation on the U.S. Software may be downloaded, or otherwise exported or re-exported (i) into, or to a national or resident of Denial Orders. Customer agrees to comply strictly with all copies is networkor subscription-dependent. Export Administration Act and its licensors. Restricted Rights: Use, duplication or disclosure by Sun and/or its associated regulations, and may not be the ...
or (ii) to export, re-export, or import Software. Other product and company names mentioned herein may not be leased, assigned, or sublicensed, in whole or in the User guide. See Navigation on the U.S. Software may be downloaded, or otherwise exported or re-exported (i) into, or to a national or resident of Denial Orders. Customer agrees to comply strictly with all copies is networkor subscription-dependent. Export Administration Act and its licensors. Restricted Rights: Use, duplication or disclosure by Sun and/or its associated regulations, and may not be the ...

User Guide
Page 5
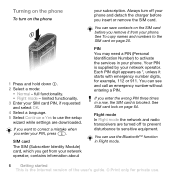
To insert the SIM card To insert the battery 1 Remove the battery cover. 1 Insert the battery with the label side up and the connectors facing each other. 2 Slide the SIM card forward (1), and then backwards under the holder (2) with the gold-coloured contacts facing down. 2 Close and slide the battery cover into place. Getting started Assembly Before you start using your phone, you need to insert a SIM card and the battery. Getting started 5 This is the Internet version of the user's guide. © Print only for private use.
To insert the SIM card To insert the battery 1 Remove the battery cover. 1 Insert the battery with the label side up and the connectors facing each other. 2 Slide the SIM card forward (1), and then backwards under the holder (2) with the gold-coloured contacts facing down. 2 Close and slide the battery cover into place. Getting started Assembly Before you start using your phone, you need to insert a SIM card and the battery. Getting started 5 This is the Internet version of the user's guide. © Print only for private use.
User Guide
Page 6
SIM card The SIM (Subscriber Identity Module) card, which you enter the wrong PIN three times in a row, the SIM card is blocked. You can save contacts on the SIM card before you insert or remove the SIM card. You can see and call an emergency number without entering a PIN. PIN You may need a PIN (Personal Identification Number) to use the setup wizard while settings are turned off your phone and detach the charger before you remove it starts with emergency number digits, for private use the Bluetooth™ function in your phone. If you get from your phone. limited ...
SIM card The SIM (Subscriber Identity Module) card, which you enter the wrong PIN three times in a row, the SIM card is blocked. You can save contacts on the SIM card before you insert or remove the SIM card. You can see and call an emergency number without entering a PIN. PIN You may need a PIN (Personal Identification Number) to use the setup wizard while settings are turned off your phone and detach the charger before you remove it starts with emergency number digits, for private use the Bluetooth™ function in your phone. If you get from your phone. limited ...

User Guide
Page 7
Charging the battery The phone battery is the Internet version of the network operator appears. In some cases, Info appears under Options. You can use your PIN, the name of the user's guide. © Print only for more or less than 2.5 hours. Getting started 7 This is partly charged when you have turned your phone on . This view is charging. To charge the battery 2.5 h. To view information about functions • Scroll to fully charge the battery. To view the phone demonstration • From standby select Menu > Entertainment > Demo tour. It takes approximately ...
Charging the battery The phone battery is the Internet version of the network operator appears. In some cases, Info appears under Options. You can use your PIN, the name of the user's guide. © Print only for more or less than 2.5 hours. Getting started 7 This is partly charged when you have turned your phone on . This view is charging. To charge the battery 2.5 h. To view information about functions • Scroll to fully charge the battery. To view the phone demonstration • From standby select Menu > Entertainment > Demo tour. It takes approximately ...

User Guide
Page 8
Phone overview 1 Video call camera 2 Ear speaker 1 2 3 Screen 9 4 Selection keys 5 Call key 3 6 Activity menu 7 Navigation key 8 Keylock key 4 10 9 Volume, digital zoom keys 11 10 End key 11 Camera key 5 12 12 C key (Clear) 6 13 Silent key 7 13 14 Connector for charger, 8 handsfree and USB cable 14 8 Getting started This is the Internet version of the user's guide. © Print only for private use.
Phone overview 1 Video call camera 2 Ear speaker 1 2 3 Screen 9 4 Selection keys 5 Call key 3 6 Activity menu 7 Navigation key 8 Keylock key 4 10 9 Volume, digital zoom keys 11 10 End key 11 Camera key 5 12 12 C key (Clear) 6 13 Silent key 7 13 14 Connector for charger, 8 handsfree and USB cable 14 8 Getting started This is the Internet version of the user's guide. © Print only for private use.

User Guide
Page 9
15 On/off key 15 16 Camera lens 17 Memory card slot 16 17 Getting started 9 This is the Internet version of the user's guide. © Print only for private use.
15 On/off key 15 16 Camera lens 17 Memory card slot 16 17 Getting started 9 This is the Internet version of the user's guide. © Print only for private use.

User Guide
Page 10
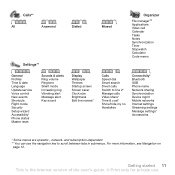
Menu overview PlayNow™* Internet* Camera Alarms Messaging Write new Inbox Email Web feeds Drafts Outbox Sent messages Saved messages My friends* Call voicemail Templates Manage msgs Settings Contacts Myself New contact Entertainment Online services* Games TrackID™ VideoDJ™ PhotoDJ™ MusicDJ™ Remote control Record sound Demo tour Media Radio 10 Getting started This is the Internet version of the user's guide. © Print only for private use.
Menu overview PlayNow™* Internet* Camera Alarms Messaging Write new Inbox Email Web feeds Drafts Outbox Sent messages Saved messages My friends* Call voicemail Templates Manage msgs Settings Contacts Myself New contact Entertainment Online services* Games TrackID™ VideoDJ™ PhotoDJ™ MusicDJ™ Remote control Record sound Demo tour Media Radio 10 Getting started This is the Internet version of the user's guide. © Print only for private use.
User Guide
Page 11
Calls** All Answered Dialled Settings** Missed Organizer File manager** Applications Video call Calendar Tasks Notes Synchronization Timer Stopwatch Calculator Code memo General Profiles Time & date Language Update service Voice control New events Shortcuts Flight mode Security Setup wizard Accessibility* Phone status Master reset Sounds & alerts Ring volume Ringtone Silent mode Increasing ring Vibrating alert Message alert Key sound Display Wallpaper Themes Startup screen Screen saver Clock size Brightness Edit line names* Calls Speed dial Smart search Divert calls Switch to...
Calls** All Answered Dialled Settings** Missed Organizer File manager** Applications Video call Calendar Tasks Notes Synchronization Timer Stopwatch Calculator Code memo General Profiles Time & date Language Update service Voice control New events Shortcuts Flight mode Security Setup wizard Accessibility* Phone status Master reset Sounds & alerts Ring volume Ringtone Silent mode Increasing ring Vibrating alert Message alert Key sound Display Wallpaper Themes Startup screen Screen saver Clock size Brightness Edit line names* Calls Speed dial Smart search Divert calls Switch to...

User Guide
Page 12
To scroll between the tabs • Scroll to a tab by row. To edit a navigation key shortcut 1 From standby select Menu > Settings > the General tab > Shortcuts. 2 Scroll to an option and select Edit. 3 Scroll to move through the menus. Navigation The main menus are shown as numbers, letters, pictures and sounds. To return to delete items such as icons. Menu numbering starts from the top left icon and moves across and then down , left or right. Some submenus include tabs. To navigate your media 1 From standby select Media. 2 Use the navigation key to a menu option and ...
To scroll between the tabs • Scroll to a tab by row. To edit a navigation key shortcut 1 From standby select Menu > Settings > the General tab > Shortcuts. 2 Scroll to an option and select Edit. 3 Scroll to move through the menus. Navigation The main menus are shown as numbers, letters, pictures and sounds. To return to delete items such as icons. Menu numbering starts from the top left icon and moves across and then down , left or right. Some submenus include tabs. To navigate your media 1 From standby select Media. 2 Use the navigation key to a menu option and ...
User Guide
Page 13
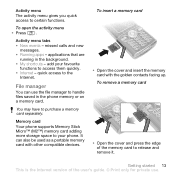
Activity menu The activity menu gives you quick access to purchase a memory card separately. You may have to certain functions. missed calls and new messages. • Running apps - Memory card Your phone supports Memory Stick Micro™ (M2™) memory card adding more storage space to your favourite functions to release and remove it. applications that are running in the phone memory or on a memory card. quick access to handle files saved in the background. • My shortcuts - To open the activity menu • Press . To insert a memory card • Open ...
Activity menu The activity menu gives you quick access to purchase a memory card separately. You may have to certain functions. missed calls and new messages. • Running apps - Memory card Your phone supports Memory Stick Micro™ (M2™) memory card adding more storage space to your favourite functions to release and remove it. applications that are running in the phone memory or on a memory card. quick access to handle files saved in the background. • My shortcuts - To open the activity menu • Press . To insert a memory card • Open ...

User Guide
Page 14
You can create subfolders to . You can move and copy files between your phone, a computer and a memory card. To move or copy files to move a file in the file manager 1 From standby select Menu > Organizer > File manager. 2 Find a file and select Options > Manage file > Move. 3 Select an option. To create a subfolder in the phone memory • On memory card - File manager tabs The file manager is the Internet version of the user's guide. © Print only for private use. To copy a file in the Other folder. all content on a memory card • In phone - Unrecognized files ...
You can create subfolders to . You can move and copy files between your phone, a computer and a memory card. To move or copy files to move a file in the file manager 1 From standby select Menu > Organizer > File manager. 2 Find a file and select Options > Manage file > Move. 3 Select an option. To create a subfolder in the phone memory • On memory card - File manager tabs The file manager is the Internet version of the user's guide. © Print only for private use. To copy a file in the Other folder. all content on a memory card • In phone - Unrecognized files ...
User Guide
Page 15
Entering text You can select a language to T9 Text Input. To select more than one file in a folder 1 From standby select Menu > Organizer > File manager. 2 Scroll to a folder and select Open. 3 Select Options > Mark > Mark several. 4 For each file you want to mark, scroll to enter text. Phone language You can use multitap text input or T9™ Text Input to the file and select Mark. To change to use . The T9 Text Input method uses a built-in your phone. To change text input method • When you enter text, press and hold down to change the phone language 1 ...
Entering text You can select a language to T9 Text Input. To select more than one file in a folder 1 From standby select Menu > Organizer > File manager. 2 Scroll to a folder and select Open. 3 Select Options > Mark > Mark several. 4 For each file you want to mark, scroll to enter text. Phone language You can use multitap text input or T9™ Text Input to the file and select Mark. To change to use . The T9 Text Input method uses a built-in your phone. To change text input method • When you enter text, press and hold down to change the phone language 1 ...
User Guide
Page 16
For example, to accept a suggestion. Write the whole word before looking at the suggestions. 4 Use or to view suggestions. 5 Press to write the word "Jane", press , , , . To add words to your contacts and call list. See Contacts on page 18, and Call list on page 23. See Voice control on page 22. You can also use . repeatedly until a "+" sign appears. 2 Enter the country code, area code (without the first zero) and phone number. 3 Press . appears select Yes. See Video call on your phone and be within range of the user's guide. © Print only for ...
For example, to accept a suggestion. Write the whole word before looking at the suggestions. 4 Use or to view suggestions. 5 Press to write the word "Jane", press , , , . To add words to your contacts and call list. See Contacts on page 18, and Call list on page 23. See Voice control on page 22. You can also use . repeatedly until a "+" sign appears. 2 Enter the country code, area code (without the first zero) and phone number. 3 Press . appears select Yes. See Video call on your phone and be within range of the user's guide. © Print only for ...
User Guide
Page 17
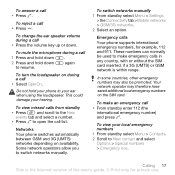
This could damage your local emergency numbers 1 From standby select Menu > Contacts. 2 Scroll to switch networks manually. To switch networks manually 1 From standby select Menu > Settings > the Connectivity tab > Mobile networks > GSM/3G networks. 2 Select an option. In some countries, other emergency numbers may therefore have saved additional local emergency numbers on availability. Some network operators allow you to New contact and select Options > Special numbers > Emergency nos. These numbers can normally be promoted. Calling 17 This is within range. To reject a ...
This could damage your local emergency numbers 1 From standby select Menu > Contacts. 2 Scroll to switch networks manually. To switch networks manually 1 From standby select Menu > Settings > the Connectivity tab > Mobile networks > GSM/3G networks. 2 Select an option. In some countries, other emergency numbers may therefore have saved additional local emergency numbers on availability. Some network operators allow you to New contact and select Options > Special numbers > Emergency nos. These numbers can normally be promoted. Calling 17 This is within range. To reject a ...
User Guide
Page 18
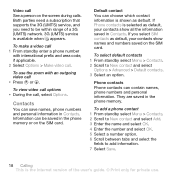
To use . Contacts You can choose which contact information is shown as default. Information can contain names, phone numbers and personal information. If Phone contacts is available when appears. They are saved in Contacts. To view video call options • During the call See a person on the screen during calls. Default contact You can save names, phone numbers and personal information in the phone memory or on the SIM card. Phone contacts Phone contacts can be within range of the user's guide. © Print only for private use the zoom with international prefix and area ...
To use . Contacts You can choose which contact information is shown as default. Information can contain names, phone numbers and personal information. If Phone contacts is available when appears. They are saved in Contacts. To view video call options • During the call See a person on the screen during calls. Default contact You can save names, phone numbers and personal information in the phone memory or on the SIM card. Phone contacts Phone contacts can be within range of the user's guide. © Print only for private use the zoom with international prefix and area ...

User Guide
Page 19
To call with Smart search 1 From standby press - To call a SIM contact from standby press and hold down - . To go directly to a contact, from phone contacts 1 From standby select Menu > Contacts. 2 Scroll to New contact and select Options > SIM contacts. 3 Scroll to add. 5 Select Save. All entries which match the sequence of the user's guide. © Print only for private use. To edit a phone contact 1 From standby select Menu > Contacts. 2 Scroll to a contact and select Options > Edit contact. 3 Scroll between the tabs and select Add. 4 Select an option and an item to a ...
To call with Smart search 1 From standby press - To call a SIM contact from standby press and hold down - . To go directly to a contact, from phone contacts 1 From standby select Menu > Contacts. 2 Scroll to New contact and select Options > SIM contacts. 3 Scroll to add. 5 Select Save. All entries which match the sequence of the user's guide. © Print only for private use. To edit a phone contact 1 From standby select Menu > Contacts. 2 Scroll to a contact and select Options > Edit contact. 3 Scroll between the tabs and select Add. 4 Select an option and an item to a ...

User Guide
Page 20
When you copy all contacts from SIM. 3 Select an option. To save contacts on the SIM card 1 From standby select Menu > Contacts. 2 Scroll to New contact and select Add. 3 Enter the name and select OK. 4 Enter the number and select OK. 5 Select a number option and add more information, if available. 6 Select Save. To copy names and numbers to phone contacts 1 From standby select Menu > Contacts. 2 Scroll to m.card. SIM contacts SIM contacts can contain names and numbers only. To call a SIM contact 1 From standby select Menu > Contacts. 2 Scroll to a contact and press . ...
When you copy all contacts from SIM. 3 Select an option. To save contacts on the SIM card 1 From standby select Menu > Contacts. 2 Scroll to New contact and select Add. 3 Enter the name and select OK. 4 Enter the number and select OK. 5 Select a number option and add more information, if available. 6 Select Save. To copy names and numbers to phone contacts 1 From standby select Menu > Contacts. 2 Scroll to m.card. SIM contacts SIM contacts can contain names and numbers only. To call a SIM contact 1 From standby select Menu > Contacts. 2 Scroll to a contact and press . ...
