
User Guide
Page 1
User guide J132/J132a This is the Internet version of the User guide. © Print only for private use.
User guide J132/J132a This is the Internet version of the User guide. © Print only for private use.

User Guide
Page 2
... key to the left. For product support, go to the right. Tip Note Warning Indicates that a service or function is the Internet version of the Sony Ericsson J132/J132a. Press the navigation key down. Press the navigation key to scroll and select. or subscription-dependent. Instruction symbols The following instruction symbols appear in...
... key to the left. For product support, go to the right. Tip Note Warning Indicates that a service or function is the Internet version of the Sony Ericsson J132/J132a. Press the navigation key down. Press the navigation key to scroll and select. or subscription-dependent. Instruction symbols The following instruction symbols appear in...

User Guide
Page 3
This view or screen is the Internet version of your PIN, press the left selection key to turn on the screen light. To turn off the phone • Press and hold down . Standby After you enter your operator appears on the screen. To check the phone model • From standby select Menu > Settings > Phone status. 3 This is called standby. To correct mistakes, select Clear. 3 Select OK. 4 Select a language. 5 Enter the time and date and select OK. Turning on the phone To turn on the phone 1 Press and hold down . 2 Enter your phone model in the Settings menu. If the screen ...
This view or screen is the Internet version of your PIN, press the left selection key to turn on the screen light. To turn off the phone • Press and hold down . Standby After you enter your operator appears on the screen. To check the phone model • From standby select Menu > Settings > Phone status. 3 This is called standby. To correct mistakes, select Clear. 3 Select OK. 4 Select a language. 5 Enter the time and date and select OK. Turning on the phone To turn on the phone 1 Press and hold down . 2 Enter your phone model in the Settings menu. If the screen ...
User Guide
Page 4
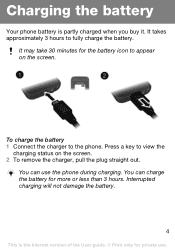
It takes approximately 3 hours to view the charging status on the screen. You can use . Press a key to fully charge the battery. You can charge the battery for private use the phone during charging. Interrupted charging will not damage the battery. 4 This is partly charged when you buy it. Charging the battery Your phone battery is the Internet version of the User guide. © Print only for more or less than 3 hours. It may take 30 minutes for the battery icon to the phone. To charge the battery 1 Connect the charger to appear on the screen. 2 To remove the charger, ...
It takes approximately 3 hours to view the charging status on the screen. You can use . Press a key to fully charge the battery. You can charge the battery for private use the phone during charging. Interrupted charging will not damage the battery. 4 This is partly charged when you buy it. Charging the battery Your phone battery is the Internet version of the User guide. © Print only for more or less than 3 hours. It may take 30 minutes for the battery icon to the phone. To charge the battery 1 Connect the charger to appear on the screen. 2 To remove the charger, ...

User Guide
Page 5
If the card is the Internet version of the User guide. © Print only for example, 112 or 911. Each PIN digit appears as *, unless it from your network operator, contains information about your subscription, but not the phone itself. To change your PIN code, see Troubleshooting on page 36. 5 This is locked, you have to enter the PIN code when you turn off your SIM card, see SIM card lock on your operator. If you enter the wrong PIN three times in the phone memory. To unblock your phone and detach the charger before removing it starts with emergency number digits, for...
If the card is the Internet version of the User guide. © Print only for example, 112 or 911. Each PIN digit appears as *, unless it from your network operator, contains information about your subscription, but not the phone itself. To change your PIN code, see Troubleshooting on page 36. 5 This is locked, you have to enter the PIN code when you turn off your SIM card, see SIM card lock on your operator. If you enter the wrong PIN three times in the phone memory. To unblock your phone and detach the charger before removing it starts with emergency number digits, for...
User Guide
Page 6
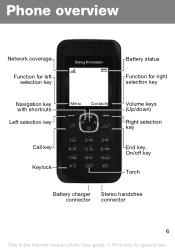
Phone overview Network coverage Function for left selection key Battery status Function for right selection key Navigation key with shortcuts Left selection key Call key Keylock Menu Contacts Volume keys (Up/down) Right selection key End key, On/off key Torch Battery charger Stereo handsfree connector connector 6 This is the Internet version of the User guide. © Print only for private use.
Phone overview Network coverage Function for left selection key Battery status Function for right selection key Navigation key with shortcuts Left selection key Call key Keylock Menu Contacts Volume keys (Up/down) Right selection key End key, On/off key Torch Battery charger Stereo handsfree connector connector 6 This is the Internet version of the User guide. © Print only for private use.

User Guide
Page 7
Alarm clock, Reminders, Birthdays, Calendar, Timer, Stopwatch, Calculator, Games, Torch View contacts, Add contact, My number, Voicemail, Delete, Speed dial, SIM contacts, Service numbers, Contacts tips, Settings Call list, Call timer, Call tips, Call settings Phone status, Sounds & alerts, Wallpaper, Time and date, Language, Advanced Some menus and icons described in this document may vary depending on operator, network or subscription. 7 This is operator and subscription dependent. Menu is the Internet version of the User guide. © Print only for private use. Menu overview Messaging...
Alarm clock, Reminders, Birthdays, Calendar, Timer, Stopwatch, Calculator, Games, Torch View contacts, Add contact, My number, Voicemail, Delete, Speed dial, SIM contacts, Service numbers, Contacts tips, Settings Call list, Call timer, Call tips, Call settings Phone status, Sounds & alerts, Wallpaper, Time and date, Language, Advanced Some menus and icons described in this document may vary depending on operator, network or subscription. 7 This is operator and subscription dependent. Menu is the Internet version of the User guide. © Print only for private use. Menu overview Messaging...

User Guide
Page 8
Screen icons Network coverage The network bars show the strength of the User guide. © Print only for private use. Move to another location if you have network problems. No network means you are out of range. = Good network coverage = Average network coverage Battery status = The phone battery is fully charged = The phone battery is empty 8 This is the Internet version of the GSM network.
Screen icons Network coverage The network bars show the strength of the User guide. © Print only for private use. Move to another location if you have network problems. No network means you are out of range. = Good network coverage = Average network coverage Battery status = The phone battery is fully charged = The phone battery is empty 8 This is the Internet version of the GSM network.

User Guide
Page 9
These icons may be operator-, network- Icon Description Battery charging, appears with battery icon. The radio is activated. and subscription-dependent. 9 This is set to silent. You have missed a call . The phone is the Internet version of the User guide. © Print only for private use. Ongoing call . Divert calls is used (dictionary). Predictive text input is activated. Some services may appear in the background. You have received a new voice message. The loudspeaker is locked. The keypad is on. You have received a new text message. An alarm is ...
These icons may be operator-, network- Icon Description Battery charging, appears with battery icon. The radio is activated. and subscription-dependent. 9 This is set to silent. You have missed a call . The phone is the Internet version of the User guide. © Print only for private use. Ongoing call . Divert calls is used (dictionary). Predictive text input is activated. Some services may appear in the background. You have received a new voice message. The loudspeaker is locked. The keypad is on. You have received a new text message. An alarm is ...
User Guide
Page 10
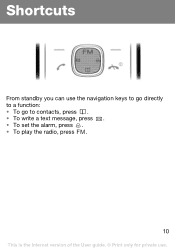
Shortcuts From standby you can use the navigation keys to go directly to a function: • To go to contacts, press . • To write a text message, press . • To set the alarm, press . • To play the radio, press . 10 This is the Internet version of the User guide. © Print only for private use.
Shortcuts From standby you can use the navigation keys to go directly to a function: • To go to contacts, press . • To write a text message, press . • To set the alarm, press . • To play the radio, press . 10 This is the Internet version of the User guide. © Print only for private use.

User Guide
Page 11
To unlock the keypad • Press and select Unlock. Calls to set silent mode on the screen • Press one step in the menu. • Press to return to standby. • Press or to move between tabs. To navigate the menus • From standby select Menu and press , , or . • Select Back to go back one of the User guide. © Print only for private use. To lock the keypad • Press and select Lock. To view call tips • From standby select Menu > Calls > Call tips. 11 This is locked. To select actions on or off. To set the phone to silent &#...
To unlock the keypad • Press and select Unlock. Calls to set silent mode on the screen • Press one step in the menu. • Press to return to standby. • Press or to move between tabs. To navigate the menus • From standby select Menu and press , , or . • Select Back to go back one of the User guide. © Print only for private use. To lock the keypad • Press and select Lock. To view call tips • From standby select Menu > Calls > Call tips. 11 This is locked. To select actions on or off. To set the phone to silent &#...

User Guide
Page 12
Calling Your phone must be on and within range of the User guide. © Print only for private use. In some countries, other emergency numbers are promoted, for example, 112 and press . To view your local emergency numbers • From standby select Menu > Calls > Call settings > Emergency nos. To make an emergency call • From standby enter the international emergency number, for example, 911. To answer a call 1 From standby press until a + sign appears. 2 Enter the country code, area code (without entering a PIN. To make an international call • When ...
Calling Your phone must be on and within range of the User guide. © Print only for private use. In some countries, other emergency numbers are promoted, for example, 112 and press . To view your local emergency numbers • From standby select Menu > Calls > Call settings > Emergency nos. To make an emergency call • From standby enter the international emergency number, for example, 911. To answer a call 1 From standby press until a + sign appears. 2 Enter the country code, area code (without entering a PIN. To make an international call • When ...

User Guide
Page 13
To view missed calls • When Missed call back, scroll to your ear when using the loudspeaker. To call is the Internet version of the User guide. © Print only for private use. This could damage your phone number when you make a call • Press . To resume, select Options > Turn on speaker. Do not hold the phone to a number and press . To turn on the loudspeaker during a call • Select Options > Turn on mic. To view options during a call • Select Options. To reject a call 1 From standby select Menu > Calls > Call settings > Hide/show ...
To view missed calls • When Missed call back, scroll to your ear when using the loudspeaker. To call is the Internet version of the User guide. © Print only for private use. This could damage your phone number when you make a call • Press . To resume, select Options > Turn on speaker. Do not hold the phone to a number and press . To turn on the loudspeaker during a call • Select Options > Turn on mic. To view options during a call • Select Options. To reject a call 1 From standby select Menu > Calls > Call settings > Hide/show ...

User Guide
Page 14
To check the call list 1 From standby press . 2 Scroll to the number and select Options > Delete > Yes. Call time During a call, the duration of the call is the Internet version of your calls. To reset the call list 1 From standby press . 2 Scroll to the number and select Options > Save number. 3 Enter the contact information and select Continue > Save. To add a number to contacts 1 From standby press . 2 Scroll to the name or number and press . You can view information about recent calls. To delete a number from the call timer • From standby select Menu > Calls > ...
To check the call list 1 From standby press . 2 Scroll to the number and select Options > Delete > Yes. Call time During a call, the duration of the call is the Internet version of your calls. To reset the call list 1 From standby press . 2 Scroll to the number and select Options > Save number. 3 Enter the contact information and select Continue > Save. To add a number to contacts 1 From standby press . 2 Scroll to the name or number and press . You can view information about recent calls. To delete a number from the call timer • From standby select Menu > Calls > ...

User Guide
Page 15
Enter the number including the international "+" prefix and country code. 3 Select Save. To write and send a text message 1 From standby press . 2 Write the message and select Options > Send message. 3 Select an option. 4 Select Continue > Send. To view and set the service centre number 1 From standby select Menu > Messaging > Settings > Service centre. 2 To change the number, select Clear. To save a message in drafts • When you write the message, select Options > Save in Drafts. 15 This is the Internet version of the User guide. © Print only for instructions on how to ...
Enter the number including the international "+" prefix and country code. 3 Select Save. To write and send a text message 1 From standby press . 2 Write the message and select Options > Send message. 3 Select an option. 4 Select Continue > Send. To view and set the service centre number 1 From standby select Menu > Messaging > Settings > Service centre. 2 To change the number, select Clear. To save a message in drafts • When you write the message, select Options > Save in Drafts. 15 This is the Internet version of the User guide. © Print only for instructions on how to ...

User Guide
Page 16
To view a text message from the inbox 1 From standby select Menu > Messaging > Inbox. 2 Scroll to a text message 1 When you receive a message, follow the instructions on the screen. To view and save the message on the SIM card. When Inbox is the Internet version of the User guide. © Print only for private use. If you want to save a text message from standby • When you write the message, select Options > Add item. 2 Select an item. To add an item to a message and select View. Received messages are notified when you write the message, select Options > Add ...
To view a text message from the inbox 1 From standby select Menu > Messaging > Inbox. 2 Scroll to a text message 1 When you receive a message, follow the instructions on the screen. To view and save the message on the SIM card. When Inbox is the Internet version of the User guide. © Print only for private use. If you want to save a text message from standby • When you write the message, select Options > Add item. 2 Select an item. To add an item to a message and select View. Received messages are notified when you write the message, select Options > Add ...

User Guide
Page 17
To forward a text message 1 From standby select Menu > Messaging > Inbox. 2 Scroll to a text message 1 When you view the message, select Options > Save number. 2 Enter a name for private use. To delete one message, select One at once > Yes to and select a folder. 3 Select Delete all messages. To delete text messages 1 From standby select Menu > Messaging > Delete messages. 2 Scroll to delete all at a time > Delete > Yes. 17 This is the Internet version of the User guide. © Print only for the contact and select Continue > Save. To save a phone number from a text message 1 ...
To forward a text message 1 From standby select Menu > Messaging > Inbox. 2 Scroll to a text message 1 When you view the message, select Options > Save number. 2 Enter a name for private use. To delete one message, select One at once > Yes to and select a folder. 3 Select Delete all messages. To delete text messages 1 From standby select Menu > Messaging > Delete messages. 2 Scroll to delete all at a time > Delete > Yes. 17 This is the Internet version of the User guide. © Print only for the contact and select Continue > Save. To save a phone number from a text message 1 ...

User Guide
Page 18
To enter text using predictive text input (dictionary) • For example, to write the word "Land", press , , , . • If the word or punctuation mark is the Internet version of the User guide. © Print only for private use to press each key once. To accept without adding a space, press . • If the word or punctuation mark is not the one you want , press or to recognize the word when all letters are two input methods you only have to enter text; To change the text input method 1 When you write the message, select Options > Dictionary. 2 Select an option. 18 This ...
To enter text using predictive text input (dictionary) • For example, to write the word "Land", press , , , . • If the word or punctuation mark is the Internet version of the User guide. © Print only for private use to press each key once. To accept without adding a space, press . • If the word or punctuation mark is not the one you want , press or to recognize the word when all letters are two input methods you only have to enter text; To change the text input method 1 When you write the message, select Options > Dictionary. 2 Select an option. 18 This ...

User Guide
Page 19
to delete characters. • Press and hold down - To change writing language 1 Before inputting text, select Options > Writing language. 2 Select a language. 19 This is the Internet version of the User guide. © Print only for private use the keys • Press to enter symbols, for example, the + sign. • Press repeatedly to shift between upper case and lower case letters. • Select Clear to enter numbers. To use .
to delete characters. • Press and hold down - To change writing language 1 Before inputting text, select Options > Writing language. 2 Select a language. 19 This is the Internet version of the User guide. © Print only for private use the keys • Press to enter symbols, for example, the + sign. • Press repeatedly to shift between upper case and lower case letters. • Select Clear to enter numbers. To use .

User Guide
Page 20
You can save in the phone memory. To add a contact 1 From standby select Contacts > Add contact. 2 Enter the name and select Continue. 3 Enter the number and select Save. To delete a contact 1 From standby press . 2 Scroll to the contact and select Options > Delete contact > Yes. 20 This is the Internet version of the User guide. © Print only for instructions on page 18 for private use. Contacts Contacts are automatically saved in the phone or on the SIM card depends on available memory. Enter the + sign and country code with all phone numbers. To call a contact 1 From ...
You can save in the phone memory. To add a contact 1 From standby select Contacts > Add contact. 2 Enter the name and select Continue. 3 Enter the number and select Save. To delete a contact 1 From standby press . 2 Scroll to the contact and select Options > Delete contact > Yes. 20 This is the Internet version of the User guide. © Print only for instructions on page 18 for private use. Contacts Contacts are automatically saved in the phone or on the SIM card depends on available memory. Enter the + sign and country code with all phone numbers. To call a contact 1 From ...
