User Guide
Page 5
Table of Call Divert 17 11 Cancelling Call Divert 17 LZT 126 1343/x R1A iii Rejecting a Call 6 About Recalling Phone Num- Attaching Battery 3. Connecting 1 Call on SIM Card 6 Storing Numbers in Phone's 6 Memory Making Your Personal Ring 9 Signal 15 About the Phone's Note...to Mains 2 Muting Microphone 8 Ring Volume 13 About the Charging Function 3 Using Phone as Scratch Pad 8 About Ring Type 13 About the Battery Sending Viewing the Clock 14 and the SIM Card 3 Tone Signals 8 Setting Clock 14 Turning On the Phone and General Information Checking 3 ...
Table of Call Divert 17 11 Cancelling Call Divert 17 LZT 126 1343/x R1A iii Rejecting a Call 6 About Recalling Phone Num- Attaching Battery 3. Connecting 1 Call on SIM Card 6 Storing Numbers in Phone's 6 Memory Making Your Personal Ring 9 Signal 15 About the Phone's Note...to Mains 2 Muting Microphone 8 Ring Volume 13 About the Charging Function 3 Using Phone as Scratch Pad 8 About Ring Type 13 About the Battery Sending Viewing the Clock 14 and the SIM Card 3 Tone Signals 8 Setting Clock 14 Turning On the Phone and General Information Checking 3 ...

User Guide
Page 7
... the SIM Card slot. Figure 2. q Connect the charger to the mains. 1. Make sure the battery is pushed in. Figure 1. The SIM release button will slide towards you handle the battery. Slide the SIM release button towards the antenna as the SIM Card is removed. 2. LZT 126 1343.../x R1A 2. Removing SIM Card. 1 Assemble and Charge - Removing SIM Card 1. Inserting SIM Card 2. Four Steps q Insert the SIM Card. q Attach the battery. Inserting SIM Card Place the SIM Card with the golden connectors facing down and the cut corner turned to the left (see Figure 2). 3.
... the SIM Card slot. Figure 2. q Connect the charger to the mains. 1. Make sure the battery is pushed in. Figure 1. The SIM release button will slide towards you handle the battery. Slide the SIM release button towards the antenna as the SIM Card is removed. 2. LZT 126 1343.../x R1A 2. Removing SIM Card. 1 Assemble and Charge - Removing SIM Card 1. Inserting SIM Card 2. Four Steps q Insert the SIM Card. q Attach the battery. Inserting SIM Card Place the SIM Card with the golden connectors facing down and the cut corner turned to the left (see Figure 2). 3.

User Guide
Page 8
... To mains Figure 3. Connecting and disconnecting charger. 4. Connecting Charger to charge the battery and you hear a click (see Figure 5). 1. 2. 2. Press the locking catch on top of the battery (see the battery meter in Figure 5. The phone now starts to Mains Plug the charger into a ... Charger Lift the plug up and away from the phone. Removing battery. 3. Attaching battery. 2 Figure 4. Figure 5. Lift the battery up and pull it out (see Figure 3). 1. 2. Connecting Charger to Phone Have the battery attached to the phone and connect the charger as described in the...
... To mains Figure 3. Connecting and disconnecting charger. 4. Connecting Charger to charge the battery and you hear a click (see Figure 5). 1. 2. 2. Press the locking catch on top of the battery (see the battery meter in Figure 5. The phone now starts to Mains Plug the charger into a ... Charger Lift the plug up and away from the phone. Removing battery. 3. Attaching battery. 2 Figure 4. Figure 5. Lift the battery up and pull it out (see Figure 3). 1. 2. Connecting Charger to Phone Have the battery attached to the phone and connect the charger as described in the...

User Guide
Page 9
... ordered from the service provider, and your phone book information. Your SIM Card is shown (see Figure 6). When you are charging the battery you can start using your phone, you need to enter into the language of the phone flashes green once every second and the standby... display is supplied with a Nickel Metal Hydride battery. About the Battery and the SIM Card The Battery Your phone is indicated as normal; Turning On the Phone and General Information This chapter describes the display information you...
... ordered from the service provider, and your phone book information. Your SIM Card is shown (see Figure 6). When you are charging the battery you can start using your phone, you need to enter into the language of the phone flashes green once every second and the standby... display is supplied with a Nickel Metal Hydride battery. About the Battery and the SIM Card The Battery Your phone is indicated as normal; Turning On the Phone and General Information This chapter describes the display information you...

User Guide
Page 10
...that you have received a short text message or area information. That you have received messages. Table 1. Whether line 1 or 2 is lit. Battery The current battery strength - About the Display Your phone display will sound when the phone is ringing. Table 1 explains what each icon means. The received signal ...to the line that no ring signal will help you to: q Verify that you are engaged in five steps, depending on your battery status. All icons may not be visible at the Display The picture below shows how the display looks when the entire icon row ...
...that you have received a short text message or area information. That you have received messages. Table 1. Whether line 1 or 2 is lit. Battery The current battery strength - About the Display Your phone display will sound when the phone is ringing. Table 1 explains what each icon means. The received signal ...to the line that no ring signal will help you to: q Verify that you are engaged in five steps, depending on your battery status. All icons may not be visible at the Display The picture below shows how the display looks when the entire icon row ...

User Guide
Page 11
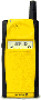
Microphone (inside) 6. 8. SIM release button 13. Charging connector 11. Phone clip 9. 13. 12. 11. 10. Figure 9. Earpiece 4. 4. Display 5. 6. Flip 9. Learning about Your Phone The parts list corresponds to Figures 8 and 9: 1. 2. 1. Battery 8. 12. Antenna 3. 2. Keypad 7. Status light 3. LZT 126 1343/x R1A Figure 8. Semi-back view of your phone. 5 Volume keys 5. Microphone channel 7. 10. Front view of your phone.
Microphone (inside) 6. 8. SIM release button 13. Charging connector 11. Phone clip 9. 13. 12. 11. 10. Figure 9. Earpiece 4. 4. Display 5. 6. Flip 9. Learning about Your Phone The parts list corresponds to Figures 8 and 9: 1. 2. 1. Battery 8. 12. Antenna 3. 2. Keypad 7. Status light 3. LZT 126 1343/x R1A Figure 8. Semi-back view of your phone. 5 Volume keys 5. Microphone channel 7. 10. Front view of your phone.
User Guide
Page 32
... off Answering calls Antenna Area information about activating adding codes changing codes erasing codes Assembly Assembly instructions Autolock B Barring calls about activating cancelling Battery about attaching removing status Battery icon Busy tone LZT 126 1343/x R1A C Call wait Calling line identification Calls 14 answering 14 barring 14 diverting, about 6 duration 5 emergency 23...
... off Answering calls Antenna Area information about activating adding codes changing codes erasing codes Assembly Assembly instructions Autolock B Barring calls about activating cancelling Battery about attaching removing status Battery icon Busy tone LZT 126 1343/x R1A C Call wait Calling line identification Calls 14 answering 14 barring 14 diverting, about 6 duration 5 emergency 23...


