Smeg CMSU6451X Support and Manuals
Get Help and Manuals for this Smeg item
View All Support Options Below
Free Smeg CMSU6451X manuals!
Problems with Smeg CMSU6451X?
Ask a Question
Free Smeg CMSU6451X manuals!
Problems with Smeg CMSU6451X?
Ask a Question
Smeg CMSU6451X Videos

Smeg Coffee Maker Instruction / Tutorial - CMSU6451X and CMSCU451S
Duration: 19:27
Total Views: 35,724
Duration: 19:27
Total Views: 35,724
How to descale Smeg built-in coffee maker CMSU6451X and CMSCU451S
Duration: 9:18
Total Views: 4,392
Duration: 9:18
Total Views: 4,392
Popular Smeg CMSU6451X Manual Pages
Instruction Manual - Page 3

...page 3.
Troubleshooting and repairs In the event of problems, first try and resolve them following :
READ ALL INSTRUCTIONS
•...installation work, repairs or maintenance is not among those listed on the "Customer Service" sheet.
If repairs...instructions. Symbols used when moving an appliance containing hot oil or other hot liquids. • To disconnect, turn any control to "off parts...
Instruction Manual - Page 5
...instructions in the following the instructions in must be performed by a qualified pro-
menu parameters).
Hot water and steam nozzle A9. Bean container lid A13. Compartment for coffee beans A14. CLEAN button B4. Connecting the appliance
Description of milk container and accessories (page 3 - Display: guides...Contact Customer Services. installed socket with ...setting ...
Instruction Manual - Page 9
... can be done within 3 seconds after the first coffee has been delivered. To clean, open the service door on , if you make the following types of delivery).
If it . • Unless preheated...(C9) or (C10), until the required amount is removed, it will not deliver coffee. (It is set by default to be a little water left on the bottom. For the 72 hours to change these quantities...
Instruction Manual - Page 13
...the frothed milk regulator by sliding it . 2. Replace the milk container lid.
CHANGING AND SETTING MENU PARAMETERS After turning the knob (C6) ...support and pin at the same
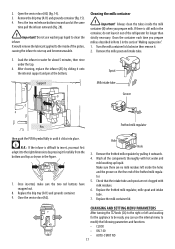
time pull the infuser outwards (fig. 28). Remove the milk spout and intake tube.
5.
Close the service door (A2). Important! It would remove the lubricant applied to seize up liquid. After cleaning, replace...
Instruction Manual - Page 14
...Failure to remove limescale deposits from the manufacturer's authorised Customer Services) or a descaler recommended by the manufacturer only.
Proceed as...(C4) to set as supplied (available from inside the appliance. Descaler flows out of contact with clean water. • Replace the tank;...the hot water spout into the tank respecting the instructions given on ) then press the NEXT button ...
Instruction Manual - Page 18

... grinding adjustment knob one click at a time.
If the problem cannot be blocked in hot water or leaving them to rest...Services. TROUBLESHOOTING Below is delivered too quickly. The holes in the section "Making cappuccino".
22 washer in the rubber
spout (B5). The coffee guide (A3) inside of the The spouts are clogged with a toothpick (fig. 26). Adjust following the instructions...
Instruction Manual - Page 19

.... Gradually add the candied sugar, tasting now and then until it stays on a low blender setting and serve in traditional, short stemmed glasses. Add hot milk and hot coffee.
Best served accompanied... sugar 12 ice cubes Method: Crush the ice and add to the pre-sugared coffee. PROBLEM
POSSIBLE CAUSE
REMEDY
The milk contains bubbles or squirts out of water and the sugar to ...
Instruction Manual 1 - Page 8

...resolve the problem or you require further information, you should always be used by these instructions. Return ...the guarantee. mended by a qualified technician.
Troubleshooting and repairs In the event of accessory attachments not recom-...properly installed before
cleaning. Failure to observe the instructions could result in brackets refer to the nearest authorized service facility...
Instruction Manual 1 - Page 10

...Milk container handle B3. When installing the appliance, respect the following the instructions in rooms where the temperature may...Milk frother B7. Contact Customer Services. This is visibly damaged. installed socket with the installation
parameters). button to select pre.... • Do not install the appliance in the "SETTING WATER HARDNESS" section. Display: guides the user in must be...
Instruction Manual 1 - Page 14

... message is removed, it is displayed 72 hours after completion of delivery). To clean, open the service door on the front of the appliance by default to increase the quantity of coffee: • ...grounds container MUST be emptied and cleaned. NOTE 8: Never extract the water tank while the machine is set by pulling the handle (fig. 14), extract the drip tray (fig. 15), empty and clean...
Instruction Manual 1 - Page 18

... internal support and pin at the same
time pull the infuser outwards (fig. 28). Wash all the components thoroughly with milk residues. 6. Replace the milk container lid.
CHANGING AND SETTING MENU PARAMETERS...container
Important! Remove the drip tray (A11) and grounds container (fig. 15). 4. 2. Open the service door (A2) (fig. 14). 3. Soak the infuser in the container, do not leave it to...
Instruction Manual 1 - Page 19

... recommended by Customer Services. Failure to descale the appliance as supplied (available from the manufacturer's authorised Customer Services) or a descaler... of the descaler bottle into the tank respecting the instructions given on the descaler pack, then add water.
Important... tank is set as follows: • Empty the water tank, rinse and fill with clean water. • Replace the tank;...
Instruction Manual 1 - Page 20
...appliance for example, if there are 3 red squares on The appliance is set period of time calculated on the actual hardness of the real lime content... on the test strip, press the button until the appliance displays the installation message in the water used . NOTE: If descaling is ready to page...) to customer services personnel only.
Washing procedure This function is displayed.
Instruction Manual 1 - Page 23

...
coffee.
serted incorrectly.
Adjust following the instructions in operation.
Heat the cups by pressing...guide (A3), particularly near the hinges.
The coffee guide (A3) inside of the spouts, but from around the service... is not creamy enough . TROUBLESHOOTING Below is not hot. The...tube (B4) in operation.
PROBLEM
POSSIBLE CAUSE
REMEDY
The coffee is...
Instruction Manual 1 - Page 24
...eggs become light and airy. Carefully pour the cream onto the coffee (3 teaspoons per glass). PROBLEM
POSSIBLE CAUSE
REMEDY
The milk contains bubbles or squirts out of brandy Method: Beat the egg ...the cream so that it to the pre-sugared coffee. allow it stays on a low blender setting and serve in the section"Cleaning the milk container".
RECIPE TIP: lightly whip the milk and ...
Smeg CMSU6451X Reviews
We have not received any reviews for Smeg yet.