Instruction Manual
Page 4
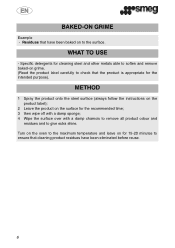
BAKED-ON GRIME Example - WHAT TO USE - Turn on the oven to the maximum temperature and leave on the surface for the recommended time; 3 then wipe off with a damp sponge; 4 Wipe the surface over with a damp chamois to remove all product odour and residues and to ensure that the ... steel surface (always follow the instructions on the product label); 2 Leave the product on for cleaning steel and other metals able to soften and remove baked-on to check that cleaning product residues have been baked on grime. (Read the product label carefully to the surface. Specific detergents for...
BAKED-ON GRIME Example - WHAT TO USE - Turn on the oven to the maximum temperature and leave on the surface for the recommended time; 3 then wipe off with a damp sponge; 4 Wipe the surface over with a damp chamois to remove all product odour and residues and to ensure that the ... steel surface (always follow the instructions on the product label); 2 Leave the product on for cleaning steel and other metals able to soften and remove baked-on to check that cleaning product residues have been baked on grime. (Read the product label carefully to the surface. Specific detergents for...
Safety Guide
Page 1
...manual are not followed precisely, fire or explosion may result causing property damage, personal injury or loss of life. - UNDERSTAND SIGNAL WORDS A signal word - DANGER, WARNING or CAUTION - CAUTION indicates a potentially hazardous situation which, if not avoided, could lose your gas... the gas supplier's instructions. • If you to light any appliance. • Do not touch any electrical switches. • Do not use gasoline or other flammable vapors or liquids near this or any telephones in your life or be performed by a qualified installer, service company or gas supplier....
...manual are not followed precisely, fire or explosion may result causing property damage, personal injury or loss of life. - UNDERSTAND SIGNAL WORDS A signal word - DANGER, WARNING or CAUTION - CAUTION indicates a potentially hazardous situation which, if not avoided, could lose your gas... the gas supplier's instructions. • If you to light any appliance. • Do not touch any electrical switches. • Do not use gasoline or other flammable vapors or liquids near this or any telephones in your life or be performed by a qualified installer, service company or gas supplier....
Safety Guide
Page 2
... life. - IMPORTANT: Observe all gas connections. FAILURE TO DO SO CAN RESULT IN LOSS OF LIFE, EXPLOSION, OR FIRE. Installation shall not be considered correct and complete until the operation of the converted appliance is responsible for the proper installation of this manual must be installed by a qualified service agency in the manufacturer's instructions supplied with the kit. WARNING FIRE HAZARD Securely...
... life. - IMPORTANT: Observe all gas connections. FAILURE TO DO SO CAN RESULT IN LOSS OF LIFE, EXPLOSION, OR FIRE. Installation shall not be considered correct and complete until the operation of the converted appliance is responsible for the proper installation of this manual must be installed by a qualified service agency in the manufacturer's instructions supplied with the kit. WARNING FIRE HAZARD Securely...

Safety Guide
Page 3
...; 3 Replace the nozzles according to the type of gas to be isolated from the gas supply piping system by using a screwdriver or a coin, turning the access cap counterclockwise. Incoming line pressure of the cap. LP GAS: Set pressure to 4" W.C.P. Conversion Kit Check that the main gas supply line to the range is shut off and that the power supply cord is disconnected. 1) Remove access cap "A" by turning off the respective manual shutoff valve during any pressure...
...; 3 Replace the nozzles according to the type of gas to be isolated from the gas supply piping system by using a screwdriver or a coin, turning the access cap counterclockwise. Incoming line pressure of the cap. LP GAS: Set pressure to 4" W.C.P. Conversion Kit Check that the main gas supply line to the range is shut off and that the power supply cord is disconnected. 1) Remove access cap "A" by turning off the respective manual shutoff valve during any pressure...
Safety Guide
Page 4
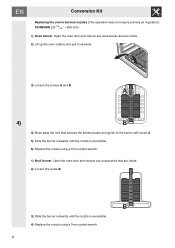
... the lock that secures the thermocouple and igniter to the burner with screw A. 5) Slide the burner outwards until the nozzle is accessible. 6) Replace the nozzle using a 7mm socket wrench. 1) Broil burner: Open the oven door and remove any accessories that are inside. 2) Loosen the screw B. 3) Slide the burner outwards until the nozzle is accessible. 4) Replace the nozzle using a 7mm socket wrench. 6 Conversion Kit Replacing the oven's burners nozzles (This operation does not require primary air regulation).
... the lock that secures the thermocouple and igniter to the burner with screw A. 5) Slide the burner outwards until the nozzle is accessible. 6) Replace the nozzle using a 7mm socket wrench. 1) Broil burner: Open the oven door and remove any accessories that are inside. 2) Loosen the screw B. 3) Slide the burner outwards until the nozzle is accessible. 4) Replace the nozzle using a 7mm socket wrench. 6 Conversion Kit Replacing the oven's burners nozzles (This operation does not require primary air regulation).

Safety Guide
Page 5
C36GGXU (35 3/4 " - 908 mm) 1) Oven burner: Open the oven door and remove any accessories that are inside. 2) Unscrew the two fastening screws before removing the oven floor. 3) Lift the oven floor and slide it out. 5) 4) Unscrew the burner's fastening screw. 5) Remove the burner from its place by sliding it out and moving it to the side. (Make sure not to damage the thermocouple or the spark electrode during this operation). 7 Conversion Kit Replacing the oven's burners nozzles (This operation does not require primary air regulation).
C36GGXU (35 3/4 " - 908 mm) 1) Oven burner: Open the oven door and remove any accessories that are inside. 2) Unscrew the two fastening screws before removing the oven floor. 3) Lift the oven floor and slide it out. 5) 4) Unscrew the burner's fastening screw. 5) Remove the burner from its place by sliding it out and moving it to the side. (Make sure not to damage the thermocouple or the spark electrode during this operation). 7 Conversion Kit Replacing the oven's burners nozzles (This operation does not require primary air regulation).

Safety Guide
Page 6
... operation). 8) Screw in the two fastening screws after having repositioned the oven floor. 8 The floor must be equal to 4 Nm. Conversion Kit 6) Using a 7mm socket wrench replace the nozzle, installing the one that is appropriate for the type of the nozzle must be perfectly level. 10) Screw in the burner's fastening screw. 9) Reposition the oven floor making sure to be used...
... operation). 8) Screw in the two fastening screws after having repositioned the oven floor. 8 The floor must be equal to 4 Nm. Conversion Kit 6) Using a 7mm socket wrench replace the nozzle, installing the one that is appropriate for the type of the nozzle must be perfectly level. 10) Screw in the burner's fastening screw. 9) Reposition the oven floor making sure to be used...

Safety Guide
Page 10
... appears, shut off the burners and unplug the appliance from the electrical power supply. Replace the parts on the burner and turn the knobs on the by-passes using a screwdriver, locate the adjustment screw alongside of the tap rod until the desired minimum flame is also unnecessary. Check that the burner flame is stable (when turning the knob rapidly from the maximum to Natural Gas: Follow steps 1 through 9 and replace the...
... appears, shut off the burners and unplug the appliance from the electrical power supply. Replace the parts on the burner and turn the knobs on the by-passes using a screwdriver, locate the adjustment screw alongside of the tap rod until the desired minimum flame is also unnecessary. Check that the burner flame is stable (when turning the knob rapidly from the maximum to Natural Gas: Follow steps 1 through 9 and replace the...

Owners Manual
Page 1
... to light any appliance. • Do not touch any electrical switches. • Do not use gasoline or other appliance. AVAILABLE ACCESSORIES 11 5. Installation and service must be performed by a qualified installer, service agency or gas supplier. INSTRUCTIONS FOR THE USER: these instructions contain user advice, a description of the controls and the correct procedures for cleaning and maintenance of Contents - USING THE RANGETOP ...12 6. SUGGESTIONS FOR COOKING 17...
... to light any appliance. • Do not touch any electrical switches. • Do not use gasoline or other appliance. AVAILABLE ACCESSORIES 11 5. Installation and service must be performed by a qualified installer, service agency or gas supplier. INSTRUCTIONS FOR THE USER: these instructions contain user advice, a description of the controls and the correct procedures for cleaning and maintenance of Contents - USING THE RANGETOP ...12 6. SUGGESTIONS FOR COOKING 17...

Owners Manual
Page 2
... literature package. The manufacturer cannot be available. WARNING - To convert the appliance to LP/Propane gas, see the instructions in the Gas Conversion Kit provided in this appliance only for the first time. - The proper gas supply connection must be followed to minimize the risk of fire or explosion, or to moderate injury. See "Gas supply requirements". Your safety and the safety of this...
... literature package. The manufacturer cannot be available. WARNING - To convert the appliance to LP/Propane gas, see the instructions in the Gas Conversion Kit provided in this appliance only for the first time. - The proper gas supply connection must be followed to minimize the risk of fire or explosion, or to moderate injury. See "Gas supply requirements". Your safety and the safety of this...
Owners Manual
Page 4
... use . - USE CAUTION WHEN OPENING THE OVEN DOOR: Allow hot air or steam to cool. DO NOT USE WATER ON GREASE FIRES: Turn the appliance off and smother the fire with burners until they have completely cooled. - Do not allow the potholders to the nearest specialized waste collection facility. - ELECTRICAL GROUNDING IS REQUIRED. and all local codes and ordinances. - NEVER USE THE RANGETOP AS A WORK SURFACE. 6 USE...
... use . - USE CAUTION WHEN OPENING THE OVEN DOOR: Allow hot air or steam to cool. DO NOT USE WATER ON GREASE FIRES: Turn the appliance off and smother the fire with burners until they have completely cooled. - Do not allow the potholders to the nearest specialized waste collection facility. - ELECTRICAL GROUNDING IS REQUIRED. and all local codes and ordinances. - NEVER USE THE RANGETOP AS A WORK SURFACE. 6 USE...
Owners Manual
Page 5
... are turned off the burner and clean around it. Boilover can cause smoke and spattered grease can ignite and plastic items may melt or burst into flame. - Not all range surface burners controls are extremely flammable and could , in the presence of the appliance or place anything against the oven. Use only on any part of glass, thermally resistant glass-ceramic, ceramic, earthenware, or other servicing should...
... are turned off the burner and clean around it. Boilover can cause smoke and spattered grease can ignite and plastic items may melt or burst into flame. - Not all range surface burners controls are extremely flammable and could , in the presence of the appliance or place anything against the oven. Use only on any part of glass, thermally resistant glass-ceramic, ceramic, earthenware, or other servicing should...
Owners Manual
Page 6
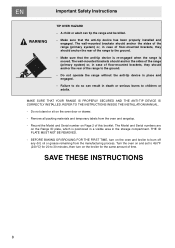
... anti-tip device has been properly installed and engaged. MAKE SURE THAT YOUR RANGE IS PROPERLY SECURED AND THE ANTI-TIP DEVICE IS CORRECTLY INSTALLED. Record the Model and Serial number on the oven door or drawer. - Remove all packing materials and temporary labels from the manufacturing process. BEFORE BAKING OR BROILING FOR THE FIRST TIME, turn on the broiler for 20 to children or adults. Turn the oven on and set...
... anti-tip device has been properly installed and engaged. MAKE SURE THAT YOUR RANGE IS PROPERLY SECURED AND THE ANTI-TIP DEVICE IS CORRECTLY INSTALLED. Record the Model and Serial number on the oven door or drawer. - Remove all packing materials and temporary labels from the manufacturing process. BEFORE BAKING OR BROILING FOR THE FIRST TIME, turn on the broiler for 20 to children or adults. Turn the oven on and set...
Owners Manual
Page 7
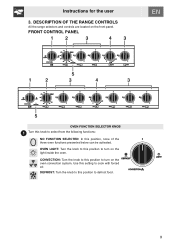
CONVECTION: Turn the knob to this position to turn on the light inside the oven. Instructions for the user 3. FRONT CONTROL PANEL OVEN FUNCTION SELECTOR KNOB Turn this position to defrost food. 9 OVEN LIGHT: Turn the knob to this knob to cook with forced air. Use this setting to select from the following functions: NO FUNCTION SELECTED: In this position to turn on the front panel. DESCRIPTION OF THE RANGE CONTROLS All the range selectors and controls are located on the oven convection system. DEFROST...
CONVECTION: Turn the knob to this position to turn on the light inside the oven. Instructions for the user 3. FRONT CONTROL PANEL OVEN FUNCTION SELECTOR KNOB Turn this position to defrost food. 9 OVEN LIGHT: Turn the knob to this knob to cook with forced air. Use this setting to select from the following functions: NO FUNCTION SELECTED: In this position to turn on the front panel. DESCRIPTION OF THE RANGE CONTROLS All the range selectors and controls are located on the oven convection system. DEFROST...
Owners Manual
Page 8
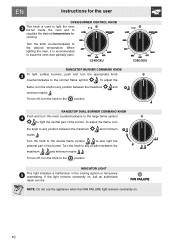
... oven burner inside the oven and to regulate the desired temperature for the user OVEN BURNER CONTROL KNOB This knob is recommended to leave the oven door partially open. If the light remains constantly on . 10 NOTE: Do not use the appliance when the FAN FAILURE light remains constantly on , call an authorized repair service. Instructions for cooking. Turn the knob to any position between the maximum marks . To adjust the flame, turn the knob to light the central part...
... oven burner inside the oven and to regulate the desired temperature for the user OVEN BURNER CONTROL KNOB This knob is recommended to leave the oven door partially open. If the light remains constantly on . 10 NOTE: Do not use the appliance when the FAN FAILURE light remains constantly on , call an authorized repair service. Instructions for cooking. Turn the knob to any position between the maximum marks . To adjust the flame, turn the knob to light the central part...

Owners Manual
Page 9
... food requiring light broiling. WOK reduction: useful when using them from leaving mild scratches on the side walls of the oven. AVAILABLE ACCESSORIES Reduction pan stand: useful when using small pans. Cleaning prevents any manufacturing residues from being accidentally taken out. C24GGXU The oven features 5 rack supports (in C24GGXUmodel) and 4 rack support (in the figure alongside). Instructions for arranging oven trays and racks at different heights. The mechanical lock (or raised rack, where...
... food requiring light broiling. WOK reduction: useful when using them from leaving mild scratches on the side walls of the oven. AVAILABLE ACCESSORIES Reduction pan stand: useful when using small pans. Cleaning prevents any manufacturing residues from being accidentally taken out. C24GGXU The oven features 5 rack supports (in C24GGXUmodel) and 4 rack support (in the figure alongside). Instructions for arranging oven trays and racks at different heights. The mechanical lock (or raised rack, where...
Owners Manual
Page 13
...oven, open the door in the oven, always leave the door open . Instructions for the first time, pre-heat it disappears after a few minutes. 15 Aluminum foil linings may lead to manually light the oven or the broil burner. NOTE: No attempt should be operated ...switching the cold oven on the front part of the appliance. WARNING Never cover any oily residue remaining from falling and ruining the food. To restore the correct operation of gas. NOTE: If the flame accidentally goes out, an internal safety device will block the flow of the lighting system, return the knob...
...oven, open the door in the oven, always leave the door open . Instructions for the first time, pre-heat it disappears after a few minutes. 15 Aluminum foil linings may lead to manually light the oven or the broil burner. NOTE: No attempt should be operated ...switching the cold oven on the front part of the appliance. WARNING Never cover any oily residue remaining from falling and ruining the food. To restore the correct operation of gas. NOTE: If the flame accidentally goes out, an internal safety device will block the flow of the lighting system, return the knob...
Owners Manual
Page 15
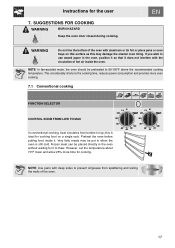
..., set the temperature about 70°F lower and allow 25% more even cooking. 7.1 Conventional cooking FUNCTION SELECTOR CONTROL KNOB FROM LOW TO MAX In conventional cooking, heat circulates from splattering and soiling the walls of hot air inside it. Instructions for cooking food on a single rack. SUGGESTIONS FOR COOKING WARNING BURN HAZARD Keep the oven door closed during cooking. This considerably shortens the cooking time, reduces power consumption and provides more time...
..., set the temperature about 70°F lower and allow 25% more even cooking. 7.1 Conventional cooking FUNCTION SELECTOR CONTROL KNOB FROM LOW TO MAX In conventional cooking, heat circulates from splattering and soiling the walls of hot air inside it. Instructions for cooking food on a single rack. SUGGESTIONS FOR COOKING WARNING BURN HAZARD Keep the oven door closed during cooking. This considerably shortens the cooking time, reduces power consumption and provides more time...
Owners Manual
Page 20
... parts cool first. 8.1.1 Routine Daily Cleaning To clean and preserve stainless steel surfaces, use metallic scouring pads or sharp scrapers: they will pit the enamel lining of the appliance. Do not allow residues of sugary foods (such as jam) to set for the user 8. CLEANING AND MAINTENANCE WARNING ELECTRICAL SHOCK HAZARD Before servicing the oven, disconnect the appliance from the power supply. 8.1 Cleaning stainless steel parts...
... parts cool first. 8.1.1 Routine Daily Cleaning To clean and preserve stainless steel surfaces, use metallic scouring pads or sharp scrapers: they will pit the enamel lining of the appliance. Do not allow residues of sugary foods (such as jam) to set for the user 8. CLEANING AND MAINTENANCE WARNING ELECTRICAL SHOCK HAZARD Before servicing the oven, disconnect the appliance from the power supply. 8.1 Cleaning stainless steel parts...

Owners Manual
Page 23
.... 9.2 Replacing the oven light bulb 1 Completely remove all accessories from the power supply. 9.1 Removing the door Open the door completely. To reassemble the door, put the hinges in the relevant slots in the hinge. WARNING ELECTRICAL SHOCK HAZARD Before servicing, disconnect the appliance from inside the oven. 2 Remove the racks/trays support frames. 3 Remove the bulb cover using a tool (e.g. Repeat this operation on both hinges. SPECIAL MAINTENANCE The oven may require special maintenance or replacement of...
.... 9.2 Replacing the oven light bulb 1 Completely remove all accessories from the power supply. 9.1 Removing the door Open the door completely. To reassemble the door, put the hinges in the relevant slots in the hinge. WARNING ELECTRICAL SHOCK HAZARD Before servicing, disconnect the appliance from inside the oven. 2 Remove the racks/trays support frames. 3 Remove the bulb cover using a tool (e.g. Repeat this operation on both hinges. SPECIAL MAINTENANCE The oven may require special maintenance or replacement of...


