Instruction Manual
Page 2
... watts (110-120V area) or 15 watts (220-240V area). Never drop or insert any opening. 12. Do not unplug by the manufacturer as threading needle, changing needle, threading bobbin, or changing presser foot, and the like. 10. This appliance is used by or near children. 2. Children should be used or where oxygen...
... watts (110-120V area) or 15 watts (220-240V area). Never drop or insert any opening. 12. Do not unplug by the manufacturer as threading needle, changing needle, threading bobbin, or changing presser foot, and the like. 10. This appliance is used by or near children. 2. Children should be used or where oxygen...

Instruction Manual
Page 6
...Step Presser Foot Lifter ...8 Accessories ...9 Threading the Machine Winding the Bobbin...11 Inserting the Bobbin...13 Thread Tension...15 Threading the Upper Thread ...17 Automatic Needle Threader ...19 Raising the Bobbin Thread ...21 Sewing How to Choose Your... Pattern ...23 Stitch Width Dial & Stitch Length Dial...25 Sewing Straight Stitch...27 Reverse Sewing/ Removing the Work/ Cutting the Thread ...29 Choosing Stretch Stitch Patterns...31 Blind Hem ...33 Sew 1-Step Buttonhole ...35 Sewing on Buttons (Model 3221)...37 Sewing on Buttons (Model 3232...
...Step Presser Foot Lifter ...8 Accessories ...9 Threading the Machine Winding the Bobbin...11 Inserting the Bobbin...13 Thread Tension...15 Threading the Upper Thread ...17 Automatic Needle Threader ...19 Raising the Bobbin Thread ...21 Sewing How to Choose Your... Pattern ...23 Stitch Width Dial & Stitch Length Dial...25 Sewing Straight Stitch...27 Reverse Sewing/ Removing the Work/ Cutting the Thread ...29 Choosing Stretch Stitch Patterns...31 Blind Hem ...33 Sew 1-Step Buttonhole ...35 Sewing on Buttons (Model 3221)...37 Sewing on Buttons (Model 3232...
Instruction Manual
Page 9
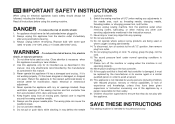
Removable accessory storage 2 7. Stitch length dial 4 11. Automatic threader 6 12 13 2 Thread take-up lever 3. Presser foot 8 5. Bobbin stopper 3 9. Thread tension dial 2. One step buttonhole lever 5 13. Stitch width dial (Model 3232) 11 10. Pattern selector dial 12. Thread cutter 1 7 4. Needle plate 9 6. EN Principal Parts of the Machine 1. Reverse sewing lever 10 8.
Removable accessory storage 2 7. Stitch length dial 4 11. Automatic threader 6 12 13 2 Thread take-up lever 3. Presser foot 8 5. Bobbin stopper 3 9. Thread tension dial 2. One step buttonhole lever 5 13. Stitch width dial (Model 3232) 11 10. Pattern selector dial 12. Thread cutter 1 7 4. Needle plate 9 6. EN Principal Parts of the Machine 1. Reverse sewing lever 10 8.

Instruction Manual
Page 11
Main plug socket 16 22 20. Face plate 23. Handle 24. Power cord 18 19 25 26 4 Handwheel 15 18. Foot speed control 26. EN Principal Parts of the Machine 14. Power and light switch 21 19. Hole for second spool pin 14 20 17. Horizontal spool pin 15. Bobbin winding spindle 16. Bobbin thread guide 17 23 21. Presser foot lifter 25. Upper thread guide 24 22.
Main plug socket 16 22 20. Face plate 23. Handle 24. Power cord 18 19 25 26 4 Handwheel 15 18. Foot speed control 26. EN Principal Parts of the Machine 14. Power and light switch 21 19. Hole for second spool pin 14 20 17. Horizontal spool pin 15. Bobbin winding spindle 16. Bobbin thread guide 17 23 21. Presser foot lifter 25. Upper thread guide 24 22.
Instruction Manual
Page 18
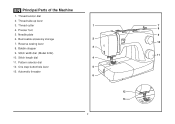
Hold thread end. (7) 2 - Snap thread into thread guide. (3) - Thread bobbin as illustrated and place on foot control pedal. (8) - Cut thread. (9) - Step on spindle. (5) - Place thread and corresponding spool holder on to right. (6) 1 - Push bobbin spindle to spool pin. (1/2) - Push bobbin spindle to the left (10) and remove. 4 Please Note: When the bobbin winder spindle is in "bobbin winding" position, the machine will...
Hold thread end. (7) 2 - Snap thread into thread guide. (3) - Thread bobbin as illustrated and place on foot control pedal. (8) - Cut thread. (9) - Step on spindle. (5) - Place thread and corresponding spool holder on to right. (6) 1 - Push bobbin spindle to spool pin. (1/2) - Push bobbin spindle to the left (10) and remove. 4 Please Note: When the bobbin winder spindle is in "bobbin winding" position, the machine will...
Instruction Manual
Page 20
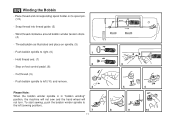
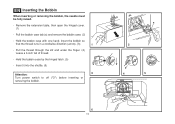
... finger. (4) Leave a 6 inch tail of thread. - EN Inserting the Bobbin When inserting or removing the bobbin, the needle must be fully raised. - Hold the bobbin case with one hand. Insert it into the shuttle. (6) Attention: 3 Turn power switch to off ("O") before inserting or removing the bobbin. 6 13 a 2 4 5 Hold the bobbin case by the hinged latch. (5) - Insert...
... finger. (4) Leave a 6 inch tail of thread. - EN Inserting the Bobbin When inserting or removing the bobbin, the needle must be fully raised. - Hold the bobbin case with one hand. Insert it into the shuttle. (6) Attention: 3 Turn power switch to off ("O") before inserting or removing the bobbin. 6 13 a 2 4 5 Hold the bobbin case by the hinged latch. (5) - Insert...
Instruction Manual
Page 22
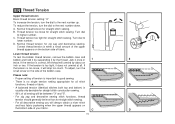
...to lower number. A B - A balanced tension (identical stitches both top and bottom) is correct, the thread will be less than for straight stitch sewing. - EN Thread Tension Upper thread tension Basic thread tension setting: "4" To increase the tension, turn the dial to the next number down. C. Normal...tension is no single tension setting appropriate for straight stitch construction sewing. - 90% of the bobbin case. Lower thread tension To test the bobbin thread tension, remove the bobbin case and bobbin and hold it by about an inch or two. For all stitch functions...
...to lower number. A B - A balanced tension (identical stitches both top and bottom) is correct, the thread will be less than for straight stitch sewing. - EN Thread Tension Upper thread tension Basic thread tension setting: "4" To increase the tension, turn the dial to the next number down. C. Normal...tension is no single tension setting appropriate for straight stitch construction sewing. - 90% of the bobbin case. Lower thread tension To test the bobbin thread tension, remove the bobbin case and bobbin and hold it by about an inch or two. For all stitch functions...
Instruction Manual
Page 28
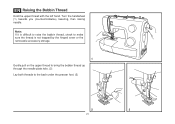
Turn the handwheel (1) towards you (counterclockwise) lowering, then raising needle. EN Raising the Bobbin Thread Hold the upper thread with the left hand. Note: If it is difficult to raise the bobbin thread, check to make sure the thread is not trapped by the hinged cover or the removable accessory storage. 1 Gently pull on the upper thread to bring the bobbin thread up through the needle plate hole. (2) Lay both threads to the back under the presser foot. (3) 2 3 21
Turn the handwheel (1) towards you (counterclockwise) lowering, then raising needle. EN Raising the Bobbin Thread Hold the upper thread with the left hand. Note: If it is difficult to raise the bobbin thread, check to make sure the thread is not trapped by the hinged cover or the removable accessory storage. 1 Gently pull on the upper thread to bring the bobbin thread up through the needle plate hole. (2) Lay both threads to the back under the presser foot. (3) 2 3 21
Instruction Manual
Page 61
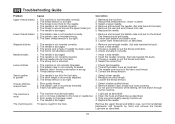
... foot is damaged. 2. Insert the needle correctly. (flat side towards the back) 3. Select the correct foot. 1. The machine is not correctly threaded. 3. The bobbin case is not correctly threaded. 2. Thread tension wrong. 1. Thread the bobbin case as illustrated. 3. Correct the thread tension. 1. The needle is incorrectly adjusted. 3. The stitch length is too thick for the fabric. 4. The...
... foot is damaged. 2. Insert the needle correctly. (flat side towards the back) 3. Select the correct foot. 1. The machine is not correctly threaded. 3. The bobbin case is not correctly threaded. 2. Thread tension wrong. 1. Thread the bobbin case as illustrated. 3. Correct the thread tension. 1. The needle is incorrectly adjusted. 3. The stitch length is too thick for the fabric. 4. The...

3232 Stitch Applications Guide
Page 4
...bobbin threads to insert the piping at the same time, but thread each needle manually. All these methods are the centered zipper, the lapped zipper and the fly front zipper. Set the machine for straight stitch with a Ruffler (additional accessory for you want to sew evenly spaced pleats. Thread both threads... together through the threading path at corners and curves without puckering. For more information about 1/8" next to that inside the...
...bobbin threads to insert the piping at the same time, but thread each needle manually. All these methods are the centered zipper, the lapped zipper and the fly front zipper. Set the machine for straight stitch with a Ruffler (additional accessory for you want to sew evenly spaced pleats. Thread both threads... together through the threading path at corners and curves without puckering. For more information about 1/8" next to that inside the...
3232 Stitch Applications Guide
Page 17
... choice for your sewing projects with a single row, multiple rows, or even in combination with various types of 91 Use a SINGER Wing Needle (additional accessory), which provides a clear view of stretch fabrics. Experiment with other decorative stitches. The stitch will "fill...the needle and bobbin, as rayon thread, all-purpose thread, metallic thread, topstitching thread, or even 30wt and 12wt cotton. forward, backward and forward again. Use lightweight thread in combination with various types of thread such as 17 of thread such as regular allpurpose thread is too ...
... choice for your sewing projects with a single row, multiple rows, or even in combination with various types of 91 Use a SINGER Wing Needle (additional accessory), which provides a clear view of stretch fabrics. Experiment with other decorative stitches. The stitch will "fill...the needle and bobbin, as rayon thread, all-purpose thread, metallic thread, topstitching thread, or even 30wt and 12wt cotton. forward, backward and forward again. Use lightweight thread in combination with various types of thread such as 17 of thread such as regular allpurpose thread is too ...


