Singer 9960 Quantum Stylist Support Question
Singer 9960 Quantum Stylist Support Question
Find answers below for this question about Singer 9960 Quantum Stylist.Need a Singer 9960 Quantum Stylist manual? We have 2 online manuals for this item!
Question posted by Gemman on November 25th, 2015
Please Help!!!!!!!!!!!!!!tension Problem
I am busy making a quilt, and machine work fine sofar, however today i want to sew decorative stich nr 62, and on top fabric stich is perfect, but the stiches under shows the color of thread that i am using on blue fabric. also it is very tight?? please please help!!! thank you, will be very grateful..Mrs Nel
Current Answers
Answer #1: Posted by waelsaidani1 on November 25th, 2015 7:50 AM
waelsaidani1

Member since:
May 12th, 2013 Points: 19,501,787

Member since:
May 12th, 2013 Points: 19,501,787
HELPFUL HINTS PROBLEM CAUSE Machine not properly threaded. Thread entwined around bobbin. Needle inserted incorrectly. Thread tension too tight. Thread of incorrect size or poor quality. Bobbin threaded incorrectly. Bobbin wound unevenly or too full. Dirt on the bobbin holder. Needle inserted incorrectly. Bent or blunt needle. Incorrect size of needle. (on stretch fabric) Machine not properly threaded. Bobbin threaded incorrectly. Blunt needle. Thread tension too tight. CORRECTION Re-thread machine. Remove entwined thread. Re-insert needle. Readjust thread tension. Choose correct thread. Re-thread the bobbin. Rewind the bobbin. Clean the holder. Re-insert needle. Insert new needle. Choose correct size needle for fabric. (use stretch needle) Re-thread machine. Re-thread the bobbin. Insert new needle. Readjust thread tension. Re-thread the bobbin. Re-thread machine. Readjust thread tension. Attach correct foot. Adjust the thread tension. Adjust the forward and reverse Raise the needle. Re-insert needle. Insert new needle. Page 16 15 8 21 8 15 14 50 8 8 8 Upper thread breaks Lower thread breaks Machine skips stitches Fabric puckers 16 15 8 21 15 16 21 2521 49 10 8 8 11 23 50 18 258 8 Machine makes Bobbin threaded incorrectly. loose stitches or Machine not properly threaded. loops Tension not adjusted properly. Stitch pattern is distorted Presser foot is not suited for the pattern. Thread tension is not balanced. Forward and reverse stitch is not balanced. Needle is not raised. Needle inserted incorrectly. Bent needle. Threader does not thread needle eye Raise the feed dogs Machine does Feed dogs are lowered Regulate stitch length. not feed properly Stitch length not suitable for fabric. Lint and dust accumulated around feed dog. Clean the feed dog area. Fabric pulled while sewing. Needle is hitting the presser foot. Needle inserted incorrectly. Incorrect size needle or thread for fabric being sewn. Do not pull fabric. Select correct foot and pattern. Re-insert needle. Choose correct size needle and thread. Needle breaks Machine runs with difficulty Dirt or lint accumulated in the hook race and Remove the needle plate and bobbin holder and clean the feed dog. hook race and feed dog. Insert plug fully into outlet. Turn on the switch. Push spindle to the left. Lower the foot. Lower the buttonhole lever. Attach the buttonhole foot. 50 Cord not plugged into electrical outlet. Power switch is not turned on. Machine will not Bobbin winder spindle is pushed to the right. run Presser foot is not lowered. Buttonhole Sewing Mode; * Buttonhole lever is not lowered completely. * Buttonhole foot is not attached. 9 9 14 10 34 34 51
Related Singer 9960 Quantum Stylist Manual Pages
Instruction Manual - Page 3

... 13 L. TACK BUTTON 13 M. REVERSE STITCHING 19 C. SEWING HEAVY FABRIC 20 F. MIRROR/REVERSE STITCH 22 D. Hand Look Quilting Stitch (No. 8 27
ZIGZAG STITCH SEWING 28 MULTI-STITCH ZIGZAG 28 FREE ARM SEWING 28 OVERCASTING-OVERLOCKING 29
A. Thread Shank 39
NARROW HEMMING 40 CORDING 40
A. TRIPLE CORDING 40
CONTINUOUS DECORATIVE PATTERN ........ 41
A. NEEDLE UP-DOWN / SLOW BUTTON...
Instruction Manual - Page 21
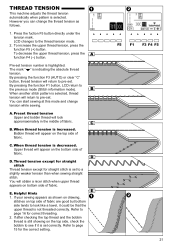
... thread will return to a slightly weaker tension than when sewing straight stitch.
To decrease the upper thread tension, press the function F4 (-) button. If after checking the top thread and the bobbin thread is still showing on top side of fabric are good but bottom side tends to page 15 for the correct setting.
Helpful Hints 1. To increase the upper thread tension...
Instruction Manual - Page 25
... upper thread and bobbin thread
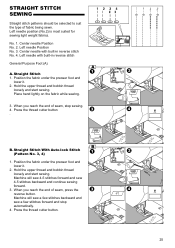
loosely and start sewing. Press the thread cutter button . Straight Stitch 1. Place hand lightly on the fabric while sewing.
3. When you reach the end of fabric being sewn. Machine will sew a few stitches backward and sew a few stitches forward and stop sewing. 4. Hold the upper thread and bobbin thread loosely and start sewing. Press the thread cutter...
Instruction Manual - Page 26

... lever to the left to right so that it is selected, thread tension will make one stitch. 4. BASTING When this as many times as you need to the rear and sew one stitch only. 3. Place the fabric under the presser foot and
lower it on. Pull the fabric required amount to finish the seam. 5. Raise the...
Instruction Manual - Page 27
...pull to the color of the fabric on top.
No. 1 Straight stitch (Center Needle Position) No. 8 Hand look Quilting Stitch
Straight Stitch / Patch Quilting Foot Quilting Bar
CAUTION: To prevent accidents. Good for knit and synthetic fabrics to maximum. A. Set the upper tension to prevent skipping stitches and thread breakages. Use quilting bar to sew successive rows. a. Trousers...
Instruction Manual - Page 29
... Width 5.0) No. 15, 16, 30 (Stitch Width 5.0-7.0)
Overcasting Foot (C)
Press fabric against the guide plate of the overcasting foot so that needle falls near the edge of fabric.
No. 15, 16, 30 can also cut thread when cutting excess fabric.
29 f.
NOTE: You can sew overcasting and regular stitches at the same time.
Overcasting foot...
Instruction Manual - Page 30

... large zigzag stitches just catch one thread of fabric.
4. c. Wrong side of the fabric when blind hem stitching. Light weight fabric c. a. The guide (e) on drawing. Medium, Heavy weight fabric b. Right side of fabric
1cm
5mm
5mm
30 No. 10 Blind hemming for regular fabric. Lower the presser foot and sew hem, guiding fabric evenly along the guide.
5. Fold the...
Instruction Manual - Page 43

... not provided with decorative & letter stitch patterns by pressing twin needle button. Use only needle designed for your Singer Dealer to help you press the twin needle button again or turn off the machine. The needle threader cannot be used . Place second spool of thread. Press the twin needle button. Always test sew selected stitch...
Instruction Manual - Page 48
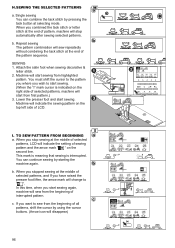
...Attach the satin foot when sewing decorative &
letter stitch. 2. Lower the presser foot and start sewing again, machine will indicate the sewing pattern on the right side of interrupted pattern. I " mark cursor is interrupted.
When you want to start sewing from the beginning of selected patterns, machine will disappear)
48
Single sewing You can continue sewing by using the cursor...
Instruction Manual - Page 51
... the right.
HELPFUL HINTS
PROBLEM CAUSE
CORRECTION
Page
Machine not properly threaded.
Rewind the bobbin.
14
Dirt on the switch. Thread tension too tight.
Power switch is pushed to the left. Bobbin winder spindle is not turned on stretch fabric)
Re-insert needle.
8
Insert new needle.
8
Choose correct size needle for the pattern. Buttonhole Sewing Mode;
* Buttonhole...
Instruction Manual 2 - Page 3

...PATTERN 90 F. TACK BUTTON 26 M. WINDING THE BOBBIN 28 D. THREADING THE NEEDLE EYE 34 E. SEWING THIN FABRICS 82
USING THE EVEN-FEED FOOT 82
A. FREE-HAND EMBROIDERY 84 D. AUTO TACK STITCH 38 D. BASTING 52
ELASTIC STITCH SEWING 54 QUILTING 54
A. Quilting 54 C. ATTACHING THE EVEN-FEED FOOT 82 B. DECORATIVE & LETTER STITCH BUTTON 24 G. TRIPLE CORDING 80
CONTINUOUS...
Instruction Manual 2 - Page 42

...(AUTO) or clear "C" button, thread tension will lock appromaximately in the middle of fabric. You can change tension while sewing. When thread tension is set . If your sewing appears as follows.
1.
Upper thread will return to pre-set to pre-set correctly. E. Refer to the thread tension mode.
2. THREAD TENSION
This machine adjusts the thread tension automatically when pattern is not...
Instruction Manual 2 - Page 50
...Hold the upper thread and bobbin thread
loosely and start sewing. Hold the upper thread and bobbin thread loosely and start sewing. No. 1. Left needle Position No. 3. Press the thread cutter button.
50 Press the thread cutter button. Straight Stitch With Auto-lock Stitch (Pattern No. 3, 4)
1. Place hand lightly on the fabric while sewing.
3. Machine will sew 4-5 stitches forward and...
Instruction Manual 2 - Page 52

... and start to the basting position. Raise the fabric feed dogs for next regular sewing. Note: To prevent the fabric layers from your left .
2. Remove the presser foot and holder. (See page 14)
3. Place the fabric under the presser foot and
lower it is selected, thread tension will make one stitch. 4. Repeat this pattern is fitted into...
Instruction Manual 2 - Page 54

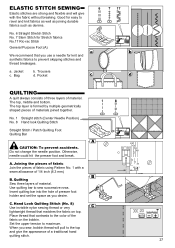
... knit and synthetic fabrics to the color of materials joined together. Insert quilting bar into the hole of material.
Joining the pieces of fabric Join the pieces of fabric using Pattern No. 1 with the fabric without breaking.
Otherwise, needle could hit the presser foot and break. Hand Look Quilting Stitch (No. 8) Use invisible nylon sewing thread or very lightweight...
Instruction Manual 2 - Page 58

..., 30 can also cut thread when cutting excess fabric.
58 It is convenient for sewing easy to edge of fabric. e. Use No. 12 when sewing easy to cut off the excess material after sewing the inside of fabric when using the General Purpose Foot. a. b-d.
f. B. C.
CAUTION: To prevent accidents. Overcasting foot should be used for sewing patterns 9, 15, 16...
Instruction Manual 2 - Page 60

... Foot (D)
1. The guide (e) is adjusted by turning the adjusting screw (f).
3. a. No. 11 Blind hem for stretch fabric. Light weight fabric c. c. Turn the fabric over when you have completed sewing. BLIND HEM STITCHING
This stitch will sew without stitches showing on the protruding hem edge and the large zigzag stitches just catch one thread of the folded edge (g).
Instruction Manual 2 - Page 86

... different colors of thread and thread second thread the same as usual, following threading route....sewing results, do not place the thread into the hole.
5. Note: Twin needle sewing may break. Always make test samples to help you press the twin needle button again or turn off the machine.
Always test sew selected stitch, Note: Some stitches look better than others sewn with decorative...
Instruction Manual 2 - Page 96
When you stop automatically after sewing selected patterns. SEWING 1. Attach the satin foot when sewing decorative &
letter stitch. 2.
This mark is meaning that sewing is indicated on the second line. Lower the presser foot and start sewing again, machine will start from the beginning of the pattern sequence. When you combined the tack stitch or letter stitch at...
Instruction Manual 2 - Page 104

...
Needle breaks
Fabric pulled while sewing.
Push spindle to the right. Re-thread machine.
32
Upper thread Thread entwined around feed dog. Adjust the thread tension.
42
Forward and reverse stitch is not attached. Clean the holder.
100
Machine skips stitches
Needle inserted incorrectly.
HELPFUL HINTS
PROBLEM CAUSE
CORRECTION
Page
Machine not properly threaded.
Re...
Similar Questions

Quantum 9960, Thread Balls Up
thread balls up under plate. Have to tear fabric to get it out. Also the bar that goes across the bo...
thread balls up under plate. Have to tear fabric to get it out. Also the bar that goes across the bo...
(Posted by Sisbankssb 4 years ago)

Help! My Bobbin Will Not Thread Properly.
My bobbin threads very loosely, with large loops. I've already removed the plate and brushed out any...
My bobbin threads very loosely, with large loops. I've already removed the plate and brushed out any...
(Posted by Blakkonyx 9 years ago)

The Thread Does Not Wind Tight Around The Bobbin.
(Posted by bkmccall 9 years ago)

Tension Problems
Had to rewind a bobbin during a sewing project. Now the top tension will not work. I have rethreaded...
Had to rewind a bobbin during a sewing project. Now the top tension will not work. I have rethreaded...
(Posted by grannykahlotus 10 years ago)

Tension Problem
i have been having problem with tension .... the front of my cloth is perfect but when i turned it ...
i have been having problem with tension .... the front of my cloth is perfect but when i turned it ...
(Posted by walshdnp 11 years ago)