

Instruction Manual
Page 3
CONTENTS IMPORTANT SAFETY SELECTING UTILITY STITCH AUTOMATIC BAR-TACK AND INSTRUCTIONS 2 PATTERN 36 DARNING 76 MODEL 9985 8 STITCH INFORMATION 36 SEWING ON BUTTONS ..........78 FOR EUROPEAN AND SIMILAR THREAD TENSION 40 A. START AND END OF SEAM 44 B. ...B. E. USING THE OVERCASTING FOOT......58 I . PREPARING TO THREAD MACHINE ...32 B. Do not pull out the front cover from the machine. 3 OPENING THE ACCESSORY CASE.....14 CHANGING THE PRESSER E. PRESSER FOOT LIFTER 20 B. HAND LOOK QUILTING STITCH (NO. 8 54 ZIGZAG STITCH SEWING.......56 D. SHIFTING THE CURSOR 88 C....
CONTENTS IMPORTANT SAFETY SELECTING UTILITY STITCH AUTOMATIC BAR-TACK AND INSTRUCTIONS 2 PATTERN 36 DARNING 76 MODEL 9985 8 STITCH INFORMATION 36 SEWING ON BUTTONS ..........78 FOR EUROPEAN AND SIMILAR THREAD TENSION 40 A. START AND END OF SEAM 44 B. ...B. E. USING THE OVERCASTING FOOT......58 I . PREPARING TO THREAD MACHINE ...32 B. Do not pull out the front cover from the machine. 3 OPENING THE ACCESSORY CASE.....14 CHANGING THE PRESSER E. PRESSER FOOT LIFTER 20 B. HAND LOOK QUILTING STITCH (NO. 8 54 ZIGZAG STITCH SEWING.......56 D. SHIFTING THE CURSOR 88 C....

Instruction Manual
Page 8
To get the most modern sewing capabilities, the manufacturer reserves the right to change the appearance, design or accessories of this sewing machine when considered necessary without supervision. 4. Blue: neutral (N) Brown: live (L) As the colors of the wires in the mains lead of this ... you are colored in your purchase of the CISPR. Les enfants ne doivent pas nettoyer ou entretenir cet appareil sans être supervisés. 4. MODEL 9985 PREFACE Thank you for your plug, proceed as follows: EU only EU seulement Sólo para Estados Unidos 1.
To get the most modern sewing capabilities, the manufacturer reserves the right to change the appearance, design or accessories of this sewing machine when considered necessary without supervision. 4. Blue: neutral (N) Brown: live (L) As the colors of the wires in the mains lead of this ... you are colored in your purchase of the CISPR. Les enfants ne doivent pas nettoyer ou entretenir cet appareil sans être supervisés. 4. MODEL 9985 PREFACE Thank you for your plug, proceed as follows: EU only EU seulement Sólo para Estados Unidos 1.
Instruction Manual
Page 10
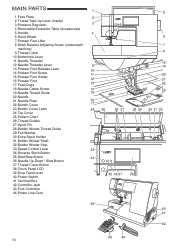
Removable Extension Table (Accessories) 5. Hand Wheel 6 7. Presser Foot Release Lever 10 14. Presser Foot Holder 16. Bobbin Cover 17 23. Spool Pin 28. Reverse Stitch Button 35. Thread Cutter ...
Removable Extension Table (Accessories) 5. Hand Wheel 6 7. Presser Foot Release Lever 10 14. Presser Foot Holder 16. Bobbin Cover 17 23. Spool Pin 28. Reverse Stitch Button 35. Thread Cutter ...
Instruction Manual
Page 12
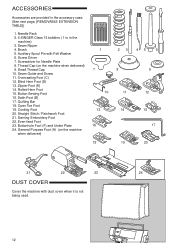
...6. Quilting Bar 18. General Purpose Foot (A) (on the machine when delivered) 9. Auxiliary Spool Pin with dust cover when it is in the accessory case. (See next page, [REMOVABLE EXTENSION TABLE]) 1. Small Thread Cap 10. Button Sewing Foot 16. Satin Foot (B) 17. Darning Embroidery... Foot 22. Brush 5. Rolled Hem Foot 15. ACCESSORIES Accessories are provided in the machine) 3. Needle Pack 2. 4 SINGER Class 15 bobbins ( 1 is not being used. 12 Cording Foot 20. Buttonhole Foot (F) and Under Plate 24. Seam ...
...6. Quilting Bar 18. General Purpose Foot (A) (on the machine when delivered) 9. Auxiliary Spool Pin with dust cover when it is in the accessory case. (See next page, [REMOVABLE EXTENSION TABLE]) 1. Small Thread Cap 10. Button Sewing Foot 16. Satin Foot (B) 17. Darning Embroidery... Foot 22. Brush 5. Rolled Hem Foot 15. ACCESSORIES Accessories are provided in the machine) 3. Needle Pack 2. 4 SINGER Class 15 bobbins ( 1 is not being used. 12 Cording Foot 20. Buttonhole Foot (F) and Under Plate 24. Seam ...
Instruction Manual
Page 14
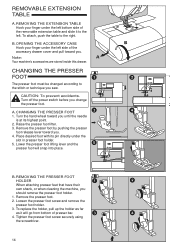
...must be changed according to the stitch or technique you . CAUTION: To prevent accidents. Place desired foot with its highest point. 2. OPENING THE ACCESSORY CASE Hook your finger under the slot in presser foot holder. 5. B. Remove the presser foot. 2. Turn off the power switch ...release lever toward you until the needle is at its pin directly under the left bottom side of the accessory drawer cover and pull toward you . 4. Note: Your machine's accessories are stored inside this drawer. REMOVING THE EXTENSION TABLE Hook your finger under the left . To...
...must be changed according to the stitch or technique you . CAUTION: To prevent accidents. Place desired foot with its highest point. 2. OPENING THE ACCESSORY CASE Hook your finger under the slot in presser foot holder. 5. B. Remove the presser foot. 2. Turn off the power switch ...release lever toward you until the needle is at its pin directly under the left bottom side of the accessory drawer cover and pull toward you . 4. Note: Your machine's accessories are stored inside this drawer. REMOVING THE EXTENSION TABLE Hook your finger under the left . To...

