

Instruction Manual
Page 2
... the manufacturer as threading needle, changing needle, threading bobbin, or changing presser foot. 15. Never operate the sewing machine with care and avoid dropping it has been dropped or damaged, or dropped into any object into water. Always use bent needles. 13. Do not pull or push fabric while stitching. IMPORTANT SAFETY INSTRUCTIONS When using a sewing machine, basic safety precautions should be used as described in the instruction manual. 16. Always unplug this sewing machine only for its...
... the manufacturer as threading needle, changing needle, threading bobbin, or changing presser foot. 15. Never operate the sewing machine with care and avoid dropping it has been dropped or damaged, or dropped into any object into water. Always use bent needles. 13. Do not pull or push fabric while stitching. IMPORTANT SAFETY INSTRUCTIONS When using a sewing machine, basic safety precautions should be used as described in the instruction manual. 16. Always unplug this sewing machine only for its...

Instruction Manual
Page 3
... FOOT 84 FABRIC, THREAD AND NEEDLE A. NEEDLE UP-DOWN / SLOW BUTTON 20 D. PRESSURE REGULATOR 22 FREE ARM SEWING 56 OVERCASTING- USING THE GENERAL PURPOSE FOOT 58 BLIND HEM STITCHING..........60 CRAZY PATCH 62 APPLIQUE 62 INSERTING ZIPPERS CENTERED INSERTION .........64 LAPPED INSERTION 66 BUTTONHOLE SEWING .........68 J. START AND END OF SEAM 44 B. REMOVING THE PRESSER FOOT HOLDER 14 INSERTING THE NEEDLE ......16 B. SPEED CONTROL LEVER 20 E. SHIFTING THE CURSOR 88 C. TOP COVER 22 OVERLOCKING 58 H. INSERTING THE BOBBIN 30 EYELET 74 THREADING THE MACHINE...
... FOOT 84 FABRIC, THREAD AND NEEDLE A. NEEDLE UP-DOWN / SLOW BUTTON 20 D. PRESSURE REGULATOR 22 FREE ARM SEWING 56 OVERCASTING- USING THE GENERAL PURPOSE FOOT 58 BLIND HEM STITCHING..........60 CRAZY PATCH 62 APPLIQUE 62 INSERTING ZIPPERS CENTERED INSERTION .........64 LAPPED INSERTION 66 BUTTONHOLE SEWING .........68 J. START AND END OF SEAM 44 B. REMOVING THE PRESSER FOOT HOLDER 14 INSERTING THE NEEDLE ......16 B. SPEED CONTROL LEVER 20 E. SHIFTING THE CURSOR 88 C. TOP COVER 22 OVERLOCKING 58 H. INSERTING THE BOBBIN 30 EYELET 74 THREADING THE MACHINE...
Instruction Manual
Page 10
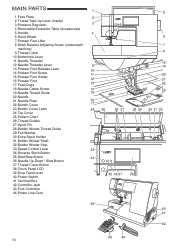
...7 machine) 9. Presser Foot Release Lever 10 14. Needle 21. Needle Plate 16 22. Pattern Chart 26. Reverse Stitch Button 35. Power Switch 35 36 37 38 41. Power Line Cord 39 40 41 42 43 44 10 Face Plate 2 2. Buttonhole Lever 11. Needle Clamp Screw 14 19. Terminal Box 42. Thread Take-Up Lever (Inside) 3. Thread Guides 27. Extra Spool Holder 31. Drop Feed Lever 40. Removable Extension Table (Accessories) 5. Hand Wheel 6 7. Presser Foot Holder 16. Bobbin Cover Latch 24. Needle Threader 12. Presser Foot...
...7 machine) 9. Presser Foot Release Lever 10 14. Needle 21. Needle Plate 16 22. Pattern Chart 26. Reverse Stitch Button 35. Power Switch 35 36 37 38 41. Power Line Cord 39 40 41 42 43 44 10 Face Plate 2 2. Buttonhole Lever 11. Needle Clamp Screw 14 19. Terminal Box 42. Thread Take-Up Lever (Inside) 3. Thread Guides 27. Extra Spool Holder 31. Drop Feed Lever 40. Removable Extension Table (Accessories) 5. Hand Wheel 6 7. Presser Foot Holder 16. Bobbin Cover Latch 24. Needle Threader 12. Presser Foot...
Instruction Manual
Page 12
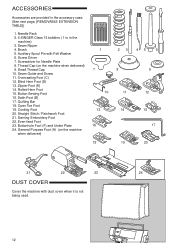
.... Blind Hem Foot (D) 13. Satin Foot (B) 17. Quilting Bar 18. Cording Foot 20. Screw Driver 7. Screwdriver for Needle Plate 8. Darning Embroidery Foot 22. Zipper Foot (E) 14. Straight Stitch / Patchwork Foot 21. General Purpose Foot (A) (on the machine when delivered) 9. Auxiliary Spool Pin with dust cover when it is in the accessory case. (See next page, [REMOVABLE EXTENSION TABLE]) 1. Seam Guide and Screw 11. Open Toe Foot 19. ACCESSORIES Accessories are provided in the machine) 3. Even-feed Foot 23. Brush 5. Small Thread Cap 10. Button Sewing Foot 16. Thread...
.... Blind Hem Foot (D) 13. Satin Foot (B) 17. Quilting Bar 18. Cording Foot 20. Screw Driver 7. Screwdriver for Needle Plate 8. Darning Embroidery Foot 22. Zipper Foot (E) 14. Straight Stitch / Patchwork Foot 21. General Purpose Foot (A) (on the machine when delivered) 9. Auxiliary Spool Pin with dust cover when it is in the accessory case. (See next page, [REMOVABLE EXTENSION TABLE]) 1. Seam Guide and Screw 11. Open Toe Foot 19. ACCESSORIES Accessories are provided in the machine) 3. Even-feed Foot 23. Brush 5. Small Thread Cap 10. Button Sewing Foot 16. Thread...
Instruction Manual
Page 14
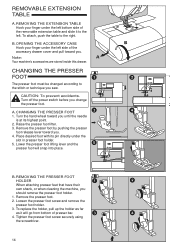
... stitch or technique you . 4. CHANGING THE PRESSER FOOT 1. B. REMOVING THE PRESSER FOOT HOLDER When attaching presser feet that have their own shank, or when cleaning the machine, you . To replace the holder, pull up the holder as far as it to the right. REMOVABLE EXTENSION TABLE A. To attach, push the table to the left bottom side of presser bar. 4. OPENING THE ACCESSORY CASE Hook your finger under the left . CAUTION: To prevent accidents. A. Lower the presser foot lifting lever and the presser foot...
... stitch or technique you . 4. CHANGING THE PRESSER FOOT 1. B. REMOVING THE PRESSER FOOT HOLDER When attaching presser feet that have their own shank, or when cleaning the machine, you . To replace the holder, pull up the holder as far as it to the right. REMOVABLE EXTENSION TABLE A. To attach, push the table to the left bottom side of presser bar. 4. OPENING THE ACCESSORY CASE Hook your finger under the left . CAUTION: To prevent accidents. A. Lower the presser foot lifting lever and the presser foot...

Instruction Manual
Page 20
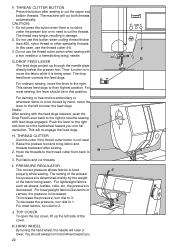
... pressed the second time. C. E. PRESSER FOOT LIFTER The presser foot is not threaded, the machine will stop . (Upper thread sensor) B. If the upper thread is raised or lowered by pressing this button, machine will sew in reverse while this button is connected, machine will sew in down . START/STOP BUTTON The machine will start running when start of sewing. Note: When the foot controller is pressed. While sewing, by this button limits the maximum speed. D. The machine will change the needle position from down...
... pressed the second time. C. E. PRESSER FOOT LIFTER The presser foot is not threaded, the machine will stop . (Upper thread sensor) B. If the upper thread is raised or lowered by pressing this button, machine will sew in reverse while this button is connected, machine will sew in down . START/STOP BUTTON The machine will start running when start of sewing. Note: When the foot controller is pressed. While sewing, by this button limits the maximum speed. D. The machine will change the needle position from down...
Instruction Manual
Page 22
... position. For darning or free motion embroidery or whenever fabric is no fabric under the presser foot or no need to resume sewing with a twin needle or a hemstitching (wing) needle. Note: After sewing with the feed dogs lowered, push the Drop Feed Lever back to the right to cut the upper and bobbin threads. PRESSURE REGULATOR The correct pressure allows fabrics to 3. For lightweight fabrics such as sheers, batiste, voile, etc, the pressure is being sewn. For most sewing, the lever...
... position. For darning or free motion embroidery or whenever fabric is no fabric under the presser foot or no need to resume sewing with a twin needle or a hemstitching (wing) needle. Note: After sewing with the feed dogs lowered, push the Drop Feed Lever back to the right to cut the upper and bobbin threads. PRESSURE REGULATOR The correct pressure allows fabrics to 3. For lightweight fabrics such as sheers, batiste, voile, etc, the pressure is being sewn. For most sewing, the lever...

Instruction Manual
Page 28
... bobbin cover latch to the size of the thread and start the machine by pressing the start /stop automatically when bobbin is full. B. SETTING SPOOL OF THREAD ON SPOOL PIN 1. Set the spool cap on bobbin winder spindle. b. Use the small spool cap when you use only SINGER Class 15 bobbins in both hands and hook thread to the guide from the spindle and cut the thread. 28 Leave small opening . 2. Bring thread to engage bobbin winder. Insert thread through hole in counter clockwise direction...
... bobbin cover latch to the size of the thread and start the machine by pressing the start /stop automatically when bobbin is full. B. SETTING SPOOL OF THREAD ON SPOOL PIN 1. Set the spool cap on bobbin winder spindle. b. Use the small spool cap when you use only SINGER Class 15 bobbins in both hands and hook thread to the guide from the spindle and cut the thread. 28 Leave small opening . 2. Bring thread to engage bobbin winder. Insert thread through hole in counter clockwise direction...

Instruction Manual
Page 30
... the bobbin thread, see page 34. a 3. NOTE: Be sure to sew without drawing up and then down until it clicks into notch (a) while holding the bobbin. Draw thread into place. NOTE: This machine can start to use only SINGER Class 15 bobbins in a counter clockwise direction. 2. D. Replace the bobbin cover. Pull thread along the groove up the bobbin thread. Place bobbin into bobbin holder, making sure the bobbin turns in this machine. 30...
... the bobbin thread, see page 34. a 3. NOTE: Be sure to sew without drawing up and then down until it clicks into notch (a) while holding the bobbin. Draw thread into place. NOTE: This machine can start to use only SINGER Class 15 bobbins in a counter clockwise direction. 2. D. Replace the bobbin cover. Pull thread along the groove up the bobbin thread. Place bobbin into bobbin holder, making sure the bobbin turns in this machine. 30...

Instruction Manual
Page 32
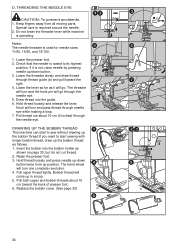
... raise the presser foot lifter before you use needle threader. 32 Not doing so will go. Bring thread to use cross wound thread. Pass through needle eye from right to left along the slit. 7. Pull up the left and pull thread down button to set the spool of thread on how to the left end of spool. Reverse spool cap direction according to back. Leave small opening . 2. C. Pull thread downward...
... raise the presser foot lifter before you use needle threader. 32 Not doing so will go. Bring thread to use cross wound thread. Pass through needle eye from right to left along the slit. 7. Pull up the left and pull thread down button to set the spool of thread on how to the left end of spool. Reverse spool cap direction according to back. Leave small opening . 2. C. Pull thread downward...
Instruction Manual
Page 34
... position. Bobbin thread will go . Hook will turn and pass thread through thread guide (a) and pull toward the back of presser foot. 6. Keep fingers away from up position. Hold thread loosely and press needle up in a loop. 5. THREADING THE NEEDLE EYE CAUTION: To prevent accidents. 1. Special care is operating. Hold thread loosely and release the lever. Insert the bobbin into the guide. 6. Pull upper thread lightly. Replace the bobbin cover. (See page 30) 34 Do not lower the threader lever...
... position. Bobbin thread will go . Hook will turn and pass thread through thread guide (a) and pull toward the back of presser foot. 6. Keep fingers away from up position. Hold thread loosely and press needle up in a loop. 5. THREADING THE NEEDLE EYE CAUTION: To prevent accidents. 1. Special care is operating. Hold thread loosely and release the lever. Insert the bobbin into the guide. 6. Pull upper thread lightly. Replace the bobbin cover. (See page 30) 34 Do not lower the threader lever...

Instruction Manual
Page 36
... right) iii. Touch the desired pattern directly. 4. Stitch Pattern The shape of stitch length, width, mirror/reverse and elongation. Touching this button appears, you can use other presser foot according to the purpose of selected pattern. (Stitch information mode) STITCH INFORMATION a. On the Home screen, touch the Utility button. b. Select utility stitch pattern as follows: i. Touch the scroll down in this booklet. Thread Tension Button (See page 40) d. You can...
... right) iii. Touch the desired pattern directly. 4. Stitch Pattern The shape of stitch length, width, mirror/reverse and elongation. Touching this button appears, you can use other presser foot according to the purpose of selected pattern. (Stitch information mode) STITCH INFORMATION a. On the Home screen, touch the Utility button. b. Select utility stitch pattern as follows: i. Touch the scroll down in this booklet. Thread Tension Button (See page 40) d. You can...

Instruction Manual
Page 40
... side of fabric. D. Helpful Hints 1. You can change tension while sewing. If after checking the top thread and the bobbin thread is selected. The upper thread should be that for correct threading. 2. Refer to page 30 for example, when doing decorative sewing. Touch the tension button. To increase the upper thread tension, touch the [+] button. Increasing Thread Tension Bobbin thread will appear on the bottom side of the fabric. THREAD TENSION This machine sets the thread tension automatically when pattern is...
... side of fabric. D. Helpful Hints 1. You can change tension while sewing. If after checking the top thread and the bobbin thread is selected. The upper thread should be that for correct threading. 2. Refer to page 30 for example, when doing decorative sewing. Touch the tension button. To increase the upper thread tension, touch the [+] button. Increasing Thread Tension Bobbin thread will appear on the bottom side of the fabric. THREAD TENSION This machine sets the thread tension automatically when pattern is...

Instruction Manual
Page 46
... the fabric in reverse stitch. Release the reverse button and press the start to sew these stitches. Press and hold reverse button and sew 4-5 reverse stitches. REVERSE STITCHING Reverse stitching is to be used for information on how to sew the selected pattern. 3. C. This function can be made and lower the presser foot. 2. Start to forward sewing. 4. See page 50 for reinforcing the ends of the stitch. Touch the tack button. Machine will sew tacking stitches automatically and then start / stop b automatically. 4. Note: Stitch patterns...
... the fabric in reverse stitch. Release the reverse button and press the start to sew these stitches. Press and hold reverse button and sew 4-5 reverse stitches. REVERSE STITCHING Reverse stitching is to be used for information on how to sew the selected pattern. 3. C. This function can be made and lower the presser foot. 2. Start to forward sewing. 4. See page 50 for reinforcing the ends of the stitch. Touch the tack button. Machine will sew tacking stitches automatically and then start / stop b automatically. 4. Note: Stitch patterns...
Instruction Manual
Page 52
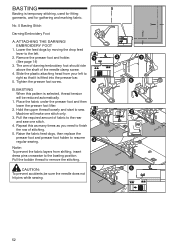
.... 5 Basting Stitch Darning/Embroidery Foot A. ATTACHING THE DARNING/ EMBROIDERY FOOT 1. Slide the plastic attaching head from shifting, insert dress pins crosswise to finish the row of the needle clamp screw. 4. Lower the feed dogs by moving the drop feed lever to the left to right so that it is fitted into the presser bar. 5. Hold the upper thread loosely and start to the rear and sew one stitch only. 3. Pull the required amount of fabric to sew. Raise the fabric feed dogs...
.... 5 Basting Stitch Darning/Embroidery Foot A. ATTACHING THE DARNING/ EMBROIDERY FOOT 1. Slide the plastic attaching head from shifting, insert dress pins crosswise to finish the row of the needle clamp screw. 4. Lower the feed dogs by moving the drop feed lever to the left to right so that it is fitted into the presser bar. 5. Hold the upper thread loosely and start to the rear and sew one stitch only. 3. Pull the required amount of fabric to sew. Raise the fabric feed dogs...

Instruction Manual
Page 54
... damage the machine. JOINING THE PIECES OF FABRIC Join the pieces of fabric using Pattern No. 1 with the fabric without breaking. Bag b. No. 1 Straight Stitch (Center Needle Position) No. 8 Hand Look Quilting Stitch Straight Stitch / Patchwork Quilting Foot Quilting Bar CAUTION: To prevent accidents, do not change the needle position. No. 6 Straight Stretch Stitch No. 7 Stem Stitch for knit and synthetic fabrics to sew successive rows. Trousers d. Insert quilting bar into the hole of fabrics joined together, creating the quilt topper. ELASTIC STITCH SEWING Elastic stitches are...
... damage the machine. JOINING THE PIECES OF FABRIC Join the pieces of fabric using Pattern No. 1 with the fabric without breaking. Bag b. No. 1 Straight Stitch (Center Needle Position) No. 8 Hand Look Quilting Stitch Straight Stitch / Patchwork Quilting Foot Quilting Bar CAUTION: To prevent accidents, do not change the needle position. No. 6 Straight Stretch Stitch No. 7 Stem Stitch for knit and synthetic fabrics to sew successive rows. Trousers d. Insert quilting bar into the hole of fabrics joined together, creating the quilt topper. ELASTIC STITCH SEWING Elastic stitches are...

Instruction Manual
Page 56
... fabric. B. FREE ARM SEWING By simply removing the extension table, you can sew zigzag stitches of various widths and lengths by changing the settings of needle while sewing. No. 12 Multi-Stitch Zigzag General Purpose Foot (A) A. Needle should fall on elastic and overcast stitching. MULTI-STITCH ZIGZAG Used for overcasting. Refer to overcast. No. 9 Zigzag Stitch General Purpose Foot or Satin Foot (A, B) Zigzag stitches are very good for Removing the Extension Table. 56 Note: Refer to ravel and knit fabrics. ZIGZAG STITCH SEWING Your machine can access the free arm, making...
... fabric. B. FREE ARM SEWING By simply removing the extension table, you can sew zigzag stitches of various widths and lengths by changing the settings of needle while sewing. No. 12 Multi-Stitch Zigzag General Purpose Foot (A) A. Needle should fall on elastic and overcast stitching. MULTI-STITCH ZIGZAG Used for overcasting. Refer to overcast. No. 9 Zigzag Stitch General Purpose Foot or Satin Foot (A, B) Zigzag stitches are very good for Removing the Extension Table. 56 Note: Refer to ravel and knit fabrics. ZIGZAG STITCH SEWING Your machine can access the free arm, making...

Instruction Manual
Page 74
... lower the presser foot. Press the thread cutter button and raise the presser foot. 3. Remove the basting. Wrong side of the eyelet. Make a hole in the center of fabric NOTE: When sewing lighter weight fabric, reinforce buttonhole area. Machine will sew the eyelet and stop automatically. 2. EYELET This stitch pattern is not provided with this machine. 74 Note: Eyelet punch is used for making belt holes and other similar applications. 117 Eyelet Satin Foot (B) You can choose 3 sizes...
... lower the presser foot. Press the thread cutter button and raise the presser foot. 3. Remove the basting. Wrong side of the eyelet. Make a hole in the center of fabric NOTE: When sewing lighter weight fabric, reinforce buttonhole area. Machine will sew the eyelet and stop automatically. 2. EYELET This stitch pattern is not provided with this machine. 74 Note: Eyelet punch is used for making belt holes and other similar applications. 117 Eyelet Satin Foot (B) You can choose 3 sizes...

Instruction Manual
Page 84
... speed, guiding hoop carefully so needle moves along line of the needle clamp screw. 4. Reinforce open areas with an even motion, stitching in place before darning. Place fabric under needle and lower the foot. 4. Slide the plastic attaching head from side to side in front and back of area to the right. DARNING 1. Start sewing, moving fabric by moving the drop feed lever to be embroidered between the two sections of the fabric. 2. Remove the presser foot and holder...
... speed, guiding hoop carefully so needle moves along line of the needle clamp screw. 4. Reinforce open areas with an even motion, stitching in place before darning. Place fabric under needle and lower the foot. 4. Slide the plastic attaching head from side to side in front and back of area to the right. DARNING 1. Start sewing, moving fabric by moving the drop feed lever to be embroidered between the two sections of the fabric. 2. Remove the presser foot and holder...

Instruction Manual
Page 104
...Readjust thread tension. 40 Stitch pattern is Presser foot is not raised. Adjust the thread tension. 40 Adjust the balance of the stitches. 98 Threader does not thread needle eye Needle is not suited for 16 fabric. (use stretch needle) Fabric puckers Machine not properly threaded. Clean the feed dog area. 100 Needle breaks Fabric pulled while sewing. Lower the foot. 20 Buttonhole Sewing Mode; * Buttonhole lever is not balanced. Readjust thread tension. 40 Thread of needle. (on . Re-thread machine. 32 Re-thread the bobbin. 30 Insert new needle. 16...
...Readjust thread tension. 40 Stitch pattern is Presser foot is not raised. Adjust the thread tension. 40 Adjust the balance of the stitches. 98 Threader does not thread needle eye Needle is not suited for 16 fabric. (use stretch needle) Fabric puckers Machine not properly threaded. Clean the feed dog area. 100 Needle breaks Fabric pulled while sewing. Lower the foot. 20 Buttonhole Sewing Mode; * Buttonhole lever is not balanced. Readjust thread tension. 40 Thread of needle. (on . Re-thread machine. 32 Re-thread the bobbin. 30 Insert new needle. 16...


