
Instruction Manual
Page 5
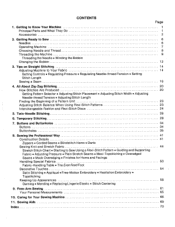
... tension 24 - 25 Changing presser foot 24 - 25 Control panel functions 26 - 27 Reverse operation button 28 - 29 2. STARTING TO SEW Quick reference table of stitch length and width 30 - 31 Straight stitching 32 ...stitch Placement of the equipment: 8.3 kg Rated Voltage: 230 V ~ Rated Frequency: 50 Hz Rated input: 75 W Using ambient temperature: Normal temperature Acoustic noise level: less than 70 db(A) 3 TABLE OF CONTENTS 1. CARING FOR YOUR MACHINE Cleaning hook area and feed dogs 50 - 51 Cleaning the sewing machine and foot controller 4. KNOWING YOUR SEWING MACHINE Machine...
... tension 24 - 25 Changing presser foot 24 - 25 Control panel functions 26 - 27 Reverse operation button 28 - 29 2. STARTING TO SEW Quick reference table of stitch length and width 30 - 31 Straight stitching 32 ...stitch Placement of the equipment: 8.3 kg Rated Voltage: 230 V ~ Rated Frequency: 50 Hz Rated input: 75 W Using ambient temperature: Normal temperature Acoustic noise level: less than 70 db(A) 3 TABLE OF CONTENTS 1. CARING FOR YOUR MACHINE Cleaning hook area and feed dogs 50 - 51 Cleaning the sewing machine and foot controller 4. KNOWING YOUR SEWING MACHINE Machine...
Instruction Manual
Page 8
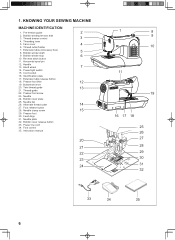
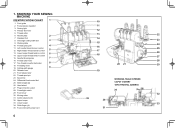
... 3 4. Extension table release button 18. Twin thread guide 13 21. Needle plate 32. Power line cord 34. KNOWING YOUR SEWING MACHINE MACHINE IDENTIFICATION 1. Bobbin winder shaft 5 9. Reverse stitch button 11. Instruction manual 20 21 22 23 24 1 8 9 10 11 19 16 17 18 25 26 27 28 29 30 31 32 33 34 35 6 Horizontal...
... 3 4. Extension table release button 18. Twin thread guide 13 21. Needle plate 32. Power line cord 34. KNOWING YOUR SEWING MACHINE MACHINE IDENTIFICATION 1. Bobbin winder shaft 5 9. Reverse stitch button 11. Instruction manual 20 21 22 23 24 1 8 9 10 11 19 16 17 18 25 26 27 28 29 30 31 32 33 34 35 6 Horizontal...

Instruction Manual
Page 26
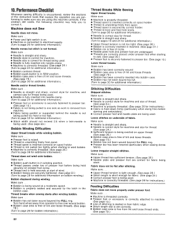
...it. You will need to adjust the tension control. Raise presser foot lifter. 1. Place the desired foot on the foot. 2 24 Presser foot lifter Levier du pied presseur Palanca pie prensatelas 3 1 Foot release button Levier de verrouillage du pied Boton de desprendimiento ...the up position. A balanced tension (identical stitches both top and bobbin threads. Lower the presser foot lifter so that the machine is largely determined by the balanced tension of the machine. Do this, however, only after you are sewing. STRAIGHT STITCHING The correct appearance of your fabric. The...
...it. You will need to adjust the tension control. Raise presser foot lifter. 1. Place the desired foot on the foot. 2 24 Presser foot lifter Levier du pied presseur Palanca pie prensatelas 3 1 Foot release button Levier de verrouillage du pied Boton de desprendimiento ...the up position. A balanced tension (identical stitches both top and bobbin threads. Lower the presser foot lifter so that the machine is largely determined by the balanced tension of the machine. Do this, however, only after you are sewing. STRAIGHT STITCHING The correct appearance of your fabric. The...
Instruction Manual
Page 56
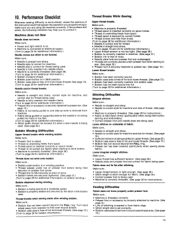
... not lowered - Raise feed dogs. STITCHING PROBLEMS Machine skips stitches. * Needle is not all the way up into the needle clamp (see page 18 - 19). * Thread is caught in bobbin case or hook. - Clean hook (see page 23). Adjust thread tension (see page 24 - 25). * Fabric is not raised when sewing stitch patterns. - Guide it gently...
... not lowered - Raise feed dogs. STITCHING PROBLEMS Machine skips stitches. * Needle is not all the way up into the needle clamp (see page 18 - 19). * Thread is caught in bobbin case or hook. - Clean hook (see page 23). Adjust thread tension (see page 24 - 25). * Fabric is not raised when sewing stitch patterns. - Guide it gently...
Instruction Manual 3
Page 5
... Use Them Page .. 2 2 Getting Ready to Know Your Sewing Machine Principal Parts - And What They Do Accessories - CONTENTS Getting to Sew Preliminary Steps Choosing Needle and Thread Threading Your Sewing Machine 9 • a 10 Straight Stiching l,e0" Adjusting Selectors 17 Sewing a Seam -!9 Zick-Zack Stitching Satin Stitching 22' . . • 24 Twin-Needle Stitching 25 Preparation 25 Threading the Needle 26 Buttons...
... Use Them Page .. 2 2 Getting Ready to Know Your Sewing Machine Principal Parts - And What They Do Accessories - CONTENTS Getting to Sew Preliminary Steps Choosing Needle and Thread Threading Your Sewing Machine 9 • a 10 Straight Stiching l,e0" Adjusting Selectors 17 Sewing a Seam -!9 Zick-Zack Stitching Satin Stitching 22' . . • 24 Twin-Needle Stitching 25 Preparation 25 Threading the Needle 26 Buttons...

Instruction Manual 3
Page 21
... in mm; the higher the number the longer the stitch. The numbers on the dial express stitch length in while the machine is positioned under the IV symbol on the control panel. • To shorten the stitch length, turn the dial clockwise to a lower number....the stitch, turn the dial counterclockwise to forWard stitching. (For detailed instructions on the push button to return to a higher number. Turn dial so that the stitch length desired is sewing). longer ones for the adjustment of stitches. adjusting selectors for your fabric ADJUSTING STITCH LENGTH The stitch length ...
... in mm; the higher the number the longer the stitch. The numbers on the dial express stitch length in while the machine is positioned under the IV symbol on the control panel. • To shorten the stitch length, turn the dial clockwise to a lower number....the stitch, turn the dial counterclockwise to forWard stitching. (For detailed instructions on the push button to return to a higher number. Turn dial so that the stitch length desired is sewing). longer ones for the adjustment of stitches. adjusting selectors for your fabric ADJUSTING STITCH LENGTH The stitch length ...
Instruction Manual 4
Page 5
Tips on Straight Stitching Adjusting Machine to Know Your Machine Principal Parts and What They Do Accessories 2. Sewing Aids Index Page 1 1 2 6 6 7 8 9 12 14 14 16 20 20 23 23 24 26 28 34 34 35 41 41 44 50 54 58 61 65 66 69 70 Getting to Your Fabric Setting Controls • Regulating Pressure &#...
Tips on Straight Stitching Adjusting Machine to Know Your Machine Principal Parts and What They Do Accessories 2. Sewing Aids Index Page 1 1 2 6 6 7 8 9 12 14 14 16 20 20 23 23 24 26 28 34 34 35 41 41 44 50 54 58 61 65 66 69 70 Getting to Your Fabric Setting Controls • Regulating Pressure &#...
Instruction Manual 4
Page 7
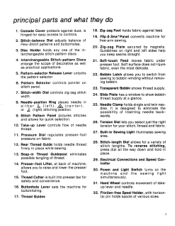
... turns on stitch panel. 7. Pattern Selector controls pointer on the machine and the sewing light simultaneously. 31. Stitch-width Dial controls zig-zag stitch width. 8. Flip & Sew*Panel converts machine for buttonholing...(center), or j. (right) stitching position. 9. Transparent Bobbin shows thread supply. 24. Console Cover protects against feed. 19. Stitch-balance Dial adjusts balance of stitch lengths. Stitch-length Dial allows for safety and...11. Disc Holder holds any one of machine, allows you select just the right tension for quick selection. 10. Electrical...
... turns on stitch panel. 7. Pattern Selector controls pointer on the machine and the sewing light simultaneously. 31. Stitch-width Dial controls zig-zag stitch width. 8. Flip & Sew*Panel converts machine for buttonholing...(center), or j. (right) stitching position. 9. Transparent Bobbin shows thread supply. 24. Console Cover protects against feed. 19. Stitch-balance Dial adjusts balance of stitch lengths. Stitch-length Dial allows for safety and...11. Disc Holder holds any one of machine, allows you select just the right tension for quick selection. 10. Electrical...

Instruction Manual 4
Page 30
...producing bold topstitching. See page 47 for smocking with your machine produce the stitches illustrated below. Attractive for borders and for special selector settings. 71 f: 72 irs .L? A traditional pattern used for 76 sewing knit, stretch, and elasticized fabrics. Ideal for hemstitching, drawn... Slant Overedge Stitch - Effective in one operation. Also reversible topstitching. 75 75 Tulip Stitch - All discs are reversible and produce two patterns. Insert the desired disc (see next page for instructions) and set speed range at the same time. 24 Provides flexibility....
...producing bold topstitching. See page 47 for smocking with your machine produce the stitches illustrated below. Attractive for borders and for special selector settings. 71 f: 72 irs .L? A traditional pattern used for 76 sewing knit, stretch, and elasticized fabrics. Ideal for hemstitching, drawn... Slant Overedge Stitch - Effective in one operation. Also reversible topstitching. 75 75 Tulip Stitch - All discs are reversible and produce two patterns. Insert the desired disc (see next page for instructions) and set speed range at the same time. 24 Provides flexibility....
Instruction Manual 4
Page 76
...Stitches Buttonholes One-step Buttonholes Corded Buttonholes Buttons Caring for your Machine Chainstitching Checklist, Performance Choosing Needle and Thread Corded Seams Darning Darts Decorative Touches Discs Fashion Stitch Discs Flexi-Stitch...25 3 3 25 59 7 56 2, 52 50-51 8 3 . 49 . 3 61 56 45 24 22 67 59 49 2, 6, 10, 21, 26 6 . 1 1, 21 10, 26 48 23...Sewing Aids 69 Sewing Knit and Stretch Fabric 44 Speed Controller 1, 7 Spool Holder 1, 6 Starting to Sew 17, 23, 45 Stitch Balance 23 Stitch Length Adjustments 15, 22 Stitch Placement 21 Stitch-width Dial . 1, 22 Straight Stitching...
...Stitches Buttonholes One-step Buttonholes Corded Buttonholes Buttons Caring for your Machine Chainstitching Checklist, Performance Choosing Needle and Thread Corded Seams Darning Darts Decorative Touches Discs Fashion Stitch Discs Flexi-Stitch...25 3 3 25 59 7 56 2, 52 50-51 8 3 . 49 . 3 61 56 45 24 22 67 59 49 2, 6, 10, 21, 26 6 . 1 1, 21 10, 26 48 23...Sewing Aids 69 Sewing Knit and Stretch Fabric 44 Speed Controller 1, 7 Spool Holder 1, 6 Starting to Sew 17, 23, 45 Stitch Balance 23 Stitch Length Adjustments 15, 22 Stitch Placement 21 Stitch-width Dial . 1, 22 Straight Stitching...
Instruction Manual 5
Page 4
... pattern 19 Accessories 4 Function of stitch width dial and stitch length dial 20 Fitting the snap-in sewing table 5 Blind hem/ lingerie stitch 21 Connecting machine to power source 6 Overlock stitches (for models A, B & C 22 Changing the bulb 7 Sewing on buttons 23 Two-step presser foot lifter/ Adjusting presser foot pressure .........8 Sew 4-step buttonholes 24 Attaching the presser foot holder...
... pattern 19 Accessories 4 Function of stitch width dial and stitch length dial 20 Fitting the snap-in sewing table 5 Blind hem/ lingerie stitch 21 Connecting machine to power source 6 Overlock stitches (for models A, B & C 22 Changing the bulb 7 Sewing on buttons 23 Two-step presser foot lifter/ Adjusting presser foot pressure .........8 Sew 4-step buttonholes 24 Attaching the presser foot holder...

Instruction Manual 5
Page 22
...20 21 22 23 24 25 26 27 28 29 30 31 32 33 34 35 36 37 38 Model A 3 DIALS B 3 DIALS C 2 DIALS D 1 DIAL 19 Stitch width dial (models A & B) Stitch length dial (models A, B & C) Stitch display A Stitch pattern selector dial (...stitch width dial and stitch length dial. If you determine your sewing machine is your sewing machine. In addition to stitch patterns there is red. As you study the chart on the stitch length dial is also a difference in the stitch display window. For example to sew honeycomb pattern 19 the stitch graphic is the type and number of sewing machines...
...20 21 22 23 24 25 26 27 28 29 30 31 32 33 34 35 36 37 38 Model A 3 DIALS B 3 DIALS C 2 DIALS D 1 DIAL 19 Stitch width dial (models A & B) Stitch length dial (models A, B & C) Stitch display A Stitch pattern selector dial (...stitch width dial and stitch length dial. If you determine your sewing machine is your sewing machine. In addition to stitch patterns there is red. As you study the chart on the stitch length dial is also a difference in the stitch display window. For example to sew honeycomb pattern 19 the stitch graphic is the type and number of sewing machines...

Instruction Manual 6
Page 54
... Work 43-44 Guiding and Supporting Fabric O O. . . 24 Length of Stitch, Regulating Needle and Thread Selection Needle Insertion Oiling and Lubricating Oiling the Stand Preparing to Sew Pressure Adjustments Principal Parts of Machine Seams, Straight SINGER Service Tension Adjustments Bobbin Thread Needle Thread Threading (upper) To Operate the Machine PAGE 18 5 6 46-47-48 49 20...
... Work 43-44 Guiding and Supporting Fabric O O. . . 24 Length of Stitch, Regulating Needle and Thread Selection Needle Insertion Oiling and Lubricating Oiling the Stand Preparing to Sew Pressure Adjustments Principal Parts of Machine Seams, Straight SINGER Service Tension Adjustments Bobbin Thread Needle Thread Threading (upper) To Operate the Machine PAGE 18 5 6 46-47-48 49 20...
Instruction Manual 13
Page 77
...page 72.) • Bobbin has been correctly inserted into needle-clamp. (Turn to page 24 for additional information.) • Presser foot or accessory is securely fastened to presser bar. (See ...page 10.) • Fabric is not being pulled to one side as work is removed from spool. • Thread spool is secured by the latch... after winding bobbin. Thread breaks when sewing starts after stitching. Performance Checklist Whenever sewing difficulty is encountered, review the sections of thread. (See page 18.) • Machine is even and free from lint and...
...page 72.) • Bobbin has been correctly inserted into needle-clamp. (Turn to page 24 for additional information.) • Presser foot or accessory is securely fastened to presser bar. (See ...page 10.) • Fabric is not being pulled to one side as work is removed from spool. • Thread spool is secured by the latch... after winding bobbin. Thread breaks when sewing starts after stitching. Performance Checklist Whenever sewing difficulty is encountered, review the sections of thread. (See page 18.) • Machine is even and free from lint and...
Instruction Manual 13
Page 80
...-Stitch Operating the Machine Overedged Seams Patterns Blindstitch Fagotting (Featherstitch) Honeycomb Multi-Stitch Zig-Zag Overedge Stretch Stitch Scallop Stitch Straight Stretch Stitch Zig-Zag Performance Checklist Power and Light Switch Presser Feet Buttonhole Foot Changing Presser Feet Darning and Embroidery Foot General Purpose Special Purpose Foot Straight Stitch Foot Zipper Foot Principal Parts Reverse Stitching 56 53 6 24 24...
...-Stitch Operating the Machine Overedged Seams Patterns Blindstitch Fagotting (Featherstitch) Honeycomb Multi-Stitch Zig-Zag Overedge Stretch Stitch Scallop Stitch Straight Stretch Stitch Zig-Zag Performance Checklist Power and Light Switch Presser Feet Buttonhole Foot Changing Presser Feet Darning and Embroidery Foot General Purpose Special Purpose Foot Straight Stitch Foot Zipper Foot Principal Parts Reverse Stitching 56 53 6 24 24...
Instruction Manual 14
Page 83
... should not exceed 2.5 when a twin-needle is free of thread. (See page 24.) • Machine is properly threaded. (See page 26 for bobbin information.) Thread Breaks While Sewing Upper thread breaks. Thread breaks when sewing starts after stitching. Make sure . . . • Bobbin has been correctly wound: • ... has been correctly inserted into needle-clamp. (Turn to page 24 for additional information.) • Presser foot or accessory is securely fastened to presser bar. (See page 1 0.) • Fabric is not being pulled to one side as work is removed from knots. (Turn to page 36...
... should not exceed 2.5 when a twin-needle is free of thread. (See page 24.) • Machine is properly threaded. (See page 26 for bobbin information.) Thread Breaks While Sewing Upper thread breaks. Thread breaks when sewing starts after stitching. Make sure . . . • Bobbin has been correctly wound: • ... has been correctly inserted into needle-clamp. (Turn to page 24 for additional information.) • Presser foot or accessory is securely fastened to presser bar. (See page 1 0.) • Fabric is not being pulled to one side as work is removed from knots. (Turn to page 36...
Instruction Manual 14
Page 86
... Machine Choosing and Changing Accessories Connecting Machine 79-82 9,10,11 25 Darning 44 Darts 45 Decorative Stitching 46 Elastic Replacing 60 Electrical Connections 5,25 Fabric, Thread and Needle Table Fabric Weight Table Flexi-Stitch Patterns Free-Arm Sewing ...18-23 12-17 33,52 78 Guiding and Supporting Fabric 53 Light Bulb 82 Lower Thread Tension 37 Mending 62 Mock Overedging 57 Needle Changing Threading Thread Tension Needle Plate Changing Plates Feed Cover General Purpose Straight-Stitch 6,24,28,36 24 28 36,47,49 6,7,11 11 8,11 6 7 Operating the Machine...
... Machine Choosing and Changing Accessories Connecting Machine 79-82 9,10,11 25 Darning 44 Darts 45 Decorative Stitching 46 Elastic Replacing 60 Electrical Connections 5,25 Fabric, Thread and Needle Table Fabric Weight Table Flexi-Stitch Patterns Free-Arm Sewing ...18-23 12-17 33,52 78 Guiding and Supporting Fabric 53 Light Bulb 82 Lower Thread Tension 37 Mending 62 Mock Overedging 57 Needle Changing Threading Thread Tension Needle Plate Changing Plates Feed Cover General Purpose Straight-Stitch 6,24,28,36 24 28 36,47,49 6,7,11 11 8,11 6 7 Operating the Machine...

Instruction Manual 15
Page 5
... 2-thread wrapped edge overlock 37 2-thread standard rolled hem stitching 37 2) 3-thread standard rolled hem stitching 38 3-thread upper looper thread wrapped rolled hem stitching 38 24. Chaining Off and Test Sewing 29 Page 22. How to Sewing 9 9. How to Adjust the Seam Width 21 •... 44 •How to Adjust the Stitch Length 21 14. Relationship between Cloth, Thread and Needle. ...49 28. Threading the Machine 12 •Threading diagram 12 • Understanding the color code 12 •To thread the machine correctly 12 1) Threading the upper looper...
... 2-thread wrapped edge overlock 37 2-thread standard rolled hem stitching 37 2) 3-thread standard rolled hem stitching 38 3-thread upper looper thread wrapped rolled hem stitching 38 24. Chaining Off and Test Sewing 29 Page 22. How to Sewing 9 9. How to Adjust the Seam Width 21 •... 44 •How to Adjust the Stitch Length 21 14. Relationship between Cloth, Thread and Needle. ...49 28. Threading the Machine 12 •Threading diagram 12 • Understanding the color code 12 •To thread the machine correctly 12 1) Threading the upper looper...

Instruction Manual 15
Page 41
... achieved by adjusting the tension of the garment. • Sew the seam. trimming the excess fabric. 24. STITCH VARIATIONS AND SEWING TECHNIQUES How to flatten the seam. • The flatlock stitch can be used as a construction and decorative stitch or for ornamentation only. (1) Machine Set Up • Remove the left or right needle. 0 0 • Begin with the...
... achieved by adjusting the tension of the garment. • Sew the seam. trimming the excess fabric. 24. STITCH VARIATIONS AND SEWING TECHNIQUES How to flatten the seam. • The flatlock stitch can be used as a construction and decorative stitch or for ornamentation only. (1) Machine Set Up • Remove the left or right needle. 0 0 • Begin with the...
Instruction Manual 17
Page 6
... 8 18. Release lever 21. Spool disc 24. Differential feed control dial 25. Power/light switch 29. Stitch finger (A) 35. Thread cutter 6. Working table 10. Thread cutter lever 17. Foot release lever 22. Hand wheel 27. Front cover 30. Cutter release knob 32. Threading chart 19. 1. KNOWING YOUR SEWING MACHINE IDENTIFICATION CHART 1 1. Cord guide 2. Foot...
... 8 18. Release lever 21. Spool disc 24. Differential feed control dial 25. Power/light switch 29. Stitch finger (A) 35. Thread cutter 6. Working table 10. Thread cutter lever 17. Foot release lever 22. Hand wheel 27. Front cover 30. Cutter release knob 32. Threading chart 19. 1. KNOWING YOUR SEWING MACHINE IDENTIFICATION CHART 1 1. Cord guide 2. Foot...


