
Instruction Manual
Page 48
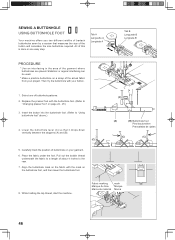
tab A Languette A Lengüeta A tab B Languette B Lengüeta B PROCEDURE * Use an interfacing in one of buttonhole patterns. 2. Select one easy step. Replace the presser foot with the buttonhole foot. (Refer to "Changing presser foot" on the buttonhole foot, ... (C) (C) 8. Lower the buttonhole lever (C) so that measures the size of the button and calculates the size buttonhole required. SEWING A BUTTONHOLE USING BUTTONHOLE FOOT Your machine offers you two different widths of bartack buttonholes sewn by a system that it drops down vertically between the stoppers (A) and (B)....
tab A Languette A Lengüeta A tab B Languette B Lengüeta B PROCEDURE * Use an interfacing in one of buttonhole patterns. 2. Select one easy step. Replace the presser foot with the buttonhole foot. (Refer to "Changing presser foot" on the buttonhole foot, ... (C) (C) 8. Lower the buttonhole lever (C) so that measures the size of the button and calculates the size buttonhole required. SEWING A BUTTONHOLE USING BUTTONHOLE FOOT Your machine offers you two different widths of bartack buttonholes sewn by a system that it drops down vertically between the stoppers (A) and (B)....

Instruction Manual 2
Page 5
... Machine 101.4, for use , has a rotary sewing hook on pages 11 and 12, is easy to carry. It is also equipped with Machine 101-4. Cabinets 40 and 306, shown on pages 1 and 10, respectively, are made of aluminum which reduces the weight of a knee lever. It is -especially designed for operation by means of the machine...
... Machine 101.4, for use , has a rotary sewing hook on pages 11 and 12, is easy to carry. It is also equipped with Machine 101-4. Cabinets 40 and 306, shown on pages 1 and 10, respectively, are made of aluminum which reduces the weight of a knee lever. It is -especially designed for operation by means of the machine...

Instruction Manual 2
Page 30
...point is sufficient. VIEW OF SEWING•HooK SHOWING OILING POINTS apply a drop of oil to the left the slide in movable contact, the D E vat 5 :*; • E ' tk's'c ys' E 672* FIG.. 27. One drop of oil at each of the places shown by arrows in the machine for bearings which cannot be...27, 28 and 29. With moderate use, an occasional oiling is sufficient with the exception of the oil hole (C, Fig. 27) into which may have accumulated around the sewing hook, take out the bobbin and FIG. 28. 28 To Oil the Machine To ensure easy running and prevent unnecessary wear of the ...
...point is sufficient. VIEW OF SEWING•HooK SHOWING OILING POINTS apply a drop of oil to the left the slide in movable contact, the D E vat 5 :*; • E ' tk's'c ys' E 672* FIG.. 27. One drop of oil at each of the places shown by arrows in the machine for bearings which cannot be...27, 28 and 29. With moderate use, an occasional oiling is sufficient with the exception of the oil hole (C, Fig. 27) into which may have accumulated around the sewing hook, take out the bobbin and FIG. 28. 28 To Oil the Machine To ensure easy running and prevent unnecessary wear of the ...

Instruction Manual 3
Page 37
...length (1.5 to 2 mm). 33 Smoothing Pile away from entire seam allowance to see page 18). use them for bound buttonholes and easy button loops. • Coat hems are less bulky if they are easy to reduce bulk. • Stitch 6 mm pre-shrunk tape into neckline and shoulder seams for ...For unpuckered seams, pin or hand baste together and then stitch under light tension (see and remove. • Sew in direction of nap. • Stitch with a fairly long machine stitch(2,5to3mm)and use a ball-point needle and a shorter-than baste, seams. Place pins at close intervals at right angles to the...
...length (1.5 to 2 mm). 33 Smoothing Pile away from entire seam allowance to see page 18). use them for bound buttonholes and easy button loops. • Coat hems are less bulky if they are easy to reduce bulk. • Stitch 6 mm pre-shrunk tape into neckline and shoulder seams for ...For unpuckered seams, pin or hand baste together and then stitch under light tension (see and remove. • Sew in direction of nap. • Stitch with a fairly long machine stitch(2,5to3mm)and use a ball-point needle and a shorter-than baste, seams. Place pins at close intervals at right angles to the...

Instruction Manual 4
Page 13
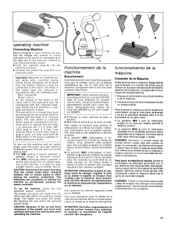
... allows for long, straight seams, and easy-to-handle fabrics. To turn on the machine and set speed range, push the power and light switch to desired speed. This eliminates the possibility of starting the machine by accidentally pressing the speed controller. setting... the machine will sew within the selected speed range. Use this setting provides is best for maximum control. Connecting and Operating Machine Power-Line Plug Machine Plug Speed Controller Power and Light Switch OFF A Machine Socket 7 operating machine CONNECTING MACHINE Before plugging in your machine, be...
... allows for long, straight seams, and easy-to-handle fabrics. To turn on the machine and set speed range, push the power and light switch to desired speed. This eliminates the possibility of starting the machine by accidentally pressing the speed controller. setting... the machine will sew within the selected speed range. Use this setting provides is best for maximum control. Connecting and Operating Machine Power-Line Plug Machine Plug Speed Controller Power and Light Switch OFF A Machine Socket 7 operating machine CONNECTING MACHINE Before plugging in your machine, be...

Instruction Manual 4
Page 22
... pins out of the presser foot. We do not extend under the presser foot. When placing bulky fabrics, such as you sew easy-to-handle fabric. Never place pins on speed basting by raising the presser-foot lifter to its up position. Normal Up Position Presser-foot Lifter ...0 High Position Up Position PLACING FABRIC Most fabric can be placed under the presser foot by machine, turn to page 28. Pin Placement When Seam Guide is Used Pins Nip into the fabric at the stitching line. • They do not recommend sewing over pins. Use fine pins and place them so that: .
... pins out of the presser foot. We do not extend under the presser foot. When placing bulky fabrics, such as you sew easy-to-handle fabric. Never place pins on speed basting by raising the presser-foot lifter to its up position. Normal Up Position Presser-foot Lifter ...0 High Position Up Position PLACING FABRIC Most fabric can be placed under the presser foot by machine, turn to page 28. Pin Placement When Seam Guide is Used Pins Nip into the fabric at the stitching line. • They do not recommend sewing over pins. Use fine pins and place them so that: .
Instruction Manual 4
Page 31
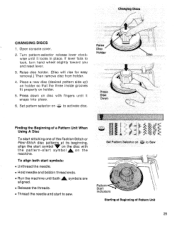
...selector release lever clock- Place a new disc (desired pattern side up) on holder so that the three inside grooves fit properly on © to sew. F Set Pattern Selector on holder. 5. Open console cover. To align both aligned. symbols are • Release the threads. • Thread ...Finding the Beginning of a Pattern Unit When Using A Disc To start stitching one of the Fashion Stitch or Flexi-Stitch disc patterns at Beginning of Pattern Unit 25 Press down on the machine. Press Disc Down 6. Raise disc holder. (Disc will rise for easy removal.) Then remove disc from holder. ...
...selector release lever clock- Place a new disc (desired pattern side up) on holder so that the three inside grooves fit properly on © to sew. F Set Pattern Selector on holder. 5. Open console cover. To align both aligned. symbols are • Release the threads. • Thread ...Finding the Beginning of a Pattern Unit When Using A Disc To start stitching one of the Fashion Stitch or Flexi-Stitch disc patterns at Beginning of Pattern Unit 25 Press down on the machine. Press Disc Down 6. Raise disc holder. (Disc will rise for easy removal.) Then remove disc from holder. ...
Instruction Manual 4
Page 47
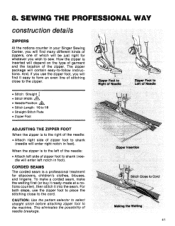
...construction details ZIPPERS At the notions counter in your Singer Sewing Center, you will find many different kinds of zippers, one of zipper foot to sew. CORDED SEAMS The corded seam is to the... the seam. CAUTION: Use the pattern selector to select straight stitch before attaching zipper foot to Cord C) Making the Welting 41 Zipper Insertion Stitch Close to the machine. Zipper Foot to Right...location of needle breakage. 8. When the zipper is inserted will contain easy-to the cord. For both steps, use the zipper foot, you wish to shank (needle will enter left side of...
...construction details ZIPPERS At the notions counter in your Singer Sewing Center, you will find many different kinds of zippers, one of zipper foot to sew. CORDED SEAMS The corded seam is to the... the seam. CAUTION: Use the pattern selector to select straight stitch before attaching zipper foot to Cord C) Making the Welting 41 Zipper Insertion Stitch Close to the machine. Zipper Foot to Right...location of needle breakage. 8. When the zipper is inserted will contain easy-to the cord. For both steps, use the zipper foot, you wish to shank (needle will enter left side of...

Instruction Manual 9
Page 4
... 3) over toward you. It will start the band wheel, treadle and pitman, the sewing mechanism having been disconnected. When you are thoroughly familiar with the treadle movement and can ...be necessary to hold the balance wheel while loosening the stop motion (E, Fig. 3) by use of the treadle and permitting the winding of Contents Previous Page | Next Page 4 Continue... without unthreading the machine. FIG 3. After releasing the balance wheel, place your feet upon it, and operate the machine in this way without being threaded, until a regular and easy movement is necessary ...
... 3) over toward you. It will start the band wheel, treadle and pitman, the sewing mechanism having been disconnected. When you are thoroughly familiar with the treadle movement and can ...be necessary to hold the balance wheel while loosening the stop motion (E, Fig. 3) by use of the treadle and permitting the winding of Contents Previous Page | Next Page 4 Continue... without unthreading the machine. FIG 3. After releasing the balance wheel, place your feet upon it, and operate the machine in this way without being threaded, until a regular and easy movement is necessary ...
Instruction Manual 13
Page 27
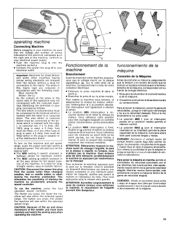
...desired speed. If a 13 Amp. (BS. 1363) plug is used , a 5 Amp. This will also turn on the machine and set speed range, push the power and light switch e to...machine will sew within the selected speed range. IMPORTANT: Votre machine fonctionne exclusivement sur courant 220/230 volts. Renseignez-vous aupres de votre Ami SINGER ou de votre magasin SINGER. • Enfoncez la prise machine...sewing light. • The MIN setting f (switch pressed in halfway) allows for long, straight seams, easy-to the terminal which is marked with the coloured markings identifying the terminals in your machine...
...desired speed. If a 13 Amp. (BS. 1363) plug is used , a 5 Amp. This will also turn on the machine and set speed range, push the power and light switch e to...machine will sew within the selected speed range. IMPORTANT: Votre machine fonctionne exclusivement sur courant 220/230 volts. Renseignez-vous aupres de votre Ami SINGER ou de votre magasin SINGER. • Enfoncez la prise machine...sewing light. • The MIN setting f (switch pressed in halfway) allows for long, straight seams, easy-to the terminal which is marked with the coloured markings identifying the terminals in your machine...
Instruction Manual 14
Page 26
...is marked with the letter L or coloured red. It is used , a 3 Amp. The lighter you press, the faster the machine will sew within the selected speed range. a Fonctionnement de la machine Branchement Avant de brancher votre machine, assurezvous que le voltage inscrit sur la plaque signaletique (a), sur... the sewing light. • The MIN setting f (switch pressed in halfway) allows for Great Britain and some other type of plug is best for long, straight seams, easy-to the terminal which is used , a 5 Amp. illustre en g) permet d'obtenir la vitesse maximum de la machine. The...
...is marked with the letter L or coloured red. It is used , a 3 Amp. The lighter you press, the faster the machine will sew within the selected speed range. a Fonctionnement de la machine Branchement Avant de brancher votre machine, assurezvous que le voltage inscrit sur la plaque signaletique (a), sur... the sewing light. • The MIN setting f (switch pressed in halfway) allows for Great Britain and some other type of plug is best for long, straight seams, easy-to the terminal which is used , a 5 Amp. illustre en g) permet d'obtenir la vitesse maximum de la machine. The...

Instruction Manual 17
Page 54
...stitched and sew over a cord or braid, holding it away from you until the cutter snaps into the "up" position. 54 Decorative top-stitching - using two threads of using three threads (flat seam) Fold fabric along the line to normal overlocking, which is fully described in this instruction book, your machine can ... a line to be enhanced by pushing the cutter release knob in the Cutter release knob and turning it all the way toward you use the blind hem foot, decorative stitches are easy. **Reduce the upper looper tension when you until it snaps into the "down" position. Pin-tucking...
...stitched and sew over a cord or braid, holding it away from you until the cutter snaps into the "up" position. 54 Decorative top-stitching - using two threads of using three threads (flat seam) Fold fabric along the line to normal overlocking, which is fully described in this instruction book, your machine can ... a line to be enhanced by pushing the cutter release knob in the Cutter release knob and turning it all the way toward you use the blind hem foot, decorative stitches are easy. **Reduce the upper looper tension when you until it snaps into the "down" position. Pin-tucking...


