
Instruction Manual
Page 5
... V ~ Rated Frequency: 50 Hz Rated input: 75 W Using ambient temperature: Normal temperature Acoustic noise level: less than 70 db(A) 3 KNOWING YOUR SEWING MACHINE Machine identification 6 - 7 Accessories 8 - 9 Setting up your machine 10 - 11 Spool pins 12 - 13 Presser foot lifter, Feed dog control 12 - 13 Converting to -sew fabrics 3. PERFORMANCE CHECKLIST 54...
... V ~ Rated Frequency: 50 Hz Rated input: 75 W Using ambient temperature: Normal temperature Acoustic noise level: less than 70 db(A) 3 KNOWING YOUR SEWING MACHINE Machine identification 6 - 7 Accessories 8 - 9 Setting up your machine 10 - 11 Spool pins 12 - 13 Presser foot lifter, Feed dog control 12 - 13 Converting to -sew fabrics 3. PERFORMANCE CHECKLIST 54...
Instruction Manual
Page 8
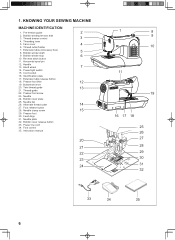
... 21. Bobbin cover plate 25. Thread cutter/holder 7. Feed dogs 31. Thread guide 22. Needle clamp screw 15 29. Bobbin winding tension disk 3. Extension table (Accessory box) 8. Instruction manual 20 21 22 23 24 1 8 9 10 11 19 16 17 18 25 26 27 28 29 30 31 32 33 34 35...
... 21. Bobbin cover plate 25. Thread cutter/holder 7. Feed dogs 31. Thread guide 22. Needle clamp screw 15 29. Bobbin winding tension disk 3. Extension table (Accessory box) 8. Instruction manual 20 21 22 23 24 1 8 9 10 11 19 16 17 18 25 26 27 28 29 30 31 32 33 34 35...
Instruction Manual
Page 10
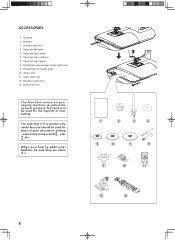
... on your sewing machine is another very useful foot and should be sure they are Class I5 J. 8 1 2 3 4 5 6 7 8 9 10 11 12 13 especially honeycomb , star a etc. ACCESSORIES 1.
... on your sewing machine is another very useful foot and should be sure they are Class I5 J. 8 1 2 3 4 5 6 7 8 9 10 11 12 13 especially honeycomb , star a etc. ACCESSORIES 1.

Instruction Manual 3
Page 1
INSTRUCTION MANUAL AND ACCESSORIES Full zig-zag sewing machine free-arm Model 1022 or Flat-bed Model 1021 SINGER
INSTRUCTION MANUAL AND ACCESSORIES Full zig-zag sewing machine free-arm Model 1022 or Flat-bed Model 1021 SINGER
Instruction Manual 3
Page 5
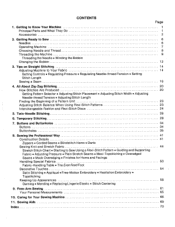
... 34 36 Caring for Your Machine Cleaning the Machine 44 Removing Bobbin Case, Face Plate and Bulb 45 Performance Checklist 46 And What They Do Accessories -
... 34 36 Caring for Your Machine Cleaning the Machine 44 Removing Bobbin Case, Face Plate and Bulb 45 Performance Checklist 46 And What They Do Accessories -
Instruction Manual 3
Page 10
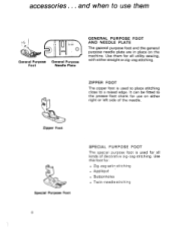
... in place on either straight or zig-zag stitching. Use this foot for all kinds of the needle. and when to use on the machine. accessories .
... in place on either straight or zig-zag stitching. Use this foot for all kinds of the needle. and when to use on the machine. accessories .
Instruction Manual 3
Page 12
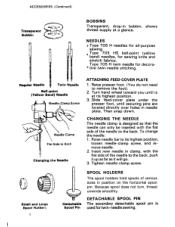
... the presser foot, until is used for twin-needle sewing. Raise needle bar to the back. push it up as far as it will go. 3. ACCESSORIES (Continued) Transparent Bobbin BOBBINS Transparent, drop-in bobbin, shows thread supply at its highest position, loosen needle-clamp screw, and remove needle. 2.
... the presser foot, until is used for twin-needle sewing. Raise needle bar to the back. push it up as far as it will go. 3. ACCESSORIES (Continued) Transparent Bobbin BOBBINS Transparent, drop-in bobbin, shows thread supply at its highest position, loosen needle-clamp screw, and remove needle. 2.
Instruction Manual 3
Page 20
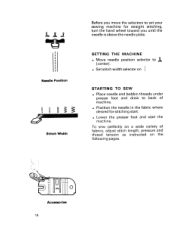
... the hand wheel toward you until the needle is above the needle plate. Set stitch width selector on the following pages. 4 4•• 34 56 0 Accessories 16 Lower the presser foot and start . . To sew 'perfectly on a wide variety of fabrics, adjust stitch length, pressure and thread tension as instructed on...
... the hand wheel toward you until the needle is above the needle plate. Set stitch width selector on the following pages. 4 4•• 34 56 0 Accessories 16 Lower the presser foot and start . . To sew 'perfectly on a wide variety of fabrics, adjust stitch length, pressure and thread tension as instructed on...
Instruction Manual 3
Page 27
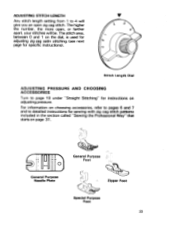
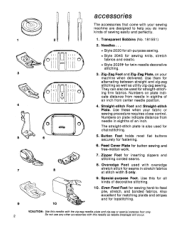
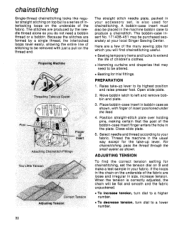
For information on choosing accessories, refer to pages 6 and 7 and to detailed instructions for specific instructions). s. Ile General Purpose Foot C) General Purpose Needle Plate Zipper Foot ti Special Purpose Foot ... the Professional Way" that starts on adjusting pressure. The higher the number, the more open zig-zag stitch. Stitch Length Dial ADJUSTING PRESSURE AND CHOOSING ACCESSORIES Turn to page 18 under "Straight Stitching" for instructions on page 31. ADJUSTING STITCH LENGTH Any stitch length setting from 1 to 4 will give you an...
For information on choosing accessories, refer to pages 6 and 7 and to detailed instructions for specific instructions). s. Ile General Purpose Foot C) General Purpose Needle Plate Zipper Foot ti Special Purpose Foot ... the Professional Way" that starts on adjusting pressure. The higher the number, the more open zig-zag stitch. Stitch Length Dial ADJUSTING PRESSURE AND CHOOSING ACCESSORIES Turn to page 18 under "Straight Stitching" for instructions on page 31. ADJUSTING STITCH LENGTH Any stitch length setting from 1 to 4 will give you an...
Instruction Manual 3
Page 28
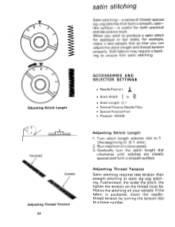
... a lower number, When you can adjust the stitch length and thread tension properly. Futrhermore, the wider the stitch, the lighter the tension on your sample. ACCESSORIES AND SELECTOR SETTINGS I • Needle Position: • Stitch Width: to ensure firm satin stitching. V O F 4 Adjusting Stitch Length Frrrrifr 3 4r1-1--Tr--1--1 Incorrect *4/ Correct Adjusting Thread Tension...
... a lower number, When you can adjust the stitch length and thread tension properly. Futrhermore, the wider the stitch, the lighter the tension on your sample. ACCESSORIES AND SELECTOR SETTINGS I • Needle Position: • Stitch Width: to ensure firm satin stitching. V O F 4 Adjusting Stitch Length Frrrrifr 3 4r1-1--Tr--1--1 Incorrect *4/ Correct Adjusting Thread Tension...
Instruction Manual 3
Page 47
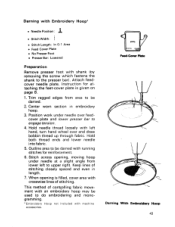
... plate and lower presser bar to engage tension. 4, Hold needle thread loosely with left to do embroidering and monogramming. *Embroidery Hoop not included with machine accessories. 0 C Feed-Cover Plate ice- Outline area to the presser bar). Stitch across opening is given on page 8. 1. Darning with Embroidery Hoop" • Needle Position: I •...
... plate and lower presser bar to engage tension. 4, Hold needle thread loosely with left to do embroidering and monogramming. *Embroidery Hoop not included with machine accessories. 0 C Feed-Cover Plate ice- Outline area to the presser bar). Stitch across opening is given on page 8. 1. Darning with Embroidery Hoop" • Needle Position: I •...
Instruction Manual 3
Page 48
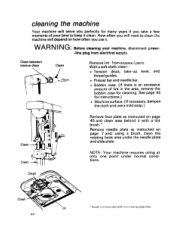
... for instructions.) • Machine surface. (If necessary, denpen the cloth and use it with machine accessories. Remove needle plate as instructed on page 45 and clean area behind it . NOTE: Your machine requires oiling at only one point under the needle plate and slide plate. How often you will need to keep...
... for instructions.) • Machine surface. (If necessary, denpen the cloth and use it with machine accessories. Remove needle plate as instructed on page 45 and clean area behind it . NOTE: Your machine requires oiling at only one point under the needle plate and slide plate. How often you will need to keep...
Instruction Manual 4
Page 5
... • Blindstitch Hems • Darts Sewing Knit and Stretch Fabric Stretch Stitch Chart • Starting to Know Your Machine Principal Parts and What They Do Accessories 2. Free-Arm Sewing Your Personal Measurements 10. Caring for Hems and Facings Handling Special Fabrics Fabric-Handling Table • The Even Feed Foot Decorative Touches...
... • Blindstitch Hems • Darts Sewing Knit and Stretch Fabric Stretch Stitch Chart • Starting to Know Your Machine Principal Parts and What They Do Accessories 2. Free-Arm Sewing Your Personal Measurements 10. Caring for Hems and Facings Handling Special Fabrics Fabric-Handling Table • The Even Feed Foot Decorative Touches...
Instruction Manual 4
Page 8
... 56 O H I 0 543 345 O 0 e7 'O O 5 6 7 8 9 10 The accessories that come with your sewing machine are designed to -feed pile, stretch, and bonded fabrics. Use them for chainstitching. 5. Numbers on plate indicate distance from ... for fastening. 6. tCAUTION: Use this needle with the zig-zag needle plate and zig-zag or special purpose foot only. 2 Do not use any other accessories with overedge stretch stitch for sewing hard-to help you do many kinds of an inch.
... 56 O H I 0 543 345 O 0 e7 'O O 5 6 7 8 9 10 The accessories that come with your sewing machine are designed to -feed pile, stretch, and bonded fabrics. Use them for chainstitching. 5. Numbers on plate indicate distance from ... for fastening. 6. tCAUTION: Use this needle with the zig-zag needle plate and zig-zag or special purpose foot only. 2 Do not use any other accessories with overedge stretch stitch for sewing hard-to help you do many kinds of an inch.
Instruction Manual 4
Page 9
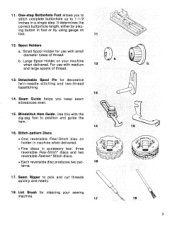
.... Lint Brush for decorative twin-needle stitching and two-thread topstitching. 13 14. Use this with small diameter tubes of thread. One-step Buttonhole Foot allows you keep seam allowances even. 15. Detachable Spool Pin for cleaning your machine when delivered. Seam Guide helps... you to stitch complete buttonhole up to 1-1/2 inches in accessory box: three reversible Flexi-Stitch* discs and two reversible Fashion* Stitch discs. • Each reversible disc produces two pat- 16 terns....
.... Lint Brush for decorative twin-needle stitching and two-thread topstitching. 13 14. Use this with small diameter tubes of thread. One-step Buttonhole Foot allows you keep seam allowances even. 15. Detachable Spool Pin for cleaning your machine when delivered. Seam Guide helps... you to stitch complete buttonhole up to 1-1/2 inches in accessory box: three reversible Flexi-Stitch* discs and two reversible Fashion* Stitch discs. • Each reversible disc produces two pat- 16 terns....
Instruction Manual 4
Page 26
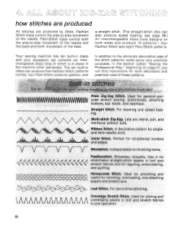
...of the needle and the back-and-forth movement of the feed. Indispensable for joining and AAAAAAAAAAAAAA overedging seams in knit and stretch fabrics in one of these patterns. Used for finishing hems. Featherstitch. In the section called "Sewing the Professional Way," beginning on both sides and produce ...L.73'it for fagoting, embroidering, and quilting. ^AAA^ AAAA/\""A^/\"/\/\/\/\A MV Vv\/\./ V\."./ \./\./V\."./\/\./\ Honeycomb Stitch. Your sewing machine has ten built-in discs and your accessory set contains six interchangeable discs (one operation. 20
...of the needle and the back-and-forth movement of the feed. Indispensable for joining and AAAAAAAAAAAAAA overedging seams in knit and stretch fabrics in one of these patterns. Used for finishing hems. Featherstitch. In the section called "Sewing the Professional Way," beginning on both sides and produce ...L.73'it for fagoting, embroidering, and quilting. ^AAA^ AAAA/\""A^/\"/\/\/\/\A MV Vv\/\./ V\."./ \./\./V\."./\/\./\ Honeycomb Stitch. Your sewing machine has ten built-in discs and your accessory set contains six interchangeable discs (one operation. 20
Instruction Manual 4
Page 33
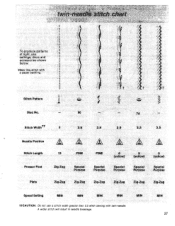
...-Zag Zig-Zag Zig-Zag Zig-Zag Zig-Zag Zig-Zag Speed Setting MIN MIN MIN MIN 11-CAUTION: Do not use settings, discs and accessories shown below. MIN MIN 27 tSew this stitch with twin-needle. A wider stitch will result in needle breakage. twin-needle stitch chart To produce patterns...
...-Zag Zig-Zag Zig-Zag Zig-Zag Zig-Zag Zig-Zag Speed Setting MIN MIN MIN MIN 11-CAUTION: Do not use settings, discs and accessories shown below. MIN MIN 27 tSew this stitch with twin-needle. A wider stitch will result in needle breakage. twin-needle stitch chart To produce patterns...
Instruction Manual 4
Page 36
... of stitching to be placed in bobbin case as shown. If the loops in the chain on 3 and make a test sample in your accessory set the tension dial on the underside of the fabric are formed by the needle thread alone so you will be altered. • Basting ...-up Eyelet 111 1111 543 ;3456 Post Finger of insert positioned under the feed. 4. Open slide plate. 2. Move bobbin latch to your local Singer Sewing Center. Position straight-stitch plate over holding pins, making certain that may be purchased separately at your fabric. Select needle and thread according to...
... of stitching to be placed in bobbin case as shown. If the loops in the chain on 3 and make a test sample in your accessory set the tension dial on the underside of the fabric are formed by the needle thread alone so you will be altered. • Basting ...-up Eyelet 111 1111 543 ;3456 Post Finger of insert positioned under the feed. 4. Open slide plate. 2. Move bobbin latch to your local Singer Sewing Center. Position straight-stitch plate over holding pins, making certain that may be purchased separately at your fabric. Select needle and thread according to...
Instruction Manual 4
Page 39
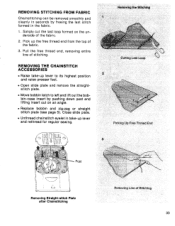
... Stitching 33 Cutting Last Loop 2 Picking Up Free Thread End 3 Post Removing Straight-stitch Plate after Chainstitching Removing Line of the fabric. 3. REMOVING THE CHAINSTITCH ACCESSORIES • Raise take -up lever and rethread for regular sewing. REMOVING STITCHING FROM FABRIC Chainstitching can be removed smoothly and cleanly in seconds by freeing...
... Stitching 33 Cutting Last Loop 2 Picking Up Free Thread End 3 Post Removing Straight-stitch Plate after Chainstitching Removing Line of the fabric. 3. REMOVING THE CHAINSTITCH ACCESSORIES • Raise take -up lever and rethread for regular sewing. REMOVING STITCHING FROM FABRIC Chainstitching can be removed smoothly and cleanly in seconds by freeing...
Instruction Manual 4
Page 56
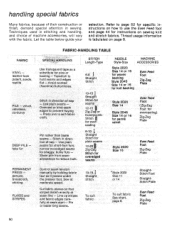
...plain seams - Line up stripes and fabric edges carefully at seam line - narrow overedged seams for pins or basting - Techniques used in direction of machine accessories, will vary with the fabric. Overcast or bind seam edges to hold seams and edges flat - STITCH Length-Type 6-8 1 Straight Stitch 10-15 ...Zag or Honeycomb Stitch for overcasting 6-10 Straight Stitch for plain seams 12-20 Zig-Zag Stitch for overedged seams NEEDLE Style-Size MACHINE ACCESSORIES Style 2020 Size 14 or 16 for woven backing Style 2045 Size 14 or 16 for knit backing Even Feed Foot Zig-Zag Plate ...
...plain seams - Line up stripes and fabric edges carefully at seam line - narrow overedged seams for pins or basting - Techniques used in direction of machine accessories, will vary with the fabric. Overcast or bind seam edges to hold seams and edges flat - STITCH Length-Type 6-8 1 Straight Stitch 10-15 ...Zag or Honeycomb Stitch for overcasting 6-10 Straight Stitch for plain seams 12-20 Zig-Zag Stitch for overedged seams NEEDLE Style-Size MACHINE ACCESSORIES Style 2020 Size 14 or 16 for woven backing Style 2045 Size 14 or 16 for knit backing Even Feed Foot Zig-Zag Plate ...

