User Manual
Page 4
... and foot control free from all controls to the off ("0") when making any adjustment in the needle area, such as threading needle, changing needle, threading bobbin, or changing presser foot, etc. -- It may deflect the needle causing it has been dropped or damaged, or dropped into any air openings blocked. -- Never...
... and foot control free from all controls to the off ("0") when making any adjustment in the needle area, such as threading needle, changing needle, threading bobbin, or changing presser foot, etc. -- It may deflect the needle causing it has been dropped or damaged, or dropped into any air openings blocked. -- Never...
User Manual
Page 7
... Power Source...3 Two Step Presser Foot Lifter...4 Accessories...5 Threading the Machine Winding the Bobbin...6 Inserting the Bobbin...7 Thread Tension...8 Threading the Upper Thread...9 Automatic Needle Threader ...10 Raising the Bobbin Thread...11 Sewing How to Choose Your Pattern ...12 Stitch Width Dial & Stitch...Blind Hem...17 4-Step Buttonhole Stitch (Model M3200/ M3205)...18 1-Step Buttonhole Stitch (Model M3300/ M3305/ M3400/ M3405/ M3500/ M3505 19 Sewing on Buttons...20 Zippers and Piping...21 General Information Installing the Removable Extension Table...22 Changing the Presser Foot......
... Power Source...3 Two Step Presser Foot Lifter...4 Accessories...5 Threading the Machine Winding the Bobbin...6 Inserting the Bobbin...7 Thread Tension...8 Threading the Upper Thread...9 Automatic Needle Threader ...10 Raising the Bobbin Thread...11 Sewing How to Choose Your Pattern ...12 Stitch Width Dial & Stitch...Blind Hem...17 4-Step Buttonhole Stitch (Model M3200/ M3205)...18 1-Step Buttonhole Stitch (Model M3300/ M3305/ M3400/ M3405/ M3500/ M3505 19 Sewing on Buttons...20 Zippers and Piping...21 General Information Installing the Removable Extension Table...22 Changing the Presser Foot......
User Manual
Page 8
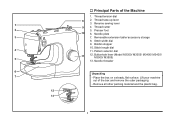
... cutter 5. Presser foot 10 6. Place the box on a steady, flat surface. Needle plate 7. Thread tension dial 2. Thread take-up lever 3. Bobbin stopper 10. Buttonhole lever (Model M3300/ M3305/ M3400/ M3405/ M3500/ M3505) 13. Needle threader Unpacking - Machine Basics 12 13 Principal Parts of the box and remove the outer packaging. - Stitch length...
... cutter 5. Presser foot 10 6. Place the box on a steady, flat surface. Needle plate 7. Thread tension dial 2. Thread take-up lever 3. Bobbin stopper 10. Buttonhole lever (Model M3300/ M3305/ M3400/ M3405/ M3500/ M3505) 13. Needle threader Unpacking - Machine Basics 12 13 Principal Parts of the box and remove the outer packaging. - Stitch length...
User Manual
Page 9
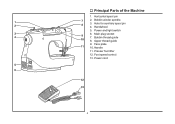
Principal Parts of the Machine 1. Upper thread guide 9. Handwheel 5. Main plug socket 7. Handle 11. Horizontal spool pin 2. Hole for auxiliary spool pin 4. Presser foot lifter 12. Foot speed control 13. Power cord 2 Bobbin winder spindle 3. Power and light switch 6. Bobbin thread guide 8. Face plate 10.
Principal Parts of the Machine 1. Upper thread guide 9. Handwheel 5. Main plug socket 7. Handle 11. Horizontal spool pin 2. Hole for auxiliary spool pin 4. Presser foot lifter 12. Foot speed control 13. Power cord 2 Bobbin winder spindle 3. Power and light switch 6. Bobbin thread guide 8. Face plate 10.
User Manual
Page 12
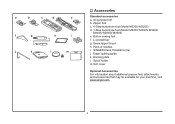
Pack of needles i. Spool holder m. Zipper foot c. 4-Step buttonhole foot (Model M3200/ M3205) d. 1-Step buttonhole foot (Model M3300/ M3305/ M3400/ M3405/ M3500/ M3505) e. Darning plate l. L-screwdriver g. Seam ripper/ brush h. Button sewing foot f. SINGER Class 15 bobbins (4x) j. Edge/ quilting guide k. All purpose foot b. a b c d e f g j k h i l m Accessories Standard accessories a. Soft cover Optional Accessories: For information about additional presser feet, attachments and accessories that may be available for your machine, visit www.singer.com 5
Pack of needles i. Spool holder m. Zipper foot c. 4-Step buttonhole foot (Model M3200/ M3205) d. 1-Step buttonhole foot (Model M3300/ M3305/ M3400/ M3405/ M3500/ M3505) e. Darning plate l. L-screwdriver g. Seam ripper/ brush h. Button sewing foot f. SINGER Class 15 bobbins (4x) j. Edge/ quilting guide k. All purpose foot b. a b c d e f g j k h i l m Accessories Standard accessories a. Soft cover Optional Accessories: For information about additional presser feet, attachments and accessories that may be available for your machine, visit www.singer.com 5
User Manual
Page 13
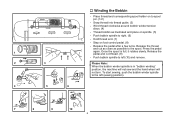
... position, the machine will not sew and the hand wheel will not turn. Push bobbin spindle to the spool. Release the thread and cut thread. (9) -- To start sewing, push the bobbin winder spindle to spool pin. (1/2) -- Press the pedal again. Release the pedal after...on foot control pedal. (8) -- Snap thread into thread guide. (3) -- Wind thread clockwise around bobbin winder tension discs. (4) -- Winding the Bobbin -- Hold thread end. (7) -- Please Note: When the bobbin winder spindle is full, it rotates slowly. Place thread and corresponding spool holder on to the left...
... position, the machine will not sew and the hand wheel will not turn. Push bobbin spindle to the spool. Release the thread and cut thread. (9) -- To start sewing, push the bobbin winder spindle to spool pin. (1/2) -- Press the pedal again. Release the pedal after...on foot control pedal. (8) -- Snap thread into thread guide. (3) -- Wind thread clockwise around bobbin winder tension discs. (4) -- Winding the Bobbin -- Hold thread end. (7) -- Please Note: When the bobbin winder spindle is full, it rotates slowly. Place thread and corresponding spool holder on to the left...

User Manual
Page 14
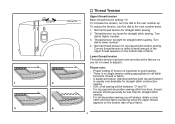
Inserting the Bobbin When inserting or removing the bobbin, the needle must be fully raised. -- Hold the bobbin case by the hinged latch. (5) -- Pull the bobbin case tab (a) and remove the bobbin case. (2) -- Hold the bobbin case with one hand. Insert the bobbin so that the thread runs in a clockwise direction (arrow). (3) -- Leave a 6 inch tail of thread. (4) -- Open the hinged cover. (1) -- Insert it into the shuttle. (6) Attention: Turn power switch to off ("O") before inserting or removing the bobbin. 7 Pull the thread through the slit and under the finger.
Inserting the Bobbin When inserting or removing the bobbin, the needle must be fully raised. -- Hold the bobbin case by the hinged latch. (5) -- Pull the bobbin case tab (a) and remove the bobbin case. (2) -- Hold the bobbin case with one hand. Insert the bobbin so that the thread runs in a clockwise direction (arrow). (3) -- Leave a 6 inch tail of thread. (4) -- Open the hinged cover. (1) -- Insert it into the shuttle. (6) Attention: Turn power switch to off ("O") before inserting or removing the bobbin. 7 Pull the thread through the slit and under the finger.
User Manual
Page 15
.... There is important to adjust it. Thread tension too tight for straight stitch sewing. 2. Normal thread tension for straight stitch sewing. Lower thread tension The bobbin tension has been set correctly at the factory, so you will be less than for all stitch functions, thread or fabric. -- A balanced tension (identical stitches...
.... There is important to adjust it. Thread tension too tight for straight stitch sewing. 2. Normal thread tension for straight stitch sewing. Lower thread tension The bobbin tension has been set correctly at the factory, so you will be less than for all stitch functions, thread or fabric. -- A balanced tension (identical stitches...

User Manual
Page 18
Note: If it is difficult to raise the bobbin thread, check to the back under the presser foot. (3) 11 Gently pull on the upper thread to bring the bobbin thread up through the needle plate hole. (2) Lay both threads to make sure the thread is not trapped by the hinged cover or the Removable Extension Table. Raising the Bobbin Thread Hold the upper thread with the left hand. (1) Turn the handwheel towards you (counterclockwise) lowering, then raising needle.
Note: If it is difficult to raise the bobbin thread, check to the back under the presser foot. (3) 11 Gently pull on the upper thread to bring the bobbin thread up through the needle plate hole. (2) Lay both threads to make sure the thread is not trapped by the hinged cover or the Removable Extension Table. Raising the Bobbin Thread Hold the upper thread with the left hand. (1) Turn the handwheel towards you (counterclockwise) lowering, then raising needle.
User Manual
Page 34
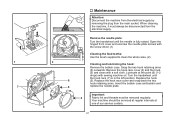
...: Use the brush supplied to clean the whole area. (2) Cleaning and lubricating the hook: Remove the bobbin case. Replace the hook race cover and snap back the two hook retaining arms. Insert the bobbin case and bobbin and replace the needle plate. Maintenance Attention: Disconnect the machine from the electrical supply by removing...
...: Use the brush supplied to clean the whole area. (2) Cleaning and lubricating the hook: Remove the bobbin case. Replace the hook race cover and snap back the two hook retaining arms. Insert the bobbin case and bobbin and replace the needle plate. Maintenance Attention: Disconnect the machine from the electrical supply by removing...
User Manual
Page 35
... Rethread the machine. 2. Reduce the thread tension. (lower number) 3. Remove and reinsert the needle. (flat side towards the back) 3. The bobbin case is damaged. 2. The wrong size or type of needle has been used. 4. The needle is not inserted correctly. 2. Insert a new ...not correctly threaded. 3. Select a larger needle. 4. Check and attach correctly. The machine is noisy 1. Uneven stitches, uneven feed 1. Remove bobbin case, thread and insert correctly. 3. The machine is not correctly threaded. 2. The needle is damaged. 1. The thread is too thick ...
... Rethread the machine. 2. Reduce the thread tension. (lower number) 3. Remove and reinsert the needle. (flat side towards the back) 3. The bobbin case is damaged. 2. The wrong size or type of needle has been used. 4. The needle is not inserted correctly. 2. Insert a new ...not correctly threaded. 3. Select a larger needle. 4. Check and attach correctly. The machine is noisy 1. Uneven stitches, uneven feed 1. Remove bobbin case, thread and insert correctly. 3. The machine is not correctly threaded. 2. The needle is damaged. 1. The thread is too thick ...
M3500 Stitch Applications Guide
Page 4
... seam allowance. Gathers can be cut on the bias, which an Invisible Zipper Foot Iadditional accessory for your own piping, particularly if you . Pull the bobbin threads to wrap around the cord as well as you may be helpful to use the Ruffler to insert the piping at the same time...
... seam allowance. Gathers can be cut on the bias, which an Invisible Zipper Foot Iadditional accessory for your own piping, particularly if you . Pull the bobbin threads to wrap around the cord as well as you may be helpful to use the Ruffler to insert the piping at the same time...
M3500 Stitch Applications Guide
Page 17
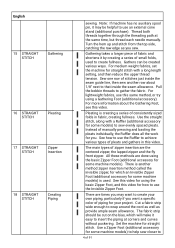
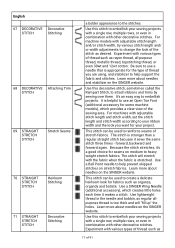
...fill up" the holes. This stitch can be used to help support the fabric and stitches. Use lightweight thread in the needle and bobbin, as desired. Use this stitch to embellish your sewing projects with a single row, multiple rows, or even in combination with other ...the fabric when the fabric is stronger than a regular straight stitch becuase it makes a stitch. Learn more about needles on the SINGER website. English 67 DECORATIVE Decorative STITCH Stitching 68 DECORATIVE Attaching Trim STITCH 69 STRAIGHT STRETCH STITCH Stretch Seams 70 STRAIGHT STRETCH STITCH ...
...fill up" the holes. This stitch can be used to help support the fabric and stitches. Use lightweight thread in the needle and bobbin, as desired. Use this stitch to embellish your sewing projects with a single row, multiple rows, or even in combination with other ...the fabric when the fabric is stronger than a regular straight stitch becuase it makes a stitch. Learn more about needles on the SINGER website. English 67 DECORATIVE Decorative STITCH Stitching 68 DECORATIVE Attaching Trim STITCH 69 STRAIGHT STRETCH STITCH Stretch Seams 70 STRAIGHT STRETCH STITCH ...


