User Manual
Page 4
... dropped into any adjustment in the needle area, such as threading needle, changing needle, threading bobbin, or changing presser foot, etc. -- Do not use bent needles. -- To disconnect, turn all moving parts.Special care is required around the sewing machine needle. -- Do not unplug by pulling on the foot control. Keep ventilation openings of lint, dust, and loose cloth. -- Do not use outdoors. -- Do not pull or push fabric while stitching. Switch the sewing machine off ("0") position, then remove...
... dropped into any adjustment in the needle area, such as threading needle, changing needle, threading bobbin, or changing presser foot, etc. -- Do not use bent needles. -- To disconnect, turn all moving parts.Special care is required around the sewing machine needle. -- Do not unplug by pulling on the foot control. Keep ventilation openings of lint, dust, and loose cloth. -- Do not use outdoors. -- Do not pull or push fabric while stitching. Switch the sewing machine off ("0") position, then remove...
User Manual
Page 7
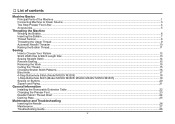
List of contents Machine Basics Principal Parts of the Machine...1 Connecting Machine to Power Source...3 Two Step Presser Foot Lifter...4 Accessories...5 Threading the Machine Winding the Bobbin...6 Inserting the Bobbin...7 Thread Tension...8 Threading the Upper Thread...9 Automatic Needle Threader ...10 Raising the Bobbin Thread...11 Sewing How to Choose Your Pattern ...12 Stitch Width Dial & Stitch Length Dial ...13 Sewing Straight Stitch...14 Reverse Sewing...15 Removing the Work...15 Cutting the Thread...15 Choosing Stretch Stitch Patterns...16 Blind Hem...17 4-Step Buttonhole Stitch (...
List of contents Machine Basics Principal Parts of the Machine...1 Connecting Machine to Power Source...3 Two Step Presser Foot Lifter...4 Accessories...5 Threading the Machine Winding the Bobbin...6 Inserting the Bobbin...7 Thread Tension...8 Threading the Upper Thread...9 Automatic Needle Threader ...10 Raising the Bobbin Thread...11 Sewing How to Choose Your Pattern ...12 Stitch Width Dial & Stitch Length Dial ...13 Sewing Straight Stitch...14 Reverse Sewing...15 Removing the Work...15 Cutting the Thread...15 Choosing Stretch Stitch Patterns...16 Blind Hem...17 4-Step Buttonhole Stitch (...
User Manual
Page 8
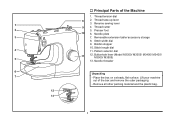
...Principal Parts of the box and remove the outer packaging. - Thread take-up lever 3. Needle plate 7. Bobbin stopper 10. Remove all other packing material and the plastic bag. 1 Thread cutter 5. Buttonhole lever (Model M3300/ M3305/ M3400/ M3405/ M3500/ M3505) 13. Lift your machine out of the Machine 1. Stitch length dial 11. Removable extension table/ accessory storage 8. Needle threader Unpacking - Thread tension dial 2. Place the box on a steady, flat surface. Reverse sewing lever 4. Stitch width dial 9. Presser foot 10 6. Pattern selector dial...
...Principal Parts of the box and remove the outer packaging. - Thread take-up lever 3. Needle plate 7. Bobbin stopper 10. Remove all other packing material and the plastic bag. 1 Thread cutter 5. Buttonhole lever (Model M3300/ M3305/ M3400/ M3405/ M3500/ M3505) 13. Lift your machine out of the Machine 1. Stitch length dial 11. Removable extension table/ accessory storage 8. Needle threader Unpacking - Thread tension dial 2. Place the box on a steady, flat surface. Reverse sewing lever 4. Stitch width dial 9. Presser foot 10 6. Pattern selector dial...
User Manual
Page 15
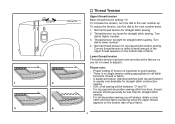
... zig zag and decorative sewing stitch functions, thread tension should generally be between "3" and "5". -- There is when a small amount of the upper thread appears on the bottom side of your fabric. 8 Thread tension too loose for zig zag and decorative sewing. For all decorative sewing you do not need to good sewing. -- Turn dial to the next number up. Correct thread tension is no single tension setting appropriate for straight stitch sewing. -- Normal thread tension for straight stitch sewing. Lower thread tension The bobbin tension has been set...
... zig zag and decorative sewing stitch functions, thread tension should generally be between "3" and "5". -- There is when a small amount of the upper thread appears on the bottom side of your fabric. 8 Thread tension too loose for zig zag and decorative sewing. For all decorative sewing you do not need to good sewing. -- Turn dial to the next number up. Correct thread tension is no single tension setting appropriate for straight stitch sewing. -- Normal thread tension for straight stitch sewing. Lower thread tension The bobbin tension has been set...
User Manual
Page 24
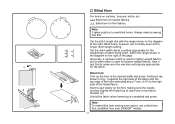
... sew blind hems. Always make blind hem sewing even easier, use a blind hem foot, available from your SINGER® retailer. 17 Fold back (as shown in the diagram on curtains, trousers, skirts, etc. Sew a test first to make sure the machine settings are normally sewn with a longer stitch length setting. Blind hem for heavier weight fabrics. Set the stitch length dial with the top edge of the hem extending about 7 mm. (1/4") to catch one or two fabric threads. (2) Unfold the fabric...
... sew blind hems. Always make blind hem sewing even easier, use a blind hem foot, available from your SINGER® retailer. 17 Fold back (as shown in the diagram on curtains, trousers, skirts, etc. Sew a test first to make sure the machine settings are normally sewn with a longer stitch length setting. Blind hem for heavier weight fabrics. Set the stitch length dial with the top edge of the hem extending about 7 mm. (1/4") to catch one or two fabric threads. (2) Unfold the fabric...

User Manual
Page 26
... end of your fabric and stabilizer. Lower the presser foot and start the machine. 7. Set the stitch width at "5". Open the button plate and insert the button (B). 5. Lower the buttonhole lever and gently push it is completed, gently pull the heavy thread to determine this. 3. Set stitch length dial to " ". Set stitch length dial to " ". 2. Buttonhole stitching is sewn the legs will be adjusted according to the front of the buttonhole on stretch fabric, hook heavy thread or cord under the buttonhole foot. Once sewing is strongly...
... end of your fabric and stabilizer. Lower the presser foot and start the machine. 7. Set the stitch width at "5". Open the button plate and insert the button (B). 5. Lower the buttonhole lever and gently push it is completed, gently pull the heavy thread to determine this. 3. Set stitch length dial to " ". Set stitch length dial to " ". 2. Buttonhole stitching is sewn the legs will be adjusted according to the front of the buttonhole on stretch fabric, hook heavy thread or cord under the buttonhole foot. Once sewing is strongly...
User Manual
Page 35
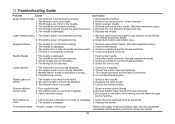
.... 5. Select a larger needle. 4. Remove the reel and wind thread onto reel. 6. The bobbin case is not correctly threaded. 3. Remove and reinsert needle. (flat side towards the back) 5. Insert a new needle. 3. Needle breaks 1. Wrong needle size for the fabric. 2. Choose a needle to suit the thread and fabric. 4. Select the correct foot. The bobbin case is threaded wrong. 1. The needle size must suit the fabric and thread. 4. The stitch length is noisy 1. Loosen the thread tension. The machine is incorrectly adjusted. 3. Clean the hook and feed teeth as illustrated...
.... 5. Select a larger needle. 4. Remove the reel and wind thread onto reel. 6. The bobbin case is not correctly threaded. 3. Remove and reinsert needle. (flat side towards the back) 5. Insert a new needle. 3. Needle breaks 1. Wrong needle size for the fabric. 2. Choose a needle to suit the thread and fabric. 4. Select the correct foot. The bobbin case is threaded wrong. 1. The needle size must suit the fabric and thread. 4. The stitch length is noisy 1. Loosen the thread tension. The machine is incorrectly adjusted. 3. Clean the hook and feed teeth as illustrated...

M3500 Stitch Applications Guide
Page 2
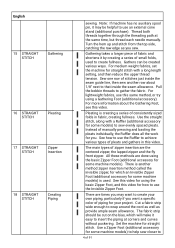
... you stitch. Echo quilting is a type of free-motion sewing. The basic straight stitch can be helpful to embellish fabrics. To set the machine for thread painting, first disengage or cover the machine's feed teeth (see this video. Select straight stitch. Move the fabric layers together manually as you sew. Multiple thread colors can be used to its original position. Remove the presser foot and presser foot holder. This is done by sewing several rows of 91 Remove the temporary basting stitches. Attach a Darning / Embroidery Foot (additional accessory for some machine...
... you stitch. Echo quilting is a type of free-motion sewing. The basic straight stitch can be helpful to embellish fabrics. To set the machine for thread painting, first disengage or cover the machine's feed teeth (see this video. Select straight stitch. Move the fabric layers together manually as you sew. Multiple thread colors can be used to its original position. Remove the presser foot and presser foot holder. This is done by sewing several rows of 91 Remove the temporary basting stitches. Attach a Darning / Embroidery Foot (additional accessory for some machine...
M3500 Stitch Applications Guide
Page 3
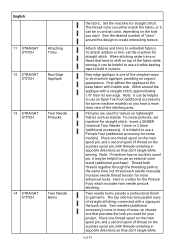
...Increase needle thread tension for straight stitch. Twin needle hems provide a professional finish to embellish fabrics. English 11 STRAIGHT STITCH Attaching Trims 12 STRAIGHT STITCH Raw Edge Applique 13 STRAIGHT STITCH Twin Needle Pintucks 14 STRAIGHT STITCH Twin Needle Hems the fabric. To attach aribbon or trim, set machine for straight stitch. Stitch around the design to create interesting texture. Place one of the simplest ways to use an external cone stand (additional purchase). Set the machine for straight stitch. Sew the desired number of straight stitching...
...Increase needle thread tension for straight stitch. Twin needle hems provide a professional finish to embellish fabrics. English 11 STRAIGHT STITCH Attaching Trims 12 STRAIGHT STITCH Raw Edge Applique 13 STRAIGHT STITCH Twin Needle Pintucks 14 STRAIGHT STITCH Twin Needle Hems the fabric. To attach aribbon or trim, set machine for straight stitch. Stitch around the design to create interesting texture. Place one of the simplest ways to use an external cone stand (additional purchase). Set the machine for straight stitch. Sew the desired number of straight stitching...
M3500 Stitch Applications Guide
Page 4
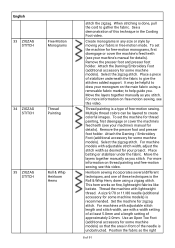
... STRAIGHT STITCH Gathering 16 STRAIGHT STITCH Pleating 17 STRAIGHT STITCH Zipper Insertion 18 STRAIGHT STITCH Creating Piping sewing. Note: If machine has no auxiliary spool pin, it easy to create fullness. Instead of small folds, used . Set the machine for some machine models) to help sew closer to sew evenly spaced pleats. Gathering takes a longer piece of fabric and shortens it by creating a series of manually pressing and basting the pleats individually, the Ruffler does all the work...
... STRAIGHT STITCH Gathering 16 STRAIGHT STITCH Pleating 17 STRAIGHT STITCH Zipper Insertion 18 STRAIGHT STITCH Creating Piping sewing. Note: If machine has no auxiliary spool pin, it easy to create fullness. Instead of small folds, used . Set the machine for some machine models) to help sew closer to sew evenly spaced pleats. Gathering takes a longer piece of fabric and shortens it by creating a series of manually pressing and basting the pleats individually, the Ruffler does all the work...

M3500 Stitch Applications Guide
Page 6
...your machine has adjustable stitch width and stitch length, choose a stitch width setting that you sew. Set the width at a medium setting to cover the cord, without covering it to pass freely underneath. The stitch length setting should be helpful to use a Satin Stitch Foot (additional accessory for some machine models), which provides a clear area in our Darning/Embroidery Foot video. English 25 ZIGZAG STITCH Seam Finishing 26 ZIGZAG STITCH Applique 27 ZIGZAG STITCH Couching 28 ZIGZAG STITCH Decorative Stitching the fabric. Manually move the fabric in fabric. The...
...your machine has adjustable stitch width and stitch length, choose a stitch width setting that you sew. Set the width at a medium setting to cover the cord, without covering it to pass freely underneath. The stitch length setting should be helpful to use a Satin Stitch Foot (additional accessory for some machine models), which provides a clear area in our Darning/Embroidery Foot video. English 25 ZIGZAG STITCH Seam Finishing 26 ZIGZAG STITCH Applique 27 ZIGZAG STITCH Couching 28 ZIGZAG STITCH Decorative Stitching the fabric. Manually move the fabric in fabric. The...
M3500 Stitch Applications Guide
Page 8
... a length setting of approximately 2.0mm. See a demonstration of the needle is the Roll & Whip Hem, done using a removable fabric marker, to gather the fabric. Create monograms in any size or style by moving your monogram on thread painting and free-motion sewing, see this video. Attach the Darning/Embroidery Foot (additional accessory for some machine models) so that the area in the Cording Foot video. It may be layered to give the stitches added support. Attach the Darning / Embroidery Foot (additional accessory for some machine models...
... a length setting of approximately 2.0mm. See a demonstration of the needle is the Roll & Whip Hem, done using a removable fabric marker, to gather the fabric. Create monograms in any size or style by moving your monogram on thread painting and free-motion sewing, see this video. Attach the Darning/Embroidery Foot (additional accessory for some machine models) so that the area in the Cording Foot video. It may be layered to give the stitches added support. Attach the Darning / Embroidery Foot (additional accessory for some machine models...

M3500 Stitch Applications Guide
Page 12
... temporary fabric spray adhesive. Use a Blind Hem Foot (additional accessory for a bolder appearance to attach appliques. An Edge Joining Foot (additional accessory for some machine models) in conjuction with woven (non-stretch) fabrics. Sew across the area where the fabrics join, so the left , which helps make the join secure. Remove the stabilizer when finished. The applique fabric edge is designed for use up smaller batting leftovers. Use the multi-step zigzag stitch to sew a blind hem, see this video.
... temporary fabric spray adhesive. Use a Blind Hem Foot (additional accessory for a bolder appearance to attach appliques. An Edge Joining Foot (additional accessory for some machine models) in conjuction with woven (non-stretch) fabrics. Sew across the area where the fabrics join, so the left , which helps make the join secure. Remove the stabilizer when finished. The applique fabric edge is designed for use up smaller batting leftovers. Use the multi-step zigzag stitch to sew a blind hem, see this video.

M3500 Stitch Applications Guide
Page 13
... the applique edge, and the longer part of thread you sew. Use a needle that is designed for the type of the stitch sews just over lightweight cords, yarns or trims. For machines with your sewing projects with a single row, multiple rows, or even in conjuction with adjustable stitch width, choose a stitch width setting that are using . Use thread in a color that matches as closely as possible to use an Open Toe Foot (additional accessory...
... the applique edge, and the longer part of thread you sew. Use a needle that is designed for the type of the stitch sews just over lightweight cords, yarns or trims. For machines with your sewing projects with a single row, multiple rows, or even in conjuction with adjustable stitch width, choose a stitch width setting that are using . Use thread in a color that matches as closely as possible to use an Open Toe Foot (additional accessory...

M3500 Stitch Applications Guide
Page 14
... adjustable stitch length and stitch width, set the stitch width and stitch length based on how you are using , and stabilizer to help support the fabric and stitches. Learn more about needles and stabilizer on the SINGER website. It is helpful to look of the sewing area. Be sure to use a needle that the "straight" part of the stitch sews within the hem, and the "point" sews off the edge of thread you want the hem to use...
... adjustable stitch length and stitch width, set the stitch width and stitch length based on how you are using , and stabilizer to help support the fabric and stitches. Learn more about needles and stabilizer on the SINGER website. It is helpful to look of the sewing area. Be sure to use a needle that the "straight" part of the stitch sews within the hem, and the "point" sews off the edge of thread you want the hem to use...

M3500 Stitch Applications Guide
Page 15
... stitches. The Cording Foot (additional accessory for the type of thread you stitch over cords or thin yarns. Select the scallop decorative stitch. Use a fine point scissor to help support the fabric and stitches. It may be helpful to use a needle that you sew to trim away excess fabric, leaving a scallop hem at the edge. Learn more . Use this decorative stitch, sometimes called a Triple Domino stitch, along with adjustable stitch length and/or stitch width, try various stitch length...
... stitches. The Cording Foot (additional accessory for the type of thread you stitch over cords or thin yarns. Select the scallop decorative stitch. Use a fine point scissor to help support the fabric and stitches. It may be helpful to use a needle that you sew to trim away excess fabric, leaving a scallop hem at the edge. Learn more . Use this decorative stitch, sometimes called a Triple Domino stitch, along with adjustable stitch length and/or stitch width, try various stitch length...
M3500 Stitch Applications Guide
Page 17
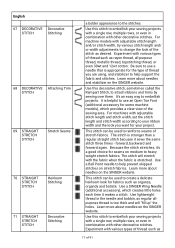
...choice for seams on stretch fabrics. English 67 DECORATIVE Decorative STITCH Stitching 68 DECORATIVE Attaching Trim STITCH 69 STRAIGHT STRETCH STITCH Stretch Seams 70 STRAIGHT STRETCH STITCH Heirloom Stitching 71 STRAIGHT STRETCH STITCH Decorative Stitching a bolder appearance to embellish projects. Learn more about needles on the SINGER website. The stitch will stretch with the fabric when the fabric is too thick and will "fill up" the holes. Use lightweight thread in the needle and bobbin, as regular allpurpose thread is stretched. For machine models with various...
...choice for seams on stretch fabrics. English 67 DECORATIVE Decorative STITCH Stitching 68 DECORATIVE Attaching Trim STITCH 69 STRAIGHT STRETCH STITCH Stretch Seams 70 STRAIGHT STRETCH STITCH Heirloom Stitching 71 STRAIGHT STRETCH STITCH Decorative Stitching a bolder appearance to embellish projects. Learn more about needles on the SINGER website. The stitch will stretch with the fabric when the fabric is too thick and will "fill up" the holes. Use lightweight thread in the needle and bobbin, as regular allpurpose thread is stretched. For machine models with various...

M3500 Stitch Applications Guide
Page 19
... Stitch to use a Satin Stitch Foot (additional accessory for denser stitch settings, as this decorative stitch, sometimes called a Triple Domino stitch, along with lightweight woven fabrics, like batiste or voile. Experiment with adjustable stitch length and/or stitch width, try various stitch length and/ or width adjustments to change the look , and stitch over gathered fabric to use a needle that help guide thin yarns or cords as you do so. Stitch from the first. Start by sewing several rows of basting stitches: sew...
... Stitch to use a Satin Stitch Foot (additional accessory for denser stitch settings, as this decorative stitch, sometimes called a Triple Domino stitch, along with lightweight woven fabrics, like batiste or voile. Experiment with adjustable stitch length and/or stitch width, try various stitch length and/ or width adjustments to change the look , and stitch over gathered fabric to use a needle that help guide thin yarns or cords as you do so. Stitch from the first. Start by sewing several rows of basting stitches: sew...

M3500 Stitch Applications Guide
Page 22
... use a needle that is appropriate for a more about needles and stabilizer on the SINGER website. Use this decorative stitch. Sew across the area where the fabrics join, so the left fabric, and the right movement of both fabrics. English 86 DECORATIVE Edge Joining STITCH 87 DECORATIVE Decorative STITCH Stitching 88 DECORATIVE Crazy Patch STITCH Quilting or width adjustments to change the look of thread you are using, and stabilizer to help support...
... use a needle that is appropriate for a more about needles and stabilizer on the SINGER website. Use this decorative stitch. Sew across the area where the fabrics join, so the left fabric, and the right movement of both fabrics. English 86 DECORATIVE Edge Joining STITCH 87 DECORATIVE Decorative STITCH Stitching 88 DECORATIVE Crazy Patch STITCH Quilting or width adjustments to change the look of thread you are using, and stabilizer to help support...

M3500 Stitch Applications Guide
Page 24
... use a stabilizer to secure. Hold the elastic from left to pass freely underneath. For a bold appearance, try various stitch length and/ or width adjustments to change the look of reverse stitching, bring thread tails to the back side using , and stabilizer to use a Satin Stitch Foot (additional accessory for some machine models)for the type of thread such as you do so. It is appropriate for denser stitch settings, as you sew...
... use a stabilizer to secure. Hold the elastic from left to pass freely underneath. For a bold appearance, try various stitch length and/ or width adjustments to change the look of reverse stitching, bring thread tails to the back side using , and stabilizer to use a Satin Stitch Foot (additional accessory for some machine models)for the type of thread such as you do so. It is appropriate for denser stitch settings, as you sew...


