User Manual
Page 4
... break. -- The foot control is required around the sewing machine needle. -- Keep ventilation openings of the sewing machine and foot control free from outlet. -- Do not unplug by the manufacturer as threading needle, changing needle, threading bobbin, or changing presser foot, etc. -- To unplug,... grasp the plug, not the cord. -- attachments recommended by pulling on the foot control. Return the sewing machine to break. -- The wrong plate can cause the ...
... break. -- The foot control is required around the sewing machine needle. -- Keep ventilation openings of the sewing machine and foot control free from outlet. -- Do not unplug by the manufacturer as threading needle, changing needle, threading bobbin, or changing presser foot, etc. -- To unplug,... grasp the plug, not the cord. -- attachments recommended by pulling on the foot control. Return the sewing machine to break. -- The wrong plate can cause the ...

User Manual
Page 8
List of contents Machine Basics Principal Parts of the Machine...1 Connecting Machine to Power Source...3 Two Step Presser Foot Lifter...4 Accessories...5 Threading the Machine Winding the Bobbin...6 Inserting the Bobbin...7 Threading the Upper Thread...8 Raising the Bobbin Thread...9 Thread Tension...10 Sewing How to Choose Your Pattern ...11 Sewing Straight Stitch...12 Reverse Sewing...13 Removing the Work...13 Cutting the...
List of contents Machine Basics Principal Parts of the Machine...1 Connecting Machine to Power Source...3 Two Step Presser Foot Lifter...4 Accessories...5 Threading the Machine Winding the Bobbin...6 Inserting the Bobbin...7 Threading the Upper Thread...8 Raising the Bobbin Thread...9 Thread Tension...10 Sewing How to Choose Your Pattern ...11 Sewing Straight Stitch...12 Reverse Sewing...13 Removing the Work...13 Cutting the...

User Manual
Page 9
Thread cutter 4. Removable extension table/ accessory storage 7. Thread tension dial 2. Machine Basics Principal Parts of the box and remove the outer packaging. - Reverse sewing lever Unpacking - Lift your machine out of the Machine 1. Pattern selector dial 8. Presser foot 5. Place the box on a steady, flat surface. Remove all other packing material and the plastic bag. 1 Thread take-up lever 3. Needle plate 6. Bobbin winding stopper 9.
Thread cutter 4. Removable extension table/ accessory storage 7. Thread tension dial 2. Machine Basics Principal Parts of the box and remove the outer packaging. - Reverse sewing lever Unpacking - Lift your machine out of the Machine 1. Pattern selector dial 8. Presser foot 5. Place the box on a steady, flat surface. Remove all other packing material and the plastic bag. 1 Thread take-up lever 3. Needle plate 6. Bobbin winding stopper 9.

User Manual
Page 14
... (9) and remove. Release the pedal after a few turns. To start sewing, push the bobbin winder spindle to the spool. Threading the Machine a Winding the Bobbin -- Release the thread and cut thread. (8) -- Press the pedal again. Push bobbin spindle to right. (5) -- Hold thread end. (6) -- Step on ...spool through the upper thread guide. (2) -- Push bobbin spindle to left (sewing position). 6 Place the thread and spool pin felt (a) onto the spool pin. (1) -- Once the spool is in "bobbin winding" position, the machine will not sew and the hand wheel will not turn. Wind the...
... (9) and remove. Release the pedal after a few turns. To start sewing, push the bobbin winder spindle to the spool. Threading the Machine a Winding the Bobbin -- Release the thread and cut thread. (8) -- Press the pedal again. Push bobbin spindle to right. (5) -- Hold thread end. (6) -- Step on ...spool through the upper thread guide. (2) -- Push bobbin spindle to left (sewing position). 6 Place the thread and spool pin felt (a) onto the spool pin. (1) -- Once the spool is in "bobbin winding" position, the machine will not sew and the hand wheel will not turn. Wind the...
User Manual
Page 32
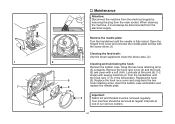
... clean the whole area. (2) Cleaning and lubricating the hook: Remove the bobbin case. Important: Fabric lint and threads must always be removed regularly. Your machine should be serviced at regular intervals at the point (6) (1-2 drops) with sewing machine oil. Maintenance Attention: Disconnect the machine from the electrical supply by removing the plug from the electrical...
... clean the whole area. (2) Cleaning and lubricating the hook: Remove the bobbin case. Important: Fabric lint and threads must always be removed regularly. Your machine should be serviced at regular intervals at the point (6) (1-2 drops) with sewing machine oil. Maintenance Attention: Disconnect the machine from the electrical supply by removing the plug from the electrical...
User Manual
Page 33
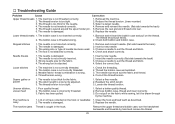
... needle is not threaded correctly. 2. Needle breaks 1. Insert the needle correctly. (flat side towards the back) 2. The machine is threaded wrong. 1. Fabric has been pulled. 1. The bobbin case is not correctly threaded. 2. The thread should pull easily. 2. Seams gather or pucker 1. The needle is too ...2. Lint or oil have collected on the fabric while sewing, let it be drawn through by hand and remove the thread. 25 Replace the needle. Reduce the thread tension. (lower number) 3. Select a larger needle. 4. The bobbin case is wound around the spool holder pin. 6. ...
... needle is not threaded correctly. 2. Needle breaks 1. Insert the needle correctly. (flat side towards the back) 2. The machine is threaded wrong. 1. Fabric has been pulled. 1. The bobbin case is not correctly threaded. 2. The thread should pull easily. 2. Seams gather or pucker 1. The needle is too ...2. Lint or oil have collected on the fabric while sewing, let it be drawn through by hand and remove the thread. 25 Replace the needle. Reduce the thread tension. (lower number) 3. Select a larger needle. 4. The bobbin case is wound around the spool holder pin. 6. ...
M1500 Stitch Applications Guide
Page 4
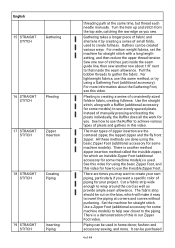
...STITCH Inserting Piping threading path at corners and curves without puckering. For medium weight fabrics, set the machine for some machine models) to help sew closer to create your project. Pull the bobbin threads to wrap around the cord as well as you . Use the straight stitch, along with...be cut on the bias, which an Invisible Zipper Foot Iadditional accessory for you sew. Sew one row of manually pressing and basting the pleats individually, the Ruffler does all the work for some machine models). Pleating is creating a series of consistently sized folds in home decor,...
...STITCH Inserting Piping threading path at corners and curves without puckering. For medium weight fabrics, set the machine for some machine models) to help sew closer to create your project. Pull the bobbin threads to wrap around the cord as well as you . Use the straight stitch, along with...be cut on the bias, which an Invisible Zipper Foot Iadditional accessory for you sew. Sew one row of manually pressing and basting the pleats individually, the Ruffler does all the work for some machine models). Pleating is creating a series of consistently sized folds in home decor,...


