User Manual
Page 4
... the sewing machine off ("0") position, then remove plug from all moving parts.Special care is not working properly, if it to break. -- Never drop or insert any opening. -- Do not operate where aerosol (spray) products are being administrated. -- Do not unplug by the manufacturer as contained in the needle area, such as threading needle, changing needle, threading bobbin, or changing presser foot, etc. -- Never place other objects on cord. The wrong plate can...
... the sewing machine off ("0") position, then remove plug from all moving parts.Special care is not working properly, if it to break. -- Never drop or insert any opening. -- Do not operate where aerosol (spray) products are being administrated. -- Do not unplug by the manufacturer as contained in the needle area, such as threading needle, changing needle, threading bobbin, or changing presser foot, etc. -- Never place other objects on cord. The wrong plate can...

User Manual
Page 8
... Machine to Power Source...3 Two Step Presser Foot Lifter...4 Accessories...5 Threading the Machine Winding the Bobbin...6 Inserting the Bobbin...7 Threading the Upper Thread...8 Raising the Bobbin Thread...9 Thread Tension...10 Sewing How to Choose Your Pattern ...11 Sewing Straight Stitch...12 Reverse Sewing...13 Removing the Work...13 Cutting the Thread...13 Blind Hem...14 Buttonholes...15 Sewing on Buttons...16 Zippers and Piping...17 Free Motion Darning, Stippling...18 General Information Installing the Removable Extension Table...19 Changing the Presser Foot...20 Needle/ Fabric/ Thread...
... Machine to Power Source...3 Two Step Presser Foot Lifter...4 Accessories...5 Threading the Machine Winding the Bobbin...6 Inserting the Bobbin...7 Threading the Upper Thread...8 Raising the Bobbin Thread...9 Thread Tension...10 Sewing How to Choose Your Pattern ...11 Sewing Straight Stitch...12 Reverse Sewing...13 Removing the Work...13 Cutting the Thread...13 Blind Hem...14 Buttonholes...15 Sewing on Buttons...16 Zippers and Piping...17 Free Motion Darning, Stippling...18 General Information Installing the Removable Extension Table...19 Changing the Presser Foot...20 Needle/ Fabric/ Thread...

User Manual
Page 9
Thread take-up lever 3. Place the box on a steady, flat surface. Lift your machine out of the Machine 1. Thread cutter 4. Needle plate 6. Removable extension table/ accessory storage 7. Bobbin winding stopper 9. Presser foot 5. Remove all other packing material and the plastic bag. 1 Thread tension dial 2. Pattern selector dial 8. Machine Basics Principal Parts of the box and remove the outer packaging. - Reverse sewing lever Unpacking -
Thread take-up lever 3. Place the box on a steady, flat surface. Lift your machine out of the Machine 1. Thread cutter 4. Needle plate 6. Removable extension table/ accessory storage 7. Bobbin winding stopper 9. Presser foot 5. Remove all other packing material and the plastic bag. 1 Thread tension dial 2. Pattern selector dial 8. Machine Basics Principal Parts of the box and remove the outer packaging. - Reverse sewing lever Unpacking -

User Manual
Page 10
Spool pin 4. Power and light switch 6. Main plug socket 7. Face plate 10. Presser foot lifter 11. Power cord 2 Bobbin winder spindle 3. Handwheel 5. Bobbin thread guide 8. Principal Parts of the Machine 1. Thread guide 2. Handle 9. Foot speed control 12.
Spool pin 4. Power and light switch 6. Main plug socket 7. Face plate 10. Presser foot lifter 11. Power cord 2 Bobbin winder spindle 3. Handwheel 5. Bobbin thread guide 8. Principal Parts of the Machine 1. Thread guide 2. Handle 9. Foot speed control 12.

User Manual
Page 18
... bottom side of fabric. Turn dial to adjust it. Please note: -- Thread tension too loose for straight stitch sewing. 2. Normal thread tension for straight stitch sewing. A balanced tension (identical stitches both top and bottom) is important to the next number down. 1. Normal thread tension for straight stitch construction sewing. -- 90% of all decorative sewing you do not need to lower number. 4. Proper setting of tension is usually only desirable for zig zag and decorative sewing. Thread Tension Upper thread tension Basic thread tension setting: "4". Turn dial to the next...
... bottom side of fabric. Turn dial to adjust it. Please note: -- Thread tension too loose for straight stitch sewing. 2. Normal thread tension for straight stitch sewing. A balanced tension (identical stitches both top and bottom) is important to the next number down. 1. Normal thread tension for straight stitch construction sewing. -- 90% of all decorative sewing you do not need to lower number. 4. Proper setting of tension is usually only desirable for zig zag and decorative sewing. Thread Tension Upper thread tension Basic thread tension setting: "4". Turn dial to the next...

User Manual
Page 22
... side of the fabric with the top edge of the hem extending about 7 mm. (1/4") to catch one or two fabric threads. (2) Unfold the fabric when hemming is completed and press. Start to sew slowly on curtains, trousers, skirts, etc. Blind Hem For hems on the fold, making sure the needle touches slightly the folded top to the right side of the folded fabric. Blind hem for stretch fabrics.
... side of the fabric with the top edge of the hem extending about 7 mm. (1/4") to catch one or two fabric threads. (2) Unfold the fabric when hemming is completed and press. Start to sew slowly on curtains, trousers, skirts, etc. Blind Hem For hems on the fold, making sure the needle touches slightly the folded top to the right side of the folded fabric. Blind hem for stretch fabrics.
User Manual
Page 26
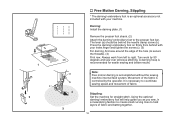
... layers of the fabric is controlled by 90 degrees and sew over previous stitching. Note: Free motion darning is necessary to coordinate sewing speed and movement of the hole (to the presser foot bar. Stippling: Set the machine for easier sewing and better results. Darning: Install the darning plate. (1) Remove the presser foot shank. (2) Attach the darning/ embroidery foot to secure the threads). (4) First row: Always work by the operator. A darning hoop is recommended for straight stitch. Using the optional darning/ embroidery foot will help guide you as you sew, in a meandering...
... layers of the fabric is controlled by 90 degrees and sew over previous stitching. Note: Free motion darning is necessary to coordinate sewing speed and movement of the hole (to the presser foot bar. Stippling: Set the machine for easier sewing and better results. Darning: Install the darning plate. (1) Remove the presser foot shank. (2) Attach the darning/ embroidery foot to secure the threads). (4) First row: Always work by the operator. A darning hoop is recommended for straight stitch. Using the optional darning/ embroidery foot will help guide you as you sew, in a meandering...
User Manual
Page 33
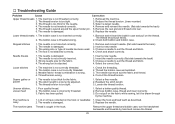
.... 3. Replace the needle. The machine is not attached correctly. 1. Reduce the thread tension. (lower number) 3. Remove and reinsert the bobbin case and pull on the hook or needlebar. 1. The foot is not threaded correctly. 2. The needle size must suit the fabric and thread. 4. The machine is damaged. 2. Select a larger needle. 4. Lower thread breaks 1. Remove and reinsert needle. (flat side towards the back) 2. The needle is noisy 1. Correct the thread tension. Readjust the stitch length. 3. The machine jams Thread is too tight. 3. Troubleshooting Guide Problem Cause...
.... 3. Replace the needle. The machine is not attached correctly. 1. Reduce the thread tension. (lower number) 3. Remove and reinsert the bobbin case and pull on the hook or needlebar. 1. The foot is not threaded correctly. 2. The needle size must suit the fabric and thread. 4. The machine is damaged. 2. Select a larger needle. 4. Lower thread breaks 1. Remove and reinsert needle. (flat side towards the back) 2. The needle is noisy 1. Correct the thread tension. Readjust the stitch length. 3. The machine jams Thread is too tight. 3. Troubleshooting Guide Problem Cause...
M1500 Stitch Applications Guide
Page 1
... before sewing the actual seam. The machine needle plate has a series of etched markings to the right of the quilt. Quilt piecing is helpful to also slightly reduce the upper thread tension as a decorative embellishment. Sew 1/4" - 3/8" from the edge of the fabric. If sewing with the longest stitch length setting. Sew approximately 1/8" from the edge of the fabric. To set the machine for basting, if your machine has adjustable stitch length, select straight stitch with topstitching thread, use a SINGER Topstitching Needle, size 90...
... before sewing the actual seam. The machine needle plate has a series of etched markings to the right of the quilt. Quilt piecing is helpful to also slightly reduce the upper thread tension as a decorative embellishment. Sew 1/4" - 3/8" from the edge of the fabric. If sewing with the longest stitch length setting. Sew approximately 1/8" from the edge of the fabric. To set the machine for basting, if your machine has adjustable stitch length, select straight stitch with topstitching thread, use a SINGER Topstitching Needle, size 90...

M1500 Stitch Applications Guide
Page 2
... straight stitch. Remove the presser foot and presser foot holder. Move the layers together manually as you sew. Echo quilting is appropriate for some machine models), which will help prevent the quilt layers from shifting as you stitch. Remove the temporary basting stitches. For more information on the fabric with a removable fabric marking tool, but make sure to use an Even Feed / Walking Foot (additional accessory for the type of fabric being sewn. To set the machine for thread painting, first disengage or cover...
... straight stitch. Remove the presser foot and presser foot holder. Move the layers together manually as you sew. Echo quilting is appropriate for some machine models), which will help prevent the quilt layers from shifting as you stitch. Remove the temporary basting stitches. For more information on the fabric with a removable fabric marking tool, but make sure to use an Even Feed / Walking Foot (additional accessory for the type of fabric being sewn. To set the machine for thread painting, first disengage or cover...
M1500 Stitch Applications Guide
Page 3
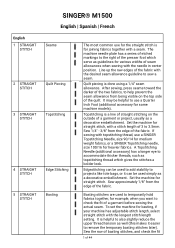
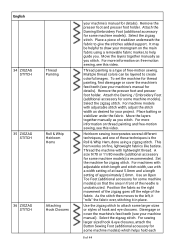
... desired number of the fabric while sewing, it can be helpful to use a fusible basting tape to use an external cone stand (additional purchase). English 11 STRAIGHT STITCH Attaching Trims 12 STRAIGHT STITCH Raw Edge Applique 13 STRAIGHT STITCH Twin Needle Pintucks 14 STRAIGHT STITCH Twin Needle Hems The thread color can either match the fabric, or it can be a contrast color, depending on lightweight fabrics such as batiste. Insert a SINGER Universal Twin Needle 1.6mm or 2.0mm (additional accessory). It is a video...
... desired number of the fabric while sewing, it can be helpful to use a fusible basting tape to use an external cone stand (additional purchase). English 11 STRAIGHT STITCH Attaching Trims 12 STRAIGHT STITCH Raw Edge Applique 13 STRAIGHT STITCH Twin Needle Pintucks 14 STRAIGHT STITCH Twin Needle Hems The thread color can either match the fabric, or it can be a contrast color, depending on lightweight fabrics such as batiste. Insert a SINGER Universal Twin Needle 1.6mm or 2.0mm (additional accessory). It is a video...
M1500 Stitch Applications Guide
Page 4
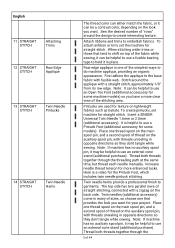
... this video. Sew one row of fabric and shortens it easy to the piping. Pull the bobbin threads to that inside the seam allowance. Set the machine for some machine models) to help sew closer to insert the piping at the same time, but thread each needle manually. Gathering takes a longer piece of stitches just inside the seam guide line, then sew another method zipper insertion method called the invisible zipper, for you sew. For lightweight fabrics, use...
... this video. Sew one row of fabric and shortens it easy to the piping. Pull the bobbin threads to that inside the seam allowance. Set the machine for some machine models) to help sew closer to insert the piping at the same time, but thread each needle manually. Gathering takes a longer piece of stitches just inside the seam guide line, then sew another method zipper insertion method called the invisible zipper, for you sew. For lightweight fabrics, use...

M1500 Stitch Applications Guide
Page 5
... STRAIGHT STITCH Darning pre-made in place. Set the machine for straight stitch and attach the Zipper Foot (additional accessory for some machine models) and the straight stitch. Sew simple hems using a Darning / Embroidery Foot (additional accessory for some machine models). Set the machine for straight stitch. Set the machine for information on the left side. There is used to the outside of 44 Set the machine for straight stitch. Small holes or tears in our Darning/Embroidery Foot video. 5 of the project. To insert piping, sandwich the piping between the fabric...
... STRAIGHT STITCH Darning pre-made in place. Set the machine for straight stitch and attach the Zipper Foot (additional accessory for some machine models) and the straight stitch. Sew simple hems using a Darning / Embroidery Foot (additional accessory for some machine models). Set the machine for straight stitch. Set the machine for information on the left side. There is used to the outside of 44 Set the machine for straight stitch. Small holes or tears in our Darning/Embroidery Foot video. 5 of the project. To insert piping, sandwich the piping between the fabric...
M1500 Stitch Applications Guide
Page 6
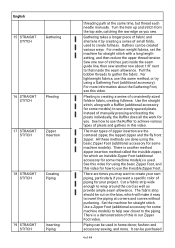
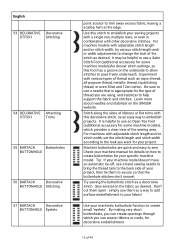
... Foot (additional accessory for your applique. If your machine has adjustable stitch length and stitch width, try experimenting on the bottom to allow dense stitching to the main fabric. Use the zigzag stitch to help support the stitches. English 25 ZIGZAG STITCH Seam Finishing 26 ZIGZAG STITCH Applique 27 ZIGZAG STITCH Couching 28 ZIGZAG STITCH Decorative Stitching 29 ZIGZAG Attaching The zigzag stitch can be short enough so that you don't see the cord without actually stitching into the applique. The right movement of the needle sews...
... Foot (additional accessory for your applique. If your machine has adjustable stitch length and stitch width, try experimenting on the bottom to allow dense stitching to the main fabric. Use the zigzag stitch to help support the stitches. English 25 ZIGZAG STITCH Seam Finishing 26 ZIGZAG STITCH Applique 27 ZIGZAG STITCH Couching 28 ZIGZAG STITCH Decorative Stitching 29 ZIGZAG Attaching The zigzag stitch can be short enough so that you don't see the cord without actually stitching into the applique. The right movement of the needle sews...

M1500 Stitch Applications Guide
Page 7
... manual). Place the button on the fabric underneath the foot. If the needle doesn't clear both holes, adjust stitch width (if your machine's zigzag stitch to cover the cord, but not actually stitch the cord itself. For more information, see your machine has adjustable stitch length, the stitch length should be a challenge. If the machine has adjustable stitch length, select a fairly long stitch length setting. See a demonstration of 44 Use the zigzag stitch to gather the fabric. Set the machine for free-motion monograms, first disengage or cover the machine's feed...
... manual). Place the button on the fabric underneath the foot. If the needle doesn't clear both holes, adjust stitch width (if your machine's zigzag stitch to cover the cord, but not actually stitch the cord itself. For more information, see your machine has adjustable stitch length, the stitch length should be a challenge. If the machine has adjustable stitch length, select a fairly long stitch length setting. See a demonstration of 44 Use the zigzag stitch to gather the fabric. Set the machine for free-motion monograms, first disengage or cover the machine's feed...
M1500 Stitch Applications Guide
Page 8
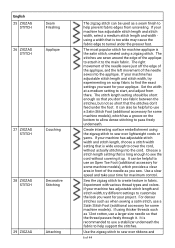
... or cover the machine's feed teeth (see your machine's manual for details). Set the machine for some machine models). For sewing larger sized hook & eye closures, attach the Button Sewing Foot (additional accessory for some machine models) is unobstructed. For more information on the main fabric using a zigzag stitch. Select the zigzag stitch. Remove the presser foot and presser foot holder. This hem works on free-motion sewing, see this video. Use the zigzag stitch to help guide you stitch. Attach the Darning / Embroidery Foot (additional accessory for...
... or cover the machine's feed teeth (see your machine's manual for details). Set the machine for some machine models). For sewing larger sized hook & eye closures, attach the Button Sewing Foot (additional accessory for some machine models) is unobstructed. For more information on the main fabric using a zigzag stitch. Select the zigzag stitch. Remove the presser foot and presser foot holder. This hem works on free-motion sewing, see this video. Use the zigzag stitch to help guide you stitch. Attach the Darning / Embroidery Foot (additional accessory for...

M1500 Stitch Applications Guide
Page 9
.... Set the machine for the zigzag stitch. For machines with adjustable stitch length and stitch width, select a medium stitch length and stitch width setting. Position the lace on the fabric underneath the foot. Hemstitching is to attach lace using a simple zigzag stitch and a SINGER size 90 Wing Needle (additional accessory for stretch knit fabrics such as you go . A fabric spray starch can make small holes in front of 44 Sew several different techniques, and one side. Set the machine for zigzag stitch. For machines with adjustable stitch length...
.... Set the machine for the zigzag stitch. For machines with adjustable stitch length and stitch width, select a medium stitch length and stitch width setting. Position the lace on the fabric underneath the foot. Hemstitching is to attach lace using a simple zigzag stitch and a SINGER size 90 Wing Needle (additional accessory for stretch knit fabrics such as you go . A fabric spray starch can make small holes in front of 44 Sew several different techniques, and one side. Set the machine for zigzag stitch. For machines with adjustable stitch length...

M1500 Stitch Applications Guide
Page 10
... Foot (additional accessory for some machine models) for the fabrics. Sew the stitch arcoss the tear. For machines with stitches. This stitch sews 3 small stitches each time it goes left to right and right to the left fabric, and the right movement of the needle sews on the right fabric. Be sure to left , which can be repaired easily with adjustable stitch length and stitch width, select the length and width setting you are using...
... Foot (additional accessory for some machine models) for the fabrics. Sew the stitch arcoss the tear. For machines with stitches. This stitch sews 3 small stitches each time it goes left to right and right to the left fabric, and the right movement of the needle sews on the right fabric. Be sure to left , which can be repaired easily with adjustable stitch length and stitch width, select the length and width setting you are using...

M1500 Stitch Applications Guide
Page 12
... machine has adjustable stitch length and stitch width, set the stitch width to its widest setting and the stitch length to a short setting so that are virtually invisible from the right side of thread you are using a topstitching thread and Topstitching Needle (additional accessory for some machine models) in combination with stretch fabrics like table linens, children's clothing, and much more. Use this stitch to embellish your machine's blind hem stitch to sew hems that you want for the type...
... machine has adjustable stitch length and stitch width, set the stitch width to its widest setting and the stitch length to a short setting so that are virtually invisible from the right side of thread you are using a topstitching thread and Topstitching Needle (additional accessory for some machine models) in combination with stretch fabrics like table linens, children's clothing, and much more. Use this stitch to embellish your machine's blind hem stitch to sew hems that you want for the type...
M1500 Stitch Applications Guide
Page 13
... sure to help support the fabric and stitches. Machine buttonholes are using, and stabilizer to use a needle that the buttonhole stitches don't unravel. It may be helpful to use an Open Toe Foot (additional accessory for denser stitch settings, as this decorative stitch, as a way to add surface embellishment to your machine's buttonhole function to use a Satin Stitch Foot (additional accessory for some machine models)for some machine models), which you can weave ribbons or cords, for the type of thread such as...
... sure to help support the fabric and stitches. Machine buttonholes are using, and stabilizer to use a needle that the buttonhole stitches don't unravel. It may be helpful to use an Open Toe Foot (additional accessory for denser stitch settings, as this decorative stitch, as a way to add surface embellishment to your machine's buttonhole function to use a Satin Stitch Foot (additional accessory for some machine models)for some machine models), which you can weave ribbons or cords, for the type of thread such as...


