
Instruction Manual and Troubleshooting Guide
Page 4
...to help and hope that the joy of sewing, creating, do-it-yourself, crafting and more can be found on the web at www.singer.com. Additional assistance, by region, may be enjoyed by -step instructions. I1• •%. .0I ..1 SETTING UP THE MACHINE Sewing... Preparation 13 Main Parts 6 Touch Panel LCD 13 Accessories 7 Home Screen Home Button 13 13 Removable Storage Compartment 8 Sewing Mode 13 To Open the Accessory Tray 8 Stitch Information 13 To Remove/Attach the Removable Storage Compartment 8 Selecting a Stitch 14 ...
...to help and hope that the joy of sewing, creating, do-it-yourself, crafting and more can be found on the web at www.singer.com. Additional assistance, by region, may be enjoyed by -step instructions. I1• •%. .0I ..1 SETTING UP THE MACHINE Sewing... Preparation 13 Main Parts 6 Touch Panel LCD 13 Accessories 7 Home Screen Home Button 13 13 Removable Storage Compartment 8 Sewing Mode 13 To Open the Accessory Tray 8 Stitch Information 13 To Remove/Attach the Removable Storage Compartment 8 Selecting a Stitch 14 ...
Instruction Manual and Troubleshooting Guide
Page 7
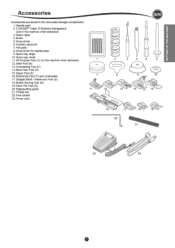
Needle pack 2.5 SINGER® Class 15 Bobbins (transparent) (one in the removable storage compartment. 1. Brush 5. Screwdriver for needle plate 9. Spool cap, small 11. Open Toe Foot (N) 20. Edge/quilting guide 21. Seam ripper 4. Zipper Foot (E) 16. Thread net 22. SETTING UP THE MACHINE Accessories Accessories are stored in the machine when delivered) 3. Screwdriver 6. Satin...
Needle pack 2.5 SINGER® Class 15 Bobbins (transparent) (one in the removable storage compartment. 1. Brush 5. Screwdriver for needle plate 9. Spool cap, small 11. Open Toe Foot (N) 20. Edge/quilting guide 21. Seam ripper 4. Zipper Foot (E) 16. Thread net 22. SETTING UP THE MACHINE Accessories Accessories are stored in the machine when delivered) 3. Screwdriver 6. Satin...
Instruction Manual and Troubleshooting Guide
Page 8
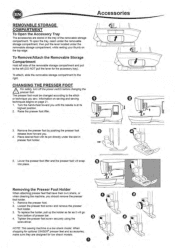
... lever toward you . 4. Information on sewing and sewing techniques begins on the top edge. When shopping for optional SINGER° presser feet and accessories, make sure they are stored in presser foot holder. 0 5. Loosen the presser foot screw and remove the presser... its highest position. 00G0 08O 2 Raise the presser foot lifter. [HI 3. Remove the presser foot. 2. Accessories REMOVABLE STORAGE COMPARTMENT To Open the Accessory Tray The accessories are designed for low shank models. 0000 0 4 O To attach, slide the removable storage compartment to the stitch...
... lever toward you . 4. Information on sewing and sewing techniques begins on the top edge. When shopping for optional SINGER° presser feet and accessories, make sure they are stored in presser foot holder. 0 5. Loosen the presser foot screw and remove the presser... its highest position. 00G0 08O 2 Raise the presser foot lifter. [HI 3. Remove the presser foot. 2. Accessories REMOVABLE STORAGE COMPARTMENT To Open the Accessory Tray The accessories are designed for low shank models. 0000 0 4 O To attach, slide the removable storage compartment to the stitch...

Instruction Manual and Troubleshooting Guide
Page 11
...turn on and cut the upper and bobbin threads. e Unplug the foot control cord from the machine. 3. Place the foot control in the accessory tray. The LED will sew in damage. • Do not use this button to incrementally increase or decrease the sewing speed. The machine will...will rotate slowly at the beginning of the next stitch, press the thread cutter button while sewing. Switch the main switch off. 2. Place all accessories in the space above the free arm. When pressed while not sewing, machine will stop position is pressed. Thread Cutter Button with LED Indicator ...
...turn on and cut the upper and bobbin threads. e Unplug the foot control cord from the machine. 3. Place the foot control in the accessory tray. The LED will sew in damage. • Do not use this button to incrementally increase or decrease the sewing speed. The machine will...will rotate slowly at the beginning of the next stitch, press the thread cutter button while sewing. Switch the main switch off. 2. Place all accessories in the space above the free arm. When pressed while not sewing, machine will stop position is pressed. Thread Cutter Button with LED Indicator ...


