
Instruction Manual
Page 4
... the machine. • Turn off or unplug the machine when the following items. Read all instructions, take care of cold water. Singer will not be used while running the machine. • In case of lubricant oil contact with the eyes or skin, washed the ... List 1 Safety Instructions 1.1 Important Safety Instructions Important When using the machine. When using it, understand that machine and operator are adequate to sew materials as indicated in its instructions manual, and indications of ingestion, seek medical help immediately. • Repair, fitting or maintenance should...
... the machine. • Turn off or unplug the machine when the following items. Read all instructions, take care of cold water. Singer will not be used while running the machine. • In case of lubricant oil contact with the eyes or skin, washed the ... List 1 Safety Instructions 1.1 Important Safety Instructions Important When using the machine. When using it, understand that machine and operator are adequate to sew materials as indicated in its instructions manual, and indications of ingestion, seek medical help immediately. • Repair, fitting or maintenance should...

Instruction Manual
Page 13
... it up until the bar end.. Figure 9 (a) OK! Insert the needle to prevent needle thread breakage and fabric damage. 3.4 Fill Silicon Oil to Reservoir When sewing in ultra high speed, fill the device with silicon oil in the accessory box and insert the needle (or remove the old For 1 needle... 1 For 2 needle 1 needle). Insert the needle with the Allen key wrench in order to the proper depth. Figure 8 3.5 Needle Attachment (or Replacement) Use only Singer's Cat. 6120 needles Loosen screw '1' as indicated on Figure 8.
... it up until the bar end.. Figure 9 (a) OK! Insert the needle to prevent needle thread breakage and fabric damage. 3.4 Fill Silicon Oil to Reservoir When sewing in ultra high speed, fill the device with silicon oil in the accessory box and insert the needle (or remove the old For 1 needle... 1 For 2 needle 1 needle). Insert the needle with the Allen key wrench in order to the proper depth. Figure 8 3.5 Needle Attachment (or Replacement) Use only Singer's Cat. 6120 needles Loosen screw '1' as indicated on Figure 8.
Instruction Manual
Page 15
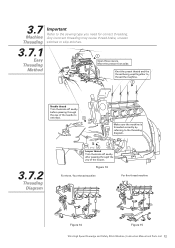
... the knots off neatly after passing through the yey of the needle to rethread. 3 Make sure the machine is threaded correctly by referring to the sewing type you need for correct threading. Knot the preset thread and the thread being used together to thread the machine. 2 Needle thread Trim the knots...
... the knots off neatly after passing through the yey of the needle to rethread. 3 Make sure the machine is threaded correctly by referring to the sewing type you need for correct threading. Knot the preset thread and the thread being used together to thread the machine. 2 Needle thread Trim the knots...
Instruction Manual
Page 16
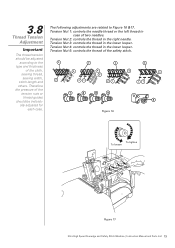
... Speed Overedge and Safety Stitch Machine | Instruction Manual and Parts List 13 3.8 The following adjustments are related to the 3 3 3 3 type and thickness of the cloth, sewing thread, 4 4 4 4 5 sewing width, 2 stitch length and 21 21 21 others. Tension Nut 1: controls the needle thread or the left thread in the right needle.
... Speed Overedge and Safety Stitch Machine | Instruction Manual and Parts List 13 3.8 The following adjustments are related to the 3 3 3 3 type and thickness of the cloth, sewing thread, 4 4 4 4 5 sewing width, 2 stitch length and 21 21 21 others. Tension Nut 1: controls the needle thread or the left thread in the right needle.

Instruction Manual
Page 17
... adjusting nut 2 to obtain the proper stitch formation. 2 1 Light Heavy Figure 18 3.10 Adjusting the Differential Feed Rate The differential feed ratio is stretched at sewing. Otherwise the fabric will be sufficient to adjust the differential feed ratio. 3.9 Presser foot pressure Loosen adjusting nut '1' of movements between the main...
... adjusting nut 2 to obtain the proper stitch formation. 2 1 Light Heavy Figure 18 3.10 Adjusting the Differential Feed Rate The differential feed ratio is stretched at sewing. Otherwise the fabric will be sufficient to adjust the differential feed ratio. 3.9 Presser foot pressure Loosen adjusting nut '1' of movements between the main...

Instruction Manual
Page 18
Press button to the sewing fabric, differential feed ration and other factors. It is made according to the end and keep it pressed as shown on the handwheel scale. Aligning Mark Coarse Fine Handwheel Push Button Figure 20 Ultra High Speed Overedge and Safety Stitch Machine | Instruction Manual and Parts List 15 Turn the handwheel until we have the desired stitch length. 3.11 Stitch Length Adjustment Important The stitch length adjustment is shown on Figure 20.
Press button to the sewing fabric, differential feed ration and other factors. It is made according to the end and keep it pressed as shown on the handwheel scale. Aligning Mark Coarse Fine Handwheel Push Button Figure 20 Ultra High Speed Overedge and Safety Stitch Machine | Instruction Manual and Parts List 15 Turn the handwheel until we have the desired stitch length. 3.11 Stitch Length Adjustment Important The stitch length adjustment is shown on Figure 20.


