Singer 70 SEVENTY Support and Manuals
Get Help and Manuals for this Singer item
View All Support Options Below
Free Singer 70 SEVENTY manuals!
Problems with Singer 70 SEVENTY?
Ask a Question
Free Singer 70 SEVENTY manuals!
Problems with Singer 70 SEVENTY?
Ask a Question
Most Recent Singer 70 SEVENTY Questions

How Do I Change A Light Bulb
my light is not working on my singer 70 sewing machine
my light is not working on my singer 70 sewing machine
(Posted by vernitawhitehorse 9 years ago)
Popular Singer 70 SEVENTY Manual Pages
Instruction Manual - Page 2

... mentioned in the instruction manual. 19. Do not unplug by a person responsible for its service agent or similarly qualified persons in the outlet, reverse the plug. To avoid electrical shock never put the machine nor the mains cable or mains plug into water. to install the proper outlet. CAUTION-- Please note that they have been...
Instruction Manual - Page 5

...- 9 Setting up your... twin needle Straight stitch needle position 52 - 53 Instructions for Bonus Accessories 54 - 65
5. STARTING TO ... Normal temperature Acoustic noise level: less than 70 db(A)
3 TABLE OF CONTENTS
1. PERFORMANCE CHECKLIST 66 - 67 Helpful messages, System error 68 - 69
For European...16 - 17 Threading the top thread 18 - 19 Using automatic needle threader 20 - 21 Needle, ...
Instruction Manual - Page 8

...
7. Reverse stitch button
11. Presser foot lifter
12
19. Feed dogs
31. Instruction manual
20
21 22 23 24
1
8
9
10
11
19
16 17 18 25 26 27 28 29 30 31...Needle plate
32. Buttonhole lever
20. Pre-tension guide
2
2. Twin thread guide
13
21. Bobbin cover plate
25. Extension table release button
18. Thread guide
22. Needle bar
26. KNOWING YOUR SEWING MACHINE...
Instruction Manual - Page 12
...o t c o n t r o l i s disconnected, the machine will not operate until the power/light switch is turned on.
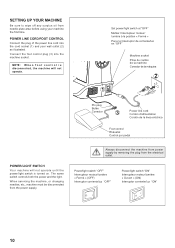
SETTING UP YOUR MACHINE
Be sure to wipe off any surplus oil from needle plate area before using your wall outlet (2) as illustrated.
Power line ... the machine socket.
When servicing the machine, or changing needles, etc., machine must be disconnected from the electrical outlet.
Instruction Manual - Page 14

...the machine converts into place until it .
To replace, slide the extension table back into a slim free-arm model for large thread spool
Attach the spool pin. ...sound to lower the presser foot to the type and diameter of thread. With the extension table in position, it to its highest position to insert or to the right. Lift it provides a large working surface as a standard flat-bed model...
Instruction Manual - Page 26

... is correctly threaded (see page 18 - 19). Raise presser foot lifter. 1. Lower the...TENSION
The bobbin tension has been correctly set at the factory, so you have ...functions, thread tension should be accomplished with the word "AUTO" exposed on the tension control dial on...verrouillage du pied Boton de desprendimiento prensatelas
Foot holder Support du pied Sujetador prensatelas If, when you start...
Instruction Manual - Page 28

... to your stitching requirements at the auto / default position. Auto (preprogrammed) default settings are contained in yellow. Once you have determined the auto / default position you power off the machine. Note: Instructions for manual adjustments than others.
26
Stitch length control
Boutons d'ajustement manuel de la longueur du point. Control de posició...
Instruction Manual - Page 34

... clothes or baby garments.
32
3/4" (19 mm) 5/8" (16 mm) 1/2" (13 mm) 3/8" ( 9 mm) 1/4" ( 6 mm) When reaching the edge of the numbered guide lines on the needle plate. KEEPING SEAMS... plate has both threads under the presser foot and lower the
5
presser foot lifter.
4. B
D
1. SETTINGS Presser foot - General purpose foot
E
Thread tension control - AUTO
NOTE: Based upon the weight of the ...
Instruction Manual - Page 38

...STITCH WIDTH AND LENGTH
Dark grey box indicates the auto/default value set manually.
The light grey boxes indicate all the possible personal preference options...position Position centrale Aguja posicionada en el centro
36 General Purpose Foot :Thread tension control - ZIGZAG STITCHING
SETTINGS :Presser foot - NOTE: The values shown in the chart are experiencing puckering, slightly reduce the ...
Instruction Manual - Page 40

... makes only one. The stitch width control changes the swing of the guide.
4. Sew slowly, guiding the fabric carefully along the edge of the needle for hemming curtains,...overcast the fabric's raw edge.
Settings : Presser foot -
General purpose foot :Thread tension control - NOTE: Mending a tear or overedging as shown in illustration requires manual adjustment of the fabric. Blind...
Instruction Manual - Page 42

... fabrics, and for reinforcing the seams of sportswear in repairing raw or worn edges of small diamonds.
The design will be a series of garments.
40 STRETCH AND DECORATIVE STITCHES
SETTINGS :Presser foot -
It's very effective for edging neck-bands, armholes, sleeves and hems. When manually adjusted to a very narrow width, it can also...
Instruction Manual - Page 46

... a scrap of garments and home decorating projects. Helpful hint: For a more pleasing appearance experiment with a Wing Needle (Singer Style 2040) to sew, check that there is most often sewn with a slightly lower (-) tension setting. Be careful not to make sure that the thread will increase the size of the stitch.
Sew 10...
Instruction Manual - Page 54

...appliqueing and bar tacking. Draw one . NOTE: Needle threader cannot be adjusted to your Singer retailer. This is recommended. Twin needles are called satin stitches. Check with the stitch ... foot when sewing stretch stitches. When using a twin-needles, the stitch width should never be set beyond a twin needle mark, regardless of tissue paper or interfacing for pin tucks, double top ...
Instruction Manual - Page 68

... threaded correctly (see page 18 - 19). * Top thread tension is too tight (see page 22). Replace needle (see page 23). * Needle... is set too wide (see page 24 - 25). * Stitch length is not correct for sheer or soft fabric. - Guide it ... bent. - Replace needle (see page 50 -51). Turn on the switch. * Buttonhole lever is not lowered - STITCHING PROBLEMS Machine skips stitches...
Instruction Manual - Page 70

...sewing. 3.
The corrections are as follows. Turn off power switch and eliminate the problem that can be operated in the machine socket for the foot control. Remove foreign...position for the function you may fix the problem by an arrow.
Helpful message on the machine. SYSTEM ERROR
All system error corrections are preceded by following the correction ...
Singer 70 SEVENTY Reviews
We have not received any reviews for Singer yet.