
Instruction Manual
Page 1
Instruction Manual and Parts List Ultra High Speed Overedge and Safety Stitch Machine 321D 131M-04 131M-04 / KS 132M-015 134M-04 241M-24 241M-24 / KS 244M-24 251M-35 251M-35 / KH 251M-55 251M-55 / KH 251M-56 251H-56 / KH 321K 131M-04 131M-04 / KS 132M-015 134M-04 241M-24 241M-24 / KS 244M-24 251M-35 251M-35 / KH 251M-55 251M-55 / KH 251M-56 251H-56 / KH ® Singer is a registered trademark of The Singer Company Limited or its affiliated companies. © 2010 Copyright The Singer Company Limited
Instruction Manual and Parts List Ultra High Speed Overedge and Safety Stitch Machine 321D 131M-04 131M-04 / KS 132M-015 134M-04 241M-24 241M-24 / KS 244M-24 251M-35 251M-35 / KH 251M-55 251M-55 / KH 251M-56 251H-56 / KH 321K 131M-04 131M-04 / KS 132M-015 134M-04 241M-24 241M-24 / KS 244M-24 251M-35 251M-35 / KH 251M-55 251M-55 / KH 251M-56 251H-56 / KH ® Singer is a registered trademark of The Singer Company Limited or its affiliated companies. © 2010 Copyright The Singer Company Limited

Instruction Manual
Page 2
... 7 3.3 Lubrication and Oil Drainage 9 3.4 Fill Silicon Oil to Reservoir 10 3.5 Needle Attachment (or Replacement) 10 3.6 Replacing Upper and Lower Knife 11 3.7 Machine Threading 12 3.8 Thread Tension Adjustment 13 3.9 Presser foot pressure 14 3.10 Adjusting the Differential Feed Rate 14 3.11 Stitch Length Adjustment 15 3.12 Parts Relation ...
... 7 3.3 Lubrication and Oil Drainage 9 3.4 Fill Silicon Oil to Reservoir 10 3.5 Needle Attachment (or Replacement) 10 3.6 Replacing Upper and Lower Knife 11 3.7 Machine Threading 12 3.8 Thread Tension Adjustment 13 3.9 Presser foot pressure 14 3.10 Adjusting the Differential Feed Rate 14 3.11 Stitch Length Adjustment 15 3.12 Parts Relation ...

Instruction Manual
Page 3
Contents 6 Parts list 21 6.1 Machine Bed Frame Components 22 6.2 Machine Cover Components (1) 24 6.3 Machine Cover Components (2) 26 6.4 Crank Shaft Drive Components 28 6.5 Thread Tension Components 30 6.6 Thread Guide and Thread Take-up Components (1) 32 6.7 Thread Guide ...62 6.22 Silicon Oil Reservoir Components 64 6.23 Exclusive Parts List for 321K series 66 6.24 Thread Stand Components 68 6.25 Accessories 70 6.26 Machine Support Plate For Semi-Submerged Components 72 6.27 Specific Parts for 321D-251 Hand 321K-251H 73 6.28 Optional Parts 74 6.29 Back Latch...
Contents 6 Parts list 21 6.1 Machine Bed Frame Components 22 6.2 Machine Cover Components (1) 24 6.3 Machine Cover Components (2) 26 6.4 Crank Shaft Drive Components 28 6.5 Thread Tension Components 30 6.6 Thread Guide and Thread Take-up Components (1) 32 6.7 Thread Guide ...62 6.22 Silicon Oil Reservoir Components 64 6.23 Exclusive Parts List for 321K series 66 6.24 Thread Stand Components 68 6.25 Accessories 70 6.26 Machine Support Plate For Semi-Submerged Components 72 6.27 Specific Parts for 321D-251 Hand 321K-251H 73 6.28 Optional Parts 74 6.29 Back Latch...

Instruction Manual
Page 4
... limited to the following items. Read all instructions, take care of this manual, and use should only be followed. Singer will not be followed. Safety Instructions 1.1 Important Safety Instructions Important When using the machine, basic safety procedures must be held responsible for any electric device is not running , a test must be used...
... limited to the following items. Read all instructions, take care of this manual, and use should only be followed. Singer will not be followed. Safety Instructions 1.1 Important Safety Instructions Important When using the machine, basic safety procedures must be held responsible for any electric device is not running , a test must be used...
Instruction Manual
Page 5
... not open the motor wiring box and do not touch the components assembled inside the wiring box. • To avoid injuries do not run the machine without the belt cover or in electric components caused by electric discharge turn it off when laying it down, or remove the belt cover and... the belt. • If you machine is equipped with a servomotor, it does not make noises while being driven.To avoid a possible accident caused by an unexpected start of accidents or damage...
... not open the motor wiring box and do not touch the components assembled inside the wiring box. • To avoid injuries do not run the machine without the belt cover or in electric components caused by electric discharge turn it off when laying it down, or remove the belt cover and... the belt. • If you machine is equipped with a servomotor, it does not make noises while being driven.To avoid a possible accident caused by an unexpected start of accidents or damage...

Instruction Manual
Page 6
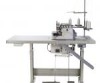
Product Description and Machine Specification 2.1 Product Description Ultra high speed overedge and safety stitch machines Ultra High Speed Overedge and Safety Stitch Machine | Instruction Manual and Parts List 3
Product Description and Machine Specification 2.1 Product Description Ultra high speed overedge and safety stitch machines Ultra High Speed Overedge and Safety Stitch Machine | Instruction Manual and Parts List 3
Instruction Manual
Page 7
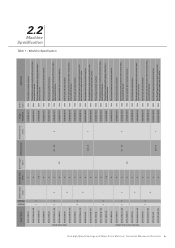
...;cation Ultra High Speed Overedge and Safety Stitch Machine | Instruction Manual and Parts List 4 Singer Model Needle Gauge [mm] Overedge Bight [mm] Stitch Length [mm] Differential Rate Presser Foot Lift [mm] Singer Needle Cat Speed [spm] Application 321D-131M-04 4 321D-131M-04 / KS 4 13 - 321D-132M-015 1.5 321D-134M-04 4 6120-06...
...;cation Ultra High Speed Overedge and Safety Stitch Machine | Instruction Manual and Parts List 4 Singer Model Needle Gauge [mm] Overedge Bight [mm] Stitch Length [mm] Differential Rate Presser Foot Lift [mm] Singer Needle Cat Speed [spm] Application 321D-131M-04 4 321D-131M-04 / KS 4 13 - 321D-132M-015 1.5 321D-134M-04 4 6120-06...

Instruction Manual
Page 8
2.3 Motor, Motor Pulley and V-Belt Specifications 2.3.1 For 321D series ½ HP 2-pole clutch motor Motor pulley diameter M type v-belt Machine Speed [spm] 5,500 6,000 6,500 7,000 7,500 Table 2 Motor Pulley Diameter [mm] 50 Hz 60 Hz 110 90 115 95 130 105 140 115 150 125 2.3.2 For 321K series Direct drive servo motor and control system. Ultra High Speed Overedge and Safety Stitch Machine | Instruction Manual and Parts List 5
2.3 Motor, Motor Pulley and V-Belt Specifications 2.3.1 For 321D series ½ HP 2-pole clutch motor Motor pulley diameter M type v-belt Machine Speed [spm] 5,500 6,000 6,500 7,000 7,500 Table 2 Motor Pulley Diameter [mm] 50 Hz 60 Hz 110 90 115 95 130 105 140 115 150 125 2.3.2 For 321K series Direct drive servo motor and control system. Ultra High Speed Overedge and Safety Stitch Machine | Instruction Manual and Parts List 5

Instruction Manual
Page 9
3 3.1 Table Cut-Out Diagram 1065 625 475 310 Setup and Adjustment Instructions 40 60 R25 13 R16 65 295 45 C-C R25 65 20 B 225 210 185 141 115 95 50 32 40 R24 48 250 A R24 47 C C B 155 55 40 A 117.95 97.31 118.5 138 190 550 Figure 1 98 110 240 345 358 A-A 25 13 B-B 25 25 1.5 3 9 Ultra High Speed Overedge and Safety Stitch Machine | Instruction Manual and Parts List 6
3 3.1 Table Cut-Out Diagram 1065 625 475 310 Setup and Adjustment Instructions 40 60 R25 13 R16 65 295 45 C-C R25 65 20 B 225 210 185 141 115 95 50 32 40 R24 48 250 A R24 47 C C B 155 55 40 A 117.95 97.31 118.5 138 190 550 Figure 1 98 110 240 345 358 A-A 25 13 B-B 25 25 1.5 3 9 Ultra High Speed Overedge and Safety Stitch Machine | Instruction Manual and Parts List 6

Instruction Manual
Page 10
3.2 Machine Installation Install the machine support components and the cloth waste chute as indicated in Figure 2. For fullysubmerged assembly, the distance is around 5.0 mm. 3 2 1 9 10 12 4 5 7 6 8 11 Figure 2 Ultra High Speed Overedge and Safety Stitch Machine | Instruction Manual and Parts List 7 In case of semi-submerged assembly, the distance between the needle plate top surface and the table top is around 100 mm.
3.2 Machine Installation Install the machine support components and the cloth waste chute as indicated in Figure 2. For fullysubmerged assembly, the distance is around 5.0 mm. 3 2 1 9 10 12 4 5 7 6 8 11 Figure 2 Ultra High Speed Overedge and Safety Stitch Machine | Instruction Manual and Parts List 7 In case of semi-submerged assembly, the distance between the needle plate top surface and the table top is around 100 mm.
Instruction Manual
Page 11
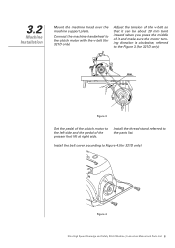
Connect the machine handwheel to the clutch motor with the v-belt (for 321D only) Adjust the tension of the v-belt so that it can be about 20 mm ... clockwise, referred to the parts list. Install the thread stand referred to the Figure 3.(for 321D only) Figure 4 Ultra High Speed Overedge and Safety Stitch Machine | Instruction Manual and Parts List 8 3.2 Machine Installation Mount the machine head over the machine support plate.
Connect the machine handwheel to the clutch motor with the v-belt (for 321D only) Adjust the tension of the v-belt so that it can be about 20 mm ... clockwise, referred to the parts list. Install the thread stand referred to the Figure 3.(for 321D only) Figure 4 Ultra High Speed Overedge and Safety Stitch Machine | Instruction Manual and Parts List 8 3.2 Machine Installation Mount the machine head over the machine support plate.
Instruction Manual
Page 12
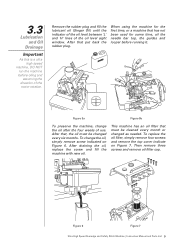
... Manual and Parts List 9 3.3 Lubrication and Oil Drainage Important As this is a ultra high speed machine, DO NOT run the machine before running it. Remove the rubber plug and fill the lubricant oil (Singer Oil) until the indicator of the oil level between 'L' and 'H' lines of use. Then remove three ...screws and remove oil filter cap. When using the machine for some time, oil the needle bar top, the guides and ...
... Manual and Parts List 9 3.3 Lubrication and Oil Drainage Important As this is a ultra high speed machine, DO NOT run the machine before running it. Remove the rubber plug and fill the lubricant oil (Singer Oil) until the indicator of the oil level between 'L' and 'H' lines of use. Then remove three ...screws and remove oil filter cap. When using the machine for some time, oil the needle bar top, the guides and ...

Instruction Manual
Page 13
... push it up until the bar end.. Tighten screw '1'. Figure 9 (b) Figure 10 Ultra High Speed Overedge and Safety Stitch Machine | Instruction Manual and Parts List 10 Figure 8 3.5 Needle Attachment (or Replacement) Use only Singer's Cat. 6120 needles Loosen screw '1' as indicated on Figure 8. Figure 9 (a) OK! Insert the needle to the proper depth...
... push it up until the bar end.. Tighten screw '1'. Figure 9 (b) Figure 10 Ultra High Speed Overedge and Safety Stitch Machine | Instruction Manual and Parts List 10 Figure 8 3.5 Needle Attachment (or Replacement) Use only Singer's Cat. 6120 needles Loosen screw '1' as indicated on Figure 8. Figure 9 (a) OK! Insert the needle to the proper depth...

Instruction Manual
Page 14
... and lower knives so that midpoint 'A' on upper knife '4' and the midpoint of the needle plate 6 Figure 12 (b) Ultra High Speed Overedge and Safety Stitch Machine | Instruction Manual and Parts List 11 Loosen screw '1'. Tighten screw '1' temporarily. 2. Loosen screw '1'ˈmove upper knife clamp '8' left and then tighten the screw '1' temporarily...
... and lower knives so that midpoint 'A' on upper knife '4' and the midpoint of the needle plate 6 Figure 12 (b) Ultra High Speed Overedge and Safety Stitch Machine | Instruction Manual and Parts List 11 Loosen screw '1'. Tighten screw '1' temporarily. 2. Loosen screw '1'ˈmove upper knife clamp '8' left and then tighten the screw '1' temporarily...
Instruction Manual
Page 15
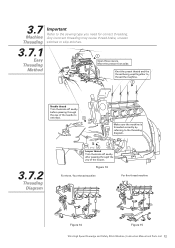
... through the yey of the looper. Move the presser foot aside. Knot the preset thread and the thread being used together to thread the machine. 2 Needle thread Trim the knots off neatly after passing through the eye of the needle to rethread. 3 Make sure the...correctly by referring to the sewing type you need for correct threading. Figure 13 For three / four thread machine For five thread machine Figure 14 Figure 15 Ultra High Speed Overedge and Safety Stitch Machine | Instruction Manual and Parts List 12 Any incorrect threading may cause thread brake, uneven stitches or skip...
... through the yey of the looper. Move the presser foot aside. Knot the preset thread and the thread being used together to thread the machine. 2 Needle thread Trim the knots off neatly after passing through the eye of the needle to rethread. 3 Make sure the...correctly by referring to the sewing type you need for correct threading. Figure 13 For three / four thread machine For five thread machine Figure 14 Figure 15 Ultra High Speed Overedge and Safety Stitch Machine | Instruction Manual and Parts List 12 Any incorrect threading may cause thread brake, uneven stitches or skip...
Instruction Manual
Page 16
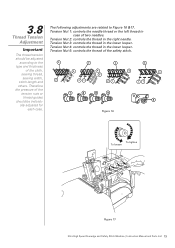
.... Important Tension Nut 4: controls the thread in the lower looper. Figure 16 To tighten To loosen 3 2 1 Figure 17 Ultra High Speed Overedge and Safety Stitch Machine | Instruction Manual and Parts List 13 Tension Nut 1: controls the needle thread or the left thread in the right needle. Tension Nut 2: controls the thread...
.... Important Tension Nut 4: controls the thread in the lower looper. Figure 16 To tighten To loosen 3 2 1 Figure 17 Ultra High Speed Overedge and Safety Stitch Machine | Instruction Manual and Parts List 13 Tension Nut 1: controls the needle thread or the left thread in the right needle. Tension Nut 2: controls the thread...

Instruction Manual
Page 17
... main feed dog and differential feed dog. As shown on Figure 19. 2 To shrink To stretch 1 Figure 19 Ultra High Speed Overedge and Safety Stitch Machine | Instruction Manual and Parts List 14 When the movement of main feed dog is bigger than the differential feed dog, the fabric is the ratio...
... main feed dog and differential feed dog. As shown on Figure 19. 2 To shrink To stretch 1 Figure 19 Ultra High Speed Overedge and Safety Stitch Machine | Instruction Manual and Parts List 14 When the movement of main feed dog is bigger than the differential feed dog, the fabric is the ratio...

Instruction Manual
Page 18
Aligning Mark Coarse Fine Handwheel Push Button Figure 20 Ultra High Speed Overedge and Safety Stitch Machine | Instruction Manual and Parts List 15 Press button to the sewing fabric, differential feed ration and other factors. Turn the handwheel until we have the desired stitch length. It is made according to the end and keep it pressed as shown on the handwheel scale. 3.11 Stitch Length Adjustment Important The stitch length adjustment is shown on Figure 20.
Aligning Mark Coarse Fine Handwheel Push Button Figure 20 Ultra High Speed Overedge and Safety Stitch Machine | Instruction Manual and Parts List 15 Press button to the sewing fabric, differential feed ration and other factors. Turn the handwheel until we have the desired stitch length. It is made according to the end and keep it pressed as shown on the handwheel scale. 3.11 Stitch Length Adjustment Important The stitch length adjustment is shown on Figure 20.

Instruction Manual
Page 19
....5 Left 14.5 Left 14.5 Left - 0.8 0.5 0.35~2.0 - 0.8 0.5 0.35~2.0 0.6~0.7 0.3 0.35~1.7 - 0.8 0.5 0.35~1.7 - 0.8 0.5 0.35~2.0 - 0.8 0.5 0.35~2.0 - 0.8 0.5 0.35~2.0 1.5 0.8 0.5 0.35~2.0 1.5 0.8 0.5 0.35~2.0 1.5 0.8 0.5 0.35~2.0 1.5 0.8 0.5 0.35~2.0 1.7 0.8 0.5 0.35~2.0 1.7 0.8 0.5 0.35~2.0 Ultra High Speed Overedge and Safety Stitch Machine | Instruction Manual and Parts List 16
....5 Left 14.5 Left 14.5 Left - 0.8 0.5 0.35~2.0 - 0.8 0.5 0.35~2.0 0.6~0.7 0.3 0.35~1.7 - 0.8 0.5 0.35~1.7 - 0.8 0.5 0.35~2.0 - 0.8 0.5 0.35~2.0 - 0.8 0.5 0.35~2.0 1.5 0.8 0.5 0.35~2.0 1.5 0.8 0.5 0.35~2.0 1.5 0.8 0.5 0.35~2.0 1.5 0.8 0.5 0.35~2.0 1.7 0.8 0.5 0.35~2.0 1.7 0.8 0.5 0.35~2.0 Ultra High Speed Overedge and Safety Stitch Machine | Instruction Manual and Parts List 16

Instruction Manual
Page 20
... tension (Except 321K) Check and be sure there is running, oil will be changed every four months. Ultra High Speed Overedge and Safety Stitch Machine | Instruction Manual and Parts List 17 The oil filter should be cleaned every month or replaced by a new one as necessary. Check ... and be sure the V-belt is not excessively worn out and see topic 3.3) If the machine was idle for a long time, oil the top of dust on the machine head. 4 Maintenance 4.1 Machine Head Cleaning Clean the machine periodically with a soft and dry cloth to wipe the surface. Do not use any kind ...
... tension (Except 321K) Check and be sure there is running, oil will be changed every four months. Ultra High Speed Overedge and Safety Stitch Machine | Instruction Manual and Parts List 17 The oil filter should be cleaned every month or replaced by a new one as necessary. Check ... and be sure the V-belt is not excessively worn out and see topic 3.3) If the machine was idle for a long time, oil the top of dust on the machine head. 4 Maintenance 4.1 Machine Head Cleaning Clean the machine periodically with a soft and dry cloth to wipe the surface. Do not use any kind ...


