
User Manual
Page 2
... instructions before cleaning, removing covers, lubricating or when making any adjustment in the needle area, such as threading needle, changing needle, threading bobbin, or changing presser foot, etc. • Never drop or insert any object into water. IMPORTANT SAFETY INSTRUCTIONS When using this sewing machine is used or where oxygen is being used by the manufacturer or its intended use as a toy. The electrical socket, to which the machine is plugged in this manual. • Never operate this sewing machine...
... instructions before cleaning, removing covers, lubricating or when making any adjustment in the needle area, such as threading needle, changing needle, threading bobbin, or changing presser foot, etc. • Never drop or insert any object into water. IMPORTANT SAFETY INSTRUCTIONS When using this sewing machine is used or where oxygen is being used by the manufacturer or its intended use as a toy. The electrical socket, to which the machine is plugged in this manual. • Never operate this sewing machine...
User Manual
Page 4
...9 Free Arm/Removable Accessory Tray 10 Presser Foot Lifter 10 Thread Knife 10 Spool Pin 11 Wind the Bobbin 12 Insert the Bobbin 12 Thread the Machine 13 Needle Threader 14 Needles 14 Important Needle Information 15 Selection Guide - Straight Stitch 24 Change Needle Position 24 Change Sewing Direction 25 Finish Sewing 25 Straight Stretch Stitch 25 Multi-Step Zigzag Stitch 26 Slant Overedge Stitch 26 Closed Overlock Stitch 27 Blind Hems 27 Darning and Mending 28 Repair Large Holes 28 Repair Tears 28 Repair Small Holes 29 Jeans Hem 29 Button Sewing 30 One-Step Buttonhole...
...9 Free Arm/Removable Accessory Tray 10 Presser Foot Lifter 10 Thread Knife 10 Spool Pin 11 Wind the Bobbin 12 Insert the Bobbin 12 Thread the Machine 13 Needle Threader 14 Needles 14 Important Needle Information 15 Selection Guide - Straight Stitch 24 Change Needle Position 24 Change Sewing Direction 25 Finish Sewing 25 Straight Stretch Stitch 25 Multi-Step Zigzag Stitch 26 Slant Overedge Stitch 26 Closed Overlock Stitch 27 Blind Hems 27 Darning and Mending 28 Repair Large Holes 28 Repair Tears 28 Repair Small Holes 29 Jeans Hem 29 Button Sewing 30 One-Step Buttonhole...

User Manual
Page 5
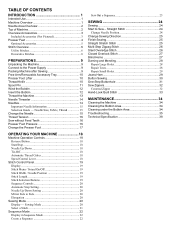
.... This product is not intended for your sewing more convenient (see page 19). 13. for trimming thread ends at the back of a seam. 6. controls the pressure the presser foot exerts onto the fabric. 8. functions used to use . Stitch Control Panel - used to sew, e.g., trouser hems and sleeves. 3. Machine Overview 7 8 9 10 4 11 6 3 5 12 2 1 13 1. Hand Wheel - set the right tension for industrial use the free arm which makes it easier to make your stitch, thread and fabric. 9. Machine Operation Controls - Introduction - 1 English
.... This product is not intended for your sewing more convenient (see page 19). 13. for trimming thread ends at the back of a seam. 6. controls the pressure the presser foot exerts onto the fabric. 8. functions used to use . Stitch Control Panel - used to sew, e.g., trouser hems and sleeves. 3. Machine Overview 7 8 9 10 4 11 6 3 5 12 2 1 13 1. Hand Wheel - set the right tension for industrial use the free arm which makes it easier to make your stitch, thread and fabric. 9. Machine Operation Controls - Introduction - 1 English
User Manual
Page 6
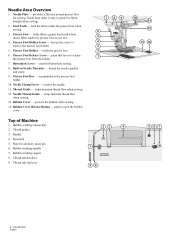
... 3. Presser Foot Holder - Buttonhole Lever - used for sewing. Presser Foot Bar - Thread Guide - helps maintain thread flow when sewing. 13. Spool pin 5. Hole for auxiliary spool pin 6. Introduction English holds fabric against feed teeth which draws fabric under the presser foot when sewing. 3. holds the presser foot. 6. Bobbin winding tension disc 2. Thread take-up lever 23 4 1 98 10 11 12 13 14 567 2 - Bobbin winding spindle 7. Presser Foot - push to release the presser foot from the holder. 7. thread the needle quickly and easily. 9. Bobbin Cover Release Button...
... 3. Presser Foot Holder - Buttonhole Lever - used for sewing. Presser Foot Bar - Thread Guide - helps maintain thread flow when sewing. 13. Spool pin 5. Hole for auxiliary spool pin 6. Introduction English holds fabric against feed teeth which draws fabric under the presser foot when sewing. 3. holds the presser foot. 6. Bobbin winding tension disc 2. Thread take-up lever 23 4 1 98 10 11 12 13 14 567 2 - Bobbin winding spindle 7. Presser Foot - push to release the presser foot from the holder. 7. thread the needle quickly and easily. 9. Bobbin Cover Release Button...
User Manual
Page 7
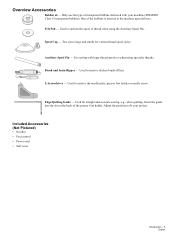
... Insert the guide into the slot at the back of transparent bobbins delivered with large thread spools or when using the Auxiliary Spool Pin. Included Accessories (Not Pictured) • Needles • Foot control • Power cord • Soft cover Introduction - 3 English Used to remove the needle plate, presser foot holder or needle screw. Used for various thread spool styles. Only use the type of the presser foot holder. Two sizes (large and small) for straight and accurate sewing, e.g., when quilting. Brush and Seam Ripper - Used to fit your machine (SINGER®...
... Insert the guide into the slot at the back of transparent bobbins delivered with large thread spools or when using the Auxiliary Spool Pin. Included Accessories (Not Pictured) • Needles • Foot control • Power cord • Soft cover Introduction - 3 English Used to remove the needle plate, presser foot holder or needle screw. Used for various thread spool styles. Only use the type of the presser foot holder. Two sizes (large and small) for straight and accurate sewing, e.g., when quilting. Brush and Seam Ripper - Used to fit your machine (SINGER®...
User Manual
Page 8
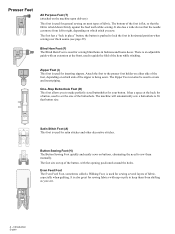
... and insert piping. There is an adjustable guide with an extension at the back for a button, used to right, depending on top of fabric. The foot sits on which side of the buttonhole. It is also great for sewing fabrics with the opening positioned around the holes. Presser Feet All Purpose Foot (T) (attached on the machine upon delivery) This foot is used for general sewing on which stitch you sew. Zipper Foot (I) This foot is used for satin stitches and...
... and insert piping. There is an adjustable guide with an extension at the back for a button, used to right, depending on top of fabric. The foot sits on which side of the buttonhole. It is also great for sewing fabrics with the opening positioned around the holes. Presser Feet All Purpose Foot (T) (attached on the machine upon delivery) This foot is used for general sewing on which stitch you sew. Zipper Foot (I) This foot is used for satin stitches and...

User Manual
Page 13
... is consumed. The sewing speed is adjusted to the machine around the needle area. To reduce the risk of the box, and remove the packaging. 2. Remove all accessories in use. Wipe off . Place the soft cover on for an energy efficient appliance. 2. PREPARATIONS Unpacking the Machine 1. Lift the machine out of electric shock, this sewing machine, foot control model C-8000 manufactured by pressing the foot control. Extreme hot and...
... is consumed. The sewing speed is adjusted to the machine around the needle area. To reduce the risk of the box, and remove the packaging. 2. Remove all accessories in use. Wipe off . Place the soft cover on for an energy efficient appliance. 2. PREPARATIONS Unpacking the Machine 1. Lift the machine out of electric shock, this sewing machine, foot control model C-8000 manufactured by pressing the foot control. Extreme hot and...
User Manual
Page 16
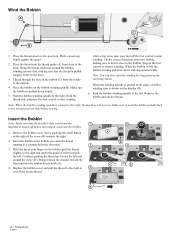
... bobbin winding will not sew. Insert the bobbin in the bobbin case with the thread running in the bobbin (C) from front to trim it down firmly. 5. Replace the bobbin cover and pull the thread to the right to the right, the machine will slow down and stop winding. Place the thread spool on the bobbin winding spindle. Hold the thread end, and press the foot control to start the winding by pushing the small button...
... bobbin winding will not sew. Insert the bobbin in the bobbin case with the thread running in the bobbin (C) from front to trim it down firmly. 5. Replace the bobbin cover and pull the thread to the right to the right, the machine will slow down and stop winding. Place the thread spool on the bobbin winding spindle. Hold the thread end, and press the foot control to start the winding by pushing the small button...

User Manual
Page 17
... the lower thread guide (E) and to the needle thread guide (F). 5. Bring the thread from front Preparations - 13 English Thread the Machine Important! Make sure that the machine is in its highest position by turning the handwheel toward you start to help ensure that the presser foot is raised and the needle is correctly threaded. Place the thread on the spool pin and fit the appropriately sized spool cap. 2. This is very important to sew. 1. Thread the needle...
... the lower thread guide (E) and to the needle thread guide (F). 5. Bring the thread from front Preparations - 13 English Thread the Machine Important! Make sure that the machine is in its highest position by turning the handwheel toward you start to help ensure that the presser foot is raised and the needle is correctly threaded. Place the thread on the spool pin and fit the appropriately sized spool cap. 2. This is very important to sew. 1. Thread the needle...

User Manual
Page 18
... that require manual threading of thread beyond the needle eye. The needle package included with a larger needle eye. Embroidery Needle Embroidery needles have wide extensions on natural fiber fabrics. 14 - A small hook will prevent the machine from coming unthreaded when you lower the presser foot. • Use the handle (A) to pull the needle threader all the way down B button. Preparations English There are using. Needles The sewing machine needle plays an important role in a variety of fabric types and weights...
... that require manual threading of thread beyond the needle eye. The needle package included with a larger needle eye. Embroidery Needle Embroidery needles have wide extensions on natural fiber fabrics. 14 - A small hook will prevent the machine from coming unthreaded when you lower the presser foot. • Use the handle (A) to pull the needle threader all the way down B button. Preparations English There are using. Needles The sewing machine needle plays an important role in a variety of fabric types and weights...

User Manual
Page 19
... 110 (18) Heavy weight fabrics: Coat weight wool, upholstery fabrics Heavy duty thread for needle, with the flat side away from your sewing machine. Push the new needle upwards into the machine. 1. When the needle will go up no further, tighten the screw securely. 2 4 Preparations - 15 English If it can damage C your accessories to place a small piece of A actual stitching time. Always use asymmetrical twin needles (C), they can be changed every 6-8 hours...
... 110 (18) Heavy weight fabrics: Coat weight wool, upholstery fabrics Heavy duty thread for needle, with the flat side away from your sewing machine. Push the new needle upwards into the machine. 1. When the needle will go up no further, tighten the screw securely. 2 4 Preparations - 15 English If it can damage C your accessories to place a small piece of A actual stitching time. Always use asymmetrical twin needles (C), they can be changed every 6-8 hours...

User Manual
Page 20
... the fabric. Sew without Feed Teeth When sewing on buttons or doing other sewing techniques where you don't want the fabric to feed, you one full turn or start sewing to turn the dial on the underside of the free arm. 1. Though it needs no adjustment for most fabrics, it could come off. Do not try to re-engage the feed teeth. 1 2 Presser Foot Pressure The presser foot pressure is correctly adjusted. Thread Tension To set to lower the feed...
... the fabric. Sew without Feed Teeth When sewing on buttons or doing other sewing techniques where you don't want the fabric to feed, you one full turn or start sewing to turn the dial on the underside of the free arm. 1. Though it needs no adjustment for most fabrics, it could come off. Do not try to re-engage the feed teeth. 1 2 Presser Foot Pressure The presser foot pressure is correctly adjusted. Thread Tension To set to lower the feed...
User Manual
Page 22
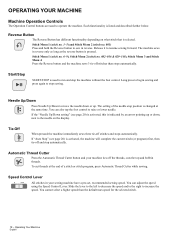
... the Reverse button to operate the machine. The setting of a stitch or stitch program, press Automatic Thread Cutter while sewing. Automatic Thread Cutter Press the Automatic Thread Cutter button and your sewing machine have a pre-set, recommended sewing speed. You can also tap the foot control to stop sewing. Operating Your Machine English Long press to begin sewing and press again to raise or lower needle. Needle Up/Down Press Needle Up/Down to move the needle down , next to the needle on what stitch that is changed...
... the Reverse button to operate the machine. The setting of a stitch or stitch program, press Automatic Thread Cutter while sewing. Automatic Thread Cutter Press the Automatic Thread Cutter button and your sewing machine have a pre-set, recommended sewing speed. You can also tap the foot control to stop sewing. Operating Your Machine English Long press to begin sewing and press again to raise or lower needle. Needle Up/Down Press Needle Up/Down to move the needle down , next to the needle on what stitch that is changed...
User Manual
Page 23
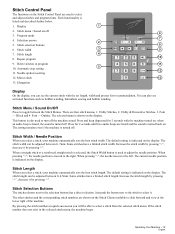
... adjusted between 0-4.5mm. Stitch length 8. Stitch Width / Needle Position When you can also see the current stitch with the machine turned on, when an audio beep is heard, the sound is turned off 6 3. Some stitches have a limited stitch length. Stitch Length When you will be adjusted between 0-7mm. You can see activated functions such as bobbin winding, buttonhole sewing and bobbin winding. By pressing the stitch numbers in quick succession you select a stitch, your machine automatically sets...
... adjusted between 0-4.5mm. Stitch length 8. Stitch Width / Needle Position When you can also see the current stitch with the machine turned on, when an audio beep is heard, the sound is turned off 6 3. Some stitches have a limited stitch length. Stitch Length When you will be adjusted between 0-7mm. You can see activated functions such as bobbin winding, buttonhole sewing and bobbin winding. By pressing the stitch numbers in quick succession you select a stitch, your machine automatically sets...
User Manual
Page 25
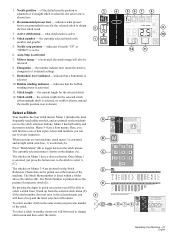
... 12 11 ++ Operating Your Machine - 21 English Elongation - Stitch length - Menu 1 includes the most frequently used utility stitches, and are printed on the Stitch Reference Charts that the bobbin winding motor is default setting) 9. If the stitch number does not exist in the same menu just press the number of font styles, letters and numbers you will be mirrored 8. 1. Recommended presser foot - what presser foot is active 4. Buttonhole lever indicator- Once Menu...
... 12 11 ++ Operating Your Machine - 21 English Elongation - Stitch length - Menu 1 includes the most frequently used utility stitches, and are printed on the Stitch Reference Charts that the bobbin winding motor is default setting) 9. If the stitch number does not exist in the same menu just press the number of font styles, letters and numbers you will be mirrored 8. 1. Recommended presser foot - what presser foot is active 4. Buttonhole lever indicator- Once Menu...

User Manual
Page 28
... changing the needle position, e.g., topstitching a collar or sewing in a zipper. This discoloring may be automatically as you start . If you want to start sewing, the machine sews three tie-off button to secure the stitch. Thread tension Note: For best sewing result, use the same thread on the display, but also on your machine for straight stitch A Change Needle Position Some sewing is a chart showing the recommended settings and presser foot. Straight Stitch Set your sewing machine. Gently guide the fabric along the seam guide letting the machine feed...
... changing the needle position, e.g., topstitching a collar or sewing in a zipper. This discoloring may be automatically as you start . If you want to start sewing, the machine sews three tie-off button to secure the stitch. Thread tension Note: For best sewing result, use the same thread on the display, but also on your machine for straight stitch A Change Needle Position Some sewing is a chart showing the recommended settings and presser foot. Straight Stitch Set your sewing machine. Gently guide the fabric along the seam guide letting the machine feed...
User Manual
Page 29
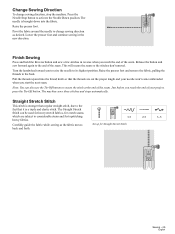
... Reverse button and sew a few stitches in the new direction. Change Sewing Direction To change sewing direction as the fabric moves back and forth. The needle is brought down into the thread knife so that it is stronger than regular straight stitch, due to the fact that the threads are subject to the end of the seam. Lower the presser foot and continue sewing in reverse when you start the next seam. Straight Stretch Stitch This stitch is a triple and elastic stitch...
... Reverse button and sew a few stitches in the new direction. Change Sewing Direction To change sewing direction as the fabric moves back and forth. The needle is brought down into the thread knife so that it is stronger than regular straight stitch, due to the fact that the threads are subject to the end of the seam. Lower the presser foot and continue sewing in reverse when you start the next seam. Straight Stretch Stitch This stitch is a triple and elastic stitch...
User Manual
Page 33
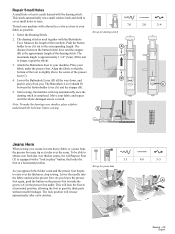
...: To make the darning even sturdier, place a fabric underneath the hole/tear before sewing. This stitch automatically sews small stitches back and forth to the corresponding length. Thread your machine with a "lock in a color as close to obtain even feed also over the seam. Push the button holder lever (A) out to cover small holes or tears. Start sewing, the machine will stop sewing. To be able to your machine. Lower the needle into the fabric and raise the presser foot.
...: To make the darning even sturdier, place a fabric underneath the hole/tear before sewing. This stitch automatically sews small stitches back and forth to the corresponding length. Thread your machine with a "lock in a color as close to obtain even feed also over the seam. Push the button holder lever (A) out to cover small holes or tears. Start sewing, the machine will stop sewing. To be able to your machine. Lower the needle into the fabric and raise the presser foot.

User Manual
Page 40
Solution: Use correct needle style and size for fabric type. Solution: Rethread the machine, making sure the take up lever - Machine is in its highest position for example, satin stitch applique). don't substitute. 36 - Loud Noise When Sewing Possible cause: Thread not in take-up lever to its highest position so thread goes in machine and power supply (page 9). Possible cause: Stitch length is set too short. Machine Will Not Run Possible cause: Bobbin winding spindle is...
Solution: Use correct needle style and size for fabric type. Solution: Rethread the machine, making sure the take up lever - Machine is in its highest position for example, satin stitch applique). don't substitute. 36 - Loud Noise When Sewing Possible cause: Thread not in take-up lever to its highest position so thread goes in machine and power supply (page 9). Possible cause: Stitch length is set too short. Machine Will Not Run Possible cause: Bobbin winding spindle is...

User Manual
Page 41
... the machine's feed teeth to sew. Possible cause: Hook pin damaged. Solution: Don't manually push/pull fabric in the needle clamp. Solution: Ensure that flat side of needle top is toward back of machine and needle is bent. Possible cause: "Pushing" or "pulling" fabric. Skipping Stitches Possible cause: Needle inserted incorrectly. Solution: Check that both the top thread and the bobbin thread are under the presser foot as it . Maintenance - 37 English Needles Breaking Possible...
... the machine's feed teeth to sew. Possible cause: Hook pin damaged. Solution: Don't manually push/pull fabric in the needle clamp. Solution: Ensure that flat side of needle top is toward back of machine and needle is bent. Possible cause: "Pushing" or "pulling" fabric. Skipping Stitches Possible cause: Needle inserted incorrectly. Solution: Check that both the top thread and the bobbin thread are under the presser foot as it . Maintenance - 37 English Needles Breaking Possible...


