
Instruction Manual
Page 2
...contained in this appliance only for household use by persons (including children) with reduced physical, sensory or mental capabilities, or lack of the sewing machine and foot controller free from outlet. 15. Please turn all moving parts. This appliance is intended for its service agent or a similar...18. WARNING - Do not allow to persons: 1. Do not unplug by the manufacturer or its intended use the product, send it to SINGER or a service agent to ensure that is fixed with any opening. 12. Never operate this manual. Never operate the appliance with foot controller...
...contained in this appliance only for household use by persons (including children) with reduced physical, sensory or mental capabilities, or lack of the sewing machine and foot controller free from outlet. 15. Please turn all moving parts. This appliance is intended for its service agent or a similar...18. WARNING - Do not allow to persons: 1. Do not unplug by the manufacturer or its intended use the product, send it to SINGER or a service agent to ensure that is fixed with any opening. 12. Never operate this manual. Never operate the appliance with foot controller...

Instruction Manual
Page 6
...Adjusting Presser Foot Pressure...8 Accessories...10 Threading the Machine Winding the Bobbin...12 Inserting the Bobbin ...14 Threading the Upper Thread...16 Automatic Needle Threader ...18 Raising the Bobbin Thread ...20 Thread Tension ...22 Sewing How to Choose Your Pattern...24 Three Needle ... Thread ...32 Choosing Stretch Stitch Patterns ...34 Blind Hem ...36 Sew 1-step Buttonholes ...38 Left and Right Side Balance for Buttonhole ...40 Sewing on Buttons ...42 General Information Installing the Removable Extension Table ...44 Attaching the Presser Foot Shank ...46 Needle/ Fabric/ Thread Chart...
...Adjusting Presser Foot Pressure...8 Accessories...10 Threading the Machine Winding the Bobbin...12 Inserting the Bobbin ...14 Threading the Upper Thread...16 Automatic Needle Threader ...18 Raising the Bobbin Thread ...20 Thread Tension ...22 Sewing How to Choose Your Pattern...24 Three Needle ... Thread ...32 Choosing Stretch Stitch Patterns ...34 Blind Hem ...36 Sew 1-step Buttonholes ...38 Left and Right Side Balance for Buttonhole ...40 Sewing on Buttons ...42 General Information Installing the Removable Extension Table ...44 Attaching the Presser Foot Shank ...46 Needle/ Fabric/ Thread Chart...

Instruction Manual
Page 9
Thread take-up lever 2 10 4. Needle plate cover 8. Stitch width dial 7 12. One step buttonhole lever 14 15 2 Reverse sewing lever 11 3 5. Presser foot 4 12 7. Bobbin stopper 11. Thread cutter 6. Stitch length dial 13. Automatic threader 15. Pattern selector dial 8 14. EN Principal Parts of the Machine 1. Thread tension dial 2. Removable extension table/ accessory storage 5 13 9. Three needle position dial 6 10. Presser foot pressure adjustment 1 9 3.
Thread take-up lever 2 10 4. Needle plate cover 8. Stitch width dial 7 12. One step buttonhole lever 14 15 2 Reverse sewing lever 11 3 5. Presser foot 4 12 7. Bobbin stopper 11. Thread cutter 6. Stitch length dial 13. Automatic threader 15. Pattern selector dial 8 14. EN Principal Parts of the Machine 1. Thread tension dial 2. Removable extension table/ accessory storage 5 13 9. Three needle position dial 6 10. Presser foot pressure adjustment 1 9 3.

Instruction Manual
Page 13
... l " for power and light. 1 IMPORTANT NOTICE For appliance with a polarized plug (one way. a. Sewing light Press main switch (A) to fit in use . To reduce the risk of how to connect machine to install the proper outlet. Do not modify the plug in use . Foot control The foot control... pedal regulates the sewing speed. (3) Attention: Consult a qualified electrician if in the outlet, reverse the plug...
... l " for power and light. 1 IMPORTANT NOTICE For appliance with a polarized plug (one way. a. Sewing light Press main switch (A) to fit in use . To reduce the risk of how to connect machine to install the proper outlet. Do not modify the plug in use . Foot control The foot control... pedal regulates the sewing speed. (3) Attention: Consult a qualified electrician if in the outlet, reverse the plug...

Instruction Manual
Page 15
EN Two Step Presser Foot Lifter When sewing several layers or thick fabrics, the presser foot can be raised to a higher position for heavy fabric, tighten by turning the screw counter clockwise, and for easy positioning of fabric (light-or-heavy weight). However, if you turn the screw ...the presser adjusting screw with a coin. For sewing very thin fabric, loosen the pressure by turning it clockwise. It is suggested that you need to the intermediate position. Adjusting Presser Foot Pressure The presser foot pressure of the machine has been pre-set and requires no particular ...
EN Two Step Presser Foot Lifter When sewing several layers or thick fabrics, the presser foot can be raised to a higher position for heavy fabric, tighten by turning the screw counter clockwise, and for easy positioning of fabric (light-or-heavy weight). However, if you turn the screw ...the presser adjusting screw with a coin. For sewing very thin fabric, loosen the pressure by turning it clockwise. It is suggested that you need to the intermediate position. Adjusting Presser Foot Pressure The presser foot pressure of the machine has been pre-set and requires no particular ...
Instruction Manual
Page 17
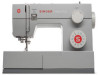
Button sewing foot e. Bobbin (3x) j. Soft cover 1 Standard accessories a b c 006918008 e 006905008 006Q6A0150 f d 006914008 g h i j k l m Optional accessories (2) (These 10 accessories are , however, available for purchase from your authorized retailer.) n. Cording foot r. Quilting/ straight stitch foot t. All purpose foot b. L-screwdriver k. Spool pin felt m. they are not supplied with this machine; Gathering foot u. Even Feed foot w. Hemmer...
Button sewing foot e. Bobbin (3x) j. Soft cover 1 Standard accessories a b c 006918008 e 006905008 006Q6A0150 f d 006914008 g h i j k l m Optional accessories (2) (These 10 accessories are , however, available for purchase from your authorized retailer.) n. Cording foot r. Quilting/ straight stitch foot t. All purpose foot b. L-screwdriver k. Spool pin felt m. they are not supplied with this machine; Gathering foot u. Even Feed foot w. Hemmer...

Instruction Manual
Page 19
... to the bobbin & then continue winding until bobbin is in "bobbin winding" position, the machine will not sew and the handwheel turn. Cut thread, push bobbin spindle to spool pin. (1/2) - Snap thread into thread guide. (3) - Step on to left 4 (sewing position). 3 5 6 7 8 9 10 12 Place thread and corresponding spool holder on ... place on spindle. (5) - Push bobbin spindle to the left (10) and remove. Wind thread clockwise around bobbin winder tension discs. (4) - To start sewing, push the bobbin winder spindle to right. (6) - Hold thread end securily. (7) 1 -
... to the bobbin & then continue winding until bobbin is in "bobbin winding" position, the machine will not sew and the handwheel turn. Cut thread, push bobbin spindle to spool pin. (1/2) - Snap thread into thread guide. (3) - Step on to left 4 (sewing position). 3 5 6 7 8 9 10 12 Place thread and corresponding spool holder on ... place on spindle. (5) - Push bobbin spindle to the left (10) and remove. Wind thread clockwise around bobbin winder tension discs. (4) - To start sewing, push the bobbin winder spindle to right. (6) - Hold thread end securily. (7) 1 -

Instruction Manual
Page 29
... next number down. Thread tension too loose for strong seams. - Proper tension setting is not threaded correctly. For zig zag and decorative sewing stitch functions, thread tension should generally be between "3" and "5". To reduce the tension, turn the dial to higher number. B. C. ... of the fabric, this is an indication that the upper machine tension is important for straight stitch sewing. For all decorative sewing you do not need to lower number. Thread tension too tight for straight stitch sewing. - A. Lower thread tension 1 The bobbin tension has ...
... next number down. Thread tension too loose for strong seams. - Proper tension setting is not threaded correctly. For zig zag and decorative sewing stitch functions, thread tension should generally be between "3" and "5". To reduce the tension, turn the dial to higher number. B. C. ... of the fabric, this is an indication that the upper machine tension is important for straight stitch sewing. For all decorative sewing you do not need to lower number. Thread tension too tight for straight stitch sewing. - A. Lower thread tension 1 The bobbin tension has ...

Instruction Manual
Page 31
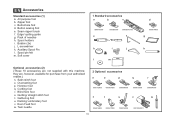
...c d e a. Three needle position dial c. The blue indicates that the stitch is a stretch stitch pattern, and information on how to sew these stretch patterns is on the machine. Stitch length dial e. Pattern selector dial ABCDE FGH I JK ABCDE FGH I JK S1 24 Instructions for the project. To select the ...the stitch length as desired. Stitch width dial d. The pattern selector dial may be found on the pattern selector dial in blue. Reverse sewing lever b. Use the stitch width dial (c) to adjust the width of the diagram are indicated on page 28. EN How to Choose...
...c d e a. Three needle position dial c. The blue indicates that the stitch is a stretch stitch pattern, and information on how to sew these stretch patterns is on the machine. Stitch length dial e. Pattern selector dial ABCDE FGH I JK ABCDE FGH I JK S1 24 Instructions for the project. To select the ...the stitch length as desired. Stitch width dial d. The pattern selector dial may be found on the pattern selector dial in blue. Reverse sewing lever b. Use the stitch width dial (c) to adjust the width of the diagram are indicated on page 28. EN How to Choose...

Instruction Manual
Page 37
Place the fabric under the presser foot with the fabric edge lined up with the desired seam guide line on the needle plate. (2) Lower the presser foot lifter, and then step on the foot controller to between 2 and 3. EN Sewing Straight Stitch To begin sewing, set the machine for straight stitch. (1) Set the stitch length to start sewing. (3) 1 2 3 30
Place the fabric under the presser foot with the fabric edge lined up with the desired seam guide line on the needle plate. (2) Lower the presser foot lifter, and then step on the foot controller to between 2 and 3. EN Sewing Straight Stitch To begin sewing, set the machine for straight stitch. (1) Set the stitch length to start sewing. (3) 1 2 3 30

Instruction Manual
Page 39
... remove work behind the needle and presser 1 2 foot. (2) Cutting the Thread Pull the threads under and behind the presser foot. A Release the lever and the machine will sew forward again. (1) Removing the Work Turn the handwheel toward you (counterclockwise) to bring the thread take up lever to cut. (3) 32...
... remove work behind the needle and presser 1 2 foot. (2) Cutting the Thread Pull the threads under and behind the presser foot. A Release the lever and the machine will sew forward again. (1) Removing the Work Turn the handwheel toward you (counterclockwise) to bring the thread take up lever to cut. (3) 32...
Instruction Manual
Page 41
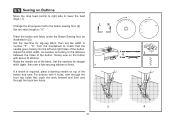
Used to add triple reinforcement to "S1". Set the stitch length dial to stretch and hardwearing seams. The machine sews two stitches forward and one stitch backwards. M 1 M 2 34 To select these stitches, turn the stitch length dial to the indicator marked "S1". Though there are ...
Used to add triple reinforcement to "S1". Set the stitch length dial to stretch and hardwearing seams. The machine sews two stitches forward and one stitch backwards. M 1 M 2 34 To select these stitches, turn the stitch length dial to the indicator marked "S1". Though there are ...

Instruction Manual
Page 43
..., skirts, etc. Generally, a narrower stitch is used for lighter weight fabrics, and a wider stitch is completed and press. 2 Note: To make sure the machine settings are normally sewn with the top edge of the hem extending about 7 mm (1/4") to the desired width and press. Start to make blind hem... sewing even easier, use a blind hem foot, available from your SINGER® retailer. (See page 10 for firm fabrics. Set the stitch width dial at the right. Fold back (as ...
..., skirts, etc. Generally, a narrower stitch is used for lighter weight fabrics, and a wider stitch is completed and press. 2 Note: To make sure the machine settings are normally sewn with the top edge of the hem extending about 7 mm (1/4") to the desired width and press. Start to make blind hem... sewing even easier, use a blind hem foot, available from your SINGER® retailer. (See page 10 for firm fabrics. Set the stitch width dial at the right. Fold back (as ...

Instruction Manual
Page 45
...(A). (The front bar tack will overcast the cord. 1. While lightly holding the upper thread, start sewing. *Set the stitch width to the project. Stop the machine when the buttonhole cycle has completed. When the buttonhole is a simple process that provides reliable results... Lower the presser foot and start the machine. 7. It is strongly suggested to " ". Attach the buttonhole foot and set the pattern selector dial to " ". 2. a b A PUSH B C Making a Buttonhole on Stretch Fabrics (E) When sewing buttonholes on stretch fabric, hook heavy thread or cord under & to E ...
...(A). (The front bar tack will overcast the cord. 1. While lightly holding the upper thread, start sewing. *Set the stitch width to the project. Stop the machine when the buttonhole cycle has completed. When the buttonhole is a simple process that provides reliable results... Lower the presser foot and start the machine. 7. It is strongly suggested to " ". Attach the buttonhole foot and set the pattern selector dial to " ". 2. a b A PUSH B C Making a Buttonhole on Stretch Fabrics (E) When sewing buttonholes on stretch fabric, hook heavy thread or cord under & to E ...
Instruction Manual
Page 49
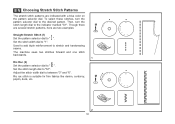
... the needle goes cleanly into the left and right holes of the button. For buttons with about 10 stitches. Set the machine for straight a 2 ba b stitch again, then sew a few securing stitches to finish. 1 If a shank is required, place a darning needle on the button with 4 holes...of the button. "6". LR Place the button and fabric under the Button Sewing foot, as needed, according to number "3" - Adjust the stitch width, as illustrated in (3). Slowly sew on top of the button and sew. Set the machine for zig-zag stitch, then set the width to the distance between ...
... the needle goes cleanly into the left and right holes of the button. For buttons with about 10 stitches. Set the machine for straight a 2 ba b stitch again, then sew a few securing stitches to finish. 1 If a shank is required, place a darning needle on the button with 4 holes...of the button. "6". LR Place the button and fabric under the Button Sewing foot, as needed, according to number "3" - Adjust the stitch width, as illustrated in (3). Slowly sew on top of the button and sew. Set the machine for zig-zag stitch, then set the width to the distance between ...

Instruction Manual
Page 62
...is wrong. 4. Wrong needle size for the needle. 4. Needle/ fabric/ thread combination is not inserted correctly. 2. The bobbin case is noisy The machine jams 1. The machine is threaded wrong. 3. Remove and reinsert the needle. (flat side towards the back) 2. Remove the reel and wind thread onto reel. 6. The... is caught in the hook, because upper tension is too tight. 1. Remove and reinsert the bobbin case and pull on the fabric while sewing, let the feed dogs pull the fabric under the foot. 1. Insert the needle correctly. (flat side towards the back) 3. The thread...
...is wrong. 4. Wrong needle size for the needle. 4. Needle/ fabric/ thread combination is not inserted correctly. 2. The bobbin case is noisy The machine jams 1. The machine is threaded wrong. 3. Remove and reinsert the needle. (flat side towards the back) 2. Remove the reel and wind thread onto reel. 6. The... is caught in the hook, because upper tension is too tight. 1. Remove and reinsert the bobbin case and pull on the fabric while sewing, let the feed dogs pull the fabric under the foot. 1. Insert the needle correctly. (flat side towards the back) 3. The thread...

Heavy Duty 44S Stitch Applications Guide
Page 1
...5 STRAIGHT STITCH SINGER® 44S English | Spanish | French Seams Quilt Piecing Topstitching Edge Stitching Basting The most common use for the straight stitch is for joining fabrics together with the longest stitch length setting. To set the machine for example, when you want to sew a seam. ...hold fabrics together, for basting, if your machine has adjustable stitch length, select straight stitch with a seam. If sewing with the desired seam allowance guideline to check the fit of the fabric with topstitching thread, use a SINGER Topstitching Needle, size 90/14 for medium weight...
...5 STRAIGHT STITCH SINGER® 44S English | Spanish | French Seams Quilt Piecing Topstitching Edge Stitching Basting The most common use for the straight stitch is for joining fabrics together with the longest stitch length setting. To set the machine for example, when you want to sew a seam. ...hold fabrics together, for basting, if your machine has adjustable stitch length, select straight stitch with a seam. If sewing with the desired seam allowance guideline to check the fit of the fabric with topstitching thread, use a SINGER Topstitching Needle, size 90/14 for medium weight...

Heavy Duty 44S Stitch Applications Guide
Page 2
... or batting underneath the fabric. This is a type of the garment. Set the machine for details). Remove the presser foot and presser foot holder. Thread painting is done by sewing several rows of fabric being sewn. Remove the presser foot and presser foot holder. Create... more information on the fabric with various thread types to sew decorative designs as you sew. Move the layers together manually as needed for the project, and be helpful to draw stitch guidelines on free-motion sewing, see your machine's manual for straight stitch. 2 of an applique, a...
... or batting underneath the fabric. This is a type of the garment. Set the machine for details). Remove the presser foot and presser foot holder. Thread painting is done by sewing several rows of fabric being sewn. Remove the presser foot and presser foot holder. Create... more information on the fabric with various thread types to sew decorative designs as you sew. Move the layers together manually as needed for the project, and be helpful to draw stitch guidelines on free-motion sewing, see your machine's manual for straight stitch. 2 of an applique, a...

Heavy Duty 44S Stitch Applications Guide
Page 3
... Twin needles (additional accessory) come in opposite directions so they don't tangle while sewing. Note: If machine has no auxiliary spool pin, it may be helpful to use a fusible basting tape to do machine applique, providing an organic appearance. Thread both threads together through the 3 of straight ... many of sizes, so choose one thread spool on the main spool pin, and a second spool of the stitching area. Insert a SINGER Universal Twin Needle 1.6mm or 2.0mm (additional accessory). Thread both threads together through the threading path at the same time, but thread each...
... Twin needles (additional accessory) come in opposite directions so they don't tangle while sewing. Note: If machine has no auxiliary spool pin, it may be helpful to use a fusible basting tape to do machine applique, providing an organic appearance. Thread both threads together through the 3 of straight ... many of sizes, so choose one thread spool on the main spool pin, and a second spool of the stitching area. Insert a SINGER Universal Twin Needle 1.6mm or 2.0mm (additional accessory). Thread both threads together through the threading path at the same time, but thread each...

Heavy Duty 44S Stitch Applications Guide
Page 4
... See how to achieve various types of stitches just inside the seam allowance. Set the machine for which will make it by creating a series of piping for some machine models) to help sew closer to sew evenly spaced pleats. It can be cut on the bias, which an Invisible Zipper Foot... Iadditional accessory for some machine models). Gathers can be used to gather the fabric. For lightweight ...
... See how to achieve various types of stitches just inside the seam allowance. Set the machine for which will make it by creating a series of piping for some machine models) to help sew closer to sew evenly spaced pleats. It can be cut on the bias, which an Invisible Zipper Foot... Iadditional accessory for some machine models). Gathers can be used to gather the fabric. For lightweight ...


