

Instruction Manual 2
Page 3
...changing the light. 10. DANGER -To reduce the risk of burns, fire, electrical shock, or injury to persons: 1. Use this appliance only for household use as using the wrong needle plate may deflect the needle causing it is not intended for their safety. 20. Special care is not ...operating properly. 18. To disconnect, turn off ("O") position, then remove plug from the electric outlet immediately after using and before using this manual. 3. Children should be supervised to the off or unplug the machine if it has been dropped or damaged, or dropped into...
...changing the light. 10. DANGER -To reduce the risk of burns, fire, electrical shock, or injury to persons: 1. Use this appliance only for household use as using the wrong needle plate may deflect the needle causing it is not intended for their safety. 20. Special care is not ...operating properly. 18. To disconnect, turn off ("O") position, then remove plug from the electric outlet immediately after using and before using this manual. 3. Children should be supervised to the off or unplug the machine if it has been dropped or damaged, or dropped into...
Instruction Manual 2
Page 4
... THE POWER SOURCE 9 Connecting the machine 9 WINDING THE BOBBIN 10-11 Bobbin winding 10-11 INSERTING THE BOBBIN 12 THREADING THE UPPER THREAD 13-14 USING THE NEEDLE THREADER 15 DRAWING UP THE LOWER THREAD 16 CUTTING THE THREAD 16 TWO-STEP PRESSER FOOT LIFTER 17 ADJUSTING PRESSER FOOT PRESSURE 17... Installing the extension table 33 Sewing on heavy fabric 33 NEEDLE POSITION AND STITCH LENGTH 34 ZIGZAG STITCHES 34 STRETCH STITCHES 35 OVERCASTING STITCHES 36 Using the overcasting foot 36 Using the all purpose foot 36
... THE POWER SOURCE 9 Connecting the machine 9 WINDING THE BOBBIN 10-11 Bobbin winding 10-11 INSERTING THE BOBBIN 12 THREADING THE UPPER THREAD 13-14 USING THE NEEDLE THREADER 15 DRAWING UP THE LOWER THREAD 16 CUTTING THE THREAD 16 TWO-STEP PRESSER FOOT LIFTER 17 ADJUSTING PRESSER FOOT PRESSURE 17... Installing the extension table 33 Sewing on heavy fabric 33 NEEDLE POSITION AND STITCH LENGTH 34 ZIGZAG STITCHES 34 STRETCH STITCHES 35 OVERCASTING STITCHES 36 Using the overcasting foot 36 Using the all purpose foot 36
Instruction Manual 2
Page 5
... FOOT 60 NON-STICK FOOT 60 FAGOTING 61 DECORATIVE TOPSTITCHING 61 SCALLOP STITCH 62 Scallop hem 62 Scallop edging 62 ELONGATION 63 MIRROR IMAGE 64 USING THE TWIN NEEDLE 65 MEMORY 66-69 Combining patterns or letters 66-67 Adding patterns or letters 67 Editing patterns 68 Clearing patterns or letters...
... FOOT 60 NON-STICK FOOT 60 FAGOTING 61 DECORATIVE TOPSTITCHING 61 SCALLOP STITCH 62 Scallop hem 62 Scallop edging 62 ELONGATION 63 MIRROR IMAGE 64 USING THE TWIN NEEDLE 65 MEMORY 66-69 Combining patterns or letters 66-67 Adding patterns or letters 67 Editing patterns 68 Clearing patterns or letters...
Instruction Manual 2
Page 8
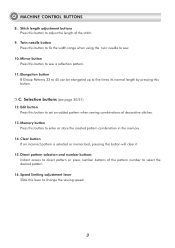
... enter or store the created pattern combination in the memory. 14. MACHINE CONTROL BUTTONS 8. C. Mirror button Press this button to fix the width range when using the twin needle to sew a reflection pattern. 11. Twin needle button Press this button to sew. 10. Direct pattern selection and number buttons Instant access...
... enter or store the created pattern combination in the memory. 14. MACHINE CONTROL BUTTONS 8. C. Mirror button Press this button to fix the width range when using the twin needle to sew a reflection pattern. 11. Twin needle button Press this button to sew. 10. Direct pattern selection and number buttons Instant access...
Instruction Manual 2
Page 14
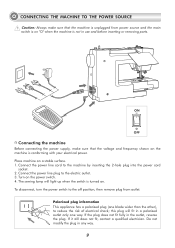
... a qualified electrician. Do not modify the plug in the outlet, reverse the plug. Place machine on the power switch. 4. The sewing lamp will fit in use and before inserting or removing parts. To disconnect, turn the power switch to the off position, then remove plug from power source and the main...
... a qualified electrician. Do not modify the plug in the outlet, reverse the plug. Place machine on the power switch. 4. The sewing lamp will fit in use and before inserting or removing parts. To disconnect, turn the power switch to the off position, then remove plug from power source and the main...

Instruction Manual 2
Page 15
.... 2 3 Wind the thread counter-clockwise around the bobbin winder tension disks. 3 4 Place the thread end through one of the spool holder toward the spool, or use the small spool holder. WINDING THE BOBBIN 2 1 3 4 10 Bobbin winding 1 1 Place the thread and spool holder onto the spool pin.
.... 2 3 Wind the thread counter-clockwise around the bobbin winder tension disks. 3 4 Place the thread end through one of the spool holder toward the spool, or use the small spool holder. WINDING THE BOBBIN 2 1 3 4 10 Bobbin winding 1 1 Place the thread and spool holder onto the spool pin.

Instruction Manual 2
Page 19
... check spring holder. 5 66. At the top of this movement, pass the thread from front to rear, and pull out about 10 cm of thread. Use the needle threader to the left through the slotted eye of the thread through the pre-tension spring as illustrated. 3 44. Pass the thread behind...
... check spring holder. 5 66. At the top of this movement, pass the thread from front to rear, and pull out about 10 cm of thread. Use the needle threader to the left through the slotted eye of the thread through the pre-tension spring as illustrated. 3 44. Pass the thread behind...

Instruction Manual 2
Page 20
The hook will turn and pass the thread through the needle eye. 4 15 USING THE NEEDLE THREADER Attention: Turn power switch to the threading position and the hook pin passes through the needle eye. 2 33 Take the thread in ...
The hook will turn and pass the thread through the needle eye. 4 15 USING THE NEEDLE THREADER Attention: Turn power switch to the threading position and the hook pin passes through the needle eye. 2 33 Take the thread in ...
Instruction Manual 2
Page 21
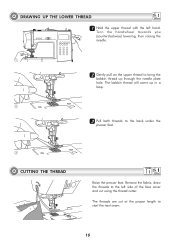
Turn the handwheel towards you (counterclockwise) lowering, then raising the needle. 1 22 Gently pull on the upper thread to the left hand. Remove the fabric, draw the threads to bring the bobbin thread up in a loop. 2 33 Pull both threads to start the next seam. 16 The threads are cut using the thread cutter. DRAWING UP THE LOWER THREAD 11 Hold the upper thread with the left side of the face cover and cut at the proper length to the back under the presser foot. 3 CUTTING THE THREAD Raise the presser foot. The bobbin thread will come up through the needle plate hole.
Turn the handwheel towards you (counterclockwise) lowering, then raising the needle. 1 22 Gently pull on the upper thread to the left hand. Remove the fabric, draw the threads to bring the bobbin thread up in a loop. 2 33 Pull both threads to start the next seam. 16 The threads are cut using the thread cutter. DRAWING UP THE LOWER THREAD 11 Hold the upper thread with the left side of the face cover and cut at the proper length to the back under the presser foot. 3 CUTTING THE THREAD Raise the presser foot. The bobbin thread will come up through the needle plate hole.
Instruction Manual 2
Page 23
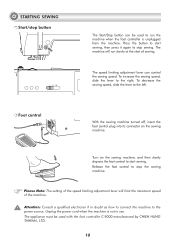
The speed limiting adjustment lever can be used to the power source. Release the foot control to start sewing. Please Note: The setting of the speed limiting adjustment lever will run the machine ... right, To decrease the sewing speed, slide the lever to stop sewing. The appliance must be used with the foot controller C-9000 manufactured by CHIEN HUNG TAIWAN., LTD. 18 Attention: Consult a qualified electrician if in use. Foot control With the sewing machine turned off, insert the foot control plug into its connector...
The speed limiting adjustment lever can be used to the power source. Release the foot control to start sewing. Please Note: The setting of the speed limiting adjustment lever will run the machine ... right, To decrease the sewing speed, slide the lever to stop sewing. The appliance must be used with the foot controller C-9000 manufactured by CHIEN HUNG TAIWAN., LTD. 18 Attention: Consult a qualified electrician if in use. Foot control With the sewing machine turned off, insert the foot control plug into its connector...
Instruction Manual 2
Page 26
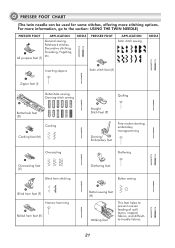
... hem stitching Gathering foot Button sewing Blind hem foot (F) Narrow hemming Rolled hem foot (K) Button sewing foot (H) Walking foot This foot helps to the section: USING THE TWIN NEEDLE) PRESSER FOOT APPLICATION General sewing, Patchwork stitches, Decorative stitching, Smocking, Fagoting, etc. PRESSER FOOT CHART (The twin needle can be...
... hem stitching Gathering foot Button sewing Blind hem foot (F) Narrow hemming Rolled hem foot (K) Button sewing foot (H) Walking foot This foot helps to the section: USING THE TWIN NEEDLE) PRESSER FOOT APPLICATION General sewing, Patchwork stitches, Decorative stitching, Smocking, Fagoting, etc. PRESSER FOOT CHART (The twin needle can be...

Instruction Manual 2
Page 27
..., denims, upholstery material (light to medium). Most threads sold are recommended for these fabrics and needle sizes. Use the same thread for sewing heavy fabrics. - Use polyester threads on synthetic materials and cotton on top and bottom. 18 (110) Heavy woolens, overcoat fabrics,...polyester. 11-14 (80-90) 14 (90) 16 (100) Medium weight fabrics-cotton, satin, sailcloth, double knits, lightweight woolen. Always use the same thread on natural woven fabrics for actual sewing. - MATCHING NEEDLE/ FABRIC/ THREAD NEEDLE, FABRIC, THREAD SELECTION GUIDE NEEDLE SIZE FABRICS ...
..., denims, upholstery material (light to medium). Most threads sold are recommended for these fabrics and needle sizes. Use the same thread for sewing heavy fabrics. - Use polyester threads on synthetic materials and cotton on top and bottom. 18 (110) Heavy woolens, overcoat fabrics,...polyester. 11-14 (80-90) 14 (90) 16 (100) Medium weight fabrics-cotton, satin, sailcloth, double knits, lightweight woolen. Always use the same thread on natural woven fabrics for actual sewing. - MATCHING NEEDLE/ FABRIC/ THREAD NEEDLE, FABRIC, THREAD SELECTION GUIDE NEEDLE SIZE FABRICS ...

Instruction Manual 2
Page 33
...will be set the recommended stitch length which will be indicated by numbers on . Utility and satin pattern mode: Stitch selection using number buttons. B Group Patterns 33-45 can be elongated up to another which opens new stitch pattern menus. Changing the... LCD screen. Decorative pattern mode: Character selection using number buttons. Direct mode stitch selection. Script letter mode: Character selection using number buttons. The stitch length can be adjusted between "0.0-4.5". Block letter mode: Character selection using number buttons. As the Mode button is pressed...
...will be set the recommended stitch length which will be indicated by numbers on . Utility and satin pattern mode: Stitch selection using number buttons. B Group Patterns 33-45 can be elongated up to another which opens new stitch pattern menus. Changing the... LCD screen. Decorative pattern mode: Character selection using number buttons. Direct mode stitch selection. Script letter mode: Character selection using number buttons. The stitch length can be adjusted between "0.0-4.5". Block letter mode: Character selection using number buttons. As the Mode button is pressed...

Instruction Manual 2
Page 35
... stitch patterns. Except the Direct Pattern mode, the other modes (Utility and satin pattern mode, Decorative pattern mode, Block letter mode and Script letter mode) use the numbered buttons to select the utility patterns shown beside the number button when the mode button is set at the Direct mode. Number buttons...
... stitch patterns. Except the Direct Pattern mode, the other modes (Utility and satin pattern mode, Decorative pattern mode, Block letter mode and Script letter mode) use the numbered buttons to select the utility patterns shown beside the number button when the mode button is set at the Direct mode. Number buttons...
Instruction Manual 2
Page 36
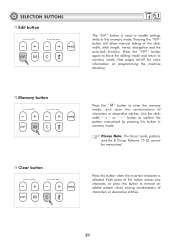
... for more information on programming the machine Memory). Each press of characters or decorative stitches. 31 Press this button when the incorrect character is used to remove an added pattern when sewing combinations of this button erases one character, or press this button in the memory mode.... Use the stitch width " + " or " – " button to confirm the pattern memorized by pressing this button to modify settings while in memory mode. Press the " " ...
... for more information on programming the machine Memory). Each press of characters or decorative stitches. 31 Press this button when the incorrect character is used to remove an added pattern when sewing combinations of this button erases one character, or press this button in the memory mode.... Use the stitch width " + " or " – " button to confirm the pattern memorized by pressing this button to modify settings while in memory mode. Press the " " ...
Instruction Manual 2
Page 37
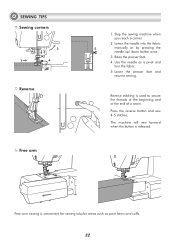
... needle as pant hems and cuffs. 32 The machine will sew forward when the button is used to secure the threads at the beginning and at the end of a seam. Reverse stitching is released. Free-arm sewing is convenient for sewing tubular ...
... needle as pant hems and cuffs. 32 The machine will sew forward when the button is used to secure the threads at the beginning and at the end of a seam. Reverse stitching is released. Free-arm sewing is convenient for sewing tubular ...

Instruction Manual 2
Page 40
Straight stretch stitch is good for easy to stretch and hardwearing seams. 35 Good for joining durable fabric such as denims. These stitches can also be used to add triple reinforcement to ravel and knit fabrics. STRETCH STITCHES T Stretch stitches Straight stitch Stretch stitches are strong and flexible and will give with the fabric without breaking. It is used as a decorative top stitch.
Straight stretch stitch is good for easy to stretch and hardwearing seams. 35 Good for joining durable fabric such as denims. These stitches can also be used to add triple reinforcement to ravel and knit fabrics. STRETCH STITCHES T Stretch stitches Straight stitch Stretch stitches are strong and flexible and will give with the fabric without breaking. It is used as a decorative top stitch.

Instruction Manual 2
Page 41
... drops over the edge of the fabric so that the needle could hit the presser foot and break when sewing other patterns and width settings. Using the all purpose foot B-10 T 2.5~4.5 2.0~3.0 1 2 11 Change the presser foot to the all purpose foot. 22 Sewing the overcasting along the edge of ...the fabric on the right side. 36 OVERCASTING STITCHES Using the overcasting foot E 5.0~7.0 2.0~3.0 1 2 11 Change the presser foot to the overcasting foot. 22 Sew the fabric with Direct Patterns 5 and 7 only...
... drops over the edge of the fabric so that the needle could hit the presser foot and break when sewing other patterns and width settings. Using the all purpose foot B-10 T 2.5~4.5 2.0~3.0 1 2 11 Change the presser foot to the all purpose foot. 22 Sewing the overcasting along the edge of ...the fabric on the right side. 36 OVERCASTING STITCHES Using the overcasting foot E 5.0~7.0 2.0~3.0 1 2 11 Change the presser foot to the overcasting foot. 22 Sew the fabric with Direct Patterns 5 and 7 only...

Instruction Manual 2
Page 46
BUTTONHOLE SEWING B-17 B-18 B-19 B-20 B-21 B-22 B-23 B-24 B-25 B-26 6 7 66 Buttonholes are sewn from the front of the buttonhole being careful not to the back, as a stopper at the bar tack so you do not cut any stitches on either side. Use a pin as shown. 77 Cut the center of the presser foot to cut too much. 41
BUTTONHOLE SEWING B-17 B-18 B-19 B-20 B-21 B-22 B-23 B-24 B-25 B-26 6 7 66 Buttonholes are sewn from the front of the buttonhole being careful not to the back, as a stopper at the bar tack so you do not cut any stitches on either side. Use a pin as shown. 77 Cut the center of the presser foot to cut too much. 41

Instruction Manual 2
Page 47
Set the stitch width to match the diameter of the gimp thread. 1 2 Once sewing is suggested that you use interfacing on the backside of the fabric. 42 BUTTONHOLE SEWING Making corded buttonholes When sewing corded buttonholes, hook a heavy thread or cord under the buttonhole ...
Set the stitch width to match the diameter of the gimp thread. 1 2 Once sewing is suggested that you use interfacing on the backside of the fabric. 42 BUTTONHOLE SEWING Making corded buttonholes When sewing corded buttonholes, hook a heavy thread or cord under the buttonhole ...


