
Instruction Manual 2
Page 5
... SATIN STITCH SEWING 51 EDGE/QUILTING GUIDE 52 GATHERING 53 SMOCKING 54 FREE MOTION SEWING 55-56 Darning 55 Embroidery 56 Monogramming 56 WALKING FOOT 57 SIDE CUTTER 58 ROLLER FOOT 58 STRAIGHT STITCH FOOT 58 OPEN TOE FOOT 59 1/4" PIECING FOOT 59 EDGE JOINING FOOT 59 INVISIBLE ZIPPER FOOT 60 NON-STICK FOOT 60 FAGOTING 61 DECORATIVE TOPSTITCHING...
... SATIN STITCH SEWING 51 EDGE/QUILTING GUIDE 52 GATHERING 53 SMOCKING 54 FREE MOTION SEWING 55-56 Darning 55 Embroidery 56 Monogramming 56 WALKING FOOT 57 SIDE CUTTER 58 ROLLER FOOT 58 STRAIGHT STITCH FOOT 58 OPEN TOE FOOT 59 1/4" PIECING FOOT 59 EDGE JOINING FOOT 59 INVISIBLE ZIPPER FOOT 60 NON-STICK FOOT 60 FAGOTING 61 DECORATIVE TOPSTITCHING...
Instruction Manual 2
Page 13
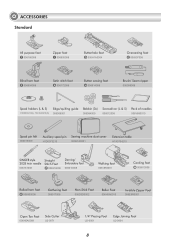
... (L & S) Edge/quilting guide Bobbin (3x) Screwdriver (L & S) Pack of needles H1D0083210(L) TA10943210(S) 006008001 006084009 006012008 006V880010 Spool pin felt 006015009 Auxiliary spool pin Sewing machine dust cover H1D0073210 020H7A0001 Extension table H7A0754210 SINGER style 2025 twin needle 006161008 Straight Stitch Foot P 006916008 Darning/ Embroidery foot 006016008 Walking foot 0061850081 Cording foot M 006813008 Rolled hem foot K 006900008 Gathering foot 006917008...
... (L & S) Edge/quilting guide Bobbin (3x) Screwdriver (L & S) Pack of needles H1D0083210(L) TA10943210(S) 006008001 006084009 006012008 006V880010 Spool pin felt 006015009 Auxiliary spool pin Sewing machine dust cover H1D0073210 020H7A0001 Extension table H7A0754210 SINGER style 2025 twin needle 006161008 Straight Stitch Foot P 006916008 Darning/ Embroidery foot 006016008 Walking foot 0061850081 Cording foot M 006813008 Rolled hem foot K 006900008 Gathering foot 006917008...

Instruction Manual 2
Page 25
...-out (c) is directly above the pin (d). Attach the presser foot holder (b) as needed for hems, pleats, quilting, etc. 20 Lower the presser foot holder (b) and the presser foot (f) will disengage. 4 Attaching the edge/guilting guide The edge/quilting guide (g) can be attached as illustrated. CHANGING THE PRESSER FOOT a Attention: Turn power switch of off ("O") position when...
...-out (c) is directly above the pin (d). Attach the presser foot holder (b) as needed for hems, pleats, quilting, etc. 20 Lower the presser foot holder (b) and the presser foot (f) will disengage. 4 Attaching the edge/guilting guide The edge/quilting guide (g) can be attached as illustrated. CHANGING THE PRESSER FOOT a Attention: Turn power switch of off ("O") position when...
Instruction Manual 2
Page 26
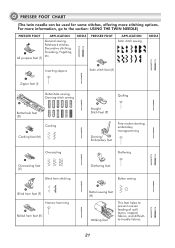
... stitch sewing NEEDLE Inserting zippers Satin stitch foot (A) Zipper foot (I) Buttonhole sewing, Darning-stitch sewing Buttonhole foot (D) Cording Cording foot (M) Overcasting Quilting Straight Stitch Foot (P) Darning/ Embroidery foot Free-motion darning, embroidery, monogramming Gathering Overcasting foot (E) Blind hem stitching Gathering foot Button sewing Blind hem foot (F) Narrow hemming Rolled hem foot (K) Button sewing foot (H) Walking foot This foot helps to the section: USING THE...
... stitch sewing NEEDLE Inserting zippers Satin stitch foot (A) Zipper foot (I) Buttonhole sewing, Darning-stitch sewing Buttonhole foot (D) Cording Cording foot (M) Overcasting Quilting Straight Stitch Foot (P) Darning/ Embroidery foot Free-motion darning, embroidery, monogramming Gathering Overcasting foot (E) Blind hem stitching Gathering foot Button sewing Blind hem foot (F) Narrow hemming Rolled hem foot (K) Button sewing foot (H) Walking foot This foot helps to the section: USING THE...

Instruction Manual 2
Page 57
Sew the first row and move over the fabric to sew successive rows with the guide riding along the previous row of stitching. 52 EDGE/QUILTING GUIDE 1 P 3.5 1.0~3.0 Insert the edge/quilting guide in the presser foot holder as illustrated and set the space as you desire.
Sew the first row and move over the fabric to sew successive rows with the guide riding along the previous row of stitching. 52 EDGE/QUILTING GUIDE 1 P 3.5 1.0~3.0 Insert the edge/quilting guide in the presser foot holder as illustrated and set the space as you desire.
Instruction Manual 2
Page 64
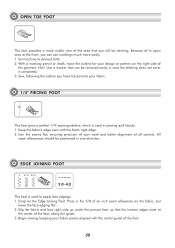
...at the front, you will be stitching. Set machine to apply lace edgings. 1. EDGE JOINING FOOT 5 B-14 B-15 3.0~4.0 This foot is used to desired stitch. 2. Press in piecing quilt blocks. 1. OPEN TOE FOOT This foot provides a more easily. 1. Because of its open area at the center of the garment. ...Hint: Use a marker that can see markings much more visible view of an inch seam allowance on the Edge Joining Foot. Snap on the...
...at the front, you will be stitching. Set machine to apply lace edgings. 1. EDGE JOINING FOOT 5 B-14 B-15 3.0~4.0 This foot is used to desired stitch. 2. Press in piecing quilt blocks. 1. OPEN TOE FOOT This foot provides a more easily. 1. Because of its open area at the center of the garment. ...Hint: Use a marker that can see markings much more visible view of an inch seam allowance on the Edge Joining Foot. Snap on the...

Instruction Manual 2
Page 84
...04 stitches 05 06 07 08 09 10 11 12 13 14 15 16 Quilt 17 stitches 18 19 20 21 22 23 24 25 26 27 28 29...Reverse Auto-lock Elongation Mirror/ Presser foot Twin needle Memory Thread cutter 5.0 2.5 A 6.0 1.0 A 4.0 1.0 A 4.0 1.0 A 6.0 1.5 A 6.0 1.5 A 6.0 1.5 A 6.0 1.5 A 5.0 2.0 T 4.0 2.0 T 3.5 2.5 T 3.5 2.5 T 4.0 2.5 A 3.5 2.5 T 6.0 2.0 T 7.0 1.5 T 6.0 2.0 T 5.0 2.0 T 5.0 2.0 T 6.0 1.5 T 5.0 1.5 A 5.0 1.0 T 6.0 2.0 T 5.0 1.5 T 5.0 2.5 A 7.0 2.0 T 7.0 1.5 A 7.0 3.0 A 7.0 2.0 T 7.0 2.5 T 5.0 2.5 T 5.0 ...
...04 stitches 05 06 07 08 09 10 11 12 13 14 15 16 Quilt 17 stitches 18 19 20 21 22 23 24 25 26 27 28 29...Reverse Auto-lock Elongation Mirror/ Presser foot Twin needle Memory Thread cutter 5.0 2.5 A 6.0 1.0 A 4.0 1.0 A 4.0 1.0 A 6.0 1.5 A 6.0 1.5 A 6.0 1.5 A 6.0 1.5 A 5.0 2.0 T 4.0 2.0 T 3.5 2.5 T 3.5 2.5 T 4.0 2.5 A 3.5 2.5 T 6.0 2.0 T 7.0 1.5 T 6.0 2.0 T 5.0 2.0 T 5.0 2.0 T 6.0 1.5 T 5.0 1.5 A 5.0 1.0 T 6.0 2.0 T 5.0 1.5 T 5.0 2.5 A 7.0 2.0 T 7.0 1.5 A 7.0 3.0 A 7.0 2.0 T 7.0 2.5 T 5.0 2.5 T 5.0 ...


