

Instruction Manual 2
Page 28
Loosen the needle clamp screw and tighten again after inserting the new needle. Blunt needles - Damaged points RAISE OR LOWER THE FEED DOGS a b b a Sliding the lever to the " " (b) will not raise up as it is slid to raise the feed ... of the handwheel) to the " " (a) in perfect condition. The feed dogs will lower the feed dog, for example during button sewing. Needles must be towards the back. Insert the needle as far up if you wish to continue sewing normally, slide the lever to raise the feed dogs. 23 Make a complete turn...
Loosen the needle clamp screw and tighten again after inserting the new needle. Blunt needles - Damaged points RAISE OR LOWER THE FEED DOGS a b b a Sliding the lever to the " " (b) will not raise up as it is slid to raise the feed ... of the handwheel) to the " " (a) in perfect condition. The feed dogs will lower the feed dog, for example during button sewing. Needles must be towards the back. Insert the needle as far up if you wish to continue sewing normally, slide the lever to raise the feed dogs. 23 Make a complete turn...
Instruction Manual 2
Page 60
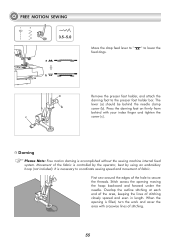
Press the darning foot on firmly from behind the needle clamp screw (b). Movement of stitching closely spaced and even in length. Overlap the outline stitching at each end of the area, keeping the lines of the .... It is controlled by the operator, best by using an embroidery hoop (not included). When the opening moving the hoop backward and forward under the needle. Stitch across the opening is accomplished without the sewing machine internal feed system. First sew around the edges of stitching. 55 The lever (a) should be...
Press the darning foot on firmly from behind the needle clamp screw (b). Movement of stitching closely spaced and even in length. Overlap the outline stitching at each end of the area, keeping the lines of the .... It is controlled by the operator, best by using an embroidery hoop (not included). When the opening moving the hoop backward and forward under the needle. Stitch across the opening is accomplished without the sewing machine internal feed system. First sew around the edges of stitching. 55 The lever (a) should be...
Instruction Manual 2
Page 62
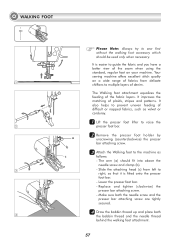
... (c) from delicate chiffons to right, so that it is easier to sew first without the walking foot accessory which should fit into above the needle screw and clamp (b). 3 - Replace and tighten (clockwise) the presser bar attaching screw. - The Walking foot attachment equalizes the feeding of plaids, stripes and patterns... layers. The arm (a) should be used only when necessary. It is fitted onto the presser foot bar. - Make sure both the needle screw and the presser bar attaching screw are tightly secured. 44 Draw the bobbin thread up and place both 4 the bobbin thread and the...
... (c) from delicate chiffons to right, so that it is easier to sew first without the walking foot accessory which should fit into above the needle screw and clamp (b). 3 - Replace and tighten (clockwise) the presser bar attaching screw. - The Walking foot attachment equalizes the feeding of plaids, stripes and patterns... layers. The arm (a) should be used only when necessary. It is fitted onto the presser foot bar. - Make sure both the needle screw and the presser bar attaching screw are tightly secured. 44 Draw the bobbin thread up and place both 4 the bobbin thread and the...
Instruction Manual 2
Page 80
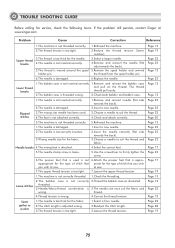
... not threaded correctly. 5.Rethread the machine. 1.The needle is damaged. 1.Insert a new needle. 2.The needle is not correctly inserted. 2.Insert the needle correctly (flat side towards the back). 3.Wrong needle size for the fabric. 3.Choose a needle to sew. 7.The upper thread tension is too ... 4.Select the correct foot. 5.The needle clamp screw is not threaded correctly. 1.Rethread the machine. TROUBLE SHOOTING GUIDE Before calling for service, check the following items. If the problem still persists, contact Singer at www.singer.com Problem Cause Correction Reference 1.The ...
... not threaded correctly. 5.Rethread the machine. 1.The needle is damaged. 1.Insert a new needle. 2.The needle is not correctly inserted. 2.Insert the needle correctly (flat side towards the back). 3.Wrong needle size for the fabric. 3.Choose a needle to sew. 7.The upper thread tension is too ... 4.Select the correct foot. 5.The needle clamp screw is not threaded correctly. 1.Rethread the machine. TROUBLE SHOOTING GUIDE Before calling for service, check the following items. If the problem still persists, contact Singer at www.singer.com Problem Cause Correction Reference 1.The ...


