Instruction Manual
Page 1
...Attaching embroidery unit 32 Removing embroidery unit 32 Securing fabric in embroidery hoop 33 Using fabric and stabilizer 34 - 35 Preparing the machine before installing the hoop 36 Attaching and removing embroidery hoop 36 Installation of operation switch panel 14 2. TABLE OF CONTENTS 1....Stitching 25 Continuous patterns 26 Sewing on a button 26 Buttonholes 27 - 29 Using buttonhole foot, Procedure, Corded buttonholes Buttonholing with Futura Multi hoop 44 - 47 Helpful messages when embroidering 48 4. OTHER THINGS YOU SHOULD KNOW Presser foot lifter 49 Feed dog control 49 ...
...Attaching embroidery unit 32 Removing embroidery unit 32 Securing fabric in embroidery hoop 33 Using fabric and stabilizer 34 - 35 Preparing the machine before installing the hoop 36 Attaching and removing embroidery hoop 36 Installation of operation switch panel 14 2. TABLE OF CONTENTS 1....Stitching 25 Continuous patterns 26 Sewing on a button 26 Buttonholes 27 - 29 Using buttonhole foot, Procedure, Corded buttonholes Buttonholing with Futura Multi hoop 44 - 47 Helpful messages when embroidering 48 4. OTHER THINGS YOU SHOULD KNOW Presser foot lifter 49 Feed dog control 49 ...
Instruction Manual
Page 2
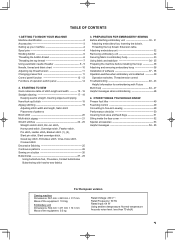
...spool pin 12. Thread guide 13 16 21. Bobbin cover plate 25. Embroidery unit 36 35 34 40 20 27 34 Hoop release lever 21 35. Handle 37. Hoop adjusting screw 32 45. Foot control 49. Pre-tension guide 2. Handle 7 13. Presser foot lifter 12 19. Twin... latch 10. Alternate thread cutter 27. Threading lever 5. Bobbin winder spindle 9. Face cover 4 6. Bobbin cover release button 33. Large hoop 42. Connector 41. Small hoop 47. Power/light switch 15. Needle plate 26 32. Inner frame 22 23 24 37 38 39 28 29 30 31 43. Needle...
...spool pin 12. Thread guide 13 16 21. Bobbin cover plate 25. Embroidery unit 36 35 34 40 20 27 34 Hoop release lever 21 35. Handle 37. Hoop adjusting screw 32 45. Foot control 49. Pre-tension guide 2. Handle 7 13. Presser foot lifter 12 19. Twin... latch 10. Alternate thread cutter 27. Threading lever 5. Bobbin winder spindle 9. Face cover 4 6. Bobbin cover release button 33. Large hoop 42. Connector 41. Small hoop 47. Power/light switch 15. Needle plate 26 32. Inner frame 22 23 24 37 38 39 28 29 30 31 43. Needle...
Instruction Manual
Page 32
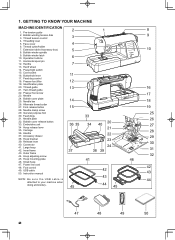
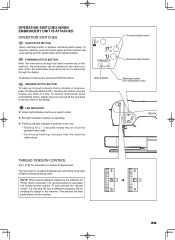
... or during the embroidering process. Don't push the carriage or put strong pressure on the machine and embroidery unit. Turn off the machine. * Remove embroidery hoop from machine. (Refer to close for general sewing. 3 Handle 1 Release lever 2 Handle Release lever 32 To make sure that the embroidery unit is fully engaged...
... or during the embroidering process. Don't push the carriage or put strong pressure on the machine and embroidery unit. Turn off the machine. * Remove embroidery hoop from machine. (Refer to close for general sewing. 3 Handle 1 Release lever 2 Handle Release lever 32 To make sure that the embroidery unit is fully engaged...

Instruction Manual
Page 33
... is tapped with no slack, securely tighten the screw. Fit the two frames together by pressing down on inner hoop will come to remove slack. Hoop adjusting screw c. Pull fabric edges to match. 33 NOTE: Apply stabilizer when appropriate, see page 34. 1. ...screw. Check inner and outer hoop mark ▼▲ to remove slack. Loosen hoop adjusting screw and place fabric between inner and outer frame. a. Tighten hoop adjusting screw. e. Slightly tighten the hoop adjusting screw and pull fabric 2 edges to front side (Large hoop only). This mark ▼ ...
... is tapped with no slack, securely tighten the screw. Fit the two frames together by pressing down on inner hoop will come to remove slack. Hoop adjusting screw c. Pull fabric edges to match. 33 NOTE: Apply stabilizer when appropriate, see page 34. 1. ...screw. Check inner and outer hoop mark ▼▲ to remove slack. Loosen hoop adjusting screw and place fabric between inner and outer frame. a. Tighten hoop adjusting screw. e. Slightly tighten the hoop adjusting screw and pull fabric 2 edges to front side (Large hoop only). This mark ▼ ...
Instruction Manual
Page 34
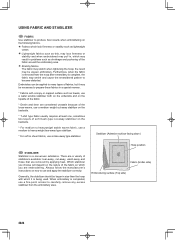
...special manner. * Fabrics with which you are removed by applying heat. Embroidery can be necessary to prepare these fabrics in size than the hoop with a loopy or napped surface such as shrinkage and puckering of stabilizers available: tear-away, cut -away stabilizer on which it may ...may be applied to many types of fabrics, but it is completed, use a fine point scissor to use a rinse-away type stabilizer. Hoop position Fabric (Under side) Embroidering surface (Top side) 34 Furthermore, when the fabric is removed from the embroidery area. Which stabilizer you choose...
...special manner. * Fabrics with which you are removed by applying heat. Embroidery can be necessary to prepare these fabrics in size than the hoop with a loopy or napped surface such as shrinkage and puckering of stabilizers available: tear-away, cut -away stabilizer on which it may ...may be applied to many types of fabrics, but it is completed, use a fine point scissor to use a rinse-away type stabilizer. Hoop position Fabric (Under side) Embroidering surface (Top side) 34 Furthermore, when the fabric is removed from the embroidery area. Which stabilizer you choose...
Instruction Manual
Page 35
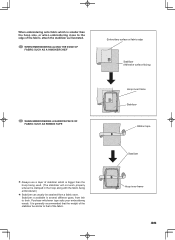
...FABRIC SUCH AS A HANDKERCHIEF Embroidery surface at fabric edge Stabilizer (Adhesive surface facing) WHEN EMBROIDERING A NARROW PIECE OF FABRIC SUCH AS RIBBON TAPE Hoop inner frame Stabilizer Ribbon tape Stabilizer Always use a layer of the fabric, attach the stabilizer as illustrated. Stabilizer is generally recommended that... of the fabric. Purchase whichever type suits your embroidering needs. It is available in the hoop along with the fabric being embroidered.) Stabilizer can usually be similar to thick...
...FABRIC SUCH AS A HANDKERCHIEF Embroidery surface at fabric edge Stabilizer (Adhesive surface facing) WHEN EMBROIDERING A NARROW PIECE OF FABRIC SUCH AS RIBBON TAPE Hoop inner frame Stabilizer Ribbon tape Stabilizer Always use a layer of the fabric, attach the stabilizer as illustrated. Stabilizer is generally recommended that... of the fabric. Purchase whichever type suits your embroidering needs. It is available in the hoop along with the fabric being embroidered.) Stabilizer can usually be similar to thick...
Instruction Manual
Page 36
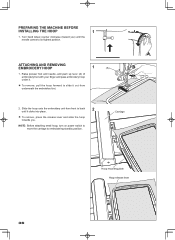
..., press the release lever and slide the hoop towards you ) until the needle comes to embroidering standby position. ATTACHING AND REMOVING EMBROIDERY HOOP 1 (A) 1. Turn hand wheel counter clockwise (toward you . Slide the hoop onto the embroidery unit from underneath the embroidery... foot. 2. PREPARING THE MACHINE BEFORE INSTALLING THE HOOP 1 1. NOTE: Before attaching small hoop, turn on power ...
..., press the release lever and slide the hoop towards you ) until the needle comes to embroidering standby position. ATTACHING AND REMOVING EMBROIDERY HOOP 1 (A) 1. Turn hand wheel counter clockwise (toward you . Slide the hoop onto the embroidery unit from underneath the embroidery... foot. 2. PREPARING THE MACHINE BEFORE INSTALLING THE HOOP 1 1. NOTE: Before attaching small hoop, turn on power ...

Instruction Manual
Page 38
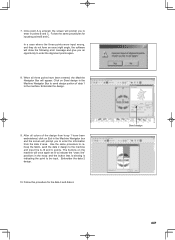
...has been moved to the highest position by clicking on "Next" to continue. Double click on the Futura Icon on your sewing machine. IMPORTANT: If you have embroidered using the small hoop, and you are not followed precisely, you will be followed for a short while until this happens... The following steps must be stored. Turn on your desktop to open the Futura software. Wait for the software will get a "Transmission Pending" error message. The installation procedure is . Boot up . Attach the hoop that you plan to work with the installation. You are requested to confirm...
...has been moved to the highest position by clicking on "Next" to continue. Double click on the Futura Icon on your sewing machine. IMPORTANT: If you have embroidered using the small hoop, and you are not followed precisely, you will be followed for a short while until this happens... The following steps must be stored. Turn on your desktop to open the Futura software. Wait for the software will get a "Transmission Pending" error message. The installation procedure is . Boot up . Attach the hoop that you plan to work with the installation. You are requested to confirm...
Instruction Manual
Page 39
Note: The embroidery hoop will stop the machine, push the button again and the machine will move as it is advancing through a design that the machine malfunctions. You may ...
Note: The embroidery hoop will stop the machine, push the button again and the machine will move as it is advancing through a design that the machine malfunctions. You may ...

Instruction Manual
Page 40
... Refer to pages 7 - 9. Thread path is tangled. Check around spool holder. Refer to pages 11. Stop embroidering, remove the hoop and untangle the thread. Needle tip is broken or needle is not installed correctly. Refer to pages 10. Select a correct needle. ... length of thread of about 6 inches at both ends and pull it makes a sound like a drum. Refer to the fabric. Hoop is broken. TROUBLESHOOTING SKIPPED STITCHES AND THREAD BREAKAGES OCCUR Needle tip is obstructed against free motion. Attach stabilizer to pages 4. Adjust the...
... Refer to pages 7 - 9. Thread path is tangled. Check around spool holder. Refer to pages 11. Stop embroidering, remove the hoop and untangle the thread. Needle tip is broken or needle is not installed correctly. Refer to pages 10. Select a correct needle. ... length of thread of about 6 inches at both ends and pull it makes a sound like a drum. Refer to the fabric. Hoop is broken. TROUBLESHOOTING SKIPPED STITCHES AND THREAD BREAKAGES OCCUR Needle tip is obstructed against free motion. Attach stabilizer to pages 4. Adjust the...
Instruction Manual
Page 41
... upper thread, (see page 7 "Setting the Top Thread".) Placing the small net that is unwinding properly. 41 HELPFUL INFORMATION FOR EMBROIDERING WITH FUTURA 1. Step back through the data until the blank area has been completely passed over the spool of thread may ensure that the thread has broken..., it may continue to embroider up to step back through the embroidery data. The hoop will move back one stitch at a time. Restart the embroidery machine and continue embroidering. Upper thread is not broken. Computer screen says...
... upper thread, (see page 7 "Setting the Top Thread".) Placing the small net that is unwinding properly. 41 HELPFUL INFORMATION FOR EMBROIDERING WITH FUTURA 1. Step back through the data until the blank area has been completely passed over the spool of thread may ensure that the thread has broken..., it may continue to embroider up to step back through the embroidery data. The hoop will move back one stitch at a time. Restart the embroidery machine and continue embroidering. Upper thread is not broken. Computer screen says...
Instruction Manual
Page 43
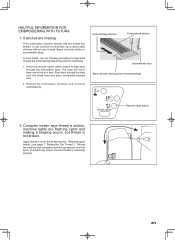
All other formats should be changed in the DESIGN/CHANGE SIZE menu in the Futura software you have brought them into very small segments? The value is usually the standard density used for Lettering. So what most probably happens is ... accordingly. Will the density of the lettering? Resizing individual letters You can accept. Because the letters are cut after you can end up into the hoop and exited the text window. Is there a way to increase the density of a design be only a few) as a separate block. 43 One color block can...
All other formats should be changed in the DESIGN/CHANGE SIZE menu in the Futura software you have brought them into very small segments? The value is usually the standard density used for Lettering. So what most probably happens is ... accordingly. Will the density of the lettering? Resizing individual letters You can accept. Because the letters are cut after you can end up into the hoop and exited the text window. Is there a way to increase the density of a design be only a few) as a separate block. 43 One color block can...
Instruction Manual
Page 44
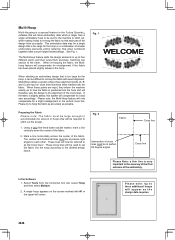
...the fabric. These lines will now be referred to three additional hoops will appear as possible. Multi-Hoop Multi-Hooping is a special feature in the Futura QuartetTM software that will allow embroidery data which is larger than a single embroidery hoop to be sent to the machine to stitch out, while ...making it easy to re-hoop the fabric so that each other . Select...
...the fabric. These lines will now be referred to three additional hoops will appear as possible. Multi-Hoop Multi-Hooping is a special feature in the Futura QuartetTM software that will allow embroidery data which is larger than a single embroidery hoop to be sent to the machine to stitch out, while ...making it easy to re-hoop the fabric so that each other . Select...
Instruction Manual
Page 45
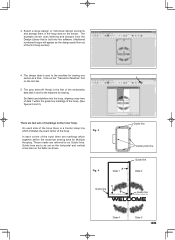
... example shown uses lettering and designs from the Design Library that is a Center Hoop line which together define the maximum sewing area for Multiple Hooping. Set fabric and stabilizer into the software. (Additional numbered hoops will appear as Guide lines. On each corner of the embroidery data that is... are markings which indicates the exact center of markings on the fabric as shown. In each side of the hoop there is sent to as the design parts flow out of the hoop. (See figures 2 and 3). Fig. 3 Fig. 4 Guide line Center point line A Data 1 Guide line Data 2 C Guide ...
... example shown uses lettering and designs from the Design Library that is a Center Hoop line which together define the maximum sewing area for Multiple Hooping. Set fabric and stabilizer into the software. (Additional numbered hoops will appear as Guide lines. On each corner of the embroidery data that is... are markings which indicates the exact center of markings on the fabric as shown. In each side of the hoop there is sent to as the design parts flow out of the hoop. (See figures 2 and 3). Fig. 3 Fig. 4 Guide line Center point line A Data 1 Guide line Data 2 C Guide ...

Instruction Manual
Page 46
...OK button. These alignment points will inform the machine exactly where the crosslines are lit to clear the point(s). Fig. 5 Center Hoop Marking Guide Line Center Hoop Marking 6. MULTIPLE HOOP SHIFT BUTTONS AND "CROSS LINE" INDICATOR LIGHTS FOR INPUTTING POINTS A, B, AND C Please Note: The buttons on the machine are... positioned in the hoop. The machine is made when entering the points, press the clear button, (twin needle/clear button) to indicate the "cross line" ...
...OK button. These alignment points will inform the machine exactly where the crosslines are lit to clear the point(s). Fig. 5 Center Hoop Marking Guide Line Center Hoop Marking 6. MULTIPLE HOOP SHIFT BUTTONS AND "CROSS LINE" INDICATOR LIGHTS FOR INPUTTING POINTS A, B, AND C Please Note: The buttons on the machine are... positioned in the hoop. The machine is made when entering the points, press the clear button, (twin needle/clear button) to indicate the "cross line" ...
Instruction Manual
Page 47
Once point A is indicating the point to be lit to enter the information from hoop 1 have been entered, the Machine Navigator Box will show the following error message and give you to indicate the "cross line" positions in the Machine ... an opportunity to the machine and input the A, B and C points. Follow the same procedures for the data 3 and data 4. The buttons on Exit in the hoop: and the button that is blinking is entered, the screen will prompt you to enter in the Machine Navigator Box to send design portion of...
Once point A is indicating the point to be lit to enter the information from hoop 1 have been entered, the Machine Navigator Box will show the following error message and give you to indicate the "cross line" positions in the Machine ... an opportunity to the machine and input the A, B and C points. Follow the same procedures for the data 3 and data 4. The buttons on Exit in the hoop: and the button that is blinking is entered, the screen will prompt you to enter in the Machine Navigator Box to send design portion of...

Instruction Manual
Page 48
This sample means 16 blocks are transferred and 3 blocks are completed. (Now block 4 is in progress.) When last block or one unit of endless hoop is still available) LED lamps are turned off . USB cable is disconnected while being transferred. USB cable is connected, but USB cable is not transferred ...
This sample means 16 blocks are transferred and 3 blocks are completed. (Now block 4 is in progress.) When last block or one unit of endless hoop is still available) LED lamps are turned off . USB cable is disconnected while being transferred. USB cable is connected, but USB cable is not transferred ...
Instruction Manual
Page 55
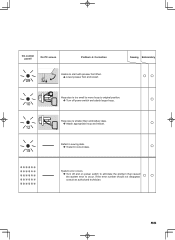
... Problem Correction Unable to start with presser foot lifted. Lower presser foot and restart. 09 Sewing Embroidery ○○ Hoop size is smaller than embroidery data. Attach appropriate hoop and restart. ○ 12 Defect in sewing data. Transmit correct data. ○ 15 System error occurs. Turn off and... on power switch to eliminate the problem that caused the system error to original position. Turn off power switch and attach larger hoop. ○ 10 Hoop size is too small to move...
... Problem Correction Unable to start with presser foot lifted. Lower presser foot and restart. 09 Sewing Embroidery ○○ Hoop size is smaller than embroidery data. Attach appropriate hoop and restart. ○ 12 Defect in sewing data. Transmit correct data. ○ 15 System error occurs. Turn off and... on power switch to eliminate the problem that caused the system error to original position. Turn off power switch and attach larger hoop. ○ 10 Hoop size is too small to move...


