

Instruction Manual
Page 20
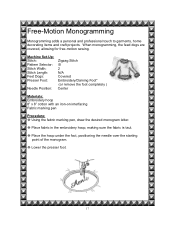
... foot's red mark with the top mark on fabric and mark the top and bottom of the buttonhole. This will establish the starting and ending point of the button.
... foot's red mark with the top mark on fabric and mark the top and bottom of the buttonhole. This will establish the starting and ending point of the button.
Instruction Manual
Page 22
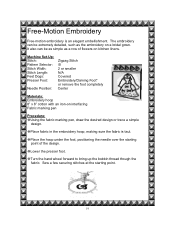
... marking pen Procedure: Using the fabric marking pen, draw the desired monogram letter. Place the hoop under the foot, positioning the needle over the starting point of the monogram.
... marking pen Procedure: Using the fabric marking pen, draw the desired monogram letter. Place the hoop under the foot, positioning the needle over the starting point of the monogram.

Instruction Manual
Page 23
Turn the hand wheel forward to bring up the bobbin thread though the fabric. Maintain a consistent sewing speed and move the fabric slowly. Coordinate sewing speed and movement of the fabric is controlled manually. *The Embroidery/Darning Foot is optional. Press the foot controller and guide the hoop so that the needle stitches on the drawn letter. Note: When the feed dogs are covered, the fabric will not automatically feed. Feeding of hoop. Check with both hands. Firmly hold the hoop with your SINGER® retailer. 18 Sew a few securing stitches at the starting point.
Turn the hand wheel forward to bring up the bobbin thread though the fabric. Maintain a consistent sewing speed and move the fabric slowly. Coordinate sewing speed and movement of the fabric is controlled manually. *The Embroidery/Darning Foot is optional. Press the foot controller and guide the hoop so that the needle stitches on the drawn letter. Note: When the feed dogs are covered, the fabric will not automatically feed. Feeding of hoop. Check with both hands. Firmly hold the hoop with your SINGER® retailer. 18 Sew a few securing stitches at the starting point.
Instruction Manual
Page 24
... the fabric is an elegant embellishment. It also can be as simple as the embroidery on a bridal gown. Sew a few securing stitches at the starting point of flowers on interfacing Fabric marking pen Procedure: Using the fabric marking pen, draw the desired design or trace a simple design. Turn the hand wheel...
... the fabric is an elegant embellishment. It also can be as simple as the embroidery on a bridal gown. Sew a few securing stitches at the starting point of flowers on interfacing Fabric marking pen Procedure: Using the fabric marking pen, draw the desired design or trace a simple design. Turn the hand wheel...

Instruction Manual
Page 38
...through the machine more easily. * The Leather needle is no width 3 Special Purpose Foot (J) or General Purpose Foot Leather Needle* SINGER PN#260-203286089S198, Wedge Point Needle Center Materials: Fashion leather Procedure: Finger press a 1" hem in the leather. Sew, using the seam guides to a ...garment, home decorating or craft project. Check with you SINGER® Retailer. 33 Sewing on Leather Leather can add a bold accent to...
...through the machine more easily. * The Leather needle is no width 3 Special Purpose Foot (J) or General Purpose Foot Leather Needle* SINGER PN#260-203286089S198, Wedge Point Needle Center Materials: Fashion leather Procedure: Finger press a 1" hem in the leather. Sew, using the seam guides to a ...garment, home decorating or craft project. Check with you SINGER® Retailer. 33 Sewing on Leather Leather can add a bold accent to...

Instruction Manual 2
Page 10
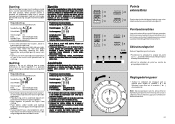
Lepinceau, pournettoyervotremachine. 4. Montage du Protège Doigt Préparationdela Machine: ! Glisserlecrochetversl'arrièreetensuite pardessuslavisdupiedpresseurentreletalonetla viscommeillustré. Plaque à aiguille point droit (C) etpied presseurpointdroit(D): Ces accessoires serventàl'assemblagedestissuslégers. 2. Bidonnetd'huile. Positionnerleprotègedoigtaveclecotécourbé ducotédroitverslebas(voirlaillustré). Serrez la ...
Lepinceau, pournettoyervotremachine. 4. Montage du Protège Doigt Préparationdela Machine: ! Glisserlecrochetversl'arrièreetensuite pardessuslavisdupiedpresseurentreletalonetla viscommeillustré. Plaque à aiguille point droit (C) etpied presseurpointdroit(D): Ces accessoires serventàl'assemblagedestissuslégers. 2. Bidonnetd'huile. Positionnerleprotègedoigtaveclecotécourbé ducotédroitverslebas(voirlaillustré). Serrez la ...
Instruction Manual 2
Page 29
... your fabric and garment. Method Nº 1 is best for firm fabrics where a 1/4" (6mm)seamallowanceisadequate.MethodNº 2isrecommendedforbulkknitsandfabricsthat have a tendency to curl o r f r a y , a n d w h e r e a wider seam allowanceisneededforsupport. RemembertouseaCatalog2045ball-point (yellow band) needle if you are sewing a 2 syntheticknit. Requiredsettings StichSelection:Overedgedseams(E) NeedlePosition: StitchWidth: 12 3 4 5 12 3 4 5 StitchLength: Mark( ) Foot: SpecialPurpose(J) NeedlePlate: GeneralPurpose(A) 3 MethodNº1-Overedging 1.Cutandfitthegarment...
... your fabric and garment. Method Nº 1 is best for firm fabrics where a 1/4" (6mm)seamallowanceisadequate.MethodNº 2isrecommendedforbulkknitsandfabricsthat have a tendency to curl o r f r a y , a n d w h e r e a wider seam allowanceisneededforsupport. RemembertouseaCatalog2045ball-point (yellow band) needle if you are sewing a 2 syntheticknit. Requiredsettings StichSelection:Overedgedseams(E) NeedlePosition: StitchWidth: 12 3 4 5 12 3 4 5 StitchLength: Mark( ) Foot: SpecialPurpose(J) NeedlePlate: GeneralPurpose(A) 3 MethodNº1-Overedging 1.Cutandfitthegarment...
Instruction Manual 2
Page 30
...turn the dial so that desired stitchlengthispositionedunder( ) symbol. • To shorten stitch length, turn the hand wheeltowardyouuntilneedleisatitshighest point. longer ones for straight stiching, turn dial toward a lowernumber. • Tolengthen stitchlength,turndial towarda highernumber. The... •Coupez les carrés de tissu de la grandeur désirée. •Assemblez lescarrés au point droit, endroit contreendroit. •Ouvrezlescouturesauferouaudoigt. •Aprèsl'assemblage,coupezunepiecearrière àlatailledel'ouvrage. •...
...turn the dial so that desired stitchlengthispositionedunder( ) symbol. • To shorten stitch length, turn the hand wheeltowardyouuntilneedleisatitshighest point. longer ones for straight stiching, turn dial toward a lowernumber. • Tolengthen stitchlength,turndial towarda highernumber. The... •Coupez les carrés de tissu de la grandeur désirée. •Assemblez lescarrés au point droit, endroit contreendroit. •Ouvrezlescouturesauferouaudoigt. •Aprèsl'assemblage,coupezunepiecearrière àlatailledel'ouvrage. •...
Instruction Manual 2
Page 38
...'s chalkorawashablemarkerontherightside ofgarment. • Placebatting,onthe underside ofgarment andcoveritwithabackingorliningfabric. • Baste together to prevent the layers from thecenterofthefabrictotheoutside edgeandguidefabricwithbothhands. 36 12 3 4 5 12 3 4 5 Points extensibles A D B C E Enplusdupointdroitetdupointdezig-zag,votre machineréaliseunevariètéd'autrespoints. Pointsextensibles Lespointsextensiblessontutiliséspourcoudre A D tricots,jerseysetautrestissusextensibles.Ces pointspeuventseréalisergrâceaumouvement avantetarriè...
...'s chalkorawashablemarkerontherightside ofgarment. • Placebatting,onthe underside ofgarment andcoveritwithabackingorliningfabric. • Baste together to prevent the layers from thecenterofthefabrictotheoutside edgeandguidefabricwithbothhands. 36 12 3 4 5 12 3 4 5 Points extensibles A D B C E Enplusdupointdroitetdupointdezig-zag,votre machineréaliseunevariètéd'autrespoints. Pointsextensibles Lespointsextensiblessontutiliséspourcoudre A D tricots,jerseysetautrestissusextensibles.Ces pointspeuventseréalisergrâceaumouvement avantetarriè...
Instruction Manual 2
Page 43
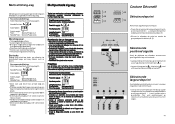
... 3 4 5 12 3 4 5 Couture Décoratif A D B Sélecteurdepoint C E Remontezl'aiguilleenpositionhaute. •Placezlesélecteurdelargeurdepointsurla positionpointdroit( ).Cettepositionpermet ledéplacementfaciledusélecteurdepoint. •Glissez le sélecteur de point au centre du groupedepointsdésirés(A-E). RecommendedSettings StitchSelection:Multi-stitchzig-zag(D) NeedlePosition: StitchWidth: 12 3 4 5 StitchLength: 1-2 Foot: SpecialPurpose(J) NeedlePlate: GeneralPurpose(A) •Mark start and finish...
... 3 4 5 12 3 4 5 Couture Décoratif A D B Sélecteurdepoint C E Remontezl'aiguilleenpositionhaute. •Placezlesélecteurdelargeurdepointsurla positionpointdroit( ).Cettepositionpermet ledéplacementfaciledusélecteurdepoint. •Glissez le sélecteur de point au centre du groupedepointsdésirés(A-E). RecommendedSettings StitchSelection:Multi-stitchzig-zag(D) NeedlePosition: StitchWidth: 12 3 4 5 StitchLength: 1-2 Foot: SpecialPurpose(J) NeedlePlate: GeneralPurpose(A) •Mark start and finish...
Instruction Manual 2
Page 44
...: Largeurdepoint: 12 3 4 5 Longueurdepoint: 1-½ à 2-½ Piedpresseur: Universelle(B) Plaqueàaiguille: Universelle(A) •Faites un essai pour régler la tension et la longueur de point. Adjustingstitchlength Anystitchlengthsettingfrom1to5willgiveyou anopenzig-zagstitch. Cette couture permet l'assemblage de tissus tricotetextensiblesetlesfinitionsdesbordsde col,encolures,poches dans les vêtements de sport. Loosen tension by turningdialtoalowernumber. Faufilerlalignedecouture...
...: Largeurdepoint: 12 3 4 5 Longueurdepoint: 1-½ à 2-½ Piedpresseur: Universelle(B) Plaqueàaiguille: Universelle(A) •Faites un essai pour régler la tension et la longueur de point. Adjustingstitchlength Anystitchlengthsettingfrom1to5willgiveyou anopenzig-zagstitch. Cette couture permet l'assemblage de tissus tricotetextensiblesetlesfinitionsdesbordsde col,encolures,poches dans les vêtements de sport. Loosen tension by turningdialtoalowernumber. Faufilerlalignedecouture...
