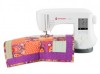
Instruction Manual and Troubleshooting Guide
Page 5
Table of Contents SETTING UP THE MACHINE SEWING Starting to Sew Where to Use Each Stitch Starting to Sew Start and End of Seam Reverse Stitching Tack Stitch Turning Corners Sewing Heavy ... Stretch Stitch Sewing Multi-Stitch Zigzag Basting Sewing on Buttons Inserting Zippers Centered Insertion Lapped Insertion To Stitch around the Zipper Tab Quilting Joining the Pieces of Fabric Quilting Hand Look Quilting Stitch Automatic Bar-Tack and Darning Buttonhole Sewing Bound Buttonhole Eyelet Continuous Decorative Pattern Applique Free Arm Sewing Twin Needle Sewing...
Table of Contents SETTING UP THE MACHINE SEWING Starting to Sew Where to Use Each Stitch Starting to Sew Start and End of Seam Reverse Stitching Tack Stitch Turning Corners Sewing Heavy ... Stretch Stitch Sewing Multi-Stitch Zigzag Basting Sewing on Buttons Inserting Zippers Centered Insertion Lapped Insertion To Stitch around the Zipper Tab Quilting Joining the Pieces of Fabric Quilting Hand Look Quilting Stitch Automatic Bar-Tack and Darning Buttonhole Sewing Bound Buttonhole Eyelet Continuous Decorative Pattern Applique Free Arm Sewing Twin Needle Sewing...
Instruction Manual and Troubleshooting Guide
Page 7
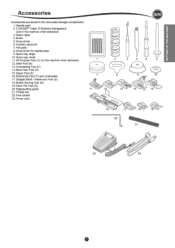
... (N) 20. Seam ripper 4. Felt pads 8. All-Purpose Foot (A) (on the machine when delivered) 12. Buttonhole Foot (F) and Underplate 17. Brush 5. Auxiliary spool pin 7. Needle pack 2.5 SINGER® Class 15 Bobbins (transparent) (one in the removable storage compartment. 1. Spool...MACHINE Accessories Accessories are stored in the machine when delivered) 3. Button Sewing Foot (M) 19. Power cord 1 C) 7 11 12 O ©> 0 2 3 8 13 4 9 14 EN O) 10 15 16 17 20 18 v 19 21 22 23 Overcasting Foot (C) 14. Foot control 23. Screwdriver for needle plate 9. Edge/quilting...
... (N) 20. Seam ripper 4. Felt pads 8. All-Purpose Foot (A) (on the machine when delivered) 12. Buttonhole Foot (F) and Underplate 17. Brush 5. Auxiliary spool pin 7. Needle pack 2.5 SINGER® Class 15 Bobbins (transparent) (one in the removable storage compartment. 1. Spool...MACHINE Accessories Accessories are stored in the machine when delivered) 3. Button Sewing Foot (M) 19. Power cord 1 C) 7 11 12 O ©> 0 2 3 8 13 4 9 14 EN O) 10 15 16 17 20 18 v 19 21 22 23 Overcasting Foot (C) 14. Foot control 23. Screwdriver for needle plate 9. Edge/quilting...
Instruction Manual and Troubleshooting Guide
Page 9
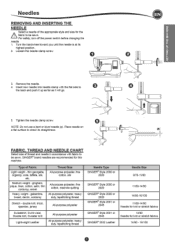
...AND NEEDLE CHART Select size of thread and needle in accordance with the flat side to check its highest position. 2. SETTING UP THE MACHINE Needles REMOVING AND INSERTING THE NEEDLE Q Select a needle of Fabric Thread Size Light weight - gabardine, tweed, denim, corduroy All-...corduroy, velvet All-purpose polyester, fine cotton, machine quilting Heavy weight - double knit, tricot, spandex, jersey All-purpose polyester Needle Type SINGER° Style 2000 or 2020 SINGER° Style 2000 or 2020 SINGER° Style 2000 or 2020 SINGER° Style 2001 or 2045 Sweatshirt, Swim-wear...
...AND NEEDLE CHART Select size of thread and needle in accordance with the flat side to check its highest position. 2. SETTING UP THE MACHINE Needles REMOVING AND INSERTING THE NEEDLE Q Select a needle of Fabric Thread Size Light weight - gabardine, tweed, denim, corduroy All-...corduroy, velvet All-purpose polyester, fine cotton, machine quilting Heavy weight - double knit, tricot, spandex, jersey All-purpose polyester Needle Type SINGER° Style 2000 or 2020 SINGER° Style 2000 or 2020 SINGER° Style 2000 or 2020 SINGER° Style 2001 or 2045 Sweatshirt, Swim-wear...
Instruction Manual and Troubleshooting Guide
Page 31
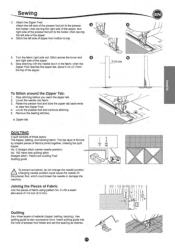
...holder and set the spacing as desired. • EN 0 7-10 mm V a GI• _:__ , , , - - - 1 1 ---i • , I :____ t ---.L.- , , , . Quilting Sew three layers of 1/4 inch (6.3 mm). a. The top layer is formed by shaped pieces of three layers: The topper, batting, and backing fabric. r I I I ; ---- 0-- --I C -- -;-' 1...look quilting stitch Straight stitch / Patchwork Quilting Foot Quilting guide A To prevent accidents, do not change the needle position. Changing needle position could cause the needle hit the presser foot, which could break the needle or damage the machine. ...
...holder and set the spacing as desired. • EN 0 7-10 mm V a GI• _:__ , , , - - - 1 1 ---i • , I :____ t ---.L.- , , , . Quilting Sew three layers of 1/4 inch (6.3 mm). a. The top layer is formed by shaped pieces of three layers: The topper, batting, and backing fabric. r I I I ; ---- 0-- --I C -- -;-' 1...look quilting stitch Straight stitch / Patchwork Quilting Foot Quilting guide A To prevent accidents, do not change the needle position. Changing needle position could cause the needle hit the presser foot, which could break the needle or damage the machine. ...
Instruction Manual and Troubleshooting Guide
Page 32
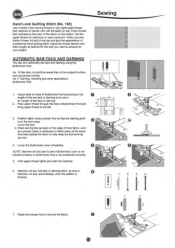
...is not 1 lM i r lowered properly or Buttonhole Foot is on top. Pass upper thread through the hole of a traditional hand quilting stitch. Buttonhole Foot Sewing O 1. NOTE: Machine willnot start to the left. No. 16 Bar-tack, to reinforce areas that will pull to strain, such as you want to ...help keep the foot level as pocket corners. When you sew, bobbin thread will be sewn. Hand Look Quilting Stitch (No. 160) Use ...
...is not 1 lM i r lowered properly or Buttonhole Foot is on top. Pass upper thread through the hole of a traditional hand quilting stitch. Buttonhole Foot Sewing O 1. NOTE: Machine willnot start to the left. No. 16 Bar-tack, to reinforce areas that will pull to strain, such as you want to ...help keep the foot level as pocket corners. When you sew, bobbin thread will be sewn. Hand Look Quilting Stitch (No. 160) Use ...


