User Manual
Page 2
... use as contained in this household sewing machine. The wrong plate can cause the needle to comply with any other objects on purchasing your new SINGER® sewing machine! To unplug, grasp the plug, not the cord. • The foot control is used by pulling on cord. Close .... • Never operate the sewing machine with IEC/EN 60335-2-28 and UL1594. Special care is being used as threading needle, changing needle, threading bobbin, or changing presser foot, etc. • Never drop or insert any object into water. It may deflect the needle causing it has been dropped...
... use as contained in this household sewing machine. The wrong plate can cause the needle to comply with any other objects on purchasing your new SINGER® sewing machine! To unplug, grasp the plug, not the cord. • The foot control is used by pulling on cord. Close .... • Never operate the sewing machine with IEC/EN 60335-2-28 and UL1594. Special care is being used as threading needle, changing needle, threading bobbin, or changing presser foot, etc. • Never drop or insert any object into water. It may deflect the needle causing it has been dropped...
User Manual
Page 8
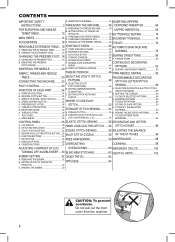
...80 A. SELECTING DECORATIVE & LETTER STITCH (SELECTING MODE 86 A. INSERTING PATTERN 88 E. TO RECALL THE SELECTED PATTERNS 92 H. REMOVING THE BOBBIN 32 B. Do not pull out the front cover from the machine. 8 CENTERED INSERTION 66 FOR EUROPEAN AND SIMILAR A. PREPARING TO ... BUTTON 24 C. CHANGING THE PRESSER FOOT 18 C. UTILITY STITCH BUTTON 28 ZIGZAG STITCH SEWING 58 ADJUSTING THE BALANCE D. INSERTING THE BOBBIN 34 INSERTING ZIPPERS INSTRUCTIONS 2 THREADING THE MACHINE 36 - THREAD SHANK 80 B. SEWING LIGHTWEIGHT FABRICS 82 FABRIC, THREAD AND NEEDLE THREAD...
...80 A. SELECTING DECORATIVE & LETTER STITCH (SELECTING MODE 86 A. INSERTING PATTERN 88 E. TO RECALL THE SELECTED PATTERNS 92 H. REMOVING THE BOBBIN 32 B. Do not pull out the front cover from the machine. 8 CENTERED INSERTION 66 FOR EUROPEAN AND SIMILAR A. PREPARING TO ... BUTTON 24 C. CHANGING THE PRESSER FOOT 18 C. UTILITY STITCH BUTTON 28 ZIGZAG STITCH SEWING 58 ADJUSTING THE BALANCE D. INSERTING THE BOBBIN 34 INSERTING ZIPPERS INSTRUCTIONS 2 THREADING THE MACHINE 36 - THREAD SHANK 80 B. SEWING LIGHTWEIGHT FABRICS 82 FABRIC, THREAD AND NEEDLE THREAD...

User Manual
Page 14
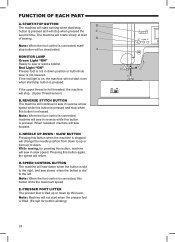
... Screw (underneath machine) 6 8. Thread Cutter 9. Presser Foot Release Lever 8 17 18 13. Presser Foot Holder 10 19 15. Presser Foot 16. Bobbin Winder Stop 32. Start/Stop Button 35. Liquid Crystal Display (LCD) 39. Scroll Down Button 43. Power Switch 46 48. Handle 5. Presser Foot ...Lifter 5 7. Buttonhole Lever 7 10. Bobbin Cover 15 22. Spool Pin 27. Speed Control Lever 39 33. Function Buttons 43 38. Cursor Right Button 42. Edit Button 46. Drop...
... Screw (underneath machine) 6 8. Thread Cutter 9. Presser Foot Release Lever 8 17 18 13. Presser Foot Holder 10 19 15. Presser Foot 16. Bobbin Winder Stop 32. Start/Stop Button 35. Liquid Crystal Display (LCD) 39. Scroll Down Button 43. Power Switch 46 48. Handle 5. Presser Foot ...Lifter 5 7. Buttonhole Lever 7 10. Bobbin Cover 15 22. Spool Pin 27. Speed Control Lever 39 33. Function Buttons 43 38. Cursor Right Button 42. Edit Button 46. Drop...

User Manual
Page 16
Seam Ripper 4. Screwdriver for Needle Plate 7. Auxiliary Spool Pin with Felt Washer 6. Blind Hem Foot (D) 10. All-Purpose Foot (On machine when delivered) (A) 1 2 34 5 6 7 8 9 10 11 12 13 16 Brush 5. Zipper Foot (E) 11. Small Thread Spool Cap 9. Large Thread Spool Cap 8. Needle Pack 2. 4 SINGER Class 15 bobbins ( 1 is in the storage compartment of the removable extension table. (See next page, [REMOVABLE EXTENSION TABLE]) 1. Satin Stitch Foot (B) 12. Buttonhole Foot (F) 13. ACCESSORIES Accessories are provided in the machine) 3.
Seam Ripper 4. Screwdriver for Needle Plate 7. Auxiliary Spool Pin with Felt Washer 6. Blind Hem Foot (D) 10. All-Purpose Foot (On machine when delivered) (A) 1 2 34 5 6 7 8 9 10 11 12 13 16 Brush 5. Zipper Foot (E) 11. Small Thread Spool Cap 9. Large Thread Spool Cap 8. Needle Pack 2. 4 SINGER Class 15 bobbins ( 1 is in the storage compartment of the removable extension table. (See next page, [REMOVABLE EXTENSION TABLE]) 1. Satin Stitch Foot (B) 12. Buttonhole Foot (F) 13. ACCESSORIES Accessories are provided in the machine) 3.
User Manual
Page 24
... time. Note: When the foot control is slid to down. When released, machine will sew faster when the button is slid to sew or wind a bobbin. Note: When the foot control is connected, this button again, the speed will not start even when start when the presser foot is on, the...
... time. Note: When the foot control is slid to down. When released, machine will sew faster when the button is slid to sew or wind a bobbin. Note: When the foot control is connected, this button again, the speed will not start even when start when the presser foot is on, the...
User Manual
Page 26
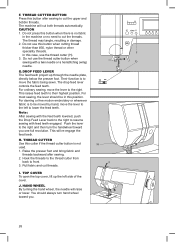
... hand wheel, the needle will re-engage the feed teeth. G.DROP FEED LEVER The feed teeth project up the left to cut the upper and bobbin threads. Hook the threads to the thread cutter from back to their highest position. Do not use the thread cutter button when sewing with feed...
... hand wheel, the needle will re-engage the feed teeth. G.DROP FEED LEVER The feed teeth project up the left to cut the upper and bobbin threads. Hook the threads to the thread cutter from back to their highest position. Do not use the thread cutter button when sewing with feed...

User Manual
Page 32
... guide from front opening between cap and spool as it is full. Remove the bobbin from left . 10. Pull the bobbin cover latch to the guide from rear side. B. Use the small spool cap when you use only SINGER Class 15 bobbins in both hands and hook thread to the right and remove the... bobbin cover. 2. Hold thread in this machine. Insert thread through the thread guide from the spindle and cut the thread. 32...
... guide from front opening between cap and spool as it is full. Remove the bobbin from left . 10. Pull the bobbin cover latch to the guide from rear side. B. Use the small spool cap when you use only SINGER Class 15 bobbins in both hands and hook thread to the right and remove the... bobbin cover. 2. Hold thread in this machine. Insert thread through the thread guide from the spindle and cut the thread. 32...

User Manual
Page 34
...it slips into place. Note: Be sure to use only SINGER Class 15 bobbins in needle plate and push the right side of notch (a). 4. Pull thread out about 10 cm (4 inches). D. Place bobbin into notch (a) while holding the bobbin lightly with your finger. 3. Pull thread toward the left tab... into the hole in this machine. 34 Draw thread into bobbin holder so that thread does not slip out of bobbin cover down until it clicks into notch ...
...it slips into place. Note: Be sure to use only SINGER Class 15 bobbins in needle plate and push the right side of notch (a). 4. Pull thread out about 10 cm (4 inches). D. Place bobbin into notch (a) while holding the bobbin lightly with your finger. 3. Pull thread toward the left tab... into the hole in this machine. 34 Draw thread into bobbin holder so that thread does not slip out of bobbin cover down until it clicks into notch ...

User Manual
Page 38
...from up position. Lower the presser foot. 2. Lower the lever as far as it is raised. DRAWING UP THE BOBBIN THREAD 1. Pull upper thread lightly. Pull both upper and bobbin threads about 10 cm (4 inches) through the needle eye. 5. Do not lower the threader lever while machine is required...loop. 7. Hold thread loosely and release the lever. Note: The needle threader is used for needle sizes 11/80, 14/90, and 16/100. 1. Bobbin thread will go through the needle eye. Draw thread into the guide. 6. Raise the presser foot. 2. Pull thread out about 10 cm (4 inches) ...
...from up position. Lower the presser foot. 2. Lower the lever as far as it is raised. DRAWING UP THE BOBBIN THREAD 1. Pull upper thread lightly. Pull both upper and bobbin threads about 10 cm (4 inches) through the needle eye. 5. Do not lower the threader lever while machine is required...loop. 7. Hold thread loosely and release the lever. Note: The needle threader is used for needle sizes 11/80, 14/90, and 16/100. 1. Bobbin thread will go through the needle eye. Draw thread into the guide. 6. Raise the presser foot. 2. Pull thread out about 10 cm (4 inches) ...
User Manual
Page 46
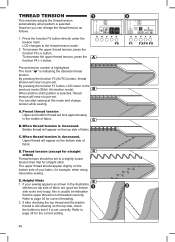
... the function F5 (+) button. By pressing the function F3 (AUTO) button, thread tension will return to the previous mode (Stitch information mode). B. Bobbin thread will lock approximately in the illustration, stitches on top side of fabric are good but bottom side looks very loopy, this mode and change... the thread tension as shown in the middle of fabric. E. If your fabric, for straight stitch. If after checking the top thread and the bobbin thread is set to see if it is still showing on the top side of fabric. The mark " " is decreased. A. Thread tension (...
... the function F5 (+) button. By pressing the function F3 (AUTO) button, thread tension will return to the previous mode (Stitch information mode). B. Bobbin thread will lock approximately in the illustration, stitches on top side of fabric are good but bottom side looks very loopy, this mode and change... the thread tension as shown in the middle of fabric. E. If your fabric, for straight stitch. If after checking the top thread and the bobbin thread is set to see if it is still showing on the top side of fabric. The mark " " is decreased. A. Thread tension (...
User Manual
Page 54
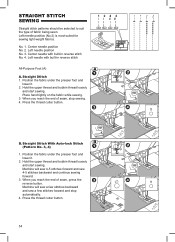
Hold the upper thread and bobbin thread loosely and start sewing. Place hand lightly on the fabric while sewing. 3. Left needle position No. 3. B. Machine will sew a few stitches backward and sew a ... reverse stitch All-Purpose Foot (A) A. Position the fabric under the presser foot and lower it . 2. Press the thread cutter button. Hold the upper thread and bobbin thread loosely and start sewing. Left needle position (No.2) is most suited for sewing light weight fabrics. Machine will sew 4-5 stitches forward and sew 4-5 stitches...
Hold the upper thread and bobbin thread loosely and start sewing. Place hand lightly on the fabric while sewing. 3. Left needle position No. 3. B. Machine will sew a few stitches backward and sew a ... reverse stitch All-Purpose Foot (A) A. Position the fabric under the presser foot and lower it . 2. Press the thread cutter button. Hold the upper thread and bobbin thread loosely and start sewing. Left needle position (No.2) is most suited for sewing light weight fabrics. Machine will sew 4-5 stitches forward and sew 4-5 stitches...
User Manual
Page 56
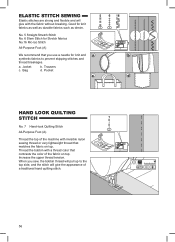
Good for Stretch fabrics No.16 Ric-rac Stitch All-Purpose Foot (A) We recommend that you sew, the bobbin thread will pull up to prevent skipping stitches and thread breakages. Trousers d. Jacket c. Thread the bobbin with a thread color that contrasts the color of a traditional hand quilting stitch. 56 When you use a needle for...
Good for Stretch fabrics No.16 Ric-rac Stitch All-Purpose Foot (A) We recommend that you sew, the bobbin thread will pull up to prevent skipping stitches and thread breakages. Trousers d. Jacket c. Thread the bobbin with a thread color that contrasts the color of a traditional hand quilting stitch. 56 When you use a needle for...
User Manual
Page 70
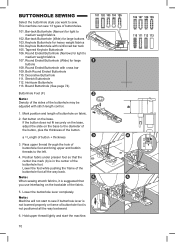
... 74) Buttonhole Foot (F) Note: Density of the sides of buttonholes. 101. Lower the foot while pushing the frame of buttonhole foot and bring upper and bobbin threads to sew. Bar-tack Buttonhole (Narrow) for large buttons 103. Pass upper thread through the hole of the buttonhole foot all the way backward...
... 74) Buttonhole Foot (F) Note: Density of the sides of buttonholes. 101. Lower the foot while pushing the frame of buttonhole foot and bring upper and bobbin threads to sew. Bar-tack Buttonhole (Narrow) for large buttons 103. Pass upper thread through the hole of the buttonhole foot all the way backward...
User Manual
Page 78
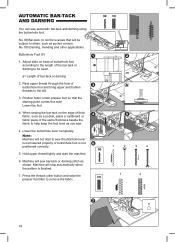
..., mending and other applications. When sewing the bar-tack on base of buttonhole foot according to the length of buttonhole foot and bring upper and bobbin threads to be subject to help keep the foot level as a pocket, place a cardboard or fabric piece of bar-tack or darning 2. Hold upper thread...
..., mending and other applications. When sewing the bar-tack on base of buttonhole foot according to the length of buttonhole foot and bring upper and bobbin threads to be subject to help keep the foot level as a pocket, place a cardboard or fabric piece of bar-tack or darning 2. Hold upper thread...

User Manual
Page 98
.... b c 98 Remove the needle, presser foot and holder. Remove the needle plate by lifting up the bobbin holder and remove it does not light, call your authorized SINGER service center for service. * There is no need to the stopper (c) as needed. Replace the screws and... plate. 2. Clean the hook race, feed teeth and bobbin holder with the smooth operation of thread accumulate in the hook, this machine. Bobbin Holder Remove the bobbin cover and bobbin. Replace the bobbin holder into the machine. Clean the bobbin holder with a brush. Do not touch thread cutter unit...
.... b c 98 Remove the needle, presser foot and holder. Remove the needle plate by lifting up the bobbin holder and remove it does not light, call your authorized SINGER service center for service. * There is no need to the stopper (c) as needed. Replace the screws and... plate. 2. Clean the hook race, feed teeth and bobbin holder with the smooth operation of thread accumulate in the hook, this machine. Bobbin Holder Remove the bobbin cover and bobbin. Replace the bobbin holder into the machine. Clean the bobbin holder with a brush. Do not touch thread cutter unit...

User Manual
Page 100
Winding the bobbin. 1 2. Lower the buttonhole lever. 2 3. After sewing buttonhole, raise the presser foot 3 lifter and set the frame of buttonhole foot to starting position. 4. Release the foot ...
Winding the bobbin. 1 2. Lower the buttonhole lever. 2 3. After sewing buttonhole, raise the presser foot 3 lifter and set the frame of buttonhole foot to starting position. 4. Release the foot ...
User Manual
Page 102
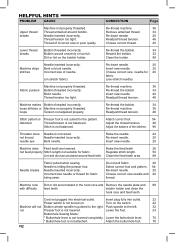
... Clean the holder. 98 Machine skips stitches Needle inserted incorrectly. Incorrect size of incorrect size or poor quality. Re-thread the bobbin. 34 Re-thread machine. 36 Readjust thread tension. 46 Stitch pattern is Presser foot is not balanced. Stitch is not suited... while sewing. Lower the foot. 24 Buttonhole Sewing Mode; * Buttonhole lever is not raised. Choose correct thread. 20 Lower thread Bobbin threaded incorrectly. Re-insert needle. 20 Choose correct size needle and 20 thread. distorted Thread tension is hitting the presser foot. Raise...
... Clean the holder. 98 Machine skips stitches Needle inserted incorrectly. Incorrect size of incorrect size or poor quality. Re-thread the bobbin. 34 Re-thread machine. 36 Readjust thread tension. 46 Stitch pattern is Presser foot is not balanced. Stitch is not suited... while sewing. Lower the foot. 24 Buttonhole Sewing Mode; * Buttonhole lever is not raised. Choose correct thread. 20 Lower thread Bobbin threaded incorrectly. Re-insert needle. 20 Choose correct size needle and 20 thread. distorted Thread tension is hitting the presser foot. Raise...


