User Manual
Page 2
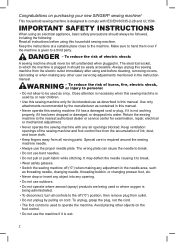
...8226; To disconnect, turn all instructions before using and before cleaning, removing covers, lubricating or when making any other objects on purchasing your new SINGER® sewing machine! Make sure to hand them over if the machine is designed to comply with any opening. • Do not use ...parts. Special care is required around the sewing machine needle. • Always use bent needles. • Do not pull or push fabric while stitching. It may deflect the needle causing it to the off ("0") when making any adjustment in this manual. Keep the instructions at a suitable place...
...8226; To disconnect, turn all instructions before using and before cleaning, removing covers, lubricating or when making any other objects on purchasing your new SINGER® sewing machine! Make sure to hand them over if the machine is designed to comply with any opening. • Do not use ...parts. Special care is required around the sewing machine needle. • Always use bent needles. • Do not pull or push fabric while stitching. It may deflect the needle causing it to the off ("0") when making any adjustment in this manual. Keep the instructions at a suitable place...
User Manual
Page 8
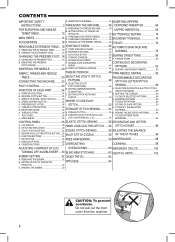
...24 WHERE TO USE EACH D. TO DELETE PATTERN 88 E. THREAD CUTTER BUTTON 26 G. DROP FEED LEVER 26 STRAIGHT STITCH SEWING 54 G. UTILITY STITCH BUTTON 28 ZIGZAG STITCH SEWING 58 ADJUSTING THE BALANCE D. Do not pull out the front cover from the machine. 8 CENTERED INSERTION 66 ...64 A. LAPPED INSERTION 68 TERRITORIES 12 SPOOL PIN 36 BUTTONHOLE SEWING 70 MAIN PARTS 14 C. FUNCTION BUTTONS 28 MULTI-STITCH ZIGZAG 58 OF THE STITCHES 96 F. CURSOR BUTTONS 28 OVERCASTING- SETTING SPOOL OF THREAD ON APPLIQUE 64 SPOOL PIN 32 C. SEWING OVER OVERLAPPED...
...24 WHERE TO USE EACH D. TO DELETE PATTERN 88 E. THREAD CUTTER BUTTON 26 G. DROP FEED LEVER 26 STRAIGHT STITCH SEWING 54 G. UTILITY STITCH BUTTON 28 ZIGZAG STITCH SEWING 58 ADJUSTING THE BALANCE D. Do not pull out the front cover from the machine. 8 CENTERED INSERTION 66 ...64 A. LAPPED INSERTION 68 TERRITORIES 12 SPOOL PIN 36 BUTTONHOLE SEWING 70 MAIN PARTS 14 C. FUNCTION BUTTONS 28 MULTI-STITCH ZIGZAG 58 OF THE STITCHES 96 F. CURSOR BUTTONS 28 OVERCASTING- SETTING SPOOL OF THREAD ON APPLIQUE 64 SPOOL PIN 32 C. SEWING OVER OVERLAPPED...

User Manual
Page 14
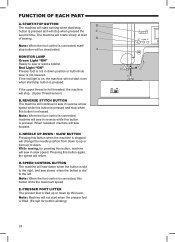
.... Top Cover 24. Spool Pin 27. Power Switch 46 48. Foot Control 51. Hand Wheel 3 6. Needle Threader Lever 12. Bobbin Cover 15 22. Decorative & Letter Stitch Button 44. Foot Control Jack 48 50. Cursor Left Button 44 34 35 36 37 38 45 41. Edit Button 46...49. Face Plate 2 2. Speed Control Lever 39 33. Liquid Crystal Display (LCD) 39. Auxiliary Spool Pin Holder 30. Thread Cutter Button 41 42 37. Utility Stitch Button 45. Thread Take-Up Lever (Inside) 3. Presser Foot 16. Drop Feed Lever 47. Bobbin Winding Tension Disc 28. Reverse...
.... Top Cover 24. Spool Pin 27. Power Switch 46 48. Foot Control 51. Hand Wheel 3 6. Needle Threader Lever 12. Bobbin Cover 15 22. Decorative & Letter Stitch Button 44. Foot Control Jack 48 50. Cursor Left Button 44 34 35 36 37 38 45 41. Edit Button 46...49. Face Plate 2 2. Speed Control Lever 39 33. Liquid Crystal Display (LCD) 39. Auxiliary Spool Pin Holder 30. Thread Cutter Button 41 42 37. Utility Stitch Button 45. Thread Take-Up Lever (Inside) 3. Presser Foot 16. Drop Feed Lever 47. Bobbin Winding Tension Disc 28. Reverse...

User Manual
Page 16
Buttonhole Foot (F) 13. Seam Ripper 4. Large Thread Spool Cap 8. Auxiliary Spool Pin with Felt Washer 6. Blind Hem Foot (D) 10. All-Purpose Foot (On machine when delivered) (A) 1 2 34 5 6 7 8 9 10 11 12 13 16 Brush 5. Screwdriver for Needle Plate 7. Small Thread Spool Cap 9. Satin Stitch Foot (B) 12. ACCESSORIES Accessories are provided in the machine) 3. Needle Pack 2. 4 SINGER Class 15 bobbins ( 1 is in the storage compartment of the removable extension table. (See next page, [REMOVABLE EXTENSION TABLE]) 1. Zipper Foot (E) 11.
Buttonhole Foot (F) 13. Seam Ripper 4. Large Thread Spool Cap 8. Auxiliary Spool Pin with Felt Washer 6. Blind Hem Foot (D) 10. All-Purpose Foot (On machine when delivered) (A) 1 2 34 5 6 7 8 9 10 11 12 13 16 Brush 5. Screwdriver for Needle Plate 7. Small Thread Spool Cap 9. Satin Stitch Foot (B) 12. ACCESSORIES Accessories are provided in the machine) 3. Needle Pack 2. 4 SINGER Class 15 bobbins ( 1 is in the storage compartment of the removable extension table. (See next page, [REMOVABLE EXTENSION TABLE]) 1. Zipper Foot (E) 11.

User Manual
Page 18
... you sew. REMOVABLE EXTENSION TABLE A. Turn off the power switch before you should remove the presser foot holder. 1. To attach, push the table to the stitch or technique you until the needle is at its pin directly under the left bottom side of the removable extension table and slide it will...
... you sew. REMOVABLE EXTENSION TABLE A. Turn off the power switch before you should remove the presser foot holder. 1. To attach, push the table to the stitch or technique you until the needle is at its pin directly under the left bottom side of the removable extension table and slide it will...
User Manual
Page 24
... foot control is not lowered. FUNCTION OF EACH PART A. Red Light "ON" Presser foot is not in reverse at start / stop . (Upper thread sensor) B. REVERSE STITCH BUTTON The machine will stop button will change the needle position from down position or buttonhole lever is connected, this button when the machine is...
... foot control is not lowered. FUNCTION OF EACH PART A. Red Light "ON" Presser foot is not in reverse at start / stop . (Upper thread sensor) B. REVERSE STITCH BUTTON The machine will stop button will change the needle position from down position or buttonhole lever is connected, this button when the machine is...
User Manual
Page 28
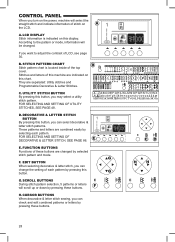
... by pressing these buttons. 28 B. FOR SELECTING AND SETTING OF DECORATIVE & LETTER STITCH, SEE PAGE 86. H. LCD DISPLAY Stitch information is located inside of the top cover. STITCH PATTERN CHART Stitch pattern chart is indicated on the LCD. These patterns and letters are separated: Utility...button. According to adjust the contrast of LCD, see page 30. They are combined easily by selected stitch pattern and mode. D. CURSOR BUTTONS When decorative & letter stitch sewing, you can change the setting of each pattern. CONTROL PANEL When you turn on the power...
... by pressing these buttons. 28 B. FOR SELECTING AND SETTING OF DECORATIVE & LETTER STITCH, SEE PAGE 86. H. LCD DISPLAY Stitch information is located inside of the top cover. STITCH PATTERN CHART Stitch pattern chart is indicated on the LCD. These patterns and letters are separated: Utility...button. According to adjust the contrast of LCD, see page 30. They are combined easily by selected stitch pattern and mode. D. CURSOR BUTTONS When decorative & letter stitch sewing, you can change the setting of each pattern. CONTROL PANEL When you turn on the power...

User Manual
Page 30
... only. a. This function is kept until you change them. To turn off the audible beep by following these procedures. 1. Press F4 or F5 to go stitch information mode. ADJUSTING CONTRAST OF LCD; F1 F2 F3 F4 F5 30 To turn on the power switch while pressing the Edit button. This function...
... only. a. This function is kept until you change them. To turn off the audible beep by following these procedures. 1. Press F4 or F5 to go stitch information mode. ADJUSTING CONTRAST OF LCD; F1 F2 F3 F4 F5 30 To turn on the power switch while pressing the Edit button. This function...

User Manual
Page 36
... spool. Press the needle up position. (Keep this position for instructions on how to left end of spool pin and set the needle in poor stitch quality, or excessive thread loops on spool pin so that the thread unrolls from right to use cross wound thread. a. Leave small opening . 8. Bring thread...
... spool. Press the needle up position. (Keep this position for instructions on how to left end of spool pin and set the needle in poor stitch quality, or excessive thread loops on spool pin so that the thread unrolls from right to use cross wound thread. a. Leave small opening . 8. Bring thread...
User Manual
Page 40
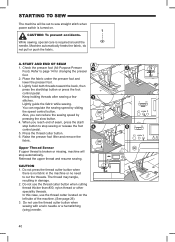
A. START AND END OF SEAM 1. Check the presser foot (All-Purpose Presser Foot). Keep holding threads after sewing a few stitches. Raise the presser foot lifter and remove the fabric. CAUTION 1. Do not press the thread cutter button when there is required around the needle. Also, ... sewing speed by sliding the speed control button. Upper Thread Sensor If upper thread is broken or missing, machine will be set to sew straight stitch when power switch is turned on the left side of seam, press the start /stop button or press the foot control pedal.
A. START AND END OF SEAM 1. Check the presser foot (All-Purpose Presser Foot). Keep holding threads after sewing a few stitches. Raise the presser foot lifter and remove the fabric. CAUTION 1. Do not press the thread cutter button when there is required around the needle. Also, ... sewing speed by sliding the speed control button. Upper Thread Sensor If upper thread is broken or missing, machine will be set to sew straight stitch when power switch is turned on the left side of seam, press the start /stop button or press the foot control pedal.

User Manual
Page 42
...all utility patterns. 1. C. This function can be made and lower the presser foot. 2. Tack mark will appear on the LCD. 2. AUTO TACK STITCH You may sew tack stitches at the beginning and end of seam, press the reverse button once. Start to sew the selected pattern. F2 42 Place the fabric...change to cancel this function, press the F2 button again. When you want to forward sewing. 4. Press and hold reverse button and sew 4-5 reverse stitches. If you reach the end of the seams. 1. See page 54 to be used for reinforcing the ends of seam, press and hold the ...
...all utility patterns. 1. C. This function can be made and lower the presser foot. 2. Tack mark will appear on the LCD. 2. AUTO TACK STITCH You may sew tack stitches at the beginning and end of seam, press the reverse button once. Start to sew the selected pattern. F2 42 Place the fabric...change to cancel this function, press the F2 button again. When you want to forward sewing. 4. Press and hold reverse button and sew 4-5 reverse stitches. If you reach the end of the seams. 1. See page 54 to be used for reinforcing the ends of seam, press and hold the ...
User Manual
Page 46
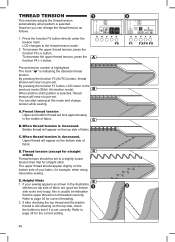
... is still showing on the top side of your sewing appears as follows. 1. LCD changes to the previous mode (Stitch information mode). The mark " " is decreased. A. Preset thread tension Upper and bobbin thread will lock approximately in the illustration...button. To decrease the upper thread tension, press the function F4 (-) button. When another stitch pattern is selected. Helpful Hints 1. Refer to page 34 for straight stitch. Thread tension (except for straight stitch) Thread tension should appear slightly on the bottom side of fabric. Press the function F5 button...
... is still showing on the top side of your sewing appears as follows. 1. LCD changes to the previous mode (Stitch information mode). The mark " " is decreased. A. Preset thread tension Upper and bobbin thread will lock approximately in the illustration...button. To decrease the upper thread tension, press the function F4 (-) button. When another stitch pattern is selected. Helpful Hints 1. Refer to page 34 for straight stitch. Thread tension (except for straight stitch) Thread tension should appear slightly on the bottom side of fabric. Press the function F5 button...

User Manual
Page 48
... cover. When pattern is selected, LCD will be changed. Recommended presser foot c. The icon on the LCD. 2. SELECTING UTILITY STITCH PATTERNS 1. First 5 patterns will flip from left and right) c. To select a pattern, press the function button directly under the mirror/reverse ...icon, stitch will be indicated on the LCD indicates the selected stitch as follows. Regular stitch (normal stitch) b. Mirror and Reverse stitch F3 F4 48 a bc d F2 F3 F4 F5 iii i ii abc d Twin needle...
... cover. When pattern is selected, LCD will be changed. Recommended presser foot c. The icon on the LCD. 2. SELECTING UTILITY STITCH PATTERNS 1. First 5 patterns will flip from left and right) c. To select a pattern, press the function button directly under the mirror/reverse ...icon, stitch will be indicated on the LCD indicates the selected stitch as follows. Regular stitch (normal stitch) b. Mirror and Reverse stitch F3 F4 48 a bc d F2 F3 F4 F5 iii i ii abc d Twin needle...

User Manual
Page 50
...Some patterns may be changed. For shorter length, press function button F4 (-). LCD will emit multiple audible beeps. Pre-set the stitch width and length suitable for the pattern. 1. Note: When further width or length adjustments are not indicated, the pattern cannot be ...position. You may be indicated as a highlighted number. Elongated F5 3. For wider width, press function button F3 (+). For straight stitch patterns (No. 1, 2, 3, 4, 5, 7), Stitch width buttons will be made while sewing. 50 You can make changes by pressing the function button (F5) directly under the width...
...Some patterns may be changed. For shorter length, press function button F4 (-). LCD will emit multiple audible beeps. Pre-set the stitch width and length suitable for the pattern. 1. Note: When further width or length adjustments are not indicated, the pattern cannot be ...position. You may be indicated as a highlighted number. Elongated F5 3. For wider width, press function button F3 (+). For straight stitch patterns (No. 1, 2, 3, 4, 5, 7), Stitch width buttons will be made while sewing. 50 You can make changes by pressing the function button (F5) directly under the width...

User Manual
Page 52
.... Bar-tack 100. Bar-tack Buttonhole (Wide) 103. Hand-look quilting stitch 08. Decorative stitch 14. Keyhole Buttonhole 104. WHERE TO USE EACH STITCH 01. Straight stitch with auto-reverse stitch center needle position 04. Straight stretch stitch • Reinforcement straight stitch 06. Ric Rac stitch 17. Eyelet 99. Bar-tack Buttonhole (Narrow) 102. Round Ended Buttonhole with...
.... Bar-tack 100. Bar-tack Buttonhole (Wide) 103. Hand-look quilting stitch 08. Decorative stitch 14. Keyhole Buttonhole 104. WHERE TO USE EACH STITCH 01. Straight stitch with auto-reverse stitch center needle position 04. Straight stretch stitch • Reinforcement straight stitch 06. Ric Rac stitch 17. Eyelet 99. Bar-tack Buttonhole (Narrow) 102. Round Ended Buttonhole with...
User Manual
Page 54
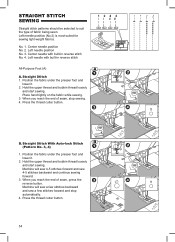
...on the fabric while sewing. 3. B. Position the fabric under the presser foot and lower it . 2. Machine will sew a few stitches backward and sew a few stitches forward and stop sewing. 4. Press the thread cutter button. 54 Left needle position (No.2) is most suited for sewing light weight ... fabric under the presser foot and lower it . 2. No. 1. Left needle with built-in reverse stitch All-Purpose Foot (A) A. Center needle position No. 2. Center needle with built-in reverse stitch No. 4. Press the thread cutter button. When you reach the end of seam, stop automatically. 4....
...on the fabric while sewing. 3. B. Position the fabric under the presser foot and lower it . 2. Machine will sew a few stitches backward and sew a few stitches forward and stop sewing. 4. Press the thread cutter button. 54 Left needle position (No.2) is most suited for sewing light weight ... fabric under the presser foot and lower it . 2. No. 1. Left needle with built-in reverse stitch All-Purpose Foot (A) A. Center needle position No. 2. Center needle with built-in reverse stitch No. 4. Press the thread cutter button. When you reach the end of seam, stop automatically. 4....
User Manual
Page 56
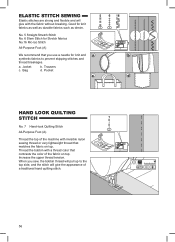
... with a thread color that contrasts the color of a traditional hand quilting stitch. 56 When you use a needle for knit fabrics as well as durable fabrics such as denim. Pocket HAND LOOK QUILTING STITCH No. 7 Hand-look Quilting Stitch All-Purpose Foot (A) Thread the top of the machine with the fabric... without breaking. Good for knit and synthetic fabrics to the top side, and the stitch will give with invisible nylon sewing thread or very lightweight thread that you sew, the bobbin thread will give the appearance of the fabric ...
... with a thread color that contrasts the color of a traditional hand quilting stitch. 56 When you use a needle for knit fabrics as well as durable fabrics such as denim. Pocket HAND LOOK QUILTING STITCH No. 7 Hand-look Quilting Stitch All-Purpose Foot (A) Thread the top of the machine with the fabric... without breaking. Good for knit and synthetic fabrics to the top side, and the stitch will give with invisible nylon sewing thread or very lightweight thread that you sew, the bobbin thread will give the appearance of the fabric ...
User Manual
Page 58
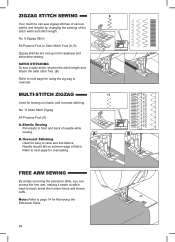
... lengths by changing the settings of fabric. Needle should fall on elastic and overcast stitching. No. 8 Zigzag Stitch All-Purpose Foot or Satin Stitch Foot (A, B) Zigzag stitches are very good for overcasting. MULTI-STITCH ZIGZAG Used for Removing the Extension Table. 58 Elastic Sewing Pull elastic in front... and back of needle while sewing. Overcast Stitching Used for using the zig-zag to next page for applique and decorative sewing. SATIN STITCHING To sew a satin stitch, shorten the stitch length and attach the satin stitch foot. (B) Refer to next page for easy to ...
... lengths by changing the settings of fabric. Needle should fall on elastic and overcast stitching. No. 8 Zigzag Stitch All-Purpose Foot or Satin Stitch Foot (A, B) Zigzag stitches are very good for overcasting. MULTI-STITCH ZIGZAG Used for Removing the Extension Table. 58 Elastic Sewing Pull elastic in front... and back of needle while sewing. Overcast Stitching Used for using the zig-zag to next page for applique and decorative sewing. SATIN STITCHING To sew a satin stitch, shorten the stitch length and attach the satin stitch foot. (B) Refer to next page for easy to ...

User Manual
Page 60
Note: If desired, trim the excess fabric after stitching is used for sewing easy to ravel or stretch fabrics. OVERCASTING OVERLOCKING No. 8, 11, 14, 15, 29 All-Purpose Foot (A) Place fabric so that the ... stretch fabrics. Be careful not to cut the threads while trimming. 60 No. 8 (Width=5.0) is complete. d-f.No. 14, 15, 29 can sew overcasting and regular stitches at the same time. b. a. c.
Note: If desired, trim the excess fabric after stitching is used for sewing easy to ravel or stretch fabrics. OVERCASTING OVERLOCKING No. 8, 11, 14, 15, 29 All-Purpose Foot (A) Place fabric so that the ... stretch fabrics. Be careful not to cut the threads while trimming. 60 No. 8 (Width=5.0) is complete. d-f.No. 14, 15, 29 can sew overcasting and regular stitches at the same time. b. a. c.

User Manual
Page 62
Turn the fabric over when you can determine the best placement of fabric similar to adjust the foot so that the straight stitches (or small zigzag stitches) are on a scrap piece of the foot's guide. 62 1cm 5mm 5mm Fold the fabric as shown in the illustration. Light ...presser foot and sew hem, guiding fabric evenly along the guide. 5. No. 9 Blind hemming for non-stretch fabric. a. The guide (e) is sewn without stitches showing on the blind foot ensures even feeding of the folded edge (g). Wrong side of fabric h. Wrong side of fabric d. Blind Hem Foot (D) 1. ...
Turn the fabric over when you can determine the best placement of fabric similar to adjust the foot so that the straight stitches (or small zigzag stitches) are on a scrap piece of the foot's guide. 62 1cm 5mm 5mm Fold the fabric as shown in the illustration. Light ...presser foot and sew hem, guiding fabric evenly along the guide. 5. No. 9 Blind hemming for non-stretch fabric. a. The guide (e) is sewn without stitches showing on the blind foot ensures even feeding of the folded edge (g). Wrong side of fabric h. Wrong side of fabric d. Blind Hem Foot (D) 1. ...


