Get support for Singer Simple 3337

Singer Simple 3337 Support Question

Singer Simple 3337 Support Question

Find answers below for this question about Singer Simple 3337.
Need a Singer Simple 3337 manual? We have 2 online manuals for this item!
Question posted by TAMCAN436 on November 12th, 2021

Zig Zag Stitch

What number is for the stitch length for a zig zag stitch?

Current Answers

Answer #1: Posted by huntaking on November 12th, 2021 8:08 PM
This answer was accepted by the poster of the original question.
huntaking

Member since:
September 25th, 2019

Points: 3,780
1,110
points
When you are making a very close zigzag stitch the stitch length must be set to .5 or slightly smaller.


K. Hunter
Answer #2: Posted by SonuKumar on November 13th, 2021 5:40 AM
SonuKumar

Member since:
May 9th, 2021

Points: 16,622,280
110
points
What is the stitch width for a zigzag stitch?

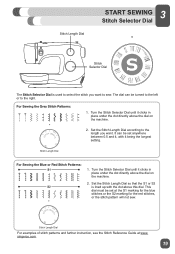
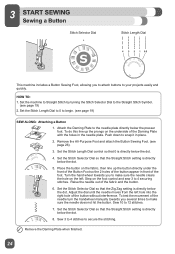
Set the machine for zigzag stitch. For machines with adjustable stitch length and stitch width, use with a width setting of at least 5.0mm and a length setting of approximately 2.0mm. Use an Open Toe Foot (additional accessory for some machine models) so that the area in front of the needle is unobstructed.

https://www.singer.com/sewing-resources/stitch-reference/163

What tension should I use for zig zag stitch?

The dial settings run from 0 to 9, so 4.5 is generally the 'default' position for normal straight-stitch sewing. This should be suitable for most fabrics. If you are doing a zig-zag stitch, or another stitch that has width, then you may find that the bobbin thread is pulled through to the top.

https://www.youtube.com/watch?v=N248bjRJiE0

https://www.singer.com/sewing-resources/stitch-reference/163


Please respond to my effort to provide you with the best possible solution by using the "Acceptable Solution" and/or the "Helpful" buttons when the answer has proven to be helpful.

Regards,
Sonu
Your search handyman for all e-support needs!!

Related Singer Simple 3337 Manual Pages

Instruction Manual and Troubleshooting Guide - Page 2

...-by all. An instruction manual with easy-to the SINGER® family and CONGRATULATIONS on purchasing a brand new SINGER® sewing machine! It is important to help from one of helpful resources: 1. Happy Sewing! 2 Personal assistance via email: [email protected] 4. Live, one-on the web at 1-844-664-5188. (North America Only...
Instruction Manual and Troubleshooting Guide - Page 3

... mechanical adjustment. - Do not pull or push fabric while stitching. Keep the instructions in . A sewing machine should always be left unattended when plugged in a suitable place... necessary when this manual. It may deflect the needle causing it to person : - Switch the sewing machine off ("O") when making any opening. - Do not operate where aerosol (spray) products are being ...
Instruction Manual and Troubleshooting Guide - Page 4

... (240V area) / 4C-336G (220-240V area) manufactured by pulling on the foot control. - Children should be replaced by a person responsible for Servicing of the sewing machine by the manufacturer or its service agent or a similarly qualified person, in a safe way and understand the hazards involved. The noise level under normal operating...
Instruction Manual and Troubleshooting Guide - Page 6

... READY TO SEW 11-16 Powering Your Machine...11 Winding the Bobbin...12 Inserting the Bobbin...13 Threading the Upper Thread...14 Automatic Needle Threader...15 Drawing Up the Bobbin Thread...16 START SEWING...17-26 Before You Start Sewing...17 Stitch Formation...18 Stitch Selector Dial...19 Sewing a Straight Stitch...20 Sewing a Decorative Stitch...21 Sewing a Stretch Stitch...22 Sewing a 1-Step...
Instruction Manual and Troubleshooting Guide - Page 7

... right tension for stretch stitch length selection. (See Page 19) 10. STITCH SELECTOR DIAL is used for your stitch, thread and fabric. (See Page 18) 2. NEEDLE THREADER LEVER is used to help you sew. (See Page 26) 5. BOBBIN holds the thread that forms the stitching that appears on the bottom side of the Machine Front 13 1. THREAD...
Instruction Manual and Troubleshooting Guide - Page 9

.... NEEDLE holds thread during stitch formation. 5. PRESSER FOOT HOLDER (OR SHANK) holds presser foot. 13. PRESSER FOOT SCREW secures the presser foot holder (shank) onto the presser bar. 6. PRESSER FOOT holds fabric against the feed teeth while sewing. NEEDLE CLAMP holds the machine's needle in needle clamp. 10. The first line is the...
Instruction Manual and Troubleshooting Guide - Page 10

... inserting a zipper) c. Doing this, you will have access to the free arm, which makes it from the machine. Buttonhole Foot (for straight & accurate quilting) h. Seam Ripper/Brush (remove stitches/brush out lint) g. L-Screwdriver (to sew tubular projects like pant hems or sleeves. Edge/Quilting guide (for making buttonholes) d. Additionally, you will find the...
Instruction Manual and Troubleshooting Guide - Page 11

... shock, this plug is adjusted to fit in use. Foot Control The foot control regulates the sewing speed. If it does not fit fully in any way. ⚠ Your Singer machine is intended to provide the best stitch results at normal room temperature. Do not modify the plug in the outlet, reverse the...
Instruction Manual and Troubleshooting Guide - Page 17

.... The foot control is used to remove excess oil. When you sew. For information on how to change to set up the machine for basic sewing techniques such as: sewing a straight stitch, sewing a decorative stitch, sewing a stretch stitch, sewing a buttonhole and sewing a button. This will help you understand what the stitching should look like when you take your foot off any excess...
Instruction Manual and Troubleshooting Guide - Page 19

... turned to the left or to sew. It can be set anywhere between 0.5 and 4, with the dot above the dial on the machine. 2. For Sewing the Grey Stitch Patterns: 1. Stitch Length Dial For examples of stitch patterns and further instruction, see the Stitch Reference Guide at the S1 marking for the blue stitches or the S2 marking for the...
Instruction Manual and Troubleshooting Guide - Page 20

.... Set the machine for regular sewing. 3. Set the Stitch Selector Dial so that the number 2 is lowered before you begin to sew. Press the reverse lever at the stitch length that the presser foot is directly below the dot. 2. This is an average stitch length setting for Straight Stitch by sewing 2 to sew. Press the reverse lever to sew backwards 2 to 3 stitches, which will...
Instruction Manual and Troubleshooting Guide - Page 21

... 2. Set the machine to the desired stitch by 1 or 2 numbers when sewing decorative stitches. Set the Stitch Length Dial between 0.5 and 3. (see page 19) SEW ALONG: Scallop Stitch 1. This will help prevent the bobbin thread from possibly showing on the foot control to begin sewing. 3 START SEWING Sewing a Decorative Stitch Stitch Selector Dial Stitch Length Dial A decorative stitch is used...
Instruction Manual and Troubleshooting Guide - Page 22

... guide line on the foot control to one of the needle plate. HOW TO: 1. Set the Stitch Length Dial control so that the Overedge stitch setting is directly below the dot. 3. Set the machine to the desired stitch by setting the Stitch Selector Dial to begin sewing. 22 23 START SEWING Sewing a Stretch Stitch Stitch Selector Dial Stitch Length Dial A stretch stitch is used ).
Instruction Manual and Troubleshooting Guide - Page 23

.... 4. Set the machine to the desired stitch by 1 or 2 numbers will improve results.  Always test sew on the fabric aligns with the center of the buttonhole foot. 7. Mark position and length of the buttonhole foot. Remove the All-Purpose Foot and attach the Buttonhole Foot (see page 19) SEW ALONG: Buttonhole Stitch 1. Set the Stitch Length Dial within...
Instruction Manual and Troubleshooting Guide - Page 24

... Stitch Length Dial control so that the Zig Zag setting is directly below the presser foot. Push down to 4 securing stitches. Step on the underside of the foot. Set the Stitch Selector Dial so that 0 is directly below the dot. 5. HOW TO: 1. Sew 10 to your projects easily and quickly. 23 START SEWING Sewing a Button Stitch Selector Dial Stitch Length Dial This machine...
Instruction Manual and Troubleshooting Guide - Page 25

... new needle, making sure that the flat side of the top part of the needle is showing signs of wear resulting in your SINGER® sewing machine. It is also important to view the Stitch Reference Guide) For best results, use the right needle for the fabric you .
Instruction Manual and Troubleshooting Guide - Page 27

... thread. Upper Thread Breaking 4. Stitches Distorted 11. Loud Noise When Sewing 16. As you pull the upper thread to the left , you have rethreaded the machine correctly, try this means you ...should pull freely. • Put the presser foot lifter down ), this simple ...
3337 Stitch Applications Guide - Page 1

... widths of 88 Edgestitching can be used to remove the temporary basting stitches later). Set the machine for basting, if your machine has adjustable stitch length, select straight stitch with the longest stitch length setting. Sew 1/4" - 3/8" from the edge of a garment before sewing the actual seam. Basting stitches are used to add stability to projects like tote bags, or it...
3337 Stitch Applications Guide - Page 5

... Hem Foot, sometimes called a Rolled Hem Foot (additional accessory for some machine models) and the straight stitch. This foot has a small scroll in front that is used in packages, or you can be repaired. Sew simple hems using the Narrow/ Rolled Hem Foot. The stitches will not be helpful to baste the layers together before...
3337 Stitch Applications Guide - Page 10

... left movement catches the flat edge of approximately 2.0mm. English STITCH 41 ZIGZAG STITCH 42 ZIGZAG STITCH 43 ZIGZAG STITCH Lettuce Edging Attaching Lace Edge Joining create delicate heirloom hems. Sew beautiful hemstitching using a simple zigzag stitch and a SINGER size 90 Wing Needle (additional accessory for some machine modeles) so that has a flat edge on top of the...

Similar Questions

Not Sewing.
when the needle goes down, it flips to the right, makes a clicking noise, flips back to the middle o...
(Posted by Kornkven289 1 year ago)
Singer Futura Quartet Seqs 6700 Sewing Machine
how to set my singer futura quartet seqs 6700 sewing machine to sew. A distance more than one inch a...
(Posted by johour2194 3 years ago)
I Get E7 Error Message On My Singer Model 7258 Sewing Machine. There Is No Refe
Error message E7 is up on my Singer Stylist model 7258 sewing machine. It is not working at all. I t...
(Posted by ebellamybellamy9 5 years ago)
Sewing Machine Will Start Sewing By Itself
I tuen the sewing machine on and c it starts sewing by itself. I try to stop it and the only way is ...
(Posted by susienolen 9 years ago)
Beeping From Singer Sewing Machine Stylist Ii 5625
My sewing machine will beep and stop sewing after three inches of sewing. I have taken it to be repa...
(Posted by arusheria 9 years ago)
Ask a New Question
Use the box below to post a new question about this Singer product .
Points & Prizes
  • You can earn points for nearly everything you do on HelpOwl.com
  • You can trade in those points for gift cards at leading retailers such as Amazon.com and Walmart
  • It's that simple!
See How it Works
Create a Free Account

Singer Manuals

Find free Singer Simple 3337 manuals and user guides available at ManualOwl.com. Try out our unique manual viewer allowing you to interact with manuals from directly within your browser!

Singer Reviews

View thousands of Singer user reviews and customer ratings available at ReviewOwl.com.

Contact Information

Complete Singer customer service contact information including steps to reach representatives, hours of operation, customer support links and more from ContactHelp.com.

Scoreboard Ratings

See detailed Singer customer service rankings, employee comments and much more from our sister site.