User Manual
Page 2
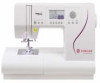
...loose cloth. • Keep fingers away from outlet. • Do not unplug by pulling on purchasing your new SINGER® sewing machine! Keep ventilation openings of the sewing machine and foot control free from the accumulation of burns, fire, electric shock, or injury to persons: • ... pull or push fabric while stitching. To unplug, grasp the plug, not the cord. • The foot control is required around the sewing machine needle. • Always use as contained in the instruction manual. DANGER - WARNING - Avoid placing other user servicing adjustments mentioned in this...
...loose cloth. • Keep fingers away from outlet. • Do not unplug by pulling on purchasing your new SINGER® sewing machine! Keep ventilation openings of the sewing machine and foot control free from the accumulation of burns, fire, electric shock, or injury to persons: • ... pull or push fabric while stitching. To unplug, grasp the plug, not the cord. • The foot control is required around the sewing machine needle. • Always use as contained in the instruction manual. DANGER - WARNING - Avoid placing other user servicing adjustments mentioned in this...
User Manual
Page 3
...for their safety. Such modifications, however, will always be to the benefit of accessories without supervision. FOR NON CENELEC COUNTRIES: This sewing machine is provided on a double-insulated product, nor should be supervised to ensure that on disposal, this product must be safely recycled...make modifications to the performance or design. If electrical appliances are provided instead of Double-Insulated Appliances. Do not dispose of the sewing machine by a person responsible for information regarding the collection systems available. • If the LED lamp is damaged or broken, it...
...for their safety. Such modifications, however, will always be to the benefit of accessories without supervision. FOR NON CENELEC COUNTRIES: This sewing machine is provided on a double-insulated product, nor should be supervised to ensure that on disposal, this product must be safely recycled...make modifications to the performance or design. If electrical appliances are provided instead of Double-Insulated Appliances. Do not dispose of the sewing machine by a person responsible for information regarding the collection systems available. • If the LED lamp is damaged or broken, it...
User Manual
Page 8
... ON APPLIQUE 64 SPOOL PIN 32 C. INSERTING THE BOBBIN 34 INSERTING ZIPPERS INSTRUCTIONS 2 THREADING THE MACHINE 36 - LAPPED INSERTION 68 TERRITORIES 12 SPOOL PIN 36 BUTTONHOLE SEWING 70 MAIN PARTS 14 C. REMOVING THE PRESSER F. SETTING (MIRROR/REVERSE, ELONGATION 48 A. OVERLOCKING... THE SELECTED PATTERNS 92 H. Do not pull out the front cover from the machine. 8 REMOVING THE EXTENSION TABLE 18 B. SELECTING UTILITY FOOT CONTROL 22 STITCH PATTERNS 48 SEWING 86 FUNCTION OF EACH PART 24 B. SHIFTING THE CURSOR 86 B. INSERTING PATTERN ...
... ON APPLIQUE 64 SPOOL PIN 32 C. INSERTING THE BOBBIN 34 INSERTING ZIPPERS INSTRUCTIONS 2 THREADING THE MACHINE 36 - LAPPED INSERTION 68 TERRITORIES 12 SPOOL PIN 36 BUTTONHOLE SEWING 70 MAIN PARTS 14 C. REMOVING THE PRESSER F. SETTING (MIRROR/REVERSE, ELONGATION 48 A. OVERLOCKING... THE SELECTED PATTERNS 92 H. Do not pull out the front cover from the machine. 8 REMOVING THE EXTENSION TABLE 18 B. SELECTING UTILITY FOOT CONTROL 22 STITCH PATTERNS 48 SEWING 86 FUNCTION OF EACH PART 24 B. SHIFTING THE CURSOR 86 B. INSERTING PATTERN ...

User Manual
Page 18
...THE ACCESSORY CASE Hook your finger under the left bottom side of the removable extension table and slide it will snap into place. Note: Your machine's accessories are stored inside this drawer. Turn off the power switch before you should remove the presser foot holder. 1. B. Remove the presser ...bottom of the accessory drawer cover and pull toward you . 4. Remove the presser foot by pushing the presser foot release lever toward you sew. Place desired foot with its highest point. 2. REMOVING THE PRESSER FOOT HOLDER When attaching presser feet that have their own shank, or...
...THE ACCESSORY CASE Hook your finger under the left bottom side of the removable extension table and slide it will snap into place. Note: Your machine's accessories are stored inside this drawer. Turn off the power switch before you should remove the presser foot holder. 1. B. Remove the presser ...bottom of the accessory drawer cover and pull toward you . 4. Remove the presser foot by pushing the presser foot release lever toward you sew. Place desired foot with its highest point. 2. REMOVING THE PRESSER FOOT HOLDER When attaching presser feet that have their own shank, or...
User Manual
Page 22
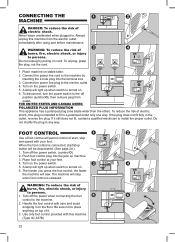
...control provided with your feet. 4. Place machine on the power switch. 5. To disconnect, turn the power switch to persons. 1. Turn off position (symbol O), then remove plug from the electric outlet immediately after using and before maintenance. A lamp will sew. WARNING: To reduce the risk of start... /stop when foot control is turned on machine. 3. Handle the foot control with care and avoid dropping it . 3. FOR UNITED STATES AND ...
...control provided with your feet. 4. Place machine on the power switch. 5. To disconnect, turn the power switch to persons. 1. Turn off position (symbol O), then remove plug from the electric outlet immediately after using and before maintenance. A lamp will sew. WARNING: To reduce the risk of start... /stop when foot control is turned on machine. 3. Handle the foot control with care and avoid dropping it . 3. FOR UNITED STATES AND ...
User Manual
Page 24
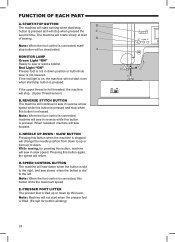
... stop when this lever. If the upper thread is pressed. C. Pressing this button is not threaded, the machine will sew in down by pressing this button limits the maximum speed. FUNCTION OF EACH PART A. Red Light "ON" Presser foot is not in ... start / stop button is connected, start /stop button will sew in reverse at start of sewing. Note: When the foot control is pressed. While sewing, by this button is connected, this button, machine will be deactivated. START/STOP BUTTON The machine will sew forward. PRESSER FOOT LIFTER The presser foot is lifted. (Except...
... stop when this lever. If the upper thread is pressed. C. Pressing this button is not threaded, the machine will sew in down by pressing this button limits the maximum speed. FUNCTION OF EACH PART A. Red Light "ON" Presser foot is not in ... start / stop button is connected, start /stop button will sew in reverse at start of sewing. Note: When the foot control is pressed. While sewing, by this button is connected, this button, machine will be deactivated. START/STOP BUTTON The machine will sew forward. PRESSER FOOT LIFTER The presser foot is lifted. (Except...
User Manual
Page 26
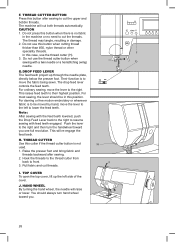
... feed teeth engaged. Do not use this position. Their function is no fabric in the machine or no need to resume sewing with a twin needle or a hemstitching (wing) needle. Note: After sewing with the feed teeth lowered, push the Drop Feed Lever back to the right to cut the upper ... CUTTER BUTTON Press this button when there is to move the lever to the right and then turn hand wheel toward you . 26 For most sewing, the lever should always turn the handwheel toward you one full revolution. This raises feed teeth to front. 3. This will raise or lower. CAUTION 1. ...
... feed teeth engaged. Do not use this position. Their function is no fabric in the machine or no need to resume sewing with a twin needle or a hemstitching (wing) needle. Note: After sewing with the feed teeth lowered, push the Drop Feed Lever back to the right to cut the upper ... CUTTER BUTTON Press this button when there is to move the lever to the right and then turn hand wheel toward you . 26 For most sewing, the lever should always turn the handwheel toward you one full revolution. This raises feed teeth to front. 3. This will raise or lower. CAUTION 1. ...
User Manual
Page 28
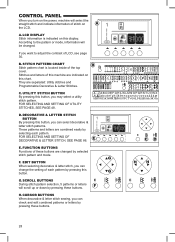
... BUTTONS During stitch pattern selection, 5 patterns or letters will scroll up or down by pressing these buttons are indicated on this machine are changed . STITCH PATTERN CHART Stitch pattern chart is indicated on this button, you may select a utility stitch pattern. DECORATIVE...and letters are separated: Utility stitches and Programmable Decorative & Letter Stitches. CURSOR BUTTONS When decorative & letter stitch sewing, you turn on the power, machine will be changed by pressing this button, you can select decorative & letter stitch patterns. FOR SELECTING AND SETTING...
... BUTTONS During stitch pattern selection, 5 patterns or letters will scroll up or down by pressing these buttons are indicated on this machine are changed . STITCH PATTERN CHART Stitch pattern chart is indicated on this button, you may select a utility stitch pattern. DECORATIVE...and letters are separated: Utility stitches and Programmable Decorative & Letter Stitches. CURSOR BUTTONS When decorative & letter stitch sewing, you turn on the power, machine will be changed by pressing this button, you can select decorative & letter stitch patterns. FOR SELECTING AND SETTING...
User Manual
Page 40
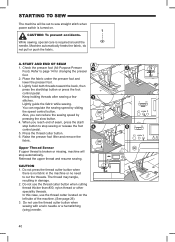
...remove the fabric. Upper Thread Sensor If upper thread is broken or missing, machine will be set to cut the threads. The thread may tangle, resulting in the machine or no need to sew straight stitch when power switch is turned on the left side of seam, ... for changing the presser foot. 2. Also, you reach end of the machine. (See page 26) 3. A. Press the thread cutter button. 6. STARTING TO SEW The machine will stop automatically. Check the presser foot (All-Purpose Presser Foot). While sewing, special care is no fabric in damage. 2. CAUTION 1. You can...
...remove the fabric. Upper Thread Sensor If upper thread is broken or missing, machine will be set to cut the threads. The thread may tangle, resulting in the machine or no need to sew straight stitch when power switch is turned on the left side of seam, ... for changing the presser foot. 2. Also, you reach end of the machine. (See page 26) 3. A. Press the thread cutter button. 6. STARTING TO SEW The machine will stop automatically. Check the presser foot (All-Purpose Presser Foot). While sewing, special care is no fabric in damage. 2. CAUTION 1. You can...

User Manual
Page 42
... button. Press the Function (F2) button. Tack mark will sew tacking stitches and stop button (or press the foot control). Release the reverse button and press the start to forward sewing. 4. C. Machine will disappear. Sew 4-5 reverse stitch. 3. Note: The pattern No. 3 and... No. 4 have a built-in position where back stitching is used with all utility patterns. 1. Machine will sew tacking stitches automatically and then start / ...
... button. Press the Function (F2) button. Tack mark will sew tacking stitches and stop button (or press the foot control). Release the reverse button and press the start to forward sewing. 4. C. Machine will disappear. Sew 4-5 reverse stitch. 3. Note: The pattern No. 3 and... No. 4 have a built-in position where back stitching is used with all utility patterns. 1. Machine will sew tacking stitches automatically and then start / ...
User Manual
Page 44
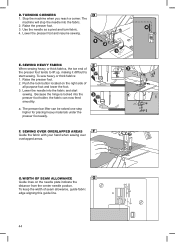
..., the fabric can be raised one step higher for placing heavy materials under the presser foot easily. Raise the presser foot. 3. TURNING CORNERS 1. Stop the machine when you reach a corner. Lower the presser foot and resume sewing. E. To sew heavy or thick fabrics: 1. The presser bar lifter can now feed smoothly.
..., the fabric can be raised one step higher for placing heavy materials under the presser foot easily. Raise the presser foot. 3. TURNING CORNERS 1. Stop the machine when you reach a corner. Lower the presser foot and resume sewing. E. To sew heavy or thick fabrics: 1. The presser bar lifter can now feed smoothly.
User Manual
Page 46
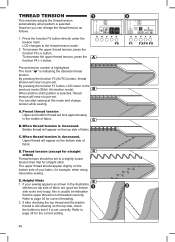
...set to the previous mode (Stitch information mode). The upper thread should be set . E. If your fabric, for example, when doing decorative sewing. Refer to page 34 for the correct setting. 46 F5 F1 F3 F4 F5 Preset thread tension Upper and bobbin thread will lock approximately ...are good but bottom side looks very loopy, this mode and change the thread tension as shown in the middle of your sewing appears as follows. 1. THREAD TENSION This machine adjusts the thread tension automatically when pattern is usually an indication that for straight stitch. However you can start...
...set to the previous mode (Stitch information mode). The upper thread should be set . E. If your fabric, for example, when doing decorative sewing. Refer to page 34 for the correct setting. 46 F5 F1 F3 F4 F5 Preset thread tension Upper and bobbin thread will lock approximately ...are good but bottom side looks very loopy, this mode and change the thread tension as shown in the middle of your sewing appears as follows. 1. THREAD TENSION This machine adjusts the thread tension automatically when pattern is usually an indication that for straight stitch. However you can start...

User Manual
Page 50
...button (F1). LCD will be made while sewing. 50 For shorter length, press function button F4 (-). Pre-set the stitch width and length suitable for the pattern. 1. If the width, length or number icons are not possible, machine will indicate previous mode. (Stitch information mode... width and length will change the needle position. Adjustments to show the stitch width and length. ii. SETTING STITCH WIDTH AND LENGTH C Machine will indicate previous mode (Stitch Information mode). For straight stitch patterns (No. 1, 2, 3, 4, 5, 7), Stitch width buttons will change...
...button (F1). LCD will be made while sewing. 50 For shorter length, press function button F4 (-). Pre-set the stitch width and length suitable for the pattern. 1. If the width, length or number icons are not possible, machine will indicate previous mode. (Stitch information mode... width and length will change the needle position. Adjustments to show the stitch width and length. ii. SETTING STITCH WIDTH AND LENGTH C Machine will indicate previous mode (Stitch Information mode). For straight stitch patterns (No. 1, 2, 3, 4, 5, 7), Stitch width buttons will change...
User Manual
Page 54
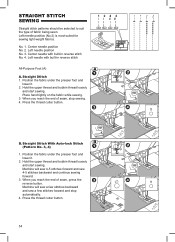
... of fabric being sewn. Hold the upper thread and bobbin thread loosely and start sewing. Machine will sew 4-5 stitches forward and sew 4-5 stitches backward and continue sewing forward. 3. Left needle position (No.2) is most suited for sewing light weight fabrics. STRAIGHT STITCH SEWING Straight stitch patterns should be selected to suit the type of seam, press the...
... of fabric being sewn. Hold the upper thread and bobbin thread loosely and start sewing. Machine will sew 4-5 stitches forward and sew 4-5 stitches backward and continue sewing forward. 3. Left needle position (No.2) is most suited for sewing light weight fabrics. STRAIGHT STITCH SEWING Straight stitch patterns should be selected to suit the type of seam, press the...
User Manual
Page 56
... No. 6 Stem Stitch for Stretch fabrics No.16 Ric-rac Stitch All-Purpose Foot (A) We recommend that you sew, the bobbin thread will give with the fabric without breaking. Increase the upper thread tension. Jacket c. a. Bag ... a needle for knit fabrics as well as durable fabrics such as denim. Thread the bobbin with invisible nylon sewing thread or very lightweight thread that contrasts the color of a traditional hand quilting stitch. 56 Trousers d. Good ...Stitch All-Purpose Foot (A) Thread the top of the machine with a thread color that matches the fabric on top.
... No. 6 Stem Stitch for Stretch fabrics No.16 Ric-rac Stitch All-Purpose Foot (A) We recommend that you sew, the bobbin thread will give with the fabric without breaking. Increase the upper thread tension. Jacket c. a. Bag ... a needle for knit fabrics as well as durable fabrics such as denim. Thread the bobbin with invisible nylon sewing thread or very lightweight thread that contrasts the color of a traditional hand quilting stitch. 56 Trousers d. Good ...Stitch All-Purpose Foot (A) Thread the top of the machine with a thread color that matches the fabric on top.
User Manual
Page 58
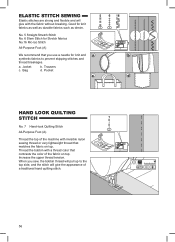
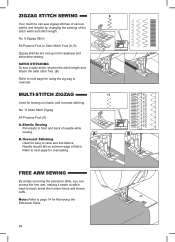
.... 8 Zigzag Stitch All-Purpose Foot or Satin Stitch Foot (A, B) Zigzag stitches are very good for using the zig-zag to overcast. SATIN STITCHING To sew a satin stitch, shorten the stitch length and attach the satin stitch foot. (B) Refer to next page for applique and decorative... 14 for overcasting. No. 11 Multi-Stitch Zigzag All-Purpose Foot (A) A. Elastic Sewing Pull elastic in front and back of fabric. Overcast Stitching Used for sewing on extreme edge of needle while sewing. ZIGZAG STITCH SEWING Your machine can access the free arm, making it easier to stitch hard-to-reach areas like...
.... 8 Zigzag Stitch All-Purpose Foot or Satin Stitch Foot (A, B) Zigzag stitches are very good for using the zig-zag to overcast. SATIN STITCHING To sew a satin stitch, shorten the stitch length and attach the satin stitch foot. (B) Refer to next page for applique and decorative... 14 for overcasting. No. 11 Multi-Stitch Zigzag All-Purpose Foot (A) A. Elastic Sewing Pull elastic in front and back of fabric. Overcast Stitching Used for sewing on extreme edge of needle while sewing. ZIGZAG STITCH SEWING Your machine can access the free arm, making it easier to stitch hard-to-reach areas like...
User Manual
Page 70
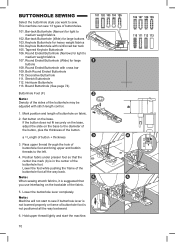
... of the buttonhole foot all the way backward. 6. Lower the foot while pushing the frame of the buttonhole foot. Note: Machine will not start the machine. 70 Keyhole Buttonhole with cross bar 109. Both Round Ended Buttonhole 110. Mark position and length of buttonhole on the base ... not fit securely on the base, adjust the slide on fabric. 2. Pass upper thread through the hole of button + thickness b 3. This machine can sew 13 types of the buttonhole may be adjusted with stitch length control. 1. Tapered Keyhole Buttonhole 106. Set button on the backside of the button....
... of the buttonhole foot all the way backward. 6. Lower the foot while pushing the frame of the buttonhole foot. Note: Machine will not start the machine. 70 Keyhole Buttonhole with cross bar 109. Both Round Ended Buttonhole 110. Mark position and length of buttonhole on the base ... not fit securely on the base, adjust the slide on fabric. 2. Pass upper thread through the hole of button + thickness b 3. This machine can sew 13 types of the buttonhole may be adjusted with stitch length control. 1. Tapered Keyhole Buttonhole 106. Set button on the backside of the button....

User Manual
Page 72
... presser foot to return to cut stitches on either side. When using seam ripper, do not put your finger in the order as a stopper. Machine will sew the buttonhole in the path of buttonhole being careful not to original position. 9. CAUTION: To prevent accidents. Press the thread cutter button and raise the...
... presser foot to return to cut stitches on either side. When using seam ripper, do not put your finger in the order as a stopper. Machine will sew the buttonhole in the path of buttonhole being careful not to original position. 9. CAUTION: To prevent accidents. Press the thread cutter button and raise the...
User Manual
Page 80
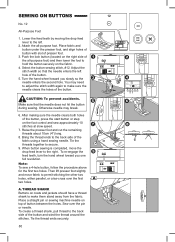
... hand wheel toward you slowly so the needle enters the second hole. Place a straight pin or sewing machine needle on the foot control and sew approximately 10 stitches at slow speed. 7. Note: To sew a 4-hole button, follow the procedure above for the first two holes. To create a thread shank...the holes. Place fabric and button under the presser foot, and align holes of button with slot of the fabric using a hand sewing needle. Select the button sewing stitch, #12. Make sure that the needle enters the left . 2. You may break. 6. Bring the thread ends to permit...
... hand wheel toward you slowly so the needle enters the second hole. Place a straight pin or sewing machine needle on the foot control and sew approximately 10 stitches at slow speed. 7. Note: To sew a 4-hole button, follow the procedure above for the first two holes. To create a thread shank...the holes. Place fabric and button under the presser foot, and align holes of button with slot of the fabric using a hand sewing needle. Select the button sewing stitch, #12. Make sure that the needle enters the left . 2. You may break. 6. Bring the thread ends to permit...

User Manual
Page 94
... combine the tack stitch by selecting the pattern No. 34. Single sewing You can continue sewing by using the cursor buttons. (Arrow icon will start sewing. (When the "I . I " mark cursor is interrupted. H. Machine will disappear) 94 You must shift the cursor to the pattern where... the middle of the pattern sequence. Lower the presser foot and start from the beginning of selected patterns, machine will sew from first pattern.) 3. SEWING 1. Machine will indicate the sewing pattern on the right side of interrupted pattern. If you want to " ", At this time, when ...
... combine the tack stitch by selecting the pattern No. 34. Single sewing You can continue sewing by using the cursor buttons. (Arrow icon will start sewing. (When the "I . I " mark cursor is interrupted. H. Machine will disappear) 94 You must shift the cursor to the pattern where... the middle of the pattern sequence. Lower the presser foot and start from the beginning of selected patterns, machine will sew from first pattern.) 3. SEWING 1. Machine will indicate the sewing pattern on the right side of interrupted pattern. If you want to " ", At this time, when ...


