Instruction Manual
Page 3
.../ EMBROIDERY FOOT .......... 26 B. ATTACHING THE DARNING/ EMBROIDERY FOOT .......... 42 B. AFTER DARNING OR FREE-HAND EMBROIDERY 42 OPTIONAL ACCESSORIES 43 TWIN NEEDLE SEWING 49 DECORATIVE & LETTER STITCH SEWING ... 50 A. SHIFTING THE CURSOR 51 C. REVERSE STITCH BUTTON 10 ... 40 CORDING 40 A. CONTENTS IMPORTANT SAFETY INSTRUCTIONS 2 MODEL 9970 4 FOR EUROPEAN AND SIMILAR TERRITORIES: ...... 4 MAIN PARTS 5 ACCESSORIES 6 DUST COVER 6 REMOVABLE EXTENSION TABLE 7 A. REMOVING THE EXTENSION TABLE 7 B. OPENING THE ACCESSORY CASE 7 CHANGING THE PRESSER FOOT 7 A. NEEDLE UP-...
.../ EMBROIDERY FOOT .......... 26 B. ATTACHING THE DARNING/ EMBROIDERY FOOT .......... 42 B. AFTER DARNING OR FREE-HAND EMBROIDERY 42 OPTIONAL ACCESSORIES 43 TWIN NEEDLE SEWING 49 DECORATIVE & LETTER STITCH SEWING ... 50 A. SHIFTING THE CURSOR 51 C. REVERSE STITCH BUTTON 10 ... 40 CORDING 40 A. CONTENTS IMPORTANT SAFETY INSTRUCTIONS 2 MODEL 9970 4 FOR EUROPEAN AND SIMILAR TERRITORIES: ...... 4 MAIN PARTS 5 ACCESSORIES 6 DUST COVER 6 REMOVABLE EXTENSION TABLE 7 A. REMOVING THE EXTENSION TABLE 7 B. OPENING THE ACCESSORY CASE 7 CHANGING THE PRESSER FOOT 7 A. NEEDLE UP-...
Instruction Manual
Page 4
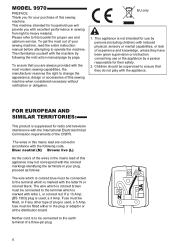
... terminal which is marked with the appliance. To get the most modern sewing capabilities, the manufacturer reserves the right to change the appearance, design or accessories of a three-pin plug. 4 Blue: neutral (N) Brown: live (L) As the colors of the wires in the mains lead of the CISPR. ... with the colored markings identifying the terminals in your sewing machine, read the entire instruction manual before attempting to operate the machine. MODEL 9970 PREFACE Thank you for your purchase of your plug, proceed as follows: The wire which is colored blue must be fitted either in ...
... terminal which is marked with the appliance. To get the most modern sewing capabilities, the manufacturer reserves the right to change the appearance, design or accessories of a three-pin plug. 4 Blue: neutral (N) Brown: live (L) As the colors of the wires in the mains lead of the CISPR. ... with the colored markings identifying the terminals in your sewing machine, read the entire instruction manual before attempting to operate the machine. MODEL 9970 PREFACE Thank you for your purchase of your plug, proceed as follows: The wire which is colored blue must be fitted either in ...
Instruction Manual
Page 6
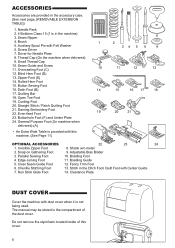
... Foot 9. Adjustable Bias Binder 3. Edge Joining Foot 11. Zipper Foot (E) 14. Invisible Zipper Foot 8. The manual may be stored in the accessory case. (See next page, [REMOVABLE EXTENSION 7 TABLE]) 1. Parallel Sewing Foot 10. Screw Driver 1 2 34 5 6 9 7. Straight ...7. Open Toe Foot 19. Clearance Plate DUST COVER Cover the machine with Felt Washer 6. ACCESSORIES Accessories are provided in the compartment of this machine. (See Page 11) OPTIONAL ACCESSORIES 22 23 24 1. Seam Ripper 8 4. Clear Seam Guide Foot 12. Blind Hem Foot...
... Foot 9. Adjustable Bias Binder 3. Edge Joining Foot 11. Zipper Foot (E) 14. Invisible Zipper Foot 8. The manual may be stored in the accessory case. (See next page, [REMOVABLE EXTENSION 7 TABLE]) 1. Parallel Sewing Foot 10. Screw Driver 1 2 34 5 6 9 7. Straight ...7. Open Toe Foot 19. Clearance Plate DUST COVER Cover the machine with Felt Washer 6. ACCESSORIES Accessories are provided in the compartment of this machine. (See Page 11) OPTIONAL ACCESSORIES 22 23 24 1. Seam Ripper 8 4. Clear Seam Guide Foot 12. Blind Hem Foot...
Instruction Manual
Page 7
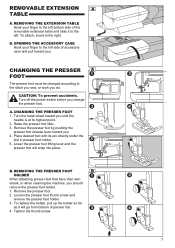
... you should remove the presser foot holder. 1. Place desired foot with its highest point. 2. Remove the presser foot. 2. OPENING THE ACCESSORY CASE Hook your finger to the left bottom side of presser bar. 4. CHANGING THE PRESSER FOOT The presser foot must be changed according to the...as far as it will snap into place. Tighten the thumb screw. 7 REMOVING THE EXTENSION TABLE Hook your finger to the left side of accessory case and pull toward you . 4. CHANGING THE PRESSER FOOT 1. Raise the presser foot lifter. 3. REMOVING THE PRESSER FOOT HOLDER When attaching presser...
... you should remove the presser foot holder. 1. Place desired foot with its highest point. 2. Remove the presser foot. 2. OPENING THE ACCESSORY CASE Hook your finger to the left bottom side of presser bar. 4. CHANGING THE PRESSER FOOT The presser foot must be changed according to the...as far as it will snap into place. Tighten the thumb screw. 7 REMOVING THE EXTENSION TABLE Hook your finger to the left side of accessory case and pull toward you . 4. CHANGING THE PRESSER FOOT 1. Raise the presser foot lifter. 3. REMOVING THE PRESSER FOOT HOLDER When attaching presser...

Instruction Manual
Page 41
USING THE EVEN-FEED FOOT The Even-feed Foot accessory equalizes the feeding of the upper and lower layers of fabric and improves the matching of sewing and sew in slow (1/2) speed. 41 No. 1, 2, or 9 ...
USING THE EVEN-FEED FOOT The Even-feed Foot accessory equalizes the feeding of the upper and lower layers of fabric and improves the matching of sewing and sew in slow (1/2) speed. 41 No. 1, 2, or 9 ...

Instruction Manual
Page 43
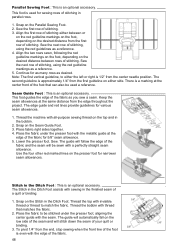
...Non-Stick Foot, Seam Guide Foot or Stitch in the back, and adjust the bracket as you sew. 43 This shank is an optional accessory. This foot adjusts to fit bias tapes 1/4" to be bound into the slot that matches its width and pull it down under the groove... on the right side of the bracket to adjust the width of the bracket. 6. Select a narrow ZigZag, Straight or Decorative Stitch. 8. OPTIONAL ACCESSORIES Shank : This is an optional accessory. Remove the current shank (presser foot holder), by loosening the presser foot thumbscrew. 2. Tighten the presser foot thumbscrew.
...Non-Stick Foot, Seam Guide Foot or Stitch in the back, and adjust the bracket as you sew. 43 This shank is an optional accessory. This foot adjusts to fit bias tapes 1/4" to be bound into the slot that matches its width and pull it down under the groove... on the right side of the bracket to adjust the width of the bracket. 6. Select a narrow ZigZag, Straight or Decorative Stitch. 8. OPTIONAL ACCESSORIES Shank : This is an optional accessory. Remove the current shank (presser foot holder), by loosening the presser foot thumbscrew. 2. Tighten the presser foot thumbscrew.

Instruction Manual
Page 44
...44 The Braiding Guide ensures that will guide the strips over the trim, braid or cord. 5. Chenille Stitching Foot : This is an optional accessory. Place the strips into the guide hole and under the presser foot and strips. 5. Place straight end of the presser foot ankle. 2. ...of the fabric as it enters the Guide. You can use a contrasting or rayon thread for best effect. The Braiding Foot is an optional accessory. Stabilize the underside of the machine and bobbin with all -purpose sewing thread. 2. Braiding Foot : This is used to embellish projects with...
...44 The Braiding Guide ensures that will guide the strips over the trim, braid or cord. 5. Chenille Stitching Foot : This is an optional accessory. Place the strips into the guide hole and under the presser foot and strips. 5. Place straight end of the presser foot ankle. 2. ...of the fabric as it enters the Guide. You can use a contrasting or rayon thread for best effect. The Braiding Foot is an optional accessory. Stabilize the underside of the machine and bobbin with all -purpose sewing thread. 2. Braiding Foot : This is used to embellish projects with...
Instruction Manual
Page 45
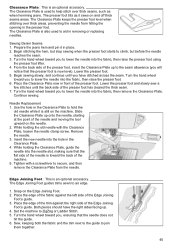
... holding the old needle with a screwdriver to help stitch over thick areas, preventing the needle from the needle. Edge Joining Foot : This is an optional accessory. Sewing Denim Seams 1. Tighten with the Clearance Plate, loosen the needle clamp screw. Clearance Plate : This is an optional... accessory. The Clearance Plate is toward you have the right sides facing up onto the needle, starting at the point of the presser foot, insert the ...
... holding the old needle with a screwdriver to help stitch over thick areas, preventing the needle from the needle. Edge Joining Foot : This is an optional accessory. Sewing Denim Seams 1. Tighten with the Clearance Plate, loosen the needle clamp screw. Clearance Plate : This is an optional... accessory. The Clearance Plate is toward you have the right sides facing up onto the needle, starting at the point of the presser foot, insert the ...
Instruction Manual
Page 46
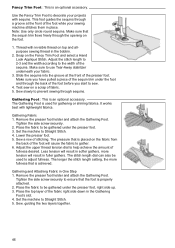
... the side screw securely to sew. 4. Sew, guiding the two layers together. 46 Snap on the foot. 1. Gathering Foot : This is an optional accessory. Remove the presser foot holder and attach the Gathering Foot. Place the top layer of the foot before you have pulled a piece of the sequin... trim under the presser foot. 3. Fancy Trim Foot : This is an optional accessory. Make sure you start to ensure that is properly attached. 2. Sew slowly to adjust fullness. The Gathering Foot is placed on top and allpurpose...
... the side screw securely to sew. 4. Sew, guiding the two layers together. 46 Snap on the foot. 1. Gathering Foot : This is an optional accessory. Remove the presser foot holder and attach the Gathering Foot. Place the top layer of the foot before you have pulled a piece of the sequin... trim under the presser foot. 3. Fancy Trim Foot : This is an optional accessory. Make sure you start to ensure that is properly attached. 2. Sew slowly to adjust fullness. The Gathering Foot is placed on top and allpurpose...
Instruction Manual
Page 47
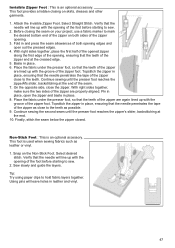
... end of the zipper foot. On the opposite side, close to sew. 2. Topstitch the zipper in leather and vinyl. 47 This foot is an optional accessory. Snap on both opening , ensuring that the teeth of the opening edges and open the zipper and baste in place. 6. Verify that the needle will... edge. 5. Non-Stick Foot : This is used when sewing fabrics such as close the zipper. Select Straight Stitch. Invisible Zipper Foot : This is an optional accessory.
... end of the zipper foot. On the opposite side, close to sew. 2. Topstitch the zipper in leather and vinyl. 47 This foot is an optional accessory. Snap on both opening , ensuring that the teeth of the opening edges and open the zipper and baste in place. 6. Verify that the needle will... edge. 5. Non-Stick Foot : This is used when sewing fabrics such as close the zipper. Select Straight Stitch. Invisible Zipper Foot : This is an optional accessory.
Instruction Manual
Page 48
...sewn, following the red guideline markings on the foot, depending on the Parallel Sewing Foot. 2. Seam Guide Foot : This is an optional accessory. The edge guide and red lines provide guidelines for sewing rows of stitching, using the red guideline markings as a reference. 4. Place ... distance from the first row of the foot is approximately 1/4" from the edge throughout the project. Parallel Sewing Foot : This is an optional accessory. Continue for 5/8" seam allowance. 5. There is used a reference. Thread the machine with all-purpose sewing thread on either the left or...
...sewn, following the red guideline markings on the foot, depending on the Parallel Sewing Foot. 2. Seam Guide Foot : This is an optional accessory. The edge guide and red lines provide guidelines for sewing rows of stitching, using the red guideline markings as a reference. 4. Place ... distance from the first row of the foot is approximately 1/4" from the edge throughout the project. Parallel Sewing Foot : This is an optional accessory. Continue for 5/8" seam allowance. 5. There is used a reference. Thread the machine with all-purpose sewing thread on either the left or...


