Instruction Manual
Page 3
...needle position 62 - 63 5. TABLE OF CONTENTS 1. KNOWING YOUR SEWING MACHINE Machine identification 6 - 7 Accessories 8 - 9 Setting up your machine 10 - 11 Spool pins 12 - 13 Presser foot lifter, Darning plate 12 - 13 Converting to free-arm sewing 12 - 13 Winding the bobbin 14 - 15 Threading the ... embroidery designs 50 - 51 Ideas on design stitching Continuous patterns 52 - 53 Sewing on a button 52 - 53 Sewing a buttonhole 54 - 59 Using buttonhole foot, Procedure, Corded buttonholes 3. STARTING TO SEW Quick reference table of stitch length and width 30 - 31 Straight stitching 32...
...needle position 62 - 63 5. TABLE OF CONTENTS 1. KNOWING YOUR SEWING MACHINE Machine identification 6 - 7 Accessories 8 - 9 Setting up your machine 10 - 11 Spool pins 12 - 13 Presser foot lifter, Darning plate 12 - 13 Converting to free-arm sewing 12 - 13 Winding the bobbin 14 - 15 Threading the ... embroidery designs 50 - 51 Ideas on design stitching Continuous patterns 52 - 53 Sewing on a button 52 - 53 Sewing a buttonhole 54 - 59 Using buttonhole foot, Procedure, Corded buttonholes 3. STARTING TO SEW Quick reference table of stitch length and width 30 - 31 Straight stitching 32...
Instruction Manual
Page 6
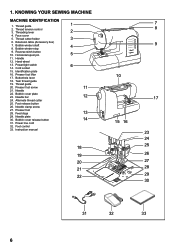
KNOWING YOUR SEWING MACHINE MACHINE IDENTIFICATION 1. Threading lever 2 4. Reverse stitch button 10. Hand wheel 13. Identification plate 16. Twin thread guide 19. Needle 22. Foot release button 26. Presser foot ...
KNOWING YOUR SEWING MACHINE MACHINE IDENTIFICATION 1. Threading lever 2 4. Reverse stitch button 10. Hand wheel 13. Identification plate 16. Twin thread guide 19. Needle 22. Foot release button 26. Presser foot ...
Instruction Manual
Page 8
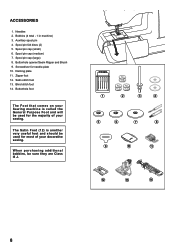
... General Purpose Foot and will be used for most of your Sewing machine is another very useful foot and should be sure they are Class I5 J. 1 2 3 4 5 6 7 8 9 10 11 12 13 14 8 Spool pin cap (small) 6. Screwdriver for the majority of your decorative sewing. Blind stitch foot 14. Spool pin cap (medium) 7. Buttonhole opener...
... General Purpose Foot and will be used for most of your Sewing machine is another very useful foot and should be sure they are Class I5 J. 1 2 3 4 5 6 7 8 9 10 11 12 13 14 8 Spool pin cap (small) 6. Screwdriver for the majority of your decorative sewing. Blind stitch foot 14. Spool pin cap (medium) 7. Buttonhole opener...
Instruction Manual
Page 12
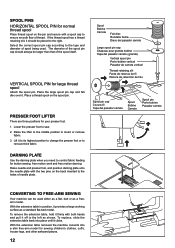
... in position, it to its highest position to change the presser foot or to the left as a freearm model. With the extension table removed the machine converts into place until it . The diameter of needle plate. Place the large spool pin cap and felt disc over it clicks. Raise the lifter... Porte-bobine Pasador carrete DARNING PLATE Use the darning plate when you need to ensure smooth flow of the spool itself. CONVERTING TO FREE-ARM SEWING Your machine can be larger than that of thread. To remove the extension table, hold it firmly with a spool cap to control fabric feeding for button...
... in position, it to its highest position to change the presser foot or to the left as a freearm model. With the extension table removed the machine converts into place until it . The diameter of needle plate. Place the large spool pin cap and felt disc over it clicks. Raise the lifter... Porte-bobine Pasador carrete DARNING PLATE Use the darning plate when you need to ensure smooth flow of the spool itself. CONVERTING TO FREE-ARM SEWING Your machine can be larger than that of thread. To remove the extension table, hold it firmly with a spool cap to control fabric feeding for button...
Instruction Manual
Page 20
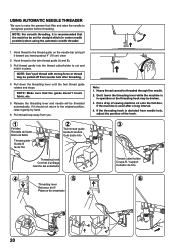
... If it should not return to the original position, raise it in place. Pull thread loop away from needle hole, adjust the position of sewing machine oil onto the felt disc, if the machine is in center needle position) when using the automatic needle threader. 1. Don't lower the threading lever while the... machine is used after threading. 4. If the threading hook is recommended that the guide doesn't touch fabric, etc. 5. Pull thread gently into the thread ...
... If it should not return to the original position, raise it in place. Pull thread loop away from needle hole, adjust the position of sewing machine oil onto the felt disc, if the machine is in center needle position) when using the automatic needle threader. 1. Don't lower the threading lever while the... machine is used after threading. 4. If the threading hook is recommended that the guide doesn't touch fabric, etc. 5. Pull thread gently into the thread ...
Instruction Manual
Page 22
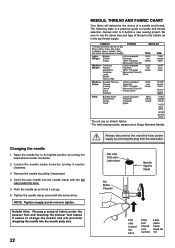
...NOTE: Tighten snugly, but do not over tighten. Remove the needle by pulling it before a new sewing project. Be sure to it downward. 4. LightWeight Batiste Chiffon Crepe Medium- Flat side Côté ...dropping the needle into the needle clamp with the screw driver. Always refer to use a Singer Branded Needle. Tighten the needle clamp screw with the flat side toward the back Côt&#.... Insert the new needle into the needle plate slot. 22 Always disconnect the machine from power supply by removing the plug from the wall-outlet. Corduroy Weight Flannel...
...NOTE: Tighten snugly, but do not over tighten. Remove the needle by pulling it before a new sewing project. Be sure to it downward. 4. LightWeight Batiste Chiffon Crepe Medium- Flat side Côté ...dropping the needle into the needle clamp with the screw driver. Always refer to use a Singer Branded Needle. Tighten the needle clamp screw with the flat side toward the back Côt&#.... Insert the new needle into the needle plate slot. 22 Always disconnect the machine from power supply by removing the plug from the wall-outlet. Corduroy Weight Flannel...
Instruction Manual
Page 24
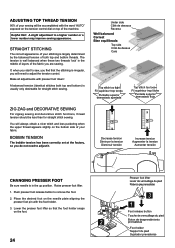
... tensión CHANGING PRESSER FOOT Be sure needle is in the middle of layers of the fabric you are sewing. Raise presser foot lifter. 1. Place the desired foot on top of the machine. Make all adjustments with the foot holder. 3. BOBBIN TENSION The bobbin tension has been correctly set at the factory..., so you find that the foot holder snaps on the bottom side of your fabric. ADJUSTING TOP THREAD TENSION 90% of your sewing will be less than...
... tensión CHANGING PRESSER FOOT Be sure needle is in the middle of layers of the fabric you are sewing. Raise presser foot lifter. 1. Place the desired foot on top of the machine. Make all adjustments with the foot holder. 3. BOBBIN TENSION The bobbin tension has been correctly set at the factory..., so you find that the foot holder snaps on the bottom side of your fabric. ADJUSTING TOP THREAD TENSION 90% of your sewing will be less than...
Instruction Manual
Page 26
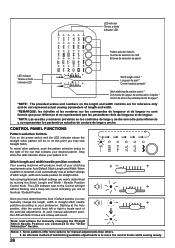
...requirements at the Auto position, slide the control knob left or right to the right of determining available adjustments is selected, it will automatically sew at the Auto / Default Position. To select other patterns, push the pattern selection button to locate each manual adjustment point, the LED... on the power switch and the LED indicator above your desired pattern. Stitch length and width/needle position controls Your sewing machine will sound indicating you are contained in the "Other Information" Section. The LED Indicator next to move the control knobs while...
...requirements at the Auto position, slide the control knob left or right to the right of determining available adjustments is selected, it will automatically sew at the Auto / Default Position. To select other patterns, push the pattern selection button to locate each manual adjustment point, the LED... on the power switch and the LED indicator above your desired pattern. Stitch length and width/needle position controls Your sewing machine will sound indicating you are contained in the "Other Information" Section. The LED Indicator next to move the control knobs while...
Instruction Manual
Page 28
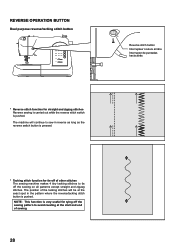
...225;s * Reverse stitch function for straight and zigzag stitches Reverse sewing is carried out while the reverse stitch switch is very useful for tie-off of other stitches The sewing machine makes 4 tiny tacking stitches to tie off the sewing pattern to avoid raveling at the exact spot in reverse as long... as the reverse switch button is pushed. The position of sewing. 28 The machine will be at the start and end ...
...225;s * Reverse stitch function for straight and zigzag stitches Reverse sewing is carried out while the reverse stitch switch is very useful for tie-off of other stitches The sewing machine makes 4 tiny tacking stitches to tie off the sewing pattern to avoid raveling at the exact spot in reverse as long... as the reverse switch button is pushed. The position of sewing. 28 The machine will be at the start and end ...
Instruction Manual
Page 32
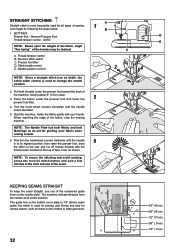
AUTO E NOTE: Based upon the weight of the fabric, slight "fine tuning" of the fabric, stop the sewing machine. Presser foot lifter D. Guide the fabric gently with the thread cutter located on the top of the seam. The numbers indicate distance from the... such as shown. Place the fabric under the presser foot toward the back of sewing. NOTE: The Needle Plate has both threads under the presser foot and lower the 5 presser foot lifter. 4. Reverse stitch switch C. Start the machine. When reaching the edge of the tension may be desired. General Purpose Foot D...
AUTO E NOTE: Based upon the weight of the fabric, slight "fine tuning" of the fabric, stop the sewing machine. Presser foot lifter D. Guide the fabric gently with the thread cutter located on the top of the seam. The numbers indicate distance from the... such as shown. Place the fabric under the presser foot toward the back of sewing. NOTE: The Needle Plate has both threads under the presser foot and lower the 5 presser foot lifter. 4. Reverse stitch switch C. Start the machine. When reaching the edge of the tension may be desired. General Purpose Foot D...
Instruction Manual
Page 34
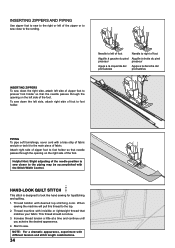
... to foot holder so that needle passes through the opening on the left side of foot to foot holder. When sewing the machine will pull this thread to sew. Thread machine with invisible or lightweight thread that the needle passes through the opening on the right side of fabric. PIPING To ...Start to the top. 2. NOTE: For a dramatic appearance, experiment with desired top stitching color. Helpful Hint: Slight adjusting of the zipper or to sew close to the cording. Thread bobbin with different tension and stitch length combinations. 34 INSERTING ZIPPERS AND PIPING Use zipper foot to...
... to foot holder so that needle passes through the opening on the left side of foot to foot holder. When sewing the machine will pull this thread to sew. Thread machine with invisible or lightweight thread that the needle passes through the opening on the right side of fabric. PIPING To ...Start to the top. 2. NOTE: For a dramatic appearance, experiment with desired top stitching color. Helpful Hint: Slight adjusting of the zipper or to sew close to the cording. Thread bobbin with different tension and stitch length combinations. 34 INSERTING ZIPPERS AND PIPING Use zipper foot to...
Instruction Manual
Page 36
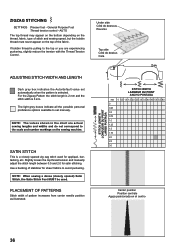
... stitch length between 0.5 and 2.0 for sheer fabrics to the scale and number markings on the top of stitch and sewing speed, but the bobbin thread must never appear on the sewing machine. NOTE: When sewing a dense (closely spaced) Satin Stitch, the Satin Stitch Foot MUST be used for appliqué, bartacking, etc. SATIN STITCH...
... stitch length between 0.5 and 2.0 for sheer fabrics to the scale and number markings on the top of stitch and sewing speed, but the bobbin thread must never appear on the sewing machine. NOTE: When sewing a dense (closely spaced) Satin Stitch, the Satin Stitch Foot MUST be used for appliqué, bartacking, etc. SATIN STITCH...

Instruction Manual
Page 54
... buttonhole patterns. 2. Replace the presser foot with your project. Stabilizer or regular interfacing can be used. * Make a practice buttonhole on page 24 - 25.) 3. SEWING A BUTTONHOLE USING BUTTONHOLE FOOT Your machine offers you two different widths of bartack buttonholes sewn by a system that it drops down vertically between the stoppers (A) and (B). (C) 54 (C) (A) (B) Buttonhole...
... buttonhole patterns. 2. Replace the presser foot with your project. Stabilizer or regular interfacing can be used. * Make a practice buttonhole on page 24 - 25.) 3. SEWING A BUTTONHOLE USING BUTTONHOLE FOOT Your machine offers you two different widths of bartack buttonholes sewn by a system that it drops down vertically between the stoppers (A) and (B). (C) 54 (C) (A) (B) Buttonhole...
Instruction Manual
Page 56
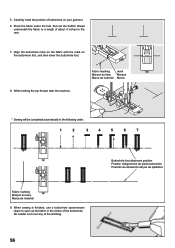
...5 6 7 Fabric marking Marque du tissu Marca de material 9. Align the buttonhole mark on the fabric with the mark on your garment. 6. 5. When sewing is finished, use a buttonhole opener/seam ripper to the rear. 7. Pull out the bobbin thread underneath the fabric to a length of the buttonhole. Be ... cut any of buttonhole on the buttonhole foot, and then lower the buttonhole foot. 8. While holding the top thread, start the machine. Carefully mark the position of the stitching. 56 Buttonhole foot alignment position Position d'alignement du pied boutonnière Posición de...
...5 6 7 Fabric marking Marque du tissu Marca de material 9. Align the buttonhole mark on the fabric with the mark on your garment. 6. 5. When sewing is finished, use a buttonhole opener/seam ripper to the rear. 7. Pull out the bobbin thread underneath the fabric to a length of the buttonhole. Be ... cut any of buttonhole on the buttonhole foot, and then lower the buttonhole foot. 8. While holding the top thread, start the machine. Carefully mark the position of the stitching. 56 Buttonhole foot alignment position Position d'alignement du pied boutonnière Posición de...
Instruction Manual
Page 60
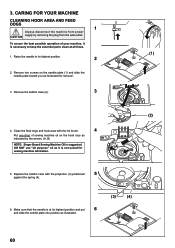
... the needle plate (1) and slide the needle plate toward you as indicated by removing the plug from power CAUTION supply by the arrows. (A, B) NOTE: Singer Brand Sewing Machine Oil is necessary to its highest position and put 6 and slide the needle plate into position as illustrated. (3) (4) 60 Raise the needle to keep the...
... the needle plate (1) and slide the needle plate toward you as indicated by removing the plug from power CAUTION supply by the arrows. (A, B) NOTE: Singer Brand Sewing Machine Oil is necessary to its highest position and put 6 and slide the needle plate into position as illustrated. (3) (4) 60 Raise the needle to keep the...
Instruction Manual
Page 62
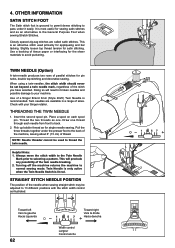
... Vers la gauche Hacia izquierda 62 Toward right Vers la droite Hacia derecha Width control Largeur Control ancho STRAIGHT STITCH NEEDLE POSITION The position of a Singer Brand 3mm (Style 2025) Twin Needle is grooved to permit dense stitching to back. 2. When using a twin-needles, the stitch width should...under it easily. Always move the stitch width to the Twin Needle Mark prior to the back of the machine, leaving about 6" (15 cm) of tissue paper or interfacing for sewing satin stitches and as for satin stitching. It is most useful for the sheer materials to 13 different ...
... Vers la gauche Hacia izquierda 62 Toward right Vers la droite Hacia derecha Width control Largeur Control ancho STRAIGHT STITCH NEEDLE POSITION The position of a Singer Brand 3mm (Style 2025) Twin Needle is grooved to permit dense stitching to back. 2. When using a twin-needles, the stitch width should...under it easily. Always move the stitch width to the Twin Needle Mark prior to the back of the machine, leaving about 6" (15 cm) of tissue paper or interfacing for sewing satin stitches and as for satin stitching. It is most useful for the sheer materials to 13 different ...
Instruction Manual
Page 64
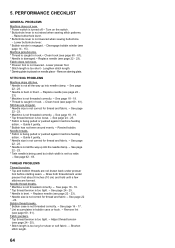
...CHECKLIST GENERAL PROBLEMS Machine does not sew. * Power ...switch is not lowered - Clean hook (see page 60 - 61). Draw both threads back under presser foot about 6 inches (10 cm) and hold until a few stitches are not drawn back under presser foot before starting seam. - Remove lint (see page 60 - 61). Adjust thread tension (see page 22 - 23). * Machine... Darning plate is placed on the switch. * Buttonhole lever is being pulled or pushed against machine feeding action. - THREAD PROBLEMS Thread bunches. * Top and bobbin threads are formed. Bobbin ...
...CHECKLIST GENERAL PROBLEMS Machine does not sew. * Power ...switch is not lowered - Clean hook (see page 60 - 61). Draw both threads back under presser foot about 6 inches (10 cm) and hold until a few stitches are not drawn back under presser foot before starting seam. - Remove lint (see page 60 - 61). Adjust thread tension (see page 22 - 23). * Machine... Darning plate is placed on the switch. * Buttonhole lever is being pulled or pushed against machine feeding action. - THREAD PROBLEMS Thread bunches. * Top and bobbin threads are formed. Bobbin ...
Instruction Manual
Page 68
...or service center for all. (European Union only) SINGER® is a registered trademark of The Singer Company Ltd or its intended use , or equivalent." Use only attachments recommended by the manufacturer as a toy. Return the sewing machine to be used as contained in this manual." 3.... Keep ventilation openings of the sewing machine and foot control free from the ...
...or service center for all. (European Union only) SINGER® is a registered trademark of The Singer Company Ltd or its intended use , or equivalent." Use only attachments recommended by the manufacturer as a toy. Return the sewing machine to be used as contained in this manual." 3.... Keep ventilation openings of the sewing machine and foot control free from the ...


