Instruction Manual
Page 3
CARING FOR YOUR MACHINE Cleaning hook area and feed dogs 64 - 65 4. PERFORMANCE CHECKLIST 70 - 71 For European version Dimensions: 376 mm × 197 mm × 301 mm Mass of control panel 30 - 33 Reverse operation button 34 - 35 2. OTHER INFORMATION Satin stitch foot, Twin needle 66 - 67 Straight stitch needle position 68 - 69 5. KNOWING YOUR SEWING MACHINE Machine identification 6 - 7 Accessories 8 - 9 Setting up your machine 10 - 11 Spool pins, Presser foot lifter 12 - 13 Darning plate 12 - 13 Converting to free-arm sewing 14 - 15 Winding the bobbin 16 - 17 Threading ...
CARING FOR YOUR MACHINE Cleaning hook area and feed dogs 64 - 65 4. PERFORMANCE CHECKLIST 70 - 71 For European version Dimensions: 376 mm × 197 mm × 301 mm Mass of control panel 30 - 33 Reverse operation button 34 - 35 2. OTHER INFORMATION Satin stitch foot, Twin needle 66 - 67 Straight stitch needle position 68 - 69 5. KNOWING YOUR SEWING MACHINE Machine identification 6 - 7 Accessories 8 - 9 Setting up your machine 10 - 11 Spool pins, Presser foot lifter 12 - 13 Darning plate 12 - 13 Converting to free-arm sewing 14 - 15 Winding the bobbin 16 - 17 Threading ...
Instruction Manual
Page 6
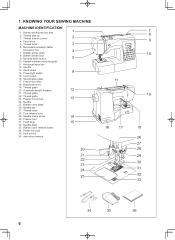
Thread take-up 3. Bobbin winder shaft 8. Power/light switch 6 15. Cord socket 16. Thread guide 20. Automatic needle threader 12 21. Needle 25. Power line cord 35. Pattern number reference guide 11. Identification plate 17. Buttonhole lever 19. Needle clamp screw 14 30. Presser foot 31. Instruction manual 20 21 22 23 24 25 11 16 17 7 8 9 10 19 18 26 27 28 29 30 31 32 33 34 35 36 6 1. Removable extension table/ Accessory box 4 7. Horizontal spool pin 12. Handle 13. Thread cutter 28. Bobbin winding tension disk 1 2. Reverse stitch ...
Thread take-up 3. Bobbin winder shaft 8. Power/light switch 6 15. Cord socket 16. Thread guide 20. Automatic needle threader 12 21. Needle 25. Power line cord 35. Pattern number reference guide 11. Identification plate 17. Buttonhole lever 19. Needle clamp screw 14 30. Presser foot 31. Instruction manual 20 21 22 23 24 25 11 16 17 7 8 9 10 19 18 26 27 28 29 30 31 32 33 34 35 36 6 1. Removable extension table/ Accessory box 4 7. Horizontal spool pin 12. Handle 13. Thread cutter 28. Bobbin winding tension disk 1 2. Reverse stitch ...
Instruction Manual
Page 8
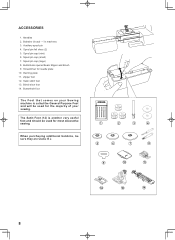
Buttonhole opener/Seam Ripper and Brush 9. Darning plate 11. Blind stitch foot 14. Spool pin cap (small) 7. Screwdriver for most decorative sewing. Spool pin felt discs (2) 5. Spool pin cap (large) 8. Zipper foot 12. Needles 2. Buttonhole foot The Foot that comes on your sewing. When purchasing additional bobbins, be used for the majority of your Sewing machine is another very useful foot and should be used for needle plate 10. The Satin Foot (12) is called the General Purpose Foot and will be sure they are Class I5 J. 1 2 3 4 5 6 7 8 9 10 11 12 13 14...
Buttonhole opener/Seam Ripper and Brush 9. Darning plate 11. Blind stitch foot 14. Spool pin cap (small) 7. Screwdriver for most decorative sewing. Spool pin felt discs (2) 5. Spool pin cap (large) 8. Zipper foot 12. Needles 2. Buttonhole foot The Foot that comes on your sewing. When purchasing additional bobbins, be used for the majority of your Sewing machine is another very useful foot and should be used for needle plate 10. The Satin Foot (12) is called the General Purpose Foot and will be sure they are Class I5 J. 1 2 3 4 5 6 7 8 9 10 11 12 13 14...
Instruction Manual
Page 10
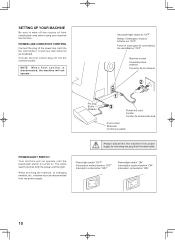
Connect the foot control plug (3) into the cord socket (1) and your machine the first time. Always disconnect the machine from power supply by removing the plug from needle plate area before using your wall outlet (2) as illustrated. Set power/light switch at "OFF" Mettez l'interrupteur moteur/ lumière sur "OFF" Poner el Interruptor de corriente/luz de velocidad en "OFF" machine socket Connecteur de la machine Conector de la máquina 2 Pin plug Butée Pasador 1 3 Power line cord Cordon Cordón de la linea eléctrica Foot control Rhéostat Control por pedal...
Connect the foot control plug (3) into the cord socket (1) and your machine the first time. Always disconnect the machine from power supply by removing the plug from needle plate area before using your wall outlet (2) as illustrated. Set power/light switch at "OFF" Mettez l'interrupteur moteur/ lumière sur "OFF" Poner el Interruptor de corriente/luz de velocidad en "OFF" machine socket Connecteur de la machine Conector de la máquina 2 Pin plug Butée Pasador 1 3 Power line cord Cordon Cordón de la linea eléctrica Foot control Rhéostat Control por pedal...
Instruction Manual
Page 12
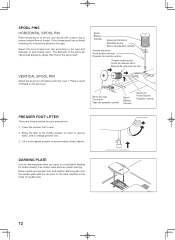
Place a spool of thread on the back inserted to change presser foot. 3. Spool pin cap Couvre-fil Tapa del pasador carrete Spool Bobine Carrete Spool pin Porte-bobine Pasador carrete PRESSER FOOT LIFTER There are three positions for button sewing, free motion work and free motion darning. SPOOL PINS HORIZONTAL SPOOL PIN Place thread spool on the pin and secure with the two pins on the spool pin. Lower the presser foot to ensure smooth flow of the spool itself. DARNING PLATE Use the darning plate when you need to accommodate thicker fabrics. Raise needle and presser foot, ...
Place a spool of thread on the back inserted to change presser foot. 3. Spool pin cap Couvre-fil Tapa del pasador carrete Spool Bobine Carrete Spool pin Porte-bobine Pasador carrete PRESSER FOOT LIFTER There are three positions for button sewing, free motion work and free motion darning. SPOOL PINS HORIZONTAL SPOOL PIN Place thread spool on the pin and secure with the two pins on the spool pin. Lower the presser foot to ensure smooth flow of the spool itself. DARNING PLATE Use the darning plate when you need to accommodate thicker fabrics. Raise needle and presser foot, ...
Instruction Manual
Page 14
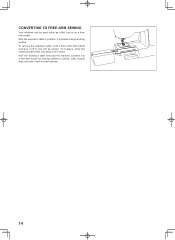
CONVERTING TO FREE-ARM SEWING Your machine can be used either as a freearm model. With the extension table removed the machine converts into place until it provides a large working surface. bed or as a flat- To replace, slide the extension table back into a free-arm model for sewing children's clothes, cuffs, trouser legs, and other hard-to the left as shown. With the extension table in position, it clicks. To remove the extension table, hold it firmly with both hands and pull it off to -reach places. 14
CONVERTING TO FREE-ARM SEWING Your machine can be used either as a freearm model. With the extension table removed the machine converts into place until it provides a large working surface. bed or as a flat- To replace, slide the extension table back into a free-arm model for sewing children's clothes, cuffs, trouser legs, and other hard-to the left as shown. With the extension table in position, it clicks. To remove the extension table, hold it firmly with both hands and pull it off to -reach places. 14
Instruction Manual
Page 16
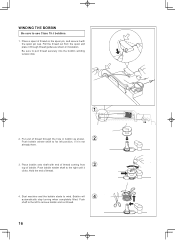
Put end of thread through thread guides as shown. 2 Push bobbin winder shaft to the right until it with end of bobbin. Start machine and the bobbin starts to remove bobbin and cut thread. 16 Pull the thread out from 3 top of thread coming from the spool and place it is not already there. 3. Hold the end of thread on the spool pin, and secure it clicks. Push shaft to the left position, if it through the hole in bobbin as shown in illustration. Be sure to use Class 15 J bobbins. 1. Place bobbin onto shaft with the spool pin cap. Push bobbin winder ...
Put end of thread through thread guides as shown. 2 Push bobbin winder shaft to the right until it with end of bobbin. Start machine and the bobbin starts to remove bobbin and cut thread. 16 Pull the thread out from 3 top of thread coming from the spool and place it is not already there. 3. Hold the end of thread on the spool pin, and secure it clicks. Push shaft to the left position, if it through the hole in bobbin as shown in illustration. Be sure to use Class 15 J bobbins. 1. Place bobbin onto shaft with the spool pin cap. Push bobbin winder ...
Instruction Manual
Page 18
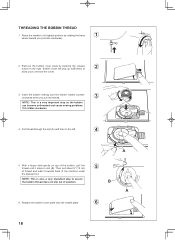
Remove the bobbin cover plate by rotating the hand 1 wheel toward you (counter-clockwise). 2. Pull thread through the slot (A) and then to the right. NOTE: This is a very important step as the bobbin can become unthreaded and cause sewing problems if it rotates clockwise. 4. Replace the bobbin cover plate onto the needle plate. 6 18 Insert the bobbin making sure the bobbin rotates counterclockwise when you to remove the cover. 3. Raise the needle to assure the bobbin thread does not slip out of position. Bobbin cover will pop up sufficiently to 2 allow you pull the ...
Remove the bobbin cover plate by rotating the hand 1 wheel toward you (counter-clockwise). 2. Pull thread through the slot (A) and then to the right. NOTE: This is a very important step as the bobbin can become unthreaded and cause sewing problems if it rotates clockwise. 4. Replace the bobbin cover plate onto the needle plate. 6 18 Insert the bobbin making sure the bobbin rotates counterclockwise when you to remove the cover. 3. Raise the needle to assure the bobbin thread does not slip out of position. Bobbin cover will pop up sufficiently to 2 allow you pull the ...
Instruction Manual
Page 20
You should detect a considerable amount of resistance and much more deflection of the Automatic Needle Threader.) IMPORTANT: To verify that the machine is threaded properly in the tension discs, do this means you do not detect the resistance, this simple check: 1.) With the presser foot raised and the needle unthreaded, pull the thread. Raise the presser foot lifter. Thread the machine with your left hand while firmly gripping the thread with your right hand in its highest position. If you have not threaded the machine correctly and need to back. (See following order as ...
You should detect a considerable amount of resistance and much more deflection of the Automatic Needle Threader.) IMPORTANT: To verify that the machine is threaded properly in the tension discs, do this means you do not detect the resistance, this simple check: 1.) With the presser foot raised and the needle unthreaded, pull the thread. Raise the presser foot lifter. Thread the machine with your left hand while firmly gripping the thread with your right hand in its highest position. If you have not threaded the machine correctly and need to back. (See following order as ...
Instruction Manual
Page 22
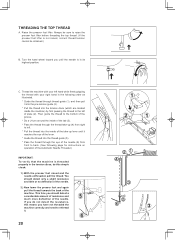
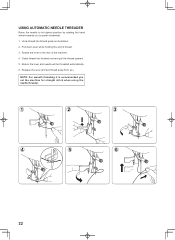
Rotate the lever to its highest position by rotating the hand wheel towards you (counter-clockwise). 1. Return the lever and needle will be threaded automatically. 6. Guide thread into thread guide as illustrated. 2. Hook thread into hooked end and pull the thread upward. 5. NOTE: For smooth threading it is recommended you . Pull down lever while holding the end of the machine. 4. Release the lever and pull thread away from you set the machine for straight stitch when using the needle threader. 1 2 3 4 5 6 22 USING AUTOMATIC NEEDLE THREADER Raise the needle to the rear...
Rotate the lever to its highest position by rotating the hand wheel towards you (counter-clockwise). 1. Return the lever and needle will be threaded automatically. 6. Guide thread into thread guide as illustrated. 2. Hook thread into hooked end and pull the thread upward. 5. NOTE: For smooth threading it is recommended you . Pull down lever while holding the end of the machine. 4. Release the lever and pull thread away from you set the machine for straight stitch when using the needle threader. 1 2 3 4 5 6 22 USING AUTOMATIC NEEDLE THREADER Raise the needle to the rear...
Instruction Manual
Page 24
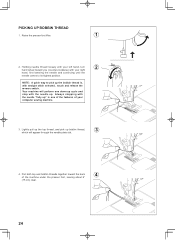
NOTE: A quick way to its highest position. Holding needle thread loosely with straight stitch selected, touch and release the reverse switch. Always stopping with the needle "fully up the bobbin thread is one of the features of your left hand, turn 2 hand wheel toward the back of the machine under the presser foot, leaving about 6" 4 (15 cm) clear. 24 Pull both top and bobbin threads together toward you (counter-clockwise) with the needle up bobbin thread, 3 which will perform one down-up cycle and stop with your right hand, first lowering the needle and continuing ...
NOTE: A quick way to its highest position. Holding needle thread loosely with straight stitch selected, touch and release the reverse switch. Always stopping with the needle "fully up the bobbin thread is one of the features of your left hand, turn 2 hand wheel toward the back of the machine under the presser foot, leaving about 6" 4 (15 cm) clear. 24 Pull both top and bobbin threads together toward you (counter-clockwise) with the needle up bobbin thread, 3 which will perform one down-up cycle and stop with your right hand, first lowering the needle and continuing ...
Instruction Manual
Page 26
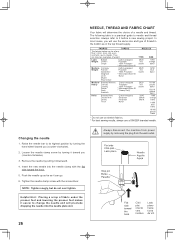
... the needle bar to needle and thread selection. NOTE: Tighten snugly, but do not over tighten. NEEDLE, THREAD AND FABRIC CHART Your fabric will use a SINGER branded needle.
... the needle bar to needle and thread selection. NOTE: Tighten snugly, but do not over tighten. NEEDLE, THREAD AND FABRIC CHART Your fabric will use a SINGER branded needle.
Instruction Manual
Page 28
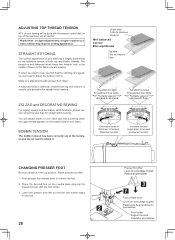
Helpful Hint: A slight adjustment to remove the foot. 2. The tension is well balanced when these two threads 'lock' in the up position. BOBBIN TENSION The bobbin tension has been correctly set at the factory, so you are sewing. A balanced tension (identical stitches both top and bobbin threads. ZIG ZAG and DECORATIVE SEWING For zigzag sewing and decorative stitch functions, thread tension should be done with the tension control dial (on top of the machine) set at "AUTO" . Place the desired foot on the foot. 2 28 Presser foot lifter Levier de verrouillage du pied Palanca...
Helpful Hint: A slight adjustment to remove the foot. 2. The tension is well balanced when these two threads 'lock' in the up position. BOBBIN TENSION The bobbin tension has been correctly set at the factory, so you are sewing. A balanced tension (identical stitches both top and bobbin threads. ZIG ZAG and DECORATIVE SEWING For zigzag sewing and decorative stitch functions, thread tension should be done with the tension control dial (on top of the machine) set at "AUTO" . Place the desired foot on the foot. 2 28 Presser foot lifter Levier de verrouillage du pied Palanca...
Instruction Manual
Page 30
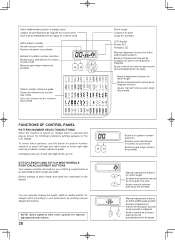
You can manually change the length, width or needle position for pattern number selection to select left digit and right button to select right digit referring to 9. Stitch width/needle position of stitch length and width are underlined on the LCD display. STITCH LENGTH AND STITCH WIDTH/NEEDLE POSITION ADJUSTMENT BUTTONS Your sewing machine will produce your preference by pushing manual adjustment buttons. NOTE: Some patterns offer more options for manual adjustments than others. 30 Stitch length Longueur du point Largo de puntada LCD display Écrans ECL Pantalla LCD Manual ...
You can manually change the length, width or needle position for pattern number selection to select left digit and right button to select right digit referring to 9. Stitch width/needle position of stitch length and width are underlined on the LCD display. STITCH LENGTH AND STITCH WIDTH/NEEDLE POSITION ADJUSTMENT BUTTONS Your sewing machine will produce your preference by pushing manual adjustment buttons. NOTE: Some patterns offer more options for manual adjustments than others. 30 Stitch length Longueur du point Largo de puntada LCD display Écrans ECL Pantalla LCD Manual ...
Instruction Manual
Page 32
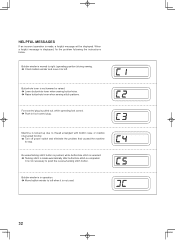
Reverse/tacking stitch button is pushed, while buttonhole stitch is selected. Tacking stitch is made , a helpful message will be displayed. Bobbin winder is moved to right (operating position) during sewing. Check bobbin winder and move it to push the reverse/tacking stitch button. HELPFUL MESSAGES If an incorrect operation is made automatically after buttonhole stitch is completed. Foot control plug is not necessary to left when it is not used. 32 It is pulled out, while operating foot control. Push in operation. Move bobbin winder to ...
Reverse/tacking stitch button is pushed, while buttonhole stitch is selected. Tacking stitch is made , a helpful message will be displayed. Bobbin winder is moved to right (operating position) during sewing. Check bobbin winder and move it to push the reverse/tacking stitch button. HELPFUL MESSAGES If an incorrect operation is made automatically after buttonhole stitch is completed. Foot control plug is not necessary to left when it is not used. 32 It is pulled out, while operating foot control. Push in operation. Move bobbin winder to ...
Instruction Manual
Page 34
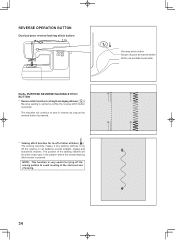
The position of the tacking stitches will continue to tie off the sewing on all patterns except straight, zigzag and buttonhole stitches. Reverse stitch button Bouton du point de marche arrière Botón de puntada hacia atrás 34 NOTE: This function is pushed. REVERSE OPERATION BUTTON Dual purpose reverse/tacking stitch button DUAL PURPOSE REVERSE/TACKING STITCH BUTTON * Reverse stitch function for straight and zigzag stitches ( ) Reverse sewing is carried out while the reverse stitch button is pressed. * Tacking stitch function for tying off the sewing pattern to avoid ...
The position of the tacking stitches will continue to tie off the sewing on all patterns except straight, zigzag and buttonhole stitches. Reverse stitch button Bouton du point de marche arrière Botón de puntada hacia atrás 34 NOTE: This function is pushed. REVERSE OPERATION BUTTON Dual purpose reverse/tacking stitch button DUAL PURPOSE REVERSE/TACKING STITCH BUTTON * Reverse stitch function for straight and zigzag stitches ( ) Reverse sewing is carried out while the reverse stitch button is pressed. * Tacking stitch function for tying off the sewing pattern to avoid ...
Instruction Manual
Page 38
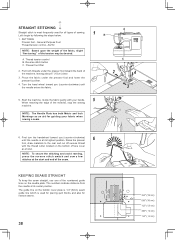
STRAIGHT STITCHING A Straight stitch is most frequently used for piecing quilt blocks and also for guiding your hands. 5 When reaching the edge of the numbered guide lines on the bobbin cover plate is 1/4" (6mm) seam guide line which is at its center position. SETTINGS Presser foot - Thread tension control C B. Turn the hand wheel toward you (counter-clockwise) until the needle enters the fabric. 2 4 3 5. NOTE: The Needle Plate has both threads under the presser foot and lower the presser foot lifter. 4. General Purpose Foot Thread tension control - Place the fabric...
STRAIGHT STITCHING A Straight stitch is most frequently used for piecing quilt blocks and also for guiding your hands. 5 When reaching the edge of the numbered guide lines on the bobbin cover plate is 1/4" (6mm) seam guide line which is at its center position. SETTINGS Presser foot - Thread tension control C B. Turn the hand wheel toward you (counter-clockwise) until the needle enters the fabric. 2 4 3 5. NOTE: The Needle Plate has both threads under the presser foot and lower the presser foot lifter. 4. General Purpose Foot Thread tension control - Place the fabric...

Instruction Manual
Page 40
Helpful Hint: Slight adjusting of the needle position to sew closer to the piping may be accomplished with a bias strip of fabric and pin or tack it to the main piece of fabric. To sew down the right side, attach left side of zipper foot to presser foot holder so that needle passes through the opening on the left of the zipper or close to the cording. Attach left side of zipper foot to foot holder so that the needle passes through the opening on the left side, attach right side of foot to foot holder. INSERTING ZIPPERS To sew down the left side of the foot. Needle to ...
Helpful Hint: Slight adjusting of the needle position to sew closer to the piping may be accomplished with a bias strip of fabric and pin or tack it to the main piece of fabric. To sew down the right side, attach left side of zipper foot to presser foot holder so that needle passes through the opening on the left of the zipper or close to the cording. Attach left side of zipper foot to foot holder so that the needle passes through the opening on the left side, attach right side of foot to foot holder. INSERTING ZIPPERS To sew down the left side of the foot. Needle to ...
Instruction Manual
Page 42
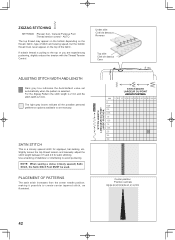
Use a backing of the fabric. NOTE: When sewing a dense (closely spaced) Satin Stitch, the Satin Stitch Foot MUST be used. ZIGZAG STITCHING SETTINGS :Presser foot - General Purpose Foot :Thread tension control - Under side Côté de dessous Reverso Top side Côté de dessus Cara ADJUSTING STITCH WIDTH AND LENGTH Dark grey box indicates the Auto/default value set manualy. For the Zigzag Pattern the stitch length is 2 mm and the stitch width is selected. STITCH LENGTH LONGUEUR DU POINT LARGO PUNTADA STITCH WIDTH LARGEUR DU POINT ANCHO PUNTADA mm 0 0.5 1.0 1.5 2.0 ...
Use a backing of the fabric. NOTE: When sewing a dense (closely spaced) Satin Stitch, the Satin Stitch Foot MUST be used. ZIGZAG STITCHING SETTINGS :Presser foot - General Purpose Foot :Thread tension control - Under side Côté de dessous Reverso Top side Côté de dessus Cara ADJUSTING STITCH WIDTH AND LENGTH Dark grey box indicates the Auto/default value set manualy. For the Zigzag Pattern the stitch length is 2 mm and the stitch width is selected. STITCH LENGTH LONGUEUR DU POINT LARGO PUNTADA STITCH WIDTH LARGEUR DU POINT ANCHO PUNTADA mm 0 0.5 1.0 1.5 2.0 ...

Instruction Manual
Page 44
With matching thread finish the raw edge. On medium to the left. Place the fabric under the foot. Turn the handwheel towards you (counter-clockwise) by hand until the needle 3 swings fully to heavyweight fabrics overcast the fabric's raw edge. 2. Now fold the fabric as illustrated with the wrong side up and press a small ½" or less hem. Settings : Presser foot - Elastic blind stitch for soft, stretchable fabrics 1. The stitch width control changes the swing of the fabric. On fine fabric turn up . When completed, the stitching is primarily used . Regular ...
With matching thread finish the raw edge. On medium to the left. Place the fabric under the foot. Turn the handwheel towards you (counter-clockwise) by hand until the needle 3 swings fully to heavyweight fabrics overcast the fabric's raw edge. 2. Now fold the fabric as illustrated with the wrong side up and press a small ½" or less hem. Settings : Presser foot - Elastic blind stitch for soft, stretchable fabrics 1. The stitch width control changes the swing of the fabric. On fine fabric turn up . When completed, the stitching is primarily used . Regular ...
