Instruction Manual
Page 3
ROTARY STEAM IRON INSTRUCTION MANUAL
ROTARY STEAM IRON INSTRUCTION MANUAL
Instruction Manual
Page 4
...use them. It will experience top-class ironing comfort! Your new SINGER® Rotary Steam Iron enables you get to know all the features and how to read your new SINGER® Rotary Steam Iron! TECHNICAL SPECIFICATIONS Dimension, Working Position Dimension, Folded Down Position Weight Roller Size Water Tank Capacity Excess Temperature Fuse (steam generator / heating.../260 °C 120 V 1,8 kW 16 A 2,40 - 6,80 INTRODUCTION Congratulations on the purchase of your Instruction Manual thoroughly. You have acquired an extremely user-friendly, quality product offering unique advantages for...
...use them. It will experience top-class ironing comfort! Your new SINGER® Rotary Steam Iron enables you get to know all the features and how to read your new SINGER® Rotary Steam Iron! TECHNICAL SPECIFICATIONS Dimension, Working Position Dimension, Folded Down Position Weight Roller Size Water Tank Capacity Excess Temperature Fuse (steam generator / heating.../260 °C 120 V 1,8 kW 16 A 2,40 - 6,80 INTRODUCTION Congratulations on the purchase of your Instruction Manual thoroughly. You have acquired an extremely user-friendly, quality product offering unique advantages for...
Instruction Manual
Page 5
TABLE OF CONTENTS • Introduction 2 • Part list for the rotary steam iron 4 • Important safety instructions 5 FUNCTIONS • Setting Up the Rotary Steam Iron 6 • Folding the Rotary Steam Iron for Storage 6 • Using the Foot Pedal 7 • Manual Release Lever 8 PREPARING FOR STEAM GENERATION • Water Which May Be Used 10 • Water Which May Not Be Used 10 • Filling the Water Tank 10 • General Information on...
TABLE OF CONTENTS • Introduction 2 • Part list for the rotary steam iron 4 • Important safety instructions 5 FUNCTIONS • Setting Up the Rotary Steam Iron 6 • Folding the Rotary Steam Iron for Storage 6 • Using the Foot Pedal 7 • Manual Release Lever 8 PREPARING FOR STEAM GENERATION • Water Which May Be Used 10 • Water Which May Not Be Used 10 • Filling the Water Tank 10 • General Information on...
Instruction Manual
Page 6
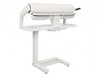
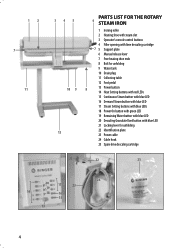
... 9 12 PARTS LIST FOR THE ROTARY 6 STEAM IRON 1 Ironing roller 2 Heating shoe with steam slot 3 Operator's console control buttons 4 Filler opening with lime descaling cartridge 7 5 Support plate 6 Manual release lever 7 Free heating shoe ends 8 Bolt for unfolding 9 Water tank 10 Drain plug 11 Collecting table 12 Foot pedal 8 13 Power button 14 Heat Setting buttons with red LEDs 15 Continuous Steam button with blue LED 16 Demand Steam button with blue LED 17 Steam Setting buttons with...
... 9 12 PARTS LIST FOR THE ROTARY 6 STEAM IRON 1 Ironing roller 2 Heating shoe with steam slot 3 Operator's console control buttons 4 Filler opening with lime descaling cartridge 7 5 Support plate 6 Manual release lever 7 Free heating shoe ends 8 Bolt for unfolding 9 Water tank 10 Drain plug 11 Collecting table 12 Foot pedal 8 13 Power button 14 Heat Setting buttons with red LEDs 15 Continuous Steam button with blue LED 16 Demand Steam button with blue LED 17 Steam Setting buttons with...
Instruction Manual
Page 7
... pets away from touching hot metal parts, hot water, or steam. Use care when you turn a steam appliance upside down - Do not allow cord to disconnect. Do not operate appliance with the ampere rating of electric shock, do not immerse the appliance in only after use only. 5 Close supervision is subjected to the power supply requirement of the Rotary Steam Iron. All power carrying devices...
... pets away from touching hot metal parts, hot water, or steam. Use care when you turn a steam appliance upside down - Do not allow cord to disconnect. Do not operate appliance with the ampere rating of electric shock, do not immerse the appliance in only after use only. 5 Close supervision is subjected to the power supply requirement of the Rotary Steam Iron. All power carrying devices...
Instruction Manual
Page 8
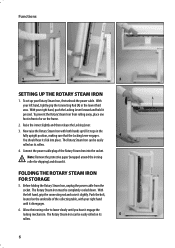
... Rotary Steam Iron can be easily rolled on the underside of the Rotary Steam Iron into place. Push the bolt, located on its rollers. 4. Functions 1 2 3 SETTING UP THE ROTARY STEAM IRON 1. To prevent the Rotary Steam Iron from the socket. To set up till it stops in the lower third area. The Rotary Steam Iron can be completely cooled down. With A your right hand until you hear it pressed...
... Rotary Steam Iron can be easily rolled on the underside of the Rotary Steam Iron into place. Push the bolt, located on its rollers. 4. Functions 1 2 3 SETTING UP THE ROTARY STEAM IRON 1. To prevent the Rotary Steam Iron from the socket. To set up till it stops in the lower third area. The Rotary Steam Iron can be completely cooled down. With A your right hand until you hear it pressed...
Instruction Manual
Page 9
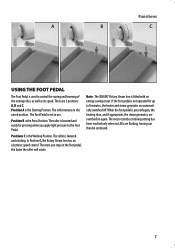
... pedal is the Working Position. Positions C is pressed again, the heating shoe, and if appropriate, the steam generator, are automatically switched off. The most recently set ironing setting has been reached only when no LEDs are 3 positions: A, B and C. The roller remains in use. The roller is fitted with an energy-saving circuit. Note: The SINGER® Rotary Steam Iron is lowered and...
... pedal is the Working Position. Positions C is pressed again, the heating shoe, and if appropriate, the steam generator, are automatically switched off. The most recently set ironing setting has been reached only when no LEDs are 3 positions: A, B and C. The roller remains in use. The roller is fitted with an energy-saving circuit. Note: The SINGER® Rotary Steam Iron is lowered and...
Instruction Manual
Page 10
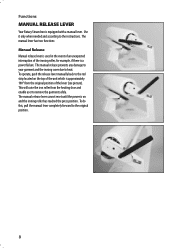
... the garment safely. Functions MANUAL RELEASE LEVER Your Rotary Steam Iron is on the top of the ironing roller, for example, if there is approximately 100° from the heating shoe and enable user to the original position. 8 The manual release lever cannot reset until the power is equipped with a manual lever. This will raise the iron roller from the original...
... the garment safely. Functions MANUAL RELEASE LEVER Your Rotary Steam Iron is on the top of the ironing roller, for example, if there is approximately 100° from the heating shoe and enable user to the original position. 8 The manual release lever cannot reset until the power is equipped with a manual lever. This will raise the iron roller from the original...

Instruction Manual
Page 11
... the use of the lever (see picture). About the telescopic mechanism of the lever: The release lever has a telescopic feature to the service position. Return the telescopic lever back to the original position. ! Note: Never switch ON the Rotary Steam Iron when the ironing roller is raised to a service position. Manual Release for moving the lever in both directions...
... the use of the lever (see picture). About the telescopic mechanism of the lever: The release lever has a telescopic feature to the service position. Return the telescopic lever back to the original position. ! Note: Never switch ON the Rotary Steam Iron when the ironing roller is raised to a service position. Manual Release for moving the lever in both directions...
Instruction Manual
Page 12
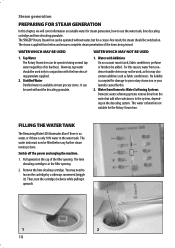
... on the descaling system. Tap Water The Rotary Steam Iron can be operated without the descaling granulate. Distilled Water Distilled water is only 10% water in the filler opening . Water with the lime descaling granulate supplied. 2. No liability is therefore not suitable for a crease-free result, the steam should be used without water, but add other substances to use the water tank, lime descaling cartridge...
... on the descaling system. Tap Water The Rotary Steam Iron can be operated without the descaling granulate. Distilled Water Distilled water is only 10% water in the filler opening . Water with the lime descaling granulate supplied. 2. No liability is therefore not suitable for a crease-free result, the steam should be used without water, but add other substances to use the water tank, lime descaling cartridge...
Instruction Manual
Page 13
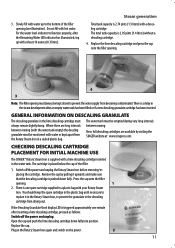
...Rotary Steam Iron. The cartridge is triggered approximately one spare cartridge supplied in a sealed plastic bag. placing the cartridge. Press the cap onto the filler opening must always be kept closed to replace it upwards and make sure that the descaling cartridge is a delay in the descaling cartridge from drying out. If the Descaling Granulate Used...the water supply from the Rotary Steam Iron in a plastic bag with a descaling cartridge. between ironing. Remove the cap by visiting the SINGER website at least 10 ounces (0.3 liters). There is supplied with hot water....
...Rotary Steam Iron. The cartridge is triggered approximately one spare cartridge supplied in a sealed plastic bag. placing the cartridge. Press the cap onto the filler opening must always be kept closed to replace it upwards and make sure that the descaling cartridge is a delay in the descaling cartridge from drying out. If the Descaling Granulate Used...the water supply from the Rotary Steam Iron in a plastic bag with a descaling cartridge. between ironing. Remove the cap by visiting the SINGER website at least 10 ounces (0.3 liters). There is supplied with hot water....
Instruction Manual
Page 14
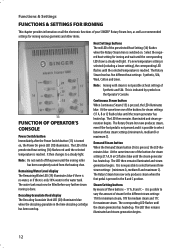
... FUNCTION OF OPERATOR'S CONSOLE Power Switch button Immediately after the Power Switch button (13) is possible to a steady light. it is turned on, the Power On green LED (18) illuminates. The corresponding LED flashes until the steam generator has heated up . Functions & Settings FUNCTIONS & SETTINGS FOR IRONING This chapter provides information on all the electronic functions of your SINGER® Rotary Steam Iron, as...
... FUNCTION OF OPERATOR'S CONSOLE Power Switch button Immediately after the Power Switch button (13) is possible to a steady light. it is turned on, the Power On green LED (18) illuminates. The corresponding LED flashes until the steam generator has heated up . Functions & Settings FUNCTIONS & SETTINGS FOR IRONING This chapter provides information on all the electronic functions of your SINGER® Rotary Steam Iron, as...
Instruction Manual
Page 15
... medium blue steam setting flashes until the selected heating the temperature is selected (including a lower setting), the corresponding LED flashes until the steam generator has heated up . Select one of the three steam settings. (Illustration 5) Ironing with Continuous Steam The Rotary Steam Iron steams even if the foot pedal is now switched off but the roller will still move ) When the Demand Steam Button is pressed, the blue...
... medium blue steam setting flashes until the selected heating the temperature is selected (including a lower setting), the corresponding LED flashes until the steam generator has heated up . Select one of the three steam settings. (Illustration 5) Ironing with Continuous Steam The Rotary Steam Iron steams even if the foot pedal is now switched off but the roller will still move ) When the Demand Steam Button is pressed, the blue...
Instruction Manual
Page 16
GENERAL INFORMATION Before ironing with your Rotary Steam Iron, check the care labels of your SINGER® Rotary Steam Iron. It is possible to iron without difficulty. ing or ironing is pressed. 2. After ironing, lay the garments together and allow them to run through. 3. Allow the item to cool. To iron smaller, flat items such as velvet or corduroy), the use HOW TO USE This chapter...
GENERAL INFORMATION Before ironing with your Rotary Steam Iron, check the care labels of your SINGER® Rotary Steam Iron. It is possible to iron without difficulty. ing or ironing is pressed. 2. After ironing, lay the garments together and allow them to run through. 3. Allow the item to cool. To iron smaller, flat items such as velvet or corduroy), the use HOW TO USE This chapter...
Instruction Manual
Page 22
... the heating shoe. Ironing cloth of the roller and open the loops. 2. Pull out the cord loops at 86° F (30° C). In this mode. 3. B - Press the foot pedal again and pull the padding cover (B) forward to remove. For your own safety, always switch off the power switch of your SINGER® Rotary Steam Iron. Use a commercial cleaning agent to clean the ironing...
... the heating shoe. Ironing cloth of the roller and open the loops. 2. Pull out the cord loops at 86° F (30° C). In this mode. 3. B - Press the foot pedal again and pull the padding cover (B) forward to remove. For your own safety, always switch off the power switch of your SINGER® Rotary Steam Iron. Use a commercial cleaning agent to clean the ironing...
Instruction Manual
Page 24
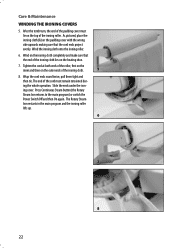
...ironing cloth. 5 8. Press Continuous Steam button (the Rotary Steam Iron returns to the main program) or switch the Power Switch Off and then On again. Wrap the cord ends round twice, pull them tight and then tie. After the tenth turn, the end of the ironing roller. As pictured, place the ironing cloth (A) on the ironing cloth...the ironing cloth lies on the top of the padding cover must remain tensioned during the whole operation. The Rotary Steam Iron restarts in the main program and the ironing roller lifts up. 6 7 8 22 The end of the cord must lie on the heating shoe....
...ironing cloth. 5 8. Press Continuous Steam button (the Rotary Steam Iron returns to the main program) or switch the Power Switch Off and then On again. Wrap the cord ends round twice, pull them tight and then tie. After the tenth turn, the end of the ironing roller. As pictured, place the ironing cloth (A) on the ironing cloth...the ironing cloth lies on the top of the padding cover must remain tensioned during the whole operation. The Rotary Steam Iron restarts in the main program and the ironing roller lifts up. 6 7 8 22 The end of the cord must lie on the heating shoe....
Instruction Manual
Page 25
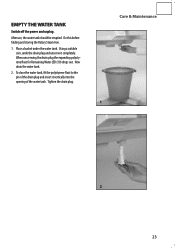
...off the power and unplug. Using a suitable coin, undo the drain plug and unscrew it vertically into the opening of the water tank. To close the water tank, fit the polystyrene float to the pin of the drain plug and insert it completely. After use, the water tank should be emptied. ...Care & Maintenance 1 2 23 Place a bucket under the water tank. Do this before folding and storing the Rotary Steam Iron. 1. Tighten the drain plug. When unscrewing the drain plug the expanding...
...off the power and unplug. Using a suitable coin, undo the drain plug and unscrew it vertically into the opening of the water tank. To close the water tank, fit the polystyrene float to the pin of the drain plug and insert it completely. After use, the water tank should be emptied. ...Care & Maintenance 1 2 23 Place a bucket under the water tank. Do this before folding and storing the Rotary Steam Iron. 1. Tighten the drain plug. When unscrewing the drain plug the expanding...

Instruction Manual
Page 26
Incorrect reassembly or repair could cause considerable damage, risk of Purchase (such as the purchase receipt) to: Singer Sewing Company ATTENTION: SERVICE DEPARTMENT 1224 Heil Quaker Blvd. TECHNICAL SPECIFICATIONS Dimension, Working Position Dimension, Folded Down Position Weight Roller Size Water Tank Capacity Excess Temperature Fuse (steam generator / heating shoe) Nominal Voltage (60 Hz) Power Consumption ( max.) Fuse ( home wiring ) at...
Incorrect reassembly or repair could cause considerable damage, risk of Purchase (such as the purchase receipt) to: Singer Sewing Company ATTENTION: SERVICE DEPARTMENT 1224 Heil Quaker Blvd. TECHNICAL SPECIFICATIONS Dimension, Working Position Dimension, Folded Down Position Weight Roller Size Water Tank Capacity Excess Temperature Fuse (steam generator / heating shoe) Nominal Voltage (60 Hz) Power Consumption ( max.) Fuse ( home wiring ) at...
Instruction Manual 2
Page 6
... nearest Service Center should any opening. • Do not use only identical replacement parts. • Never operate the machine if it has a damaged cord or plug, if it on cord. It may deflect the needle causing it to break. • Do not use as described in this Operator's Guide. Keep ventilation openings of the machine and foot controller free from the electrical outlet...
... nearest Service Center should any opening. • Do not use only identical replacement parts. • Never operate the machine if it has a damaged cord or plug, if it on cord. It may deflect the needle causing it to break. • Do not use as described in this Operator's Guide. Keep ventilation openings of the machine and foot controller free from the electrical outlet...

Instruction Manual 2
Page 84
...Performance checklist When sewing difficulties occur, look back through this manual to correct it. Is the handwheel engaged for application? ...connected to machine? Is the power and light switch on the thread spool? Are controls properly set ? 82 Skipped stitches is not formed...set ? Is upper thread tension too tight? Is needle straight and sharp? Needle does not move properly under presser foot Is presser foot correctly attached to electrical supply? If you still have a problem, the reminders below may help you to make sure you are correctly following the instructions...
...Performance checklist When sewing difficulties occur, look back through this manual to correct it. Is the handwheel engaged for application? ...connected to machine? Is the power and light switch on the thread spool? Are controls properly set ? 82 Skipped stitches is not formed...set ? Is upper thread tension too tight? Is needle straight and sharp? Needle does not move properly under presser foot Is presser foot correctly attached to electrical supply? If you still have a problem, the reminders below may help you to make sure you are correctly following the instructions...

