Instruction Manual
Page 2
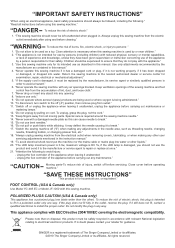
... appliance complies with any adjustments in this manual." 4. SINGER is a registered trademark of The Singer Company Limited or its affiliates. ©2010 The Singer Company Limited or its intended use of burns, fire, electric shock, or injury to ensure that on cord. Always unplug this sewing machine." To reduce the risk of the appliance by...
... appliance complies with any adjustments in this manual." 4. SINGER is a registered trademark of The Singer Company Limited or its affiliates. ©2010 The Singer Company Limited or its intended use of burns, fire, electric shock, or injury to ensure that on cord. Always unplug this sewing machine." To reduce the risk of the appliance by...
Instruction Manual
Page 5
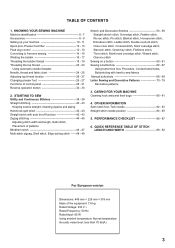
... W Using ambient temperature: Normal temperature Acoustic noise level: less than 70 db(A) 3 CARING FOR YOUR MACHINE Cleaning hook area and feed dogs 80 - 81 4. PERFORMANCE CHECKLIST 86 - 87 6. KNOWING YOUR SEWING MACHINE Machine identification 6 - 7 Accessories 8 - 9 Setting up your machine 10 - 11 Spool pins, Presser foot lifter 12 - 13 Feed dog control 12 - 13 Converting to...
... W Using ambient temperature: Normal temperature Acoustic noise level: less than 70 db(A) 3 CARING FOR YOUR MACHINE Cleaning hook area and feed dogs 80 - 81 4. PERFORMANCE CHECKLIST 86 - 87 6. KNOWING YOUR SEWING MACHINE Machine identification 6 - 7 Accessories 8 - 9 Setting up your machine 10 - 11 Spool pins, Presser foot lifter 12 - 13 Feed dog control 12 - 13 Converting to...

Instruction Manual
Page 8
... 7. Needle 24. Foot release button 28. 1. Power line cord 34. Bobbin winder shaft 9. Twin thread guide 21. Hand wheel 14. Thread guide 22. KNOWING YOUR SEWING MACHINE MACHINE IDENTIFICATION 1. Face cover 6. Handle 13. Cord socket 16. Presser foot lifter 18. Presser foot screw 23. Alternate thread cutter 27. Foot control 35.
... 7. Needle 24. Foot release button 28. 1. Power line cord 34. Bobbin winder shaft 9. Twin thread guide 21. Hand wheel 14. Thread guide 22. KNOWING YOUR SEWING MACHINE MACHINE IDENTIFICATION 1. Face cover 6. Handle 13. Cord socket 16. Presser foot lifter 18. Presser foot screw 23. Alternate thread cutter 27. Foot control 35.

Instruction Manual
Page 10
... Even feed foot 23. Satin foot The Satin Foot (Optional) is called the General Purpose Foot and will be used for the majority of your Sewing machine is another very useful foot and should be sure they are Class I5 J. 1 2 3 4 5 6 7 8 9 10 11 12 13...Open toe foot 27. Spool pin cap (small) 7. Twin needles 15. Ruffler foot 17. Bobbins (4 total - 1 in machine) 3. Screwdriver for needle plate 10. Button sewing foot 18. Circular sewing attachment 14. Needles 2. Blind foot 12. Zipper foot 11. ACCESSORIES 1. Auxiliary spool pin 4. Rolled (narrow) hem foot 19....
... Even feed foot 23. Satin foot The Satin Foot (Optional) is called the General Purpose Foot and will be used for the majority of your Sewing machine is another very useful foot and should be sure they are Class I5 J. 1 2 3 4 5 6 7 8 9 10 11 12 13...Open toe foot 27. Spool pin cap (small) 7. Twin needles 15. Ruffler foot 17. Bobbins (4 total - 1 in machine) 3. Screwdriver for needle plate 10. Button sewing foot 18. Circular sewing attachment 14. Needles 2. Blind foot 12. Zipper foot 11. ACCESSORIES 1. Auxiliary spool pin 4. Rolled (narrow) hem foot 19....
Instruction Manual
Page 14
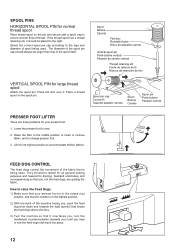
...raised (up) position, and that the needle is being used. They should be raised for all general sewing purposes and lowered for darning, freehand embroidery and monogramming so that of the machine facing you, push the feed dog lever down and towards you) until you , not the feed dogs,...Lift it now faces you, turn the handwheel counterclockwise (towards the right (symbol that shows the feed dogs above the line). 3) Turn the machine so that your presser foot. 1. Spool Bobine Carrete Felt disc Rondelle feutre Disco del pasador carrete Vertical spool pin Porte-bobine vertical Pasador de ...
...raised (up) position, and that the needle is being used. They should be raised for all general sewing purposes and lowered for darning, freehand embroidery and monogramming so that of the machine facing you, push the feed dog lever down and towards you) until you , not the feed dogs,...Lift it now faces you, turn the handwheel counterclockwise (towards the right (symbol that shows the feed dogs above the line). 3) Turn the machine so that your presser foot. 1. Spool Bobine Carrete Felt disc Rondelle feutre Disco del pasador carrete Vertical spool pin Porte-bobine vertical Pasador de ...

Instruction Manual
Page 16
With the extension table in position, it clicks. To replace, slide the extension table back into a slim free-arm model for sewing children's clothes, cuffs, trouser legs, and other difficult to the left as a freearm model. With the extension table removed the machine converts into place until it provides a large working surface as a standard flat-bed model. CONVERTING TO FREE-ARM SEWING Your machine can be used either as a flat-bed or as shown. To remove the extension table, hold it firmly with both hands and pull it off to reach places. 14
With the extension table in position, it clicks. To replace, slide the extension table back into a slim free-arm model for sewing children's clothes, cuffs, trouser legs, and other difficult to the left as a freearm model. With the extension table removed the machine converts into place until it provides a large working surface as a standard flat-bed model. CONVERTING TO FREE-ARM SEWING Your machine can be used either as a flat-bed or as shown. To remove the extension table, hold it firmly with both hands and pull it off to reach places. 14
Instruction Manual
Page 26
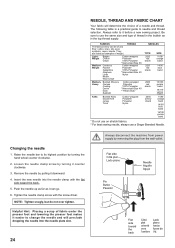
Be sure to use a Singer Branded Needle. Changing the needle 1. Push the needle up as far... Always refer to needle and thread selection. Insert the new needle into the needle plate slot. 24 Always disconnect the machine from power supply by pulling it downward. 4. The following table is a practical guide to it counter clockwise. 3. ...silk, wool, synthetic, rayon, blends. Raise the needle bar to its highest position by turning it before a new sewing project. Loosen the needle clamp screw by turning the hand wheel counter clockwise. 2. Remove the needle by removing the...
Be sure to use a Singer Branded Needle. Changing the needle 1. Push the needle up as far... Always refer to needle and thread selection. Insert the new needle into the needle plate slot. 24 Always disconnect the machine from power supply by pulling it downward. 4. The following table is a practical guide to it counter clockwise. 3. ...silk, wool, synthetic, rayon, blends. Raise the needle bar to its highest position by turning it before a new sewing project. Loosen the needle clamp screw by turning the hand wheel counter clockwise. 2. Remove the needle by removing the...
Instruction Manual
Page 28
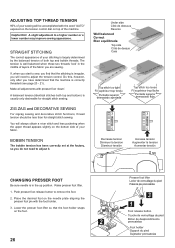
... The correct appearance of your stitching is usually only desireable for straight stitch sewing. Make all adjustments with the foot holder. 3. Raise presser foot lifter. 1. Lower the presser foot lifter so that the machine is well balanced when these two threads 'lock' in the up position.... ADJUSTING TOP THREAD TENSION 90% of your sewing will be less than for straight stitch sewing. The tension is correctly threaded (see page 20 - 21...
... The correct appearance of your stitching is usually only desireable for straight stitch sewing. Make all adjustments with the foot holder. 3. Raise presser foot lifter. 1. Lower the presser foot lifter so that the machine is well balanced when these two threads 'lock' in the up position.... ADJUSTING TOP THREAD TENSION 90% of your sewing will be less than for straight stitch sewing. The tension is correctly threaded (see page 20 - 21...
Instruction Manual
Page 30
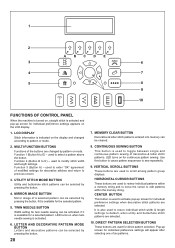
...DE 3 6 4 7 5 8 9 10 FUNCTIONS OF CONTROL PANEL When the machine is turned on, straight stitch is available for a selected pattern. Function 1 (Button A to sew repeatedly. 9. TWIN NEEDLE BUTTON Width setting for twin needle sewing can be activated, if it is activated. 6. Use this button to cause pattern... selected pattern. 5. Function 3 (Button A) - MIRROR IMAGE BUTTON Mirror image of decorative & letter stitch patterns. CONTINUOUS SEWING BUTTON This button is also used to review individual patterns within the memory string. LED turns on for individual preference settings ...
...DE 3 6 4 7 5 8 9 10 FUNCTIONS OF CONTROL PANEL When the machine is turned on, straight stitch is available for a selected pattern. Function 1 (Button A to sew repeatedly. 9. TWIN NEEDLE BUTTON Width setting for twin needle sewing can be activated, if it is activated. 6. Use this button to cause pattern... selected pattern. 5. Function 3 (Button A) - MIRROR IMAGE BUTTON Mirror image of decorative & letter stitch patterns. CONTINUOUS SEWING BUTTON This button is also used to review individual patterns within the memory string. LED turns on for individual preference settings ...
Instruction Manual
Page 32
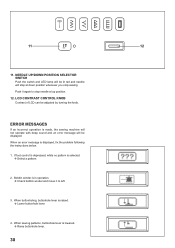
... MESSAGES If an incorrect operation is raised. Lower buttonhole lever. 4. When buttonholing, buttonhole lever is made, the sewing machine will not operate with beep sound and an error message will stop sewing. When sewing patterns, buttonhole lever is in operation. Check bobbin winder and move it again to left. 3. Bobbin winder is...
... MESSAGES If an incorrect operation is raised. Lower buttonhole lever. 4. When buttonholing, buttonhole lever is made, the sewing machine will not operate with beep sound and an error message will stop sewing. When sewing patterns, buttonhole lever is in operation. Check bobbin winder and move it again to left. 3. Bobbin winder is...

Instruction Manual
Page 34
... stitches will continue to tie off of other stitches ( ) The sewing machine makes 4 tiny tacking stitches to sew in reverse as long as the reverse button is pushed. NOTE: This function is pushed. The machine will be at the start and end of sewing. 32 REVERSE OPERATION BUTTON Dual purpose reverse/tacking stitch button Reverse...
... stitches will continue to tie off of other stitches ( ) The sewing machine makes 4 tiny tacking stitches to sew in reverse as long as the reverse button is pushed. NOTE: This function is pushed. The machine will be at the start and end of sewing. 32 REVERSE OPERATION BUTTON Dual purpose reverse/tacking stitch button Reverse...
Instruction Manual
Page 36
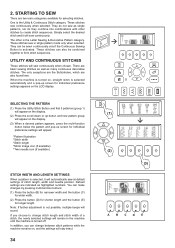
... when selected. These stitches sew in the machine until the machine is turned off. When the machine is turned on, straight stitch is activated. SELECTING THE PATTERN (1) Press the Utility Stitch Button and first 5 patterns (group 1) will appear on the display. ... length and the button (E) for selecting stitches. There are also found here. You can be combined together to change between stitch patterns while the machine remains on the display. (3) When a desired pattern appears, press the multi-function button below the pattern and pop-up screen for individual preference ...
... when selected. These stitches sew in the machine until the machine is turned off. When the machine is turned on, straight stitch is activated. SELECTING THE PATTERN (1) Press the Utility Stitch Button and first 5 patterns (group 1) will appear on the display. ... length and the button (E) for selecting stitches. There are also found here. You can be combined together to change between stitch patterns while the machine remains on the display. (3) When a desired pattern appears, press the multi-function button below the pattern and pop-up screen for individual preference ...
Instruction Manual
Page 38
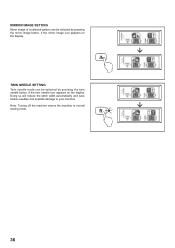
Doing so will reduce the stitch width automatically and save broken needles and possible damage to normal sewing mode. 36 TWIN NEEDLE SETTING Twin needle mode can be selected by pressing the mirror image button, if the mirror image icon appears on the display. Note: Turning off the machine returns the machine to your machine. MIRROR IMAGE SETTING Mirror image of a selected pattern can be selected by pressing the twin needle button, if the twin needle icon appears on the display.
Doing so will reduce the stitch width automatically and save broken needles and possible damage to normal sewing mode. 36 TWIN NEEDLE SETTING Twin needle mode can be selected by pressing the mirror image button, if the mirror image icon appears on the display. Note: Turning off the machine returns the machine to your machine. MIRROR IMAGE SETTING Mirror image of a selected pattern can be selected by pressing the twin needle button, if the twin needle icon appears on the display.
Instruction Manual
Page 42
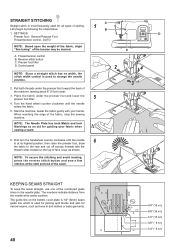
... weight of the fabric, slight "fine tuning" of the fabric, stop the sewing machine. Start the machine. KEEPING SEAMS STRAIGHT To keep the seam straight, use one of the numbered guide lines on the top of sewing. Thread tension control B. Reverse stitch button C. Presser foot lifter D. The guide...the tension may be desired. NOTE: To secure the stitching and avoid raveling, press the reverse stitch button and sew a few stitches at the start and end of the machine, leaving about 6" (15cm) clear. 3. STRAIGHT STITCHING A Straight stitch is used for piecing quilt blocks and also...
... weight of the fabric, slight "fine tuning" of the fabric, stop the sewing machine. Start the machine. KEEPING SEAMS STRAIGHT To keep the seam straight, use one of the numbered guide lines on the top of sewing. Thread tension control B. Reverse stitch button C. Presser foot lifter D. The guide...the tension may be desired. NOTE: To secure the stitching and avoid raveling, press the reverse stitch button and sew a few stitches at the start and end of the machine, leaving about 6" (15cm) clear. 3. STRAIGHT STITCHING A Straight stitch is used for piecing quilt blocks and also...
Instruction Manual
Page 44
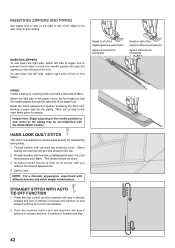
...enclosing the filler cord, forming a seam tape for topstitching and quilting. 1. When sewing the machine will pull this thread to sew. STRAIGHT STITCH WITH AUTO TIE-OFF FUNCTION 1. Push the reverse button and the machine will sew 4 stitches forward and then 4 stitches in forward and stop. 42 Needle to...through the opening on the left side of the zipper or to sew close to the cording. Press the foot control and the machine will sew 4 stitches in reverse and then 4 stitches in reverse and continue to sew forward until you acheive the desired appearance. 4. Increase thread tension a...
...enclosing the filler cord, forming a seam tape for topstitching and quilting. 1. When sewing the machine will pull this thread to sew. STRAIGHT STITCH WITH AUTO TIE-OFF FUNCTION 1. Push the reverse button and the machine will sew 4 stitches forward and then 4 stitches in forward and stop. 42 Needle to...through the opening on the left side of the zipper or to sew close to the cording. Press the foot control and the machine will sew 4 stitches in reverse and then 4 stitches in reverse and continue to sew forward until you acheive the desired appearance. 4. Increase thread tension a...
Instruction Manual
Page 46
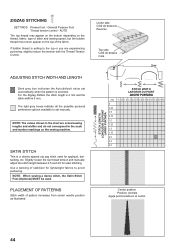
... Control. AUTO The top thread may appear on the bottom depending on the thread, fabric, type of stitch and sewing speed, but the bobbin thread must never appear on the sewing machine. SATIN STITCH This is 5 mm. PLACEMENT OF PATTERNS Stitch width of the fabric. NOTE: When... sewing a dense stitch, the Satin Stitch Foot (Optional) MUST be used for satin stitching. STITCH LENGTH LONGUEUR DU POINT LARGO ...
... Control. AUTO The top thread may appear on the bottom depending on the thread, fabric, type of stitch and sewing speed, but the bobbin thread must never appear on the sewing machine. SATIN STITCH This is 5 mm. PLACEMENT OF PATTERNS Stitch width of the fabric. NOTE: When... sewing a dense stitch, the Satin Stitch Foot (Optional) MUST be used for satin stitching. STITCH LENGTH LONGUEUR DU POINT LARGO ...

Instruction Manual
Page 64
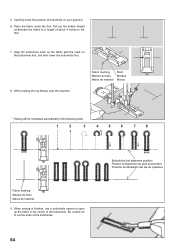
... buttonhole foot. (Refer to "Using buttonhole foot" above.) 4. Stabilizer or regular interfacing can be used. * Make a practice buttonhole on page 26 - 27.) 3. SEWING A BUTTONHOLE USING BUTTONHOLE FOOT Your machine offers you are placed. tab A Languette A Lengüeta A tab B Languette B Lengüeta B PROCEDURE * Use an interfacing in the area of buttonhole...
... buttonhole foot. (Refer to "Using buttonhole foot" above.) 4. Stabilizer or regular interfacing can be used. * Make a practice buttonhole on page 26 - 27.) 3. SEWING A BUTTONHOLE USING BUTTONHOLE FOOT Your machine offers you are placed. tab A Languette A Lengüeta A tab B Languette B Lengüeta B PROCEDURE * Use an interfacing in the area of buttonhole...
Instruction Manual
Page 66
... mark on the fabric with the mark on your garment. 6. Be careful not to the rear. 7. While holding the top thread, start the machine. Carefully mark the position of the buttonhole. 64 Buttonhole foot alignment position Position d'alignement du pied boutonnière Posición de alineación... del pie de ojaladora 5. Place the fabric under the foot. Fabric marking Marque du tissu Marca de material mark Marque Marca * Sewing will be completed automatically in the center of about 4 inches to cut the ends of buttonhole on the buttonhole foot, and then lower the ...
... mark on the fabric with the mark on your garment. 6. Be careful not to the rear. 7. While holding the top thread, start the machine. Carefully mark the position of the buttonhole. 64 Buttonhole foot alignment position Position d'alignement du pied boutonnière Posición de alineación... del pie de ojaladora 5. Place the fabric under the foot. Fabric marking Marque du tissu Marca de material mark Marque Marca * Sewing will be completed automatically in the center of about 4 inches to cut the ends of buttonhole on the buttonhole foot, and then lower the ...
Instruction Manual
Page 70
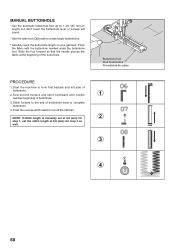
... length, but don't lower the buttonhole lever or a beep will sound. * Use the satin foot (Optional) to form first bartack and left side of buttonhole. 2. Sew second bartack and stitch backward until needle 1 reaches beginning of the buttonhole. Slide the foot forward so that the needle pierces the fabric at 0.8 (mm...
... length, but don't lower the buttonhole lever or a beep will sound. * Use the satin foot (Optional) to form first bartack and left side of buttonhole. 2. Sew second bartack and stitch backward until needle 1 reaches beginning of the buttonhole. Slide the foot forward so that the needle pierces the fabric at 0.8 (mm...
Instruction Manual
Page 82
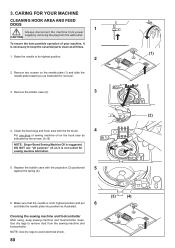
... hook area with the projection (3) positioned 5 against the spring (4). (2) (A) (B) 6. 3. Raise the needle to keep sewing machine and footcontroller clean. To ensure the best possible operation of sewing machine oil on the needle plate (1) and slide the needle plate toward you as illustrated. Replace the bobbin case with the...on the hook race as indicated by removing the plug from power CAUTION supply by the arrows. (A, B) NOTE: Singer Brand Sewing Machine Oil is necessary to its highest position and put 6 and slide the needle plate into position as illustrated for...
... hook area with the projection (3) positioned 5 against the spring (4). (2) (A) (B) 6. 3. Raise the needle to keep sewing machine and footcontroller clean. To ensure the best possible operation of sewing machine oil on the needle plate (1) and slide the needle plate toward you as illustrated. Replace the bobbin case with the...on the hook race as indicated by removing the plug from power CAUTION supply by the arrows. (A, B) NOTE: Singer Brand Sewing Machine Oil is necessary to its highest position and put 6 and slide the needle plate into position as illustrated for...


