
Instruction Manual
Page 6
... Accessories ...9 Threading the Machine Winding the Bobbin...11 Inserting the Bobbin...13 Thread Tension...15 Threading the Upper Thread ...17 Automatic Needle Threader ...19 Raising the Bobbin Thread ...21 Sewing How to Choose Your Pattern ...23 Stitch Width Dial & Stitch Length Dial...25...Step Buttonhole ...35 Sewing on Buttons (Model 3221)...37 Sewing on Buttons (Model 3232)...39 General Information Installing the Removable Accessory Storage ...41 Attaching the Presser Foot Shank ...43 Needle/Fabric/Thread Chart ...45 Darning Plate ...48 Maintenance and Troubleshooting Inserting & Changing...
... Accessories ...9 Threading the Machine Winding the Bobbin...11 Inserting the Bobbin...13 Thread Tension...15 Threading the Upper Thread ...17 Automatic Needle Threader ...19 Raising the Bobbin Thread ...21 Sewing How to Choose Your Pattern ...23 Stitch Width Dial & Stitch Length Dial...25...Step Buttonhole ...35 Sewing on Buttons (Model 3221)...37 Sewing on Buttons (Model 3232)...39 General Information Installing the Removable Accessory Storage ...41 Attaching the Presser Foot Shank ...43 Needle/Fabric/Thread Chart ...45 Darning Plate ...48 Maintenance and Troubleshooting Inserting & Changing...
Instruction Manual
Page 9
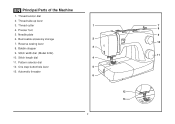
Thread take-up lever 3. Stitch width dial (Model 3232) 11 10. Thread tension dial 2. Needle plate 9 6. Bobbin stopper 3 9. Automatic threader 6 12 13 2 Presser foot 8 5. Pattern selector dial 12. Thread cutter 1 7 4. Stitch length dial 4 11. EN Principal Parts of the Machine 1. Removable accessory storage 2 7. One step buttonhole lever 5 13. Reverse sewing lever 10 8.
Thread take-up lever 3. Stitch width dial (Model 3232) 11 10. Thread tension dial 2. Needle plate 9 6. Bobbin stopper 3 9. Automatic threader 6 12 13 2 Presser foot 8 5. Pattern selector dial 12. Thread cutter 1 7 4. Stitch length dial 4 11. EN Principal Parts of the Machine 1. Removable accessory storage 2 7. One step buttonhole lever 5 13. Reverse sewing lever 10 8.
Instruction Manual
Page 24
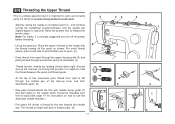
... right channel and up the spool pin. EN Threading the Upper Thread This is a simple operation but it is important to carry out correctly as by leading thread down to the needle which should be threaded from front to back.(See page 19 for instructions on the holder... - At the top of the take-up lever and then downwards again. (6) 2 3 4 - Pull about 6-8 inches of thread on how to use the Automatic needle threader.) - Place the spool of thread to spool. (2) - Lift up left channel. (5) During this movement pass thread from right to length with the thread coming off...
... right channel and up the spool pin. EN Threading the Upper Thread This is a simple operation but it is important to carry out correctly as by leading thread down to the needle which should be threaded from front to back.(See page 19 for instructions on the holder... - At the top of the take-up lever and then downwards again. (6) 2 3 4 - Pull about 6-8 inches of thread on how to use the Automatic needle threader.) - Place the spool of thread to spool. (2) - Lift up left channel. (5) During this movement pass thread from right to length with the thread coming off...
Instruction Manual
Page 26
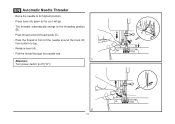
Raise the needle to off ("O")! 2 19 A C A B C D B D A C Pass the thread in front of the needle around thread guide (C). - Release lever (A). - EN Automatic Needle Threader - Pull the thread through the needle eye. Press lever (A) down as far as it will go. - Attention: 1 Turn power switch to its highest position. - The threader automatically swings to top. - Pass thread around the hook (D) from bottom to the threading position (B). -
Raise the needle to off ("O")! 2 19 A C A B C D B D A C Pass the thread in front of the needle around thread guide (C). - Release lever (A). - EN Automatic Needle Threader - Pull the thread through the needle eye. Press lever (A) down as far as it will go. - Attention: 1 Turn power switch to its highest position. - The threader automatically swings to top. - Pass thread around the hook (D) from bottom to the threading position (B). -


