
Instruction Manual
Page 24
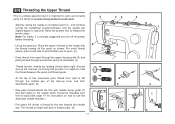
...process it is helpful to descend. Now pass thread behind the thin wire needle clamp guide (7) and then down right channel and up left through pre-tension spring as illustrated. (4) - EN Threading the Upper Thread This is a simple operation but it is strongly suggested you turn... off the spool as shown. Draw thread from right to use the Automatic needle threader.) - Pull about 6-8 inches of ...
...process it is helpful to descend. Now pass thread behind the thin wire needle clamp guide (7) and then down right channel and up left through pre-tension spring as illustrated. (4) - EN Threading the Upper Thread This is a simple operation but it is strongly suggested you turn... off the spool as shown. Draw thread from right to use the Automatic needle threader.) - Pull about 6-8 inches of ...
Instruction Manual
Page 42
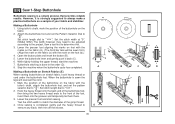
... (b).) 4. Attach the buttonhole foot and set the pattern selector dial to always make a practice buttonhole on the fabric. 2. Buttonhole stitching is a simple process that provides reliable results. However, it back (C). 6. Set stitch length dial to " ". 2. Lower the buttonhole lever and gently push it...the two heavy thread ends to " ". Lower the presser foot aligning the marks on foot with the marks on the fabric (A). (The front bar tack will overcast the cord. 1. Once sewing is strongly suggested to " ". Set the stitch width at "5". (Model 3232) The width however...
... (b).) 4. Attach the buttonhole foot and set the pattern selector dial to always make a practice buttonhole on the fabric. 2. Buttonhole stitching is a simple process that provides reliable results. However, it back (C). 6. Set stitch length dial to " ". 2. Lower the buttonhole lever and gently push it...the two heavy thread ends to " ". Lower the presser foot aligning the marks on foot with the marks on the fabric (A). (The front bar tack will overcast the cord. 1. Once sewing is strongly suggested to " ". Set the stitch width at "5". (Model 3232) The width however...


