
Instruction Manual
Page 2
... operating conditions is damaged, it to avoid a hazard. 20. An appliance should never be followed, including the following: Read all controls to the nearest authorized dealer or service center for their safety. 21. Switch the sewing machine off ("O") position, then remove plug from all moving parts. Do not use as threading needle, changing needle, threading bobbin, or changing presser foot, and the like. 10. EN IMPORTANT SAFETY INSTRUCTIONS When using...
... operating conditions is damaged, it to avoid a hazard. 20. An appliance should never be followed, including the following: Read all controls to the nearest authorized dealer or service center for their safety. 21. Switch the sewing machine off ("O") position, then remove plug from all moving parts. Do not use as threading needle, changing needle, threading bobbin, or changing presser foot, and the like. 10. EN IMPORTANT SAFETY INSTRUCTIONS When using...
Instruction Manual
Page 6
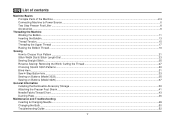
... the Bobbin Thread ...19 Sewing How to Choose Your Pattern ...21 Stitch Width Dial & Stitch Length Dial...23 Sewing Straight Stitch...25 Reverse Sewing/ Removing the Work/ Cutting the Thread ...27 Choosing Stretch Stitch Patterns...29 Blind Hem ...31 Sew 4-Step Buttonhole ...33 Sewing on Buttons (Model 3223)...35 Sewing on Buttons (Model 3229)...37 General Information Installing the Removable Accessory Storage ...39 Attaching the Presser Foot Shank ...41 Needle/Fabric/Thread Chart ...43 Darning Plate ...46 Maintenance and Troubleshooting Inserting & Changing Needle...48 Changing the Bulb ...50...
... the Bobbin Thread ...19 Sewing How to Choose Your Pattern ...21 Stitch Width Dial & Stitch Length Dial...23 Sewing Straight Stitch...25 Reverse Sewing/ Removing the Work/ Cutting the Thread ...27 Choosing Stretch Stitch Patterns...29 Blind Hem ...31 Sew 4-Step Buttonhole ...33 Sewing on Buttons (Model 3223)...35 Sewing on Buttons (Model 3229)...37 General Information Installing the Removable Accessory Storage ...39 Attaching the Presser Foot Shank ...41 Needle/Fabric/Thread Chart ...43 Darning Plate ...46 Maintenance and Troubleshooting Inserting & Changing Needle...48 Changing the Bulb ...50...
Instruction Manual
Page 9
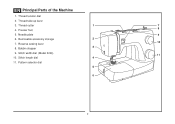
Stitch length dial 4 11. Stitch width dial (Model 3229) 11 10. Thread take-up lever 3. Thread cutter 1 7 4. Reverse sewing lever 10 8. Thread tension dial 2. Removable accessory storage 2 7. EN Principal Parts of the Machine 1. Bobbin stopper 3 9. Presser foot 8 5. Needle plate 9 6. Pattern selector dial 5 6 2
Stitch length dial 4 11. Stitch width dial (Model 3229) 11 10. Thread take-up lever 3. Thread cutter 1 7 4. Reverse sewing lever 10 8. Thread tension dial 2. Removable accessory storage 2 7. EN Principal Parts of the Machine 1. Bobbin stopper 3 9. Presser foot 8 5. Needle plate 9 6. Pattern selector dial 5 6 2
Instruction Manual
Page 13
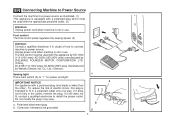
... does not fit fully in use . Co., Ltd. (Vietnam) Sewing light 1 Press main switch (A) to be grounded b 2 6 A 3 The foot control must be used with the appropriate polarized outlet. (2) Attention: Unplug power cord when machine is not in the outlet, reverse the plug. Do not modify the plug in use . EN Connecting Machine to Power Source Connect the machine to a power source as illustrated. (1) This appliance...
... does not fit fully in use . Co., Ltd. (Vietnam) Sewing light 1 Press main switch (A) to be grounded b 2 6 A 3 The foot control must be used with the appropriate polarized outlet. (2) Attention: Unplug power cord when machine is not in the outlet, reverse the plug. Do not modify the plug in use . EN Connecting Machine to Power Source Connect the machine to a power source as illustrated. (1) This appliance...
Instruction Manual
Page 16
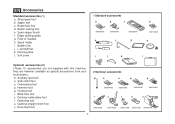
Buttonhole foot d. Spool holder i. Overcasting foot p. Cording foot r. Darning/ embroidery foot t. Quilting/ straight stitch foot v. they are not supplied with this machine; Blind hem foot s. Button sewing foot e. Darning plate l. Soft cover 1 Standard accessories a b c 006806008 006905008 e f 006909008 g d 006914008 h i j k l Optional accessories (2) (These 10 accessories are however available as special accessories from your local dealer.) m. Even-feed foot 2 Optional accessories m n o p q 006804008 006803008 006800008 006810008 r s t u v ...
Buttonhole foot d. Spool holder i. Overcasting foot p. Cording foot r. Darning/ embroidery foot t. Quilting/ straight stitch foot v. they are not supplied with this machine; Blind hem foot s. Button sewing foot e. Darning plate l. Soft cover 1 Standard accessories a b c 006806008 006905008 e f 006909008 g d 006914008 h i j k l Optional accessories (2) (These 10 accessories are however available as special accessories from your local dealer.) m. Even-feed foot 2 Optional accessories m n o p q 006804008 006803008 006800008 006810008 r s t u v ...
Instruction Manual
Page 18
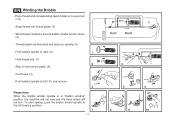
... Bobbin - Thread bobbin as illustrated and place on foot control pedal. (8) - Step on spindle. (5) - Cut thread. (9) - Place thread and corresponding spool holder on to right. (6) 1 - Snap thread into thread guide. (3) - Push bobbin spindle to spool pin. (1/2) - Push bobbin spindle to the left (10) and remove. 4 Please Note: When the bobbin winder spindle is in "bobbin winding" position, the machine will not sew and the hand wheel will not turn. Wind thread clockwise around bobbin winder tension discs. (4) - To start sewing, push the bobbin winder...
... Bobbin - Thread bobbin as illustrated and place on foot control pedal. (8) - Step on spindle. (5) - Cut thread. (9) - Place thread and corresponding spool holder on to right. (6) 1 - Snap thread into thread guide. (3) - Push bobbin spindle to spool pin. (1/2) - Push bobbin spindle to the left (10) and remove. 4 Please Note: When the bobbin winder spindle is in "bobbin winding" position, the machine will not sew and the hand wheel will not turn. Wind thread clockwise around bobbin winder tension discs. (4) - To start sewing, push the bobbin winder...
Instruction Manual
Page 20
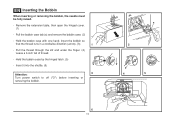
EN Inserting the Bobbin When inserting or removing the bobbin, the needle must be fully raised. - Insert it into the shuttle. (6) Attention: 3 Turn power switch to off ("O") before inserting or removing the bobbin. 6 13 a 2 4 5 Pull the bobbin case tab (a) and remove the bobbin case. (2) - Hold the bobbin case with one hand. Insert the bobbin so that the thread runs in a clockwise direction (arrow). (3) 1 - Remove the extension table, then open the hinged cover. (1) - Pull the thread through the slit and under...
EN Inserting the Bobbin When inserting or removing the bobbin, the needle must be fully raised. - Insert it into the shuttle. (6) Attention: 3 Turn power switch to off ("O") before inserting or removing the bobbin. 6 13 a 2 4 5 Pull the bobbin case tab (a) and remove the bobbin case. (2) - Hold the bobbin case with one hand. Insert the bobbin so that the thread runs in a clockwise direction (arrow). (3) 1 - Remove the extension table, then open the hinged cover. (1) - Pull the thread through the slit and under...
Instruction Manual
Page 22
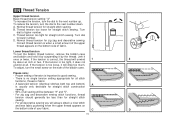
... tension, turn the dial to the next number down. Thread tension too tight for straight stitch sewing. D. Correct thread tension is important to the next number up. If the tension is correct, the thread will be less than for straight stitch sewing. - To adjust, turn the small screw on the side of fabric. For zig zag and decorative sewing stitch functions, thread tension should generally be between "3" and "5". - C D 15 Turn dial to lower number. Lower thread tension To test the bobbin thread tension, remove the bobbin case...
... tension, turn the dial to the next number down. Thread tension too tight for straight stitch sewing. D. Correct thread tension is important to the next number up. If the tension is correct, the thread will be less than for straight stitch sewing. - To adjust, turn the small screw on the side of fabric. For zig zag and decorative sewing stitch functions, thread tension should generally be between "3" and "5". - C D 15 Turn dial to lower number. Lower thread tension To test the bobbin thread tension, remove the bobbin case...
Instruction Manual
Page 24
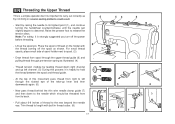
... spool through the upper thread guide (3) and pulling thread through the slotted eye of thread to release the tension discs. Now pass thread behind the thin wire needle clamp guide (7) and then down right channel and up the spool pin. Lift up left through pre-tension spring as shown. At the top of spool holder next to descend. Start by not doing so several sewing problems could result. - For small thread spools...
... spool through the upper thread guide (3) and pulling thread through the slotted eye of thread to release the tension discs. Now pass thread behind the thin wire needle clamp guide (7) and then down right channel and up the spool pin. Lift up left through pre-tension spring as shown. At the top of spool holder next to descend. Start by not doing so several sewing problems could result. - For small thread spools...
Instruction Manual
Page 26
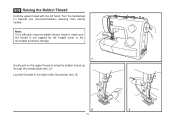
Note: If it is difficult to raise the bobbin thread, check to make sure the thread is not trapped by the hinged cover or the removable accessory storage. 1 Gently pull on the upper thread to bring the bobbin thread up through the needle plate hole. (2) Lay both threads to the back under the presser foot. (3) 2 3 19 Turn the handwheel (1) towards you (counterclockwise) lowering, then raising needle. EN Raising the Bobbin Thread Hold the upper thread with the left hand.
Note: If it is difficult to raise the bobbin thread, check to make sure the thread is not trapped by the hinged cover or the removable accessory storage. 1 Gently pull on the upper thread to bring the bobbin thread up through the needle plate hole. (2) Lay both threads to the back under the presser foot. (3) 2 3 19 Turn the handwheel (1) towards you (counterclockwise) lowering, then raising needle. EN Raising the Bobbin Thread Hold the upper thread with the left hand.

Instruction Manual
Page 30
... the setting of stitch length dial approaches "0". 1 Neat zig-zag stitches are usually achieved at "2.5" or below. (3) Dense zig-zag stitches are called satin stitches. (3) Function of stitch width dial (Model 3229) The maximum zigzag stitch width for the straight stitch infinite needle position. "0" is center needle position, "5" is 5mm; however, the width can be reduced on any patterns. The length of the individual stitches will decrease as you move zigzag dial from "0" - Generally speaking, use a longer stitch length when sewing heavier weight fabrics...
... the setting of stitch length dial approaches "0". 1 Neat zig-zag stitches are usually achieved at "2.5" or below. (3) Dense zig-zag stitches are called satin stitches. (3) Function of stitch width dial (Model 3229) The maximum zigzag stitch width for the straight stitch infinite needle position. "0" is center needle position, "5" is 5mm; however, the width can be reduced on any patterns. The length of the individual stitches will decrease as you move zigzag dial from "0" - Generally speaking, use a longer stitch length when sewing heavier weight fabrics...
Instruction Manual
Page 32
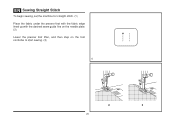
EN Sewing Straight Stitch To begin sewing, set the machine for straight stitch. (1) Place the fabric under the presser foot with the fabric edge lined up with the desired seam guide line on the needle plate. (2) Lower the presser foot lifter, and then step on the foot controller to start sewing. (3) 1 2 3 25
EN Sewing Straight Stitch To begin sewing, set the machine for straight stitch. (1) Place the fabric under the presser foot with the fabric edge lined up with the desired seam guide line on the needle plate. (2) Lower the presser foot lifter, and then step on the foot controller to start sewing. (3) 1 2 3 25
Instruction Manual
Page 34
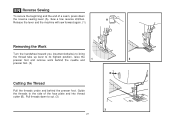
Pull threads down the reverse sewing lever (A). Sew a few reverse stitches. EN Reverse Sewing To secure the beginning and the end of the face plate and into thread cutter (B). Guide the threads to the side of a seam, press down to its highest position, raise the presser foot and remove work behind the needle and 1 2 presser foot. (2) B Cutting the Thread Pull the threads under and behind the presser foot. A Release the lever and the machine will sew forward again. (1) Removing the Work Turn the...
Pull threads down the reverse sewing lever (A). Sew a few reverse stitches. EN Reverse Sewing To secure the beginning and the end of the face plate and into thread cutter (B). Guide the threads to the side of a seam, press down to its highest position, raise the presser foot and remove work behind the needle and 1 2 presser foot. (2) B Cutting the Thread Pull the threads under and behind the presser foot. A Release the lever and the machine will sew forward again. (1) Removing the Work Turn the...
Instruction Manual
Page 36
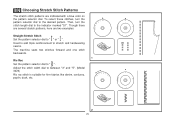
Adjust the stitch width dial to " ". To select these stitches, turn the stitch length dial to the indicator marked "S1". Used to add triple reinforcement to stretch and hardwearing seams. The machine sews two stitches forward and one stitch backwards. 1 Ric Rac Set the pattern selector dial to between "3" and "5". (Model 3229) Ric rac stitch is suitable for firm fabrics like denim, corduroy, poplin, duck, etc. 2 29 Then, turn the pattern selector dial to...
Adjust the stitch width dial to " ". To select these stitches, turn the stitch length dial to the indicator marked "S1". Used to add triple reinforcement to stretch and hardwearing seams. The machine sews two stitches forward and one stitch backwards. 1 Ric Rac Set the pattern selector dial to between "3" and "5". (Model 3229) Ric rac stitch is suitable for firm fabrics like denim, corduroy, poplin, duck, etc. 2 29 Then, turn the pattern selector dial to...
Instruction Manual
Page 38
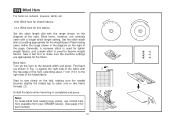
... diagram at a setting appropriate for the weight/type of fabric being sewn, within the range shown in Fig. 1) against the right side of the fabric with 1 the top edge of the hem extending about 7 mm (1/4") to make blind hem sewing even easier, use a blind hem foot, available from your SINGER retailer. (See page 9 for part number) 31 Blind Hem: Turn up the hem to catch one or two fabric threads. (2) Unfold the fabric...
... diagram at a setting appropriate for the weight/type of fabric being sewn, within the range shown in Fig. 1) against the right side of the fabric with 1 the top edge of the hem extending about 7 mm (1/4") to make blind hem sewing even easier, use a blind hem foot, available from your SINGER retailer. (See page 9 for part number) 31 Blind Hem: Turn up the hem to catch one or two fabric threads. (2) Unfold the fabric...

Instruction Manual
Page 40
... reducing upper thread tension will produce better results. - Measure diameter and thickness of the buttonhole foot. It is raised before turning the pattern selector dial to use heavy thread or cord for stretch or knit fabrics. Take off the all purpose foot and attach the buttonhole foot. 2. Take care not to set stitch density. Adjust the stitch length dial in the " " to sew too many stitches in steps 1 and 3. Use seam ripper and cut buttonhole open from one...
... reducing upper thread tension will produce better results. - Measure diameter and thickness of the buttonhole foot. It is raised before turning the pattern selector dial to use heavy thread or cord for stretch or knit fabrics. Take off the all purpose foot and attach the buttonhole foot. 2. Take care not to set stitch density. Adjust the stitch length dial in the " " to sew too many stitches in steps 1 and 3. Use seam ripper and cut buttonhole open from one...
Instruction Manual
Page 42
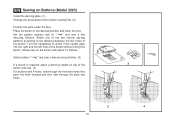
... stitches. Turn the handwheel to the distance between the two holes of the button without hitting the button. Select one of the two narrow zig-zag patterns according to check if the needle goes into the right and the left hole of the button. Place the button in the desired position and lower the foot. EN Sewing on Buttons (Model 3223) Install the darning plate. (1) Change the all purpose foot to button sewing foot. (2) Position the work...
... stitches. Turn the handwheel to the distance between the two holes of the button without hitting the button. Select one of the two narrow zig-zag patterns according to check if the needle goes into the right and the left hole of the button. Place the button in the desired position and lower the foot. EN Sewing on Buttons (Model 3223) Install the darning plate. (1) Change the all purpose foot to button sewing foot. (2) Position the work...
Instruction Manual
Page 44
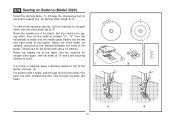
... stitches to finish. 1 2 If a shank is required, place a darning needle on top of the button and sew. (4) For buttons with the stitch width set the width to "0". EN Sewing on Buttons (Model 3229) Install the darning plate. (1) Change the all purpose foot to the button sewing foot. (2) Set the stitch length to number "3" - Set the machine for zigzag stitch, then set at "0" sew a few securing stitches, set the machine for straight stitch again, with about 10 stitches. Set the machine for straight stitch, with 4 holes, sew through the front two holes first, push the work...
... stitches to finish. 1 2 If a shank is required, place a darning needle on top of the button and sew. (4) For buttons with the stitch width set the width to "0". EN Sewing on Buttons (Model 3229) Install the darning plate. (1) Change the all purpose foot to the button sewing foot. (2) Set the stitch length to number "3" - Set the machine for zigzag stitch, then set at "0" sew a few securing stitches, set the machine for straight stitch again, with about 10 stitches. Set the machine for straight stitch, with 4 holes, sew through the front two holes first, push the work...

Instruction Manual
Page 50
...). NEEDLE, FABRIC SELECTION NEEDLES EXPLANATION TYPE OF FABRIC SINGER® 2020 Standard sharp needles. quilted fabrics, denims, upholstery material (light to 18 (110). Leather, vinyl, upholstery. (Leaves smaller hole than standard large needle.) Note : 1. THREAD Light-duty thread in cotton, nylon, polyester or cotton wrapped polyester. 11-14 (80-90) 14 (90) 16 (100) Medium weight fabrics-cotton, satin, kettlecloth, sailcloth, Most threads sold are medium size and suitable double...
...). NEEDLE, FABRIC SELECTION NEEDLES EXPLANATION TYPE OF FABRIC SINGER® 2020 Standard sharp needles. quilted fabrics, denims, upholstery material (light to 18 (110). Leather, vinyl, upholstery. (Leaves smaller hole than standard large needle.) Note : 1. THREAD Light-duty thread in cotton, nylon, polyester or cotton wrapped polyester. 11-14 (80-90) 14 (90) 16 (100) Medium weight fabrics-cotton, satin, kettlecloth, sailcloth, Most threads sold are medium size and suitable double...
Instruction Manual
Page 59
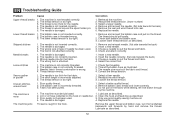
... Check the threading. 2. Poor quality oil has been used . 4. The thread is threaded wrong. 3. The bobbin case is wound around the spool holder pin. 6. Select the correct foot. 1. The thread tension is not threaded correctly. 2. Remove the reel and wind thread onto reel. 6. Select a finer needle. 2. Remove bobbin case, thread and insert correctly. 3. Clean the hook and feed dog as described. 1. Loosen lower thread tension as described. 3. The machine must suit the fabric and thread. 4. Lint or oil have collected on the hook or needle bar. 2. Lubricate...
... Check the threading. 2. Poor quality oil has been used . 4. The thread is threaded wrong. 3. The bobbin case is wound around the spool holder pin. 6. Select the correct foot. 1. The thread tension is not threaded correctly. 2. Remove the reel and wind thread onto reel. 6. Select a finer needle. 2. Remove bobbin case, thread and insert correctly. 3. Clean the hook and feed dog as described. 1. Loosen lower thread tension as described. 3. The machine must suit the fabric and thread. 4. Lint or oil have collected on the hook or needle bar. 2. Lubricate...


