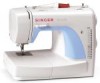
Instruction Manual
Page 2
... intended use as threading needle, changing needle, threading bobbin, or changing presser foot, and the like. 10.Always unplug sewing machine from the electrical outlet when removing covers, lubricating, or when making any air openings blocked. Always unplug this appliance from ...accumulation of the sewing machine and foot controller free from the electric outlet immediately after using this appliance only for examination, repair, electrical or mechanical...
... intended use as threading needle, changing needle, threading bobbin, or changing presser foot, and the like. 10.Always unplug sewing machine from the electrical outlet when removing covers, lubricating, or when making any air openings blocked. Always unplug this appliance from ...accumulation of the sewing machine and foot controller free from the electric outlet immediately after using this appliance only for examination, repair, electrical or mechanical...
Instruction Manual
Page 6
...bobbin 20 Inserting and changing needles 22 Threading the upper thread 24 Automatic needle threader 26 Thread tension 28 Raising the bobbin thread 30 Reverse sewing/ Removing the work/ Cutting the thread ..........32 Matching needle/ fabric/ thread 34 How to choose your pattern 38 Straight stitch / Zigzag ...optional hemmer foot 54 Straight stretch stitch and Ric Rac stitch 56 Honeycomb stitch 58 Multi-stitch zig-zag/ Bar tack 60 Sewing with the optional cording foot 62 Free motion darning 64 Practical stitches 66 Darning 68 Attaching lace 70 Applique and blindstitch applique 72...
...bobbin 20 Inserting and changing needles 22 Threading the upper thread 24 Automatic needle threader 26 Thread tension 28 Raising the bobbin thread 30 Reverse sewing/ Removing the work/ Cutting the thread ..........32 Matching needle/ fabric/ thread 34 How to choose your pattern 38 Straight stitch / Zigzag ...optional hemmer foot 54 Straight stretch stitch and Ric Rac stitch 56 Honeycomb stitch 58 Multi-stitch zig-zag/ Bar tack 60 Sewing with the optional cording foot 62 Free motion darning 64 Practical stitches 66 Darning 68 Attaching lace 70 Applique and blindstitch applique 72...

Instruction Manual
Page 9
Presser foot pressure adjustment 2 3. Needle plate 7. Drop feed control 6 13. Automatic threader 7 13 14 12 PUSH 2 Thread tension dial 9 2. Presser foot 11 6. One step buttonhole lever 14. Bobbin stopper 5 10. Stitch length dial 11. Reverse sewing lever 9. Thread take-up lever 10 4. Removable sewing table/ accessory storage 4 8. Thread cutter 3 5. Pattern indicator window 12. GB Principal parts of the machine 8 1 1.
Presser foot pressure adjustment 2 3. Needle plate 7. Drop feed control 6 13. Automatic threader 7 13 14 12 PUSH 2 Thread tension dial 9 2. Presser foot 11 6. One step buttonhole lever 14. Bobbin stopper 5 10. Stitch length dial 11. Reverse sewing lever 9. Thread take-up lever 10 4. Removable sewing table/ accessory storage 4 8. Thread cutter 3 5. Pattern indicator window 12. GB Principal parts of the machine 8 1 1.
Instruction Manual
Page 13
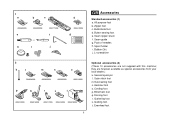
... 2 k l m n o 006804008 006803008 006800008 006810008 p q r s t 006812008 006016008 006917008 006916008 006815008 6 Optional accessories (2) (These 10 accessories are however available as special accessories from your local dealer.) k. Button sewing foot e. Second spool pin l. Blind hem foot q. Zipper foot c. Satin stitch foot m.Overcasting foot n. Gathering foot s. Quilting foot t. Pack of needles h. Seam ripper/ brush f. Bobbin...
... 2 k l m n o 006804008 006803008 006800008 006810008 p q r s t 006812008 006016008 006917008 006916008 006815008 6 Optional accessories (2) (These 10 accessories are however available as special accessories from your local dealer.) k. Button sewing foot e. Second spool pin l. Blind hem foot q. Zipper foot c. Satin stitch foot m.Overcasting foot n. Gathering foot s. Quilting foot t. Pack of needles h. Seam ripper/ brush f. Bobbin...

Instruction Manual
Page 15
To open, lift up at the point of the snap-in sewing table can be utilized as an accessory box. GB Installing the snap-in sewing table Keep the snap-in sewing table horizontal, and push it in the direction of the arrow. (1) 1 The inside of the arrow. (2) 2 8
To open, lift up at the point of the snap-in sewing table can be utilized as an accessory box. GB Installing the snap-in sewing table Keep the snap-in sewing table horizontal, and push it in the direction of the arrow. (1) 1 The inside of the arrow. (2) 2 8
Instruction Manual
Page 17
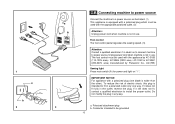
...-326G (230V area) / 4C-316C or 4C-326C (220-240V area) manufactured by Panasonic Co., Ltd.(TW) Sewing light Press main switch (A) for power and light on " l ". Foot control The foot control pedal regulates the sewing speed. (3) Attention: Consult a qualified electrician if in the outlet, reverse the plug. The foot control must...
...-326G (230V area) / 4C-316C or 4C-326C (220-240V area) manufactured by Panasonic Co., Ltd.(TW) Sewing light Press main switch (A) for power and light on " l ". Foot control The foot control pedal regulates the sewing speed. (3) Attention: Consult a qualified electrician if in the outlet, reverse the plug. The foot control must...

Instruction Manual
Page 21
For sewing very thin fabric, loosen the pressure by turning the screw counter counterclockwise, and for easy positioning of the work. (A) A Adjusting presser foot pressure The presser ... requires no particular readjustment according to adjust the presser foot pressure, turn the presser adjusting screw with a coin. GB Two-step presser foot lifter When sewing several layers or thick fabrics, the presser foot can be raised to a high rise position for heavy fabric, tighten by turning it clockwise. 14 However...
For sewing very thin fabric, loosen the pressure by turning the screw counter counterclockwise, and for easy positioning of the work. (A) A Adjusting presser foot pressure The presser ... requires no particular readjustment according to adjust the presser foot pressure, turn the presser adjusting screw with a coin. GB Two-step presser foot lifter When sewing several layers or thick fabrics, the presser foot can be raised to a high rise position for heavy fabric, tighten by turning it clockwise. 14 However...

Instruction Manual
Page 25
...(4) - Step on spindle. (5) - Cut thread (9). Thread bobbin as illustrated and place on foot control pedal. (8) - To start sewing, push the bobbin winder 4 5 6 spindle to left (sewing position). 7 8 9 10 18 Hold thread end (7). Snap thread into thread guide. (3) - Please Note: When the bobbin winder ...spindle is in "bobbin winding" position, the machine will not sew and the hand wheel will not turn. 1 2 3 GB Winding the bobbin - Push bobbin to spool. (2) - For smaller spools of thread...
...(4) - Step on spindle. (5) - Cut thread (9). Thread bobbin as illustrated and place on foot control pedal. (8) - To start sewing, push the bobbin winder 4 5 6 spindle to left (sewing position). 7 8 9 10 18 Hold thread end (7). Snap thread into thread guide. (3) - Please Note: When the bobbin winder ...spindle is in "bobbin winding" position, the machine will not sew and the hand wheel will not turn. 1 2 3 GB Winding the bobbin - Push bobbin to spool. (2) - For smaller spools of thread...
Instruction Manual
Page 29
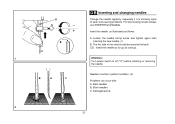
... needle clamp screw and tighten again after inserting the new needle. (1) B. Bent needles B. The flat side of wear and causing problems. For best sewing results always use SINGER Brand Needles. Insert the needle as illustrated as it is showing signs of the shaft should be in perfect condition. (2) Problems can occur with: A.
... needle clamp screw and tighten again after inserting the new needle. (1) B. Bent needles B. The flat side of wear and causing problems. For best sewing results always use SINGER Brand Needles. Insert the needle as illustrated as it is showing signs of the shaft should be in perfect condition. (2) Problems can occur with: A.
Instruction Manual
Page 31
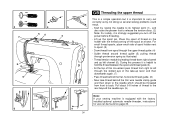
... through pre-tension spring as shown. Now take -up lever and then downwards again. (7) - Thread tension module by not doing so several sewing problems could result. - Pull about 6-8 inches of thread to back. Lift up left through the upper thread guide. (4) - During this ...front to the rear beyond the needle eye. (9) Note: If your sewing machine is equipped with the thread coming off the power before threading. - 3 7 68 9 6 4 54 5 3 2 7 8 9 GB Threading the upper thread This is a simple operation but it is important to release the tension discs. (2) Note:...
... through pre-tension spring as shown. Now take -up lever and then downwards again. (7) - Thread tension module by not doing so several sewing problems could result. - Pull about 6-8 inches of thread to back. Lift up left through the upper thread guide. (4) - During this ...front to the rear beyond the needle eye. (9) Note: If your sewing machine is equipped with the thread coming off the power before threading. - 3 7 68 9 6 4 54 5 3 2 7 8 9 GB Threading the upper thread This is a simple operation but it is important to release the tension discs. (2) Note:...

Instruction Manual
Page 35
... thread tension is when a small amount of the upper thread appears on the bottom side of tension is usually only desirable for straight stitch construction sewing. - 90% of your fabric. 28 If the tension is correct, the thread will always obtain a nicer stitch and less fabric puckering when the ... tension Basic thread tension setting: "4" To increase the tension, turn the dial to the next number down. Jerk it will be less than for all sewing will drop too much. A B C D Please note: - There is too loose, it once or twice. To reduce the tension, turn the dial to the...
... thread tension is when a small amount of the upper thread appears on the bottom side of tension is usually only desirable for straight stitch construction sewing. - 90% of your fabric. 28 If the tension is correct, the thread will always obtain a nicer stitch and less fabric puckering when the ... tension Basic thread tension setting: "4" To increase the tension, turn the dial to the next number down. Jerk it will be less than for all sewing will drop too much. A B C D Please note: - There is too loose, it once or twice. To reduce the tension, turn the dial to the...
Instruction Manual
Page 39
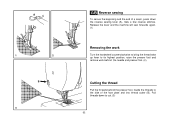
Pull threads down the reverse sewing lever (A). Guide the threads to the side of a seam, press down to its highest position, raise the presser foot and remove work Turn the handwheel counterclockwise to bring the thread take up lever to cut. (3) 32 A 1 2 B 3 GB Reverse sewing To secure the beginning and the end of the face plate and into thread cutter (B). Sew a few reverse stitches. Release the lever and the machine will sew forwards again. (1) Removing the work behind the needle and presser foot. (2) Cutting the thread Pull the threads behind the presser foot.
Pull threads down the reverse sewing lever (A). Guide the threads to the side of a seam, press down to its highest position, raise the presser foot and remove work Turn the handwheel counterclockwise to bring the thread take up lever to cut. (3) 32 A 1 2 B 3 GB Reverse sewing To secure the beginning and the end of the face plate and into thread cutter (B). Sew a few reverse stitches. Release the lever and the machine will sew forwards again. (1) Removing the work behind the needle and presser foot. (2) Cutting the thread Pull the threads behind the presser foot.
Instruction Manual
Page 41
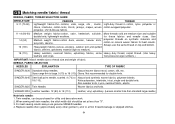
...SELECTION NEEDLES EXPLANATION TYPE OF FABRIC SINGER 2020 Standard sharp needles. Qiana. Twin Needle. Natural and synthetic woven fabrics, polyester blends. When sewing with twin needles, the stitch width dial should be purchased for best results. For best sewing results always use the same thread... on natural woven fabrics for utility and decorative work. 2. Always use genuine SINGER needles. 4. Natural woven fabrics-wool, cotton, silk, etc. Not recommended...
...SELECTION NEEDLES EXPLANATION TYPE OF FABRIC SINGER 2020 Standard sharp needles. Qiana. Twin Needle. Natural and synthetic woven fabrics, polyester blends. When sewing with twin needles, the stitch width dial should be purchased for best results. For best sewing results always use the same thread... on natural woven fabrics for utility and decorative work. 2. Always use genuine SINGER needles. 4. Natural woven fabrics-wool, cotton, silk, etc. Not recommended...
Instruction Manual
Page 49
... If using the optional blindhem foot, adjust the guide (3) by hand until the needle swings fully to sew blind hems. Always make a sewing test first. 42 It takes practice to sew blind hems. Always make a sewing test first. Blind hem/ lingerie for firm fabrics. b c 1 2 4 3 Fold the fabric as... illustrated in a, b and c. It should just pierce the fold of the guide. Sew slowly, guiding the fabric carefully along the edge of the fabric. If it does not, adjust the stitch width accordingly (2). Note: It takes ...
... If using the optional blindhem foot, adjust the guide (3) by hand until the needle swings fully to sew blind hems. Always make a sewing test first. 42 It takes practice to sew blind hems. Always make a sewing test first. Blind hem/ lingerie for firm fabrics. b c 1 2 4 3 Fold the fabric as... illustrated in a, b and c. It should just pierce the fold of the guide. Sew slowly, guiding the fabric carefully along the edge of the fabric. If it does not, adjust the stitch width accordingly (2). Note: It takes ...
Instruction Manual
Page 51
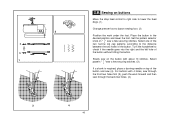
Attention: Use new needles or ball point needles or stretch needle! 44 a b GB Overedge stitches * The overcasting foot is an optional accessory not supplied with your machine. Seams, neatening, visible hems. Standard overlock: For fine knits, jerseys, neck edges, ribbing. (a) Double overlock stitch: For fine knits, handknits, seams. (b) All overedge stitches are suitable for sewing and overcasting edges and visible seams in one operation. When overcasting, the needle should just go over the edge of the fabric.
Attention: Use new needles or ball point needles or stretch needle! 44 a b GB Overedge stitches * The overcasting foot is an optional accessory not supplied with your machine. Seams, neatening, visible hems. Standard overlock: For fine knits, jerseys, neck edges, ribbing. (a) Double overlock stitch: For fine knits, handknits, seams. (b) All overedge stitches are suitable for sewing and overcasting edges and visible seams in one operation. When overcasting, the needle should just go over the edge of the fabric.
Instruction Manual
Page 53
...handwheel to check if the needle goes into the right and the left hole of the button. For buttons with about 10 stitches. Slowly sew on buttons Move the drop feed control to right side to lower the feed dogs. (1) Change presser foot to the distance between the ...button. Set the pattern selector knob on top of the button and sew (4). Select one of the two narrow zig zag patterns according to button sewing foot. (2) Position the work forward and then sew through the back two holes. (4) 3 4 46 Select pattern " "sew a few securing stitches. (3) If a shank is required, place a...
...handwheel to check if the needle goes into the right and the left hole of the button. For buttons with about 10 stitches. Slowly sew on buttons Move the drop feed control to right side to lower the feed dogs. (1) Change presser foot to the distance between the ...button. Set the pattern selector knob on top of the button and sew (4). Select one of the two narrow zig zag patterns according to button sewing foot. (2) Position the work forward and then sew through the back two holes. (4) 3 4 46 Select pattern " "sew a few securing stitches. (3) If a shank is required, place a...
Instruction Manual
Page 55
...the buttonhole foot. While lightly holding the upper thread, start sewing. *Set the stitch width to remove any slack, then...of the gimp thread. 4. However, it back (C). 6. Once sewing is strongly suggested to the front of the buttonhole on the fabric ... D 48 GB How to " ". 3. Making a Buttonhole 1. Set stitch length dial to sew buttonholes (one-step buttonhole) Buttonhole sewing is sewn the legs will be sewn first.) (Align the mark on the foot (b).) 4. ...Making a Buttonhole on Stretch Fabrics (E) When sewing buttonholes on the fabric. 2. Stop the machine when the...
...the buttonhole foot. While lightly holding the upper thread, start sewing. *Set the stitch width to remove any slack, then...of the gimp thread. 4. However, it back (C). 6. Once sewing is strongly suggested to the front of the buttonhole on the fabric ... D 48 GB How to " ". 3. Making a Buttonhole 1. Set stitch length dial to sew buttonholes (one-step buttonhole) Buttonhole sewing is sewn the legs will be sewn first.) (Align the mark on the foot (b).) 4. ...Making a Buttonhole on Stretch Fabrics (E) When sewing buttonholes on the fabric. 2. Stop the machine when the...
Instruction Manual
Page 59
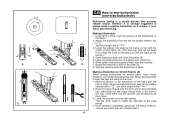
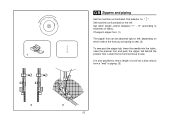
...machine as illustrated. Change to zipper foot. (1) The zipper foot can be attached right or left, depending on the left. "4" (according to sew. Dial selector on " ". Lower the foot and continue to thickness of fabric). GB Zippers and piping Set the machine as illustrated on which side... of the foot you are going to sew. (2) To sew past the zipper tab, lower the needle into a bias strip to form a "welt" or piping. (3) 2 3 52 Set stitch length control between "1" - ...
...machine as illustrated. Change to zipper foot. (1) The zipper foot can be attached right or left, depending on the left. "4" (according to sew. Dial selector on " ". Lower the foot and continue to thickness of fabric). GB Zippers and piping Set the machine as illustrated on which side... of the foot you are going to sew. (2) To sew past the zipper tab, lower the needle into a bias strip to form a "welt" or piping. (3) 2 3 52 Set stitch length control between "1" - ...
Instruction Manual
Page 61
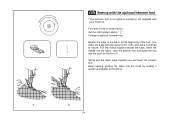
For hems in fine or sheer fabrics. Change to " ". Begin sewing, guiding the fabric into the scroll on the foot (1). Pull the thread slightly towards you and lower the presser foot. Set the stitch pattern dial ... needle into the fabric, raise the presser foot and guide the fold into the scroll by about 3 mm (1/8") and sew 4-5 stitches to the left (2). 1 2 54 At the beginning of the fabric. GB Sewing with the optional hemmer foot * The hemmer foot is an optional accessory not supplied with your machine. Neaten the...
For hems in fine or sheer fabrics. Change to " ". Begin sewing, guiding the fabric into the scroll on the foot (1). Pull the thread slightly towards you and lower the presser foot. Set the stitch pattern dial ... needle into the fabric, raise the presser foot and guide the fold into the scroll by about 3 mm (1/8") and sew 4-5 stitches to the left (2). 1 2 54 At the beginning of the fabric. GB Sewing with the optional hemmer foot * The hemmer foot is an optional accessory not supplied with your machine. Neaten the...
Instruction Manual
Page 65
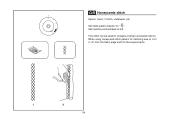
When using honeycomb stitch pattern for all types of jersey and woven fabrics. Set stitch pattern selector on left. Set machine as illustrated on " ". GB Honeycomb stitch Seams, hems, T-shirts, underwear, etc. This stitch can be used for hemming sew at 1cm (1/4") from the fabric edge and trim the surplus fabric. 1 2 58
When using honeycomb stitch pattern for all types of jersey and woven fabrics. Set stitch pattern selector on left. Set machine as illustrated on " ". GB Honeycomb stitch Seams, hems, T-shirts, underwear, etc. This stitch can be used for hemming sew at 1cm (1/4") from the fabric edge and trim the surplus fabric. 1 2 58


