Instruction Manual
Page 2
... sensory or mental capabilities, or lack of experience and knowledge, unless they do not play with any opening. 12. Switch the sewing machine off ("O") when making any adjustments in this manual. Do not operate where aerosol spray products are being administered. 14. This appliance ...is not intended for use by the manufacturer as contained in . 2. GB IMPORTANT SAFETY INSTRUCTIONS When using this sewing machine. WARNING - Do not allow to be followed, including the following: Read all instructions before cleaning. 3. Special care is used by ...
... sensory or mental capabilities, or lack of experience and knowledge, unless they do not play with any opening. 12. Switch the sewing machine off ("O") when making any adjustments in this manual. Do not operate where aerosol spray products are being administered. 14. This appliance ...is not intended for use by the manufacturer as contained in . 2. GB IMPORTANT SAFETY INSTRUCTIONS When using this sewing machine. WARNING - Do not allow to be followed, including the following: Read all instructions before cleaning. 3. Special care is used by ...
Instruction Manual
Page 6
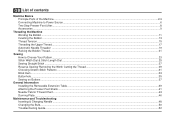
GB List of contents Machine Basics Principle Parts of the Machine...2/4 Connecting Machine to Power Source ...6 Two Step Presser Foot Lifter...8 Accessories ...9 Threading the Machine Winding the Bobbin ...11 Inserting the Bobbin ...13 Thread Tension ...15 Threading the Upper Thread ...17 Automatic Needle Threader ...19 Raising the Bobbin Thread...21 Sewing How to Choose Your Pattern...
GB List of contents Machine Basics Principle Parts of the Machine...2/4 Connecting Machine to Power Source ...6 Two Step Presser Foot Lifter...8 Accessories ...9 Threading the Machine Winding the Bobbin ...11 Inserting the Bobbin ...13 Thread Tension ...15 Threading the Upper Thread ...17 Automatic Needle Threader ...19 Raising the Bobbin Thread...21 Sewing How to Choose Your Pattern...
Instruction Manual
Page 9
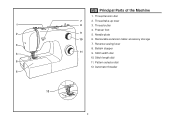
Thread take-up lever 8 3. Needle plate 10 6. Removable extension table/ accessory storage 7. Reverse sewing lever 8. Stitch width dial 10. Automatic threader 2 Stitch length dial 11. 1 2 3 4 5 6 12 GB Principal Parts of the Machine 1. Thread tension dial 7 2. Bobbin stopper 11 9. Thread cutter 4. Pattern selector dial 12. Presser foot 9 5.
Thread take-up lever 8 3. Needle plate 10 6. Removable extension table/ accessory storage 7. Reverse sewing lever 8. Stitch width dial 10. Automatic threader 2 Stitch length dial 11. 1 2 3 4 5 6 12 GB Principal Parts of the Machine 1. Thread tension dial 7 2. Bobbin stopper 11 9. Thread cutter 4. Pattern selector dial 12. Presser foot 9 5.
Instruction Manual
Page 13
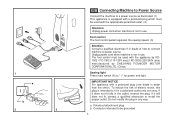
... a qualified electrician to install the proper outlet. Conductor intended to be used with the appropriate polarized outlet. (2) Attention: Unplug power cord when machine is wider than the other). The foot control must be used with the appliance by KD1902 / FC-1902 (110-120V area) / KD...-2902 (220-240V area) manufactured by ZHEJIANG FOUNDER MOTOR CORPORATION LTD. (China) Sewing light Press main switch (A) to " l " for power and light. To reduce the risk of how to connect machine to power source. a. If it does not fit fully in use . A 1 a b 2 3 GB...
... a qualified electrician to install the proper outlet. Conductor intended to be used with the appropriate polarized outlet. (2) Attention: Unplug power cord when machine is wider than the other). The foot control must be used with the appliance by KD1902 / FC-1902 (110-120V area) / KD...-2902 (220-240V area) manufactured by ZHEJIANG FOUNDER MOTOR CORPORATION LTD. (China) Sewing light Press main switch (A) to " l " for power and light. To reduce the risk of how to connect machine to power source. a. If it does not fit fully in use . A 1 a b 2 3 GB...
Instruction Manual
Page 16
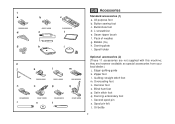
All purpose foot b. Darning plate i. they are not supplied with this machine; Hemmer foot o. L-screwdriver e. Oil bottle 9 Buttonhole foot d. Bobbin (3x) h. Quilting/ straight stitch foot m. Satin stitch foot q. Overcasting foot n. Zipper foot l. Spool pin felt t. Darning/ embroidery foot r. Second spool pin s. Button sewing foot c. Edge/ quilting guide k. Pack of needles g. 1 a 006806008 d b c 006914008 e 006909008...
All purpose foot b. Darning plate i. they are not supplied with this machine; Hemmer foot o. L-screwdriver e. Oil bottle 9 Buttonhole foot d. Bobbin (3x) h. Quilting/ straight stitch foot m. Satin stitch foot q. Overcasting foot n. Zipper foot l. Spool pin felt t. Darning/ embroidery foot r. Second spool pin s. Button sewing foot c. Edge/ quilting guide k. Pack of needles g. 1 a 006806008 d b c 006914008 e 006909008...
Instruction Manual
Page 18
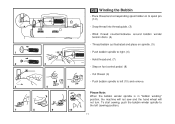
... (10) and remove. 4 5 6 Please Note: When the bobbin winder spindle is in "bobbin winding" position, the machine will not sew and the hand wheel will not turn. To start sewing, push the bobbin winder spindle to left (sewing position). 7 8 9 10 11 Wind thread counterclockwise around bobbin winder tension discs. (4) - Step on foot control pedal...
... (10) and remove. 4 5 6 Please Note: When the bobbin winder spindle is in "bobbin winding" position, the machine will not sew and the hand wheel will not turn. To start sewing, push the bobbin winder spindle to left (sewing position). 7 8 9 10 11 Wind thread counterclockwise around bobbin winder tension discs. (4) - Step on foot control pedal...
Instruction Manual
Page 30
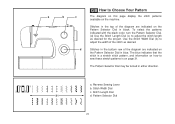
... page 31. Stitch Width Dial c. Pattern Selector Dial 23 d Stitches in the bottom row of the stitch as desired for the project. GB How to sew these stretch patterns is a stretch stitch pattern, and information on how to Choose Your Pattern a b c The diagram on this page display the stitch patterns available...
... page 31. Stitch Width Dial c. Pattern Selector Dial 23 d Stitches in the bottom row of the stitch as desired for the project. GB How to sew these stretch patterns is a stretch stitch pattern, and information on how to Choose Your Pattern a b c The diagram on this page display the stitch patterns available...
Instruction Manual
Page 34
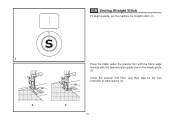
GB Sewing Straight Stitch To begin sewing, set the machine for straight stitch. (1) 1 2 Place the fabric under the presser foot with the fabric edge lined up with the desired seam guide line on the needle plate. (2) Lower the presser foot lifter, and then step on the foot controller to start sewing. (3) 3 27
GB Sewing Straight Stitch To begin sewing, set the machine for straight stitch. (1) 1 2 Place the fabric under the presser foot with the fabric edge lined up with the desired seam guide line on the needle plate. (2) Lower the presser foot lifter, and then step on the foot controller to start sewing. (3) 3 27
Instruction Manual
Page 36
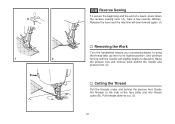
... secure the beginning and the end of the face plate and into thread cutter (B). Release the lever and the machine will sew forward again. (1) Removing the Work Turn the handwheel toward you (counterclockwise) to bring the thread take up lever to its highest position, and continue turning ...
... secure the beginning and the end of the face plate and into thread cutter (B). Release the lever and the machine will sew forward again. (1) Removing the Work Turn the handwheel toward you (counterclockwise) to bring the thread take up lever to its highest position, and continue turning ...
Instruction Manual
Page 38
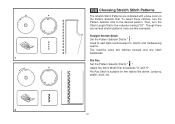
... Stitch Patterns are two examples: Straight Stretch Stitch Set the Pattern Selector Dial to " ". Used to add triple reinforcement to stretch and hardwearing seams. The machine sews two stitches forward and one stitch backwards. 1 Ric Rac Set the Pattern Selector Dial to " ". Then, turn the Pattern Selector Dial to between "3" and "5". Adjust...
... Stitch Patterns are two examples: Straight Stretch Stitch Set the Pattern Selector Dial to " ". Used to add triple reinforcement to stretch and hardwearing seams. The machine sews two stitches forward and one stitch backwards. 1 Ric Rac Set the Pattern Selector Dial to " ". Then, turn the Pattern Selector Dial to between "3" and "5". Adjust...
Instruction Manual
Page 40
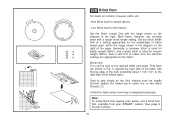
Start to sew slowly on curtains, trousers, skirts, etc. Set the Stitch Length Dial with a longer stitch length setting. Blind hems, however, are appropriate for the fabric. GB ... the folded fabric. Set the Stitch Width Dial at the right. Sew a test first to make blind hem sewing even easier, use a blind hem foot, available from your SINGER® retailer. (See page 9 for part number) 33 Note: To make sure the machine settings are normally sewn with the range shown on the diagram...
Start to sew slowly on curtains, trousers, skirts, etc. Set the Stitch Length Dial with a longer stitch length setting. Blind hems, however, are appropriate for the fabric. GB ... the folded fabric. Set the Stitch Width Dial at the right. Sew a test first to make blind hem sewing even easier, use a blind hem foot, available from your SINGER® retailer. (See page 9 for part number) 33 Note: To make sure the machine settings are normally sewn with the range shown on the diagram...
Instruction Manual
Page 44
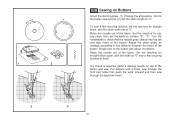
... right holes of the fabric. For buttons with about 10 stitches. Set the machine for zigzag stitch, then set the machine for straight stitch again, with the stitch width set at "0" sew a few securing stitches, set the width to number "3" - 1 2 GB Sewing on Buttons Install the darning plate. (1) Change the all purpose foot to...
... right holes of the fabric. For buttons with about 10 stitches. Set the machine for zigzag stitch, then set the machine for straight stitch again, with the stitch width set at "0" sew a few securing stitches, set the width to number "3" - 1 2 GB Sewing on Buttons Install the darning plate. (1) Change the all purpose foot to...
Instruction Manual
Page 59
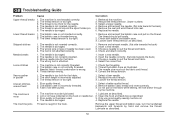
... correctly. (flat side towards the back) 5. The stitch length is not inserted correctly. 2. Lint or oil have collected on the thread. Only use good quality sewing machine oil. 4. Remove the reel and wind thread onto reel. 6. Remove and reinsert the bobbin case and pull on the hook or needle bar. 2. The needle...
... correctly. (flat side towards the back) 5. The stitch length is not inserted correctly. 2. Lint or oil have collected on the thread. Only use good quality sewing machine oil. 4. Remove the reel and wind thread onto reel. 6. Remove and reinsert the bobbin case and pull on the hook or needle bar. 2. The needle...
Instruction Manual 2
Page 1
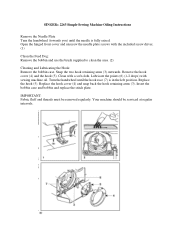
... the Feed Dog: Remove the bobbin and use the brush supplied to clean the area. (2) Cleaning and Lubricating the Hook: Remove the bobbin case. SINGER® 2263 Simple Sewing Machine Oiling Instructions Remove the Needle Plate Turn the handwheel (towards you) until the hook race (7) is fully raised. Replace the hook (5). Insert the bobbin case...
... the Feed Dog: Remove the bobbin and use the brush supplied to clean the area. (2) Cleaning and Lubricating the Hook: Remove the bobbin case. SINGER® 2263 Simple Sewing Machine Oiling Instructions Remove the Needle Plate Turn the handwheel (towards you) until the hook race (7) is fully raised. Replace the hook (5). Insert the bobbin case...


